
Diskover AWS Customer Deployment Guide
Installation of Diskover on an Existing AWS Infrastructure.
This guide is intended for Service Professionals and System Administrators.
Introduction
Overview
Diskover Data is a web-based platform that provides single-pane viewing of distributed digital assets. It provides point-in-time snapshot indexes of data fragmented across cloud and on-premise storage spread across an entire organization. Users can quickly and easily search across company files. Diskover is a data management application for your digital filing cabinet, providing powerful granular search capabilities, analytics, file-based workflow automation, and ultimately enables companies to scale their business and be more efficient at reducing their operating costs.
For more information, please visit diskoverdata.com
Approved AWS Technology Partner
Diskover Data is an official AWS Technology Partner. Please note that AWS has renamed Amazon Elasticsearch Service to Amazon OpenSearch Service. Most operating and configuration details for OpenSearch Service should also be applicable to Elasticsearch..

Diskover Use Cases
Diskover addresses unstructured data stored across various storage repositories. Data curation encompasses the manual and automated processes needed for principled and controlled data creation, maintenance, cleanup, and management, together with the capacity to add value to data.
System Administrators
The use case for System Administrators is often centered around data cleanup, data disposition, ensuring data redundancy, and automating data. System Administrators are often tasked with controlling costs associated with unstructured data.
Line of Business Users
The use cases for Line of Business users are often centered around adding value to data, finding relevant data, correlating, analyzing, taking action on data sets, and adding business context to data.
Document Conventions
| TOOL | PURPOSE |
|---|---|
| Copy/Paste Icon for Code Snippets | Throughout this document, all code snippets can easily be copied to a clipboard using the copy icon on the far right of the code block: |
| 🔴 | Proposed action items |
| ⚠️ | Important notes and warnings |
| Features Categorization | IMPORTANT
|
| Core Features |     |
| Industry Add-Ons | These labels will only appear when a feature is exclusive to a specific industry.    |
Architecture Overview
Diskover's Main Components
Deploying Diskover uses 3 major components:
| COMPONENT | ROLE |
|---|---|
| 1️⃣ Elasticsearch |
Elasticsearch is the backbone of Diskover. It indexes and organizes the metadata collected during the scanning process, allowing for fast and efficient querying of large datasets. Elasticsearch is a distributed, RESTful search engine capable of handling vast amounts of data, making it crucial for retrieving information from scanned file systems and directories. |
| 2️⃣ Diskover-Web |
Diskover-Web is the user interface that allows users to interact with the Diskover system. Through this web-based platform, users can search, filter, and visualize the data indexed by Elasticsearch. It provides a streamlined and intuitive experience for managing, analyzing, and curating data. Diskover-Web is where users can explore results, run tasks, and monitor processes. |
| 3️⃣ Diskover Scanners |
The scanners, sometimes called crawlers, are the components responsible for scanning file systems and collecting metadata. These scanners feed that metadata into Elasticsearch for storage and later retrieval. Diskover supports various types of scanners, which are optimized for different file systems, ensuring efficient and comprehensive data collection. Out of the box, Diskover efficiently scans generic filesystems. However, in today’s complex IT architectures, files are often stored across a variety of repositories. To address this, Diskover offers various alternate scanners as well as provides a robust foundation for building alternate scanners, enabling comprehensive scanning of any file storage location. |
| 🔀 Diskover Ingesters |
Diskover’s ingesters are the ultimate bridge between your unstructured data and high-performance, next-generation data platforms. By leveraging the open-standard Parquet format, Diskover converts and streams your data efficiently and consistently. Whether you’re firehosing into Dell data lakehouse, Snowflake, Databricks, or other modern data infrastructures, our ingesters ensure your data flows effortlessly—optimized for speed, scalability, and insight-ready delivery. |
Diskover Platform Overview
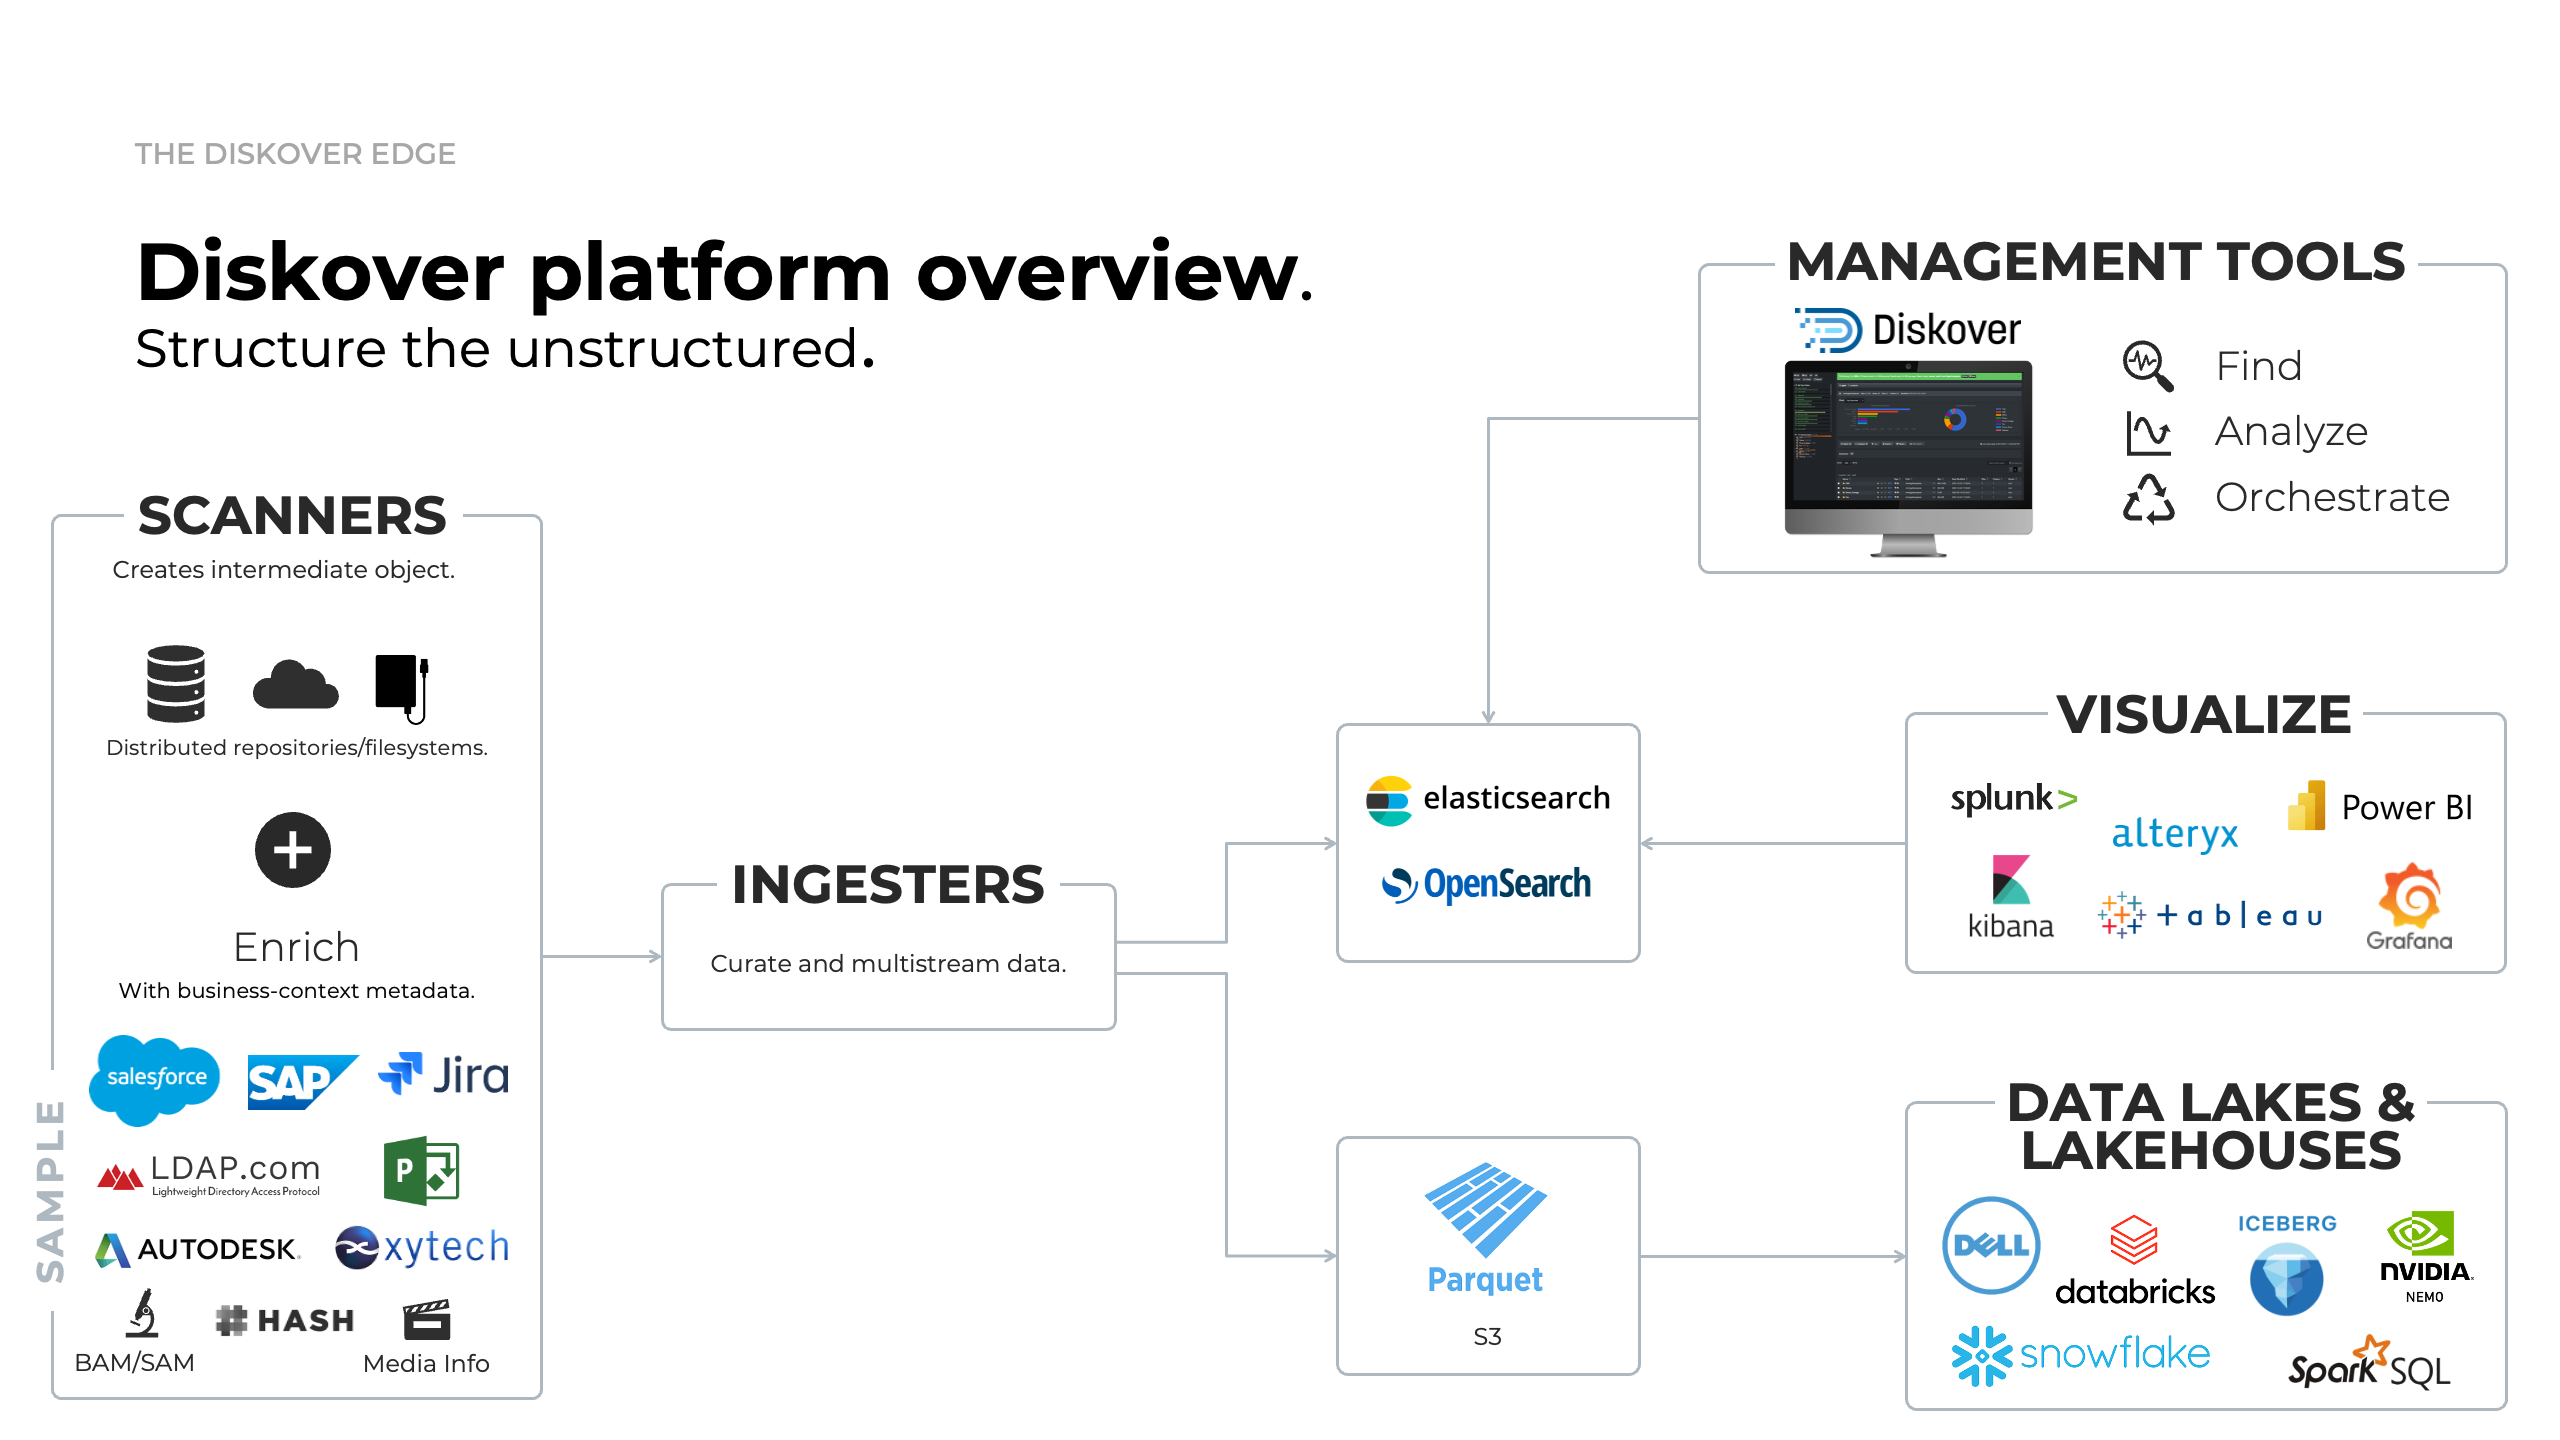
Click here for a full screen view of the Diskover Platform Overview.
Diskover Scale-Out Architecture Overview Diagram
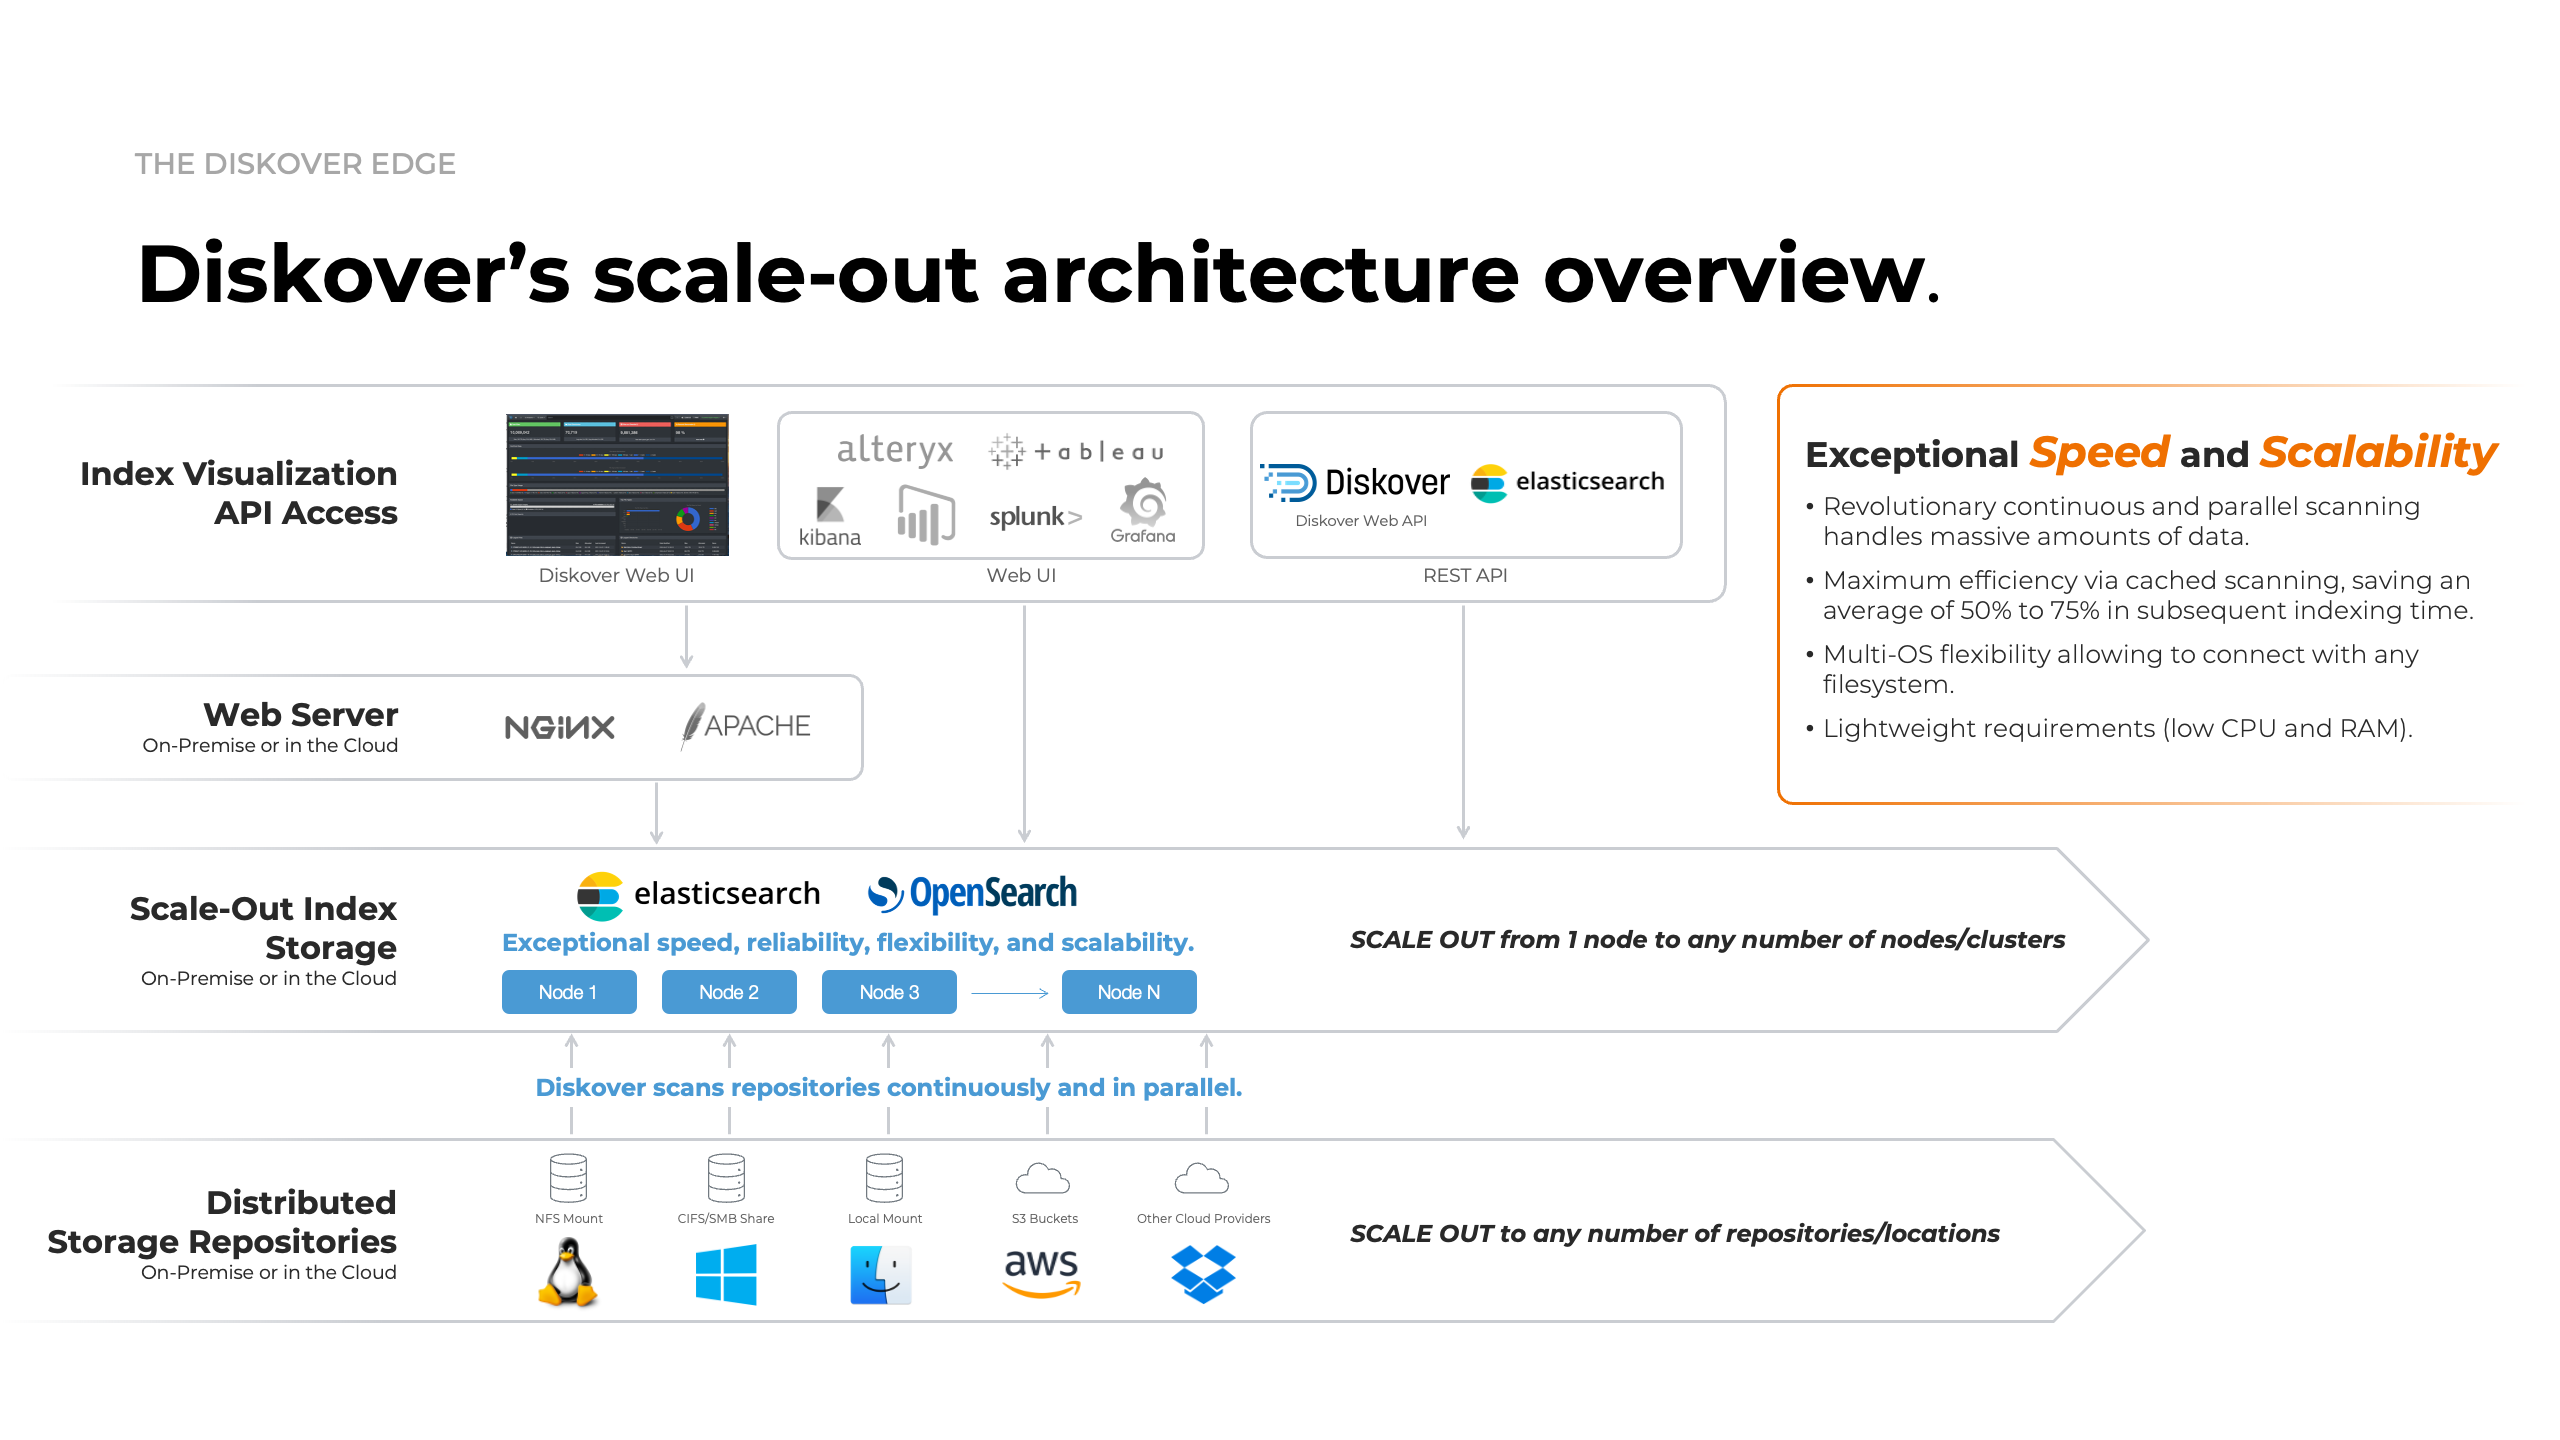
Click here for a full screen view of the Diskover Architecture Overview diagram.
Diskover Config Architecture Overview
It is highly recommended to separate the Elasticsearch node/cluster, web server, and indexing host(s).
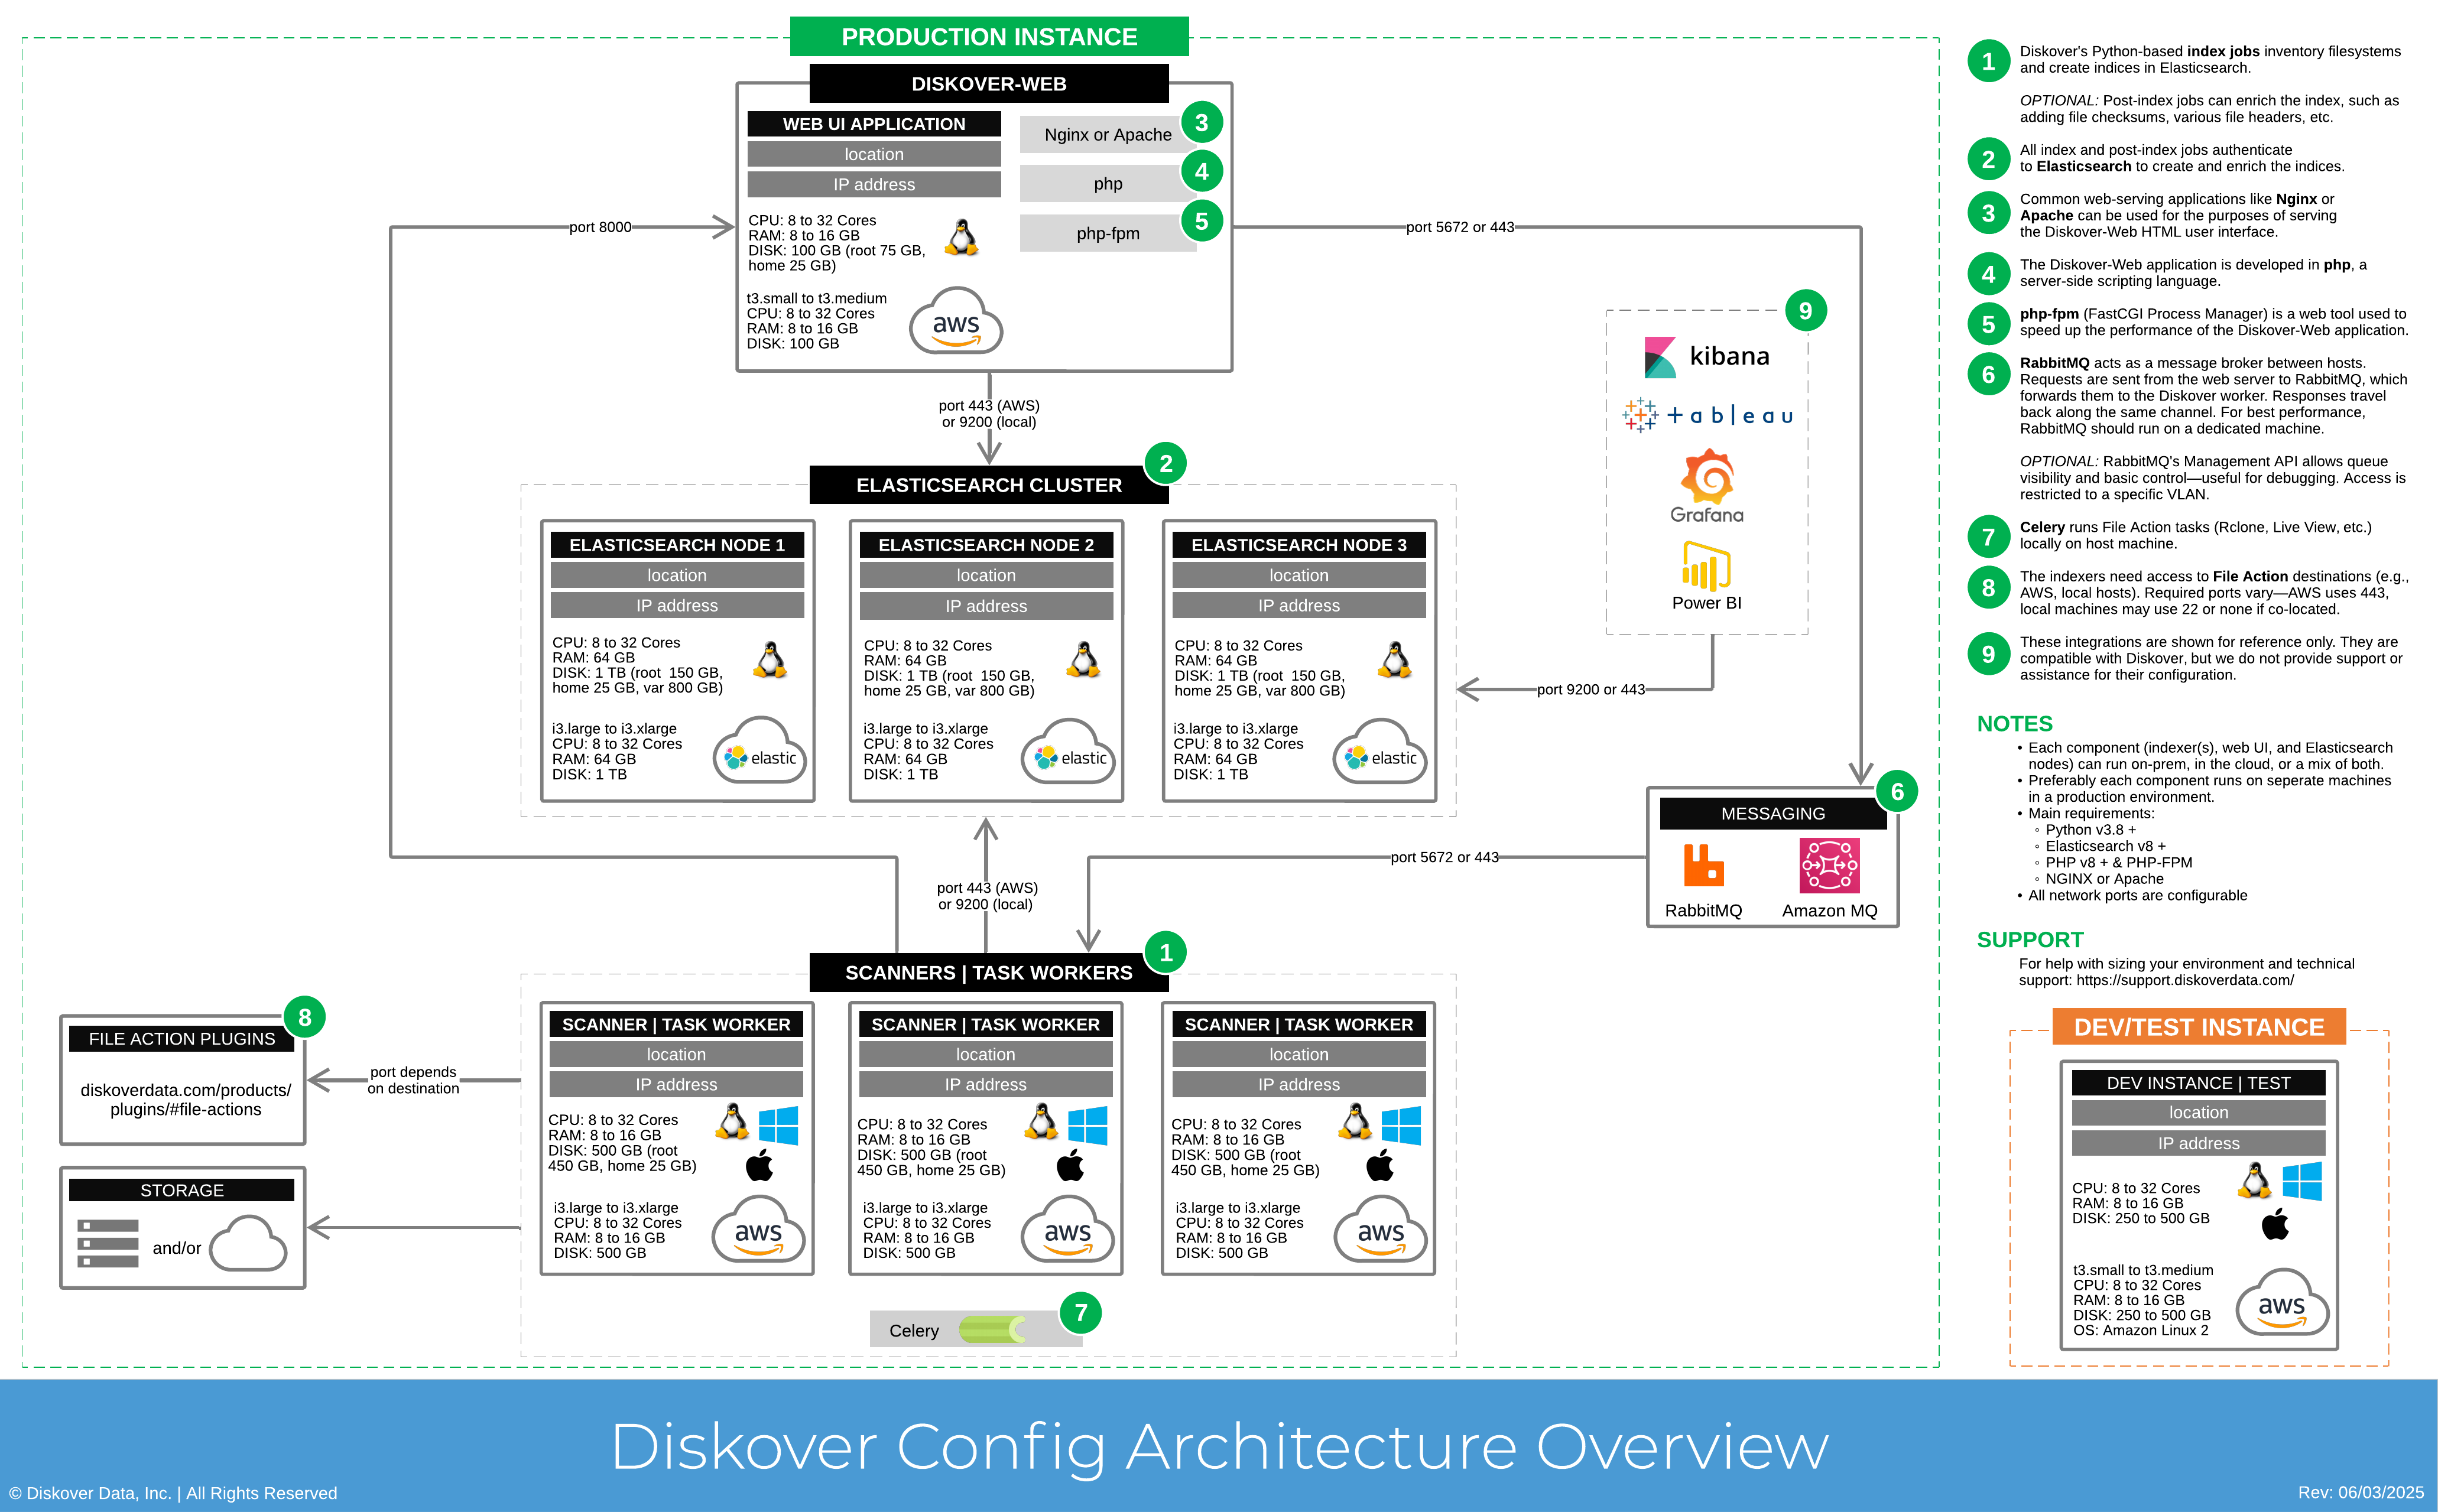
Click here for the full screen view of this diagram.
Metadata Catalog
Diskover is designed to scan generic filesystems out of the box efficiently, but it also supports flexible integration with various repositories through customizable alternate scanners. This adaptability allows Diskover to scan diverse storage locations and include enhanced metadata for precise data management and analysis.
With a wide range of metadata harvest plugins, Diskover enriches indexed data with valuable business context attributes, supporting workflows that enable targeted data organization, retrieval, analysis, and enhanced workflow. These plugins can run at indexing or post-indexing intervals, balancing comprehensive metadata capture with high-speed scanning.
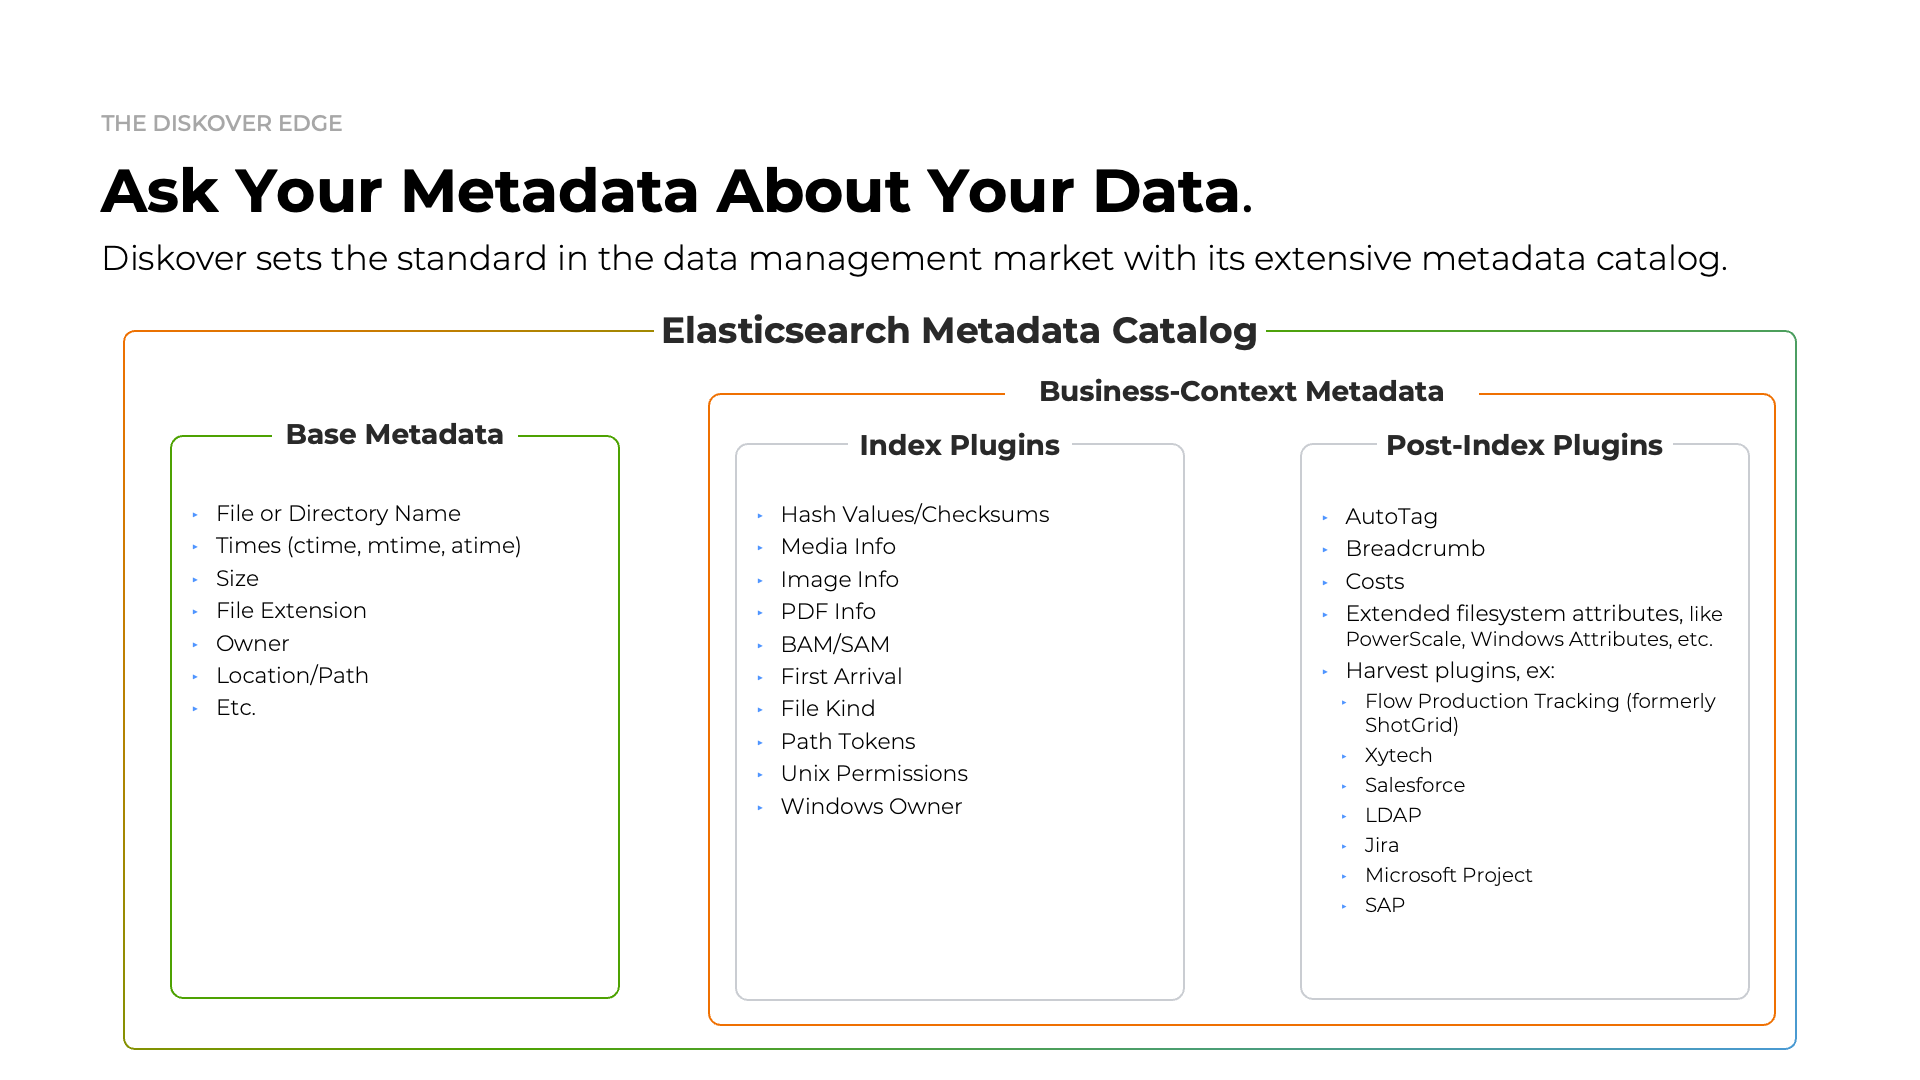
Click here for a full screen view of the Metadata Catalog Summary.
Requirements
Overview
Visit the System Readiness section for further information on preparing your system for Diskover.
| Packages | Usage |
|---|---|
| Python 3.8+ | Required for Diskover scanners/workers and Diskover-Web → go to installation instructions |
| Elasticsearch 8.x | Is the heart of Diskover → go to installation instructions |
| PHP 8.x and PHP-FPM | Required for Diskover-Web → go to installation instructions |
| NGINX or Apache | Required for Diskover-Web → go to installation instructions Note that Apache can be used instead of NGINX but the setup is not supported or covered in this guide. |
Security
- Disabling SELinux and using a software firewall is optional and not required to run Diskover.
- Internet access is required during the installation to download packages with yum.
Recommended Operating Systems
As per the config diagram in the previous chapter, note that Windows and Mac are only supported for scanners.
| Linux* | Windows | Mac |
|---|---|---|
|
|
|
* Diskover can technically run on all flavors of Linux, although only the ones mentioned above are fully supported.
AWS Environment Configuration
The following describes the AWS environment needed to complete the installation.
- AWS IAM account with Administrator privileges.
- Ability to configure JSON based IAM access polices on both AWS Elasticsearch Domain and EC2 instance.
- Valid Diskover licenses
Elasticsearch Requirements
Elasticsearch Version
Diskover is currently tested and deployed with Elasticsearch v8.x. Note that ES7 Python packages are required to connect to an Elasticsearch v8 cluster.
Elasticsearch Architecture Overview and Terminology
Please refer to this diagram to better understand the terminology used by Elasticsearch and throughout the Diskover documentation.
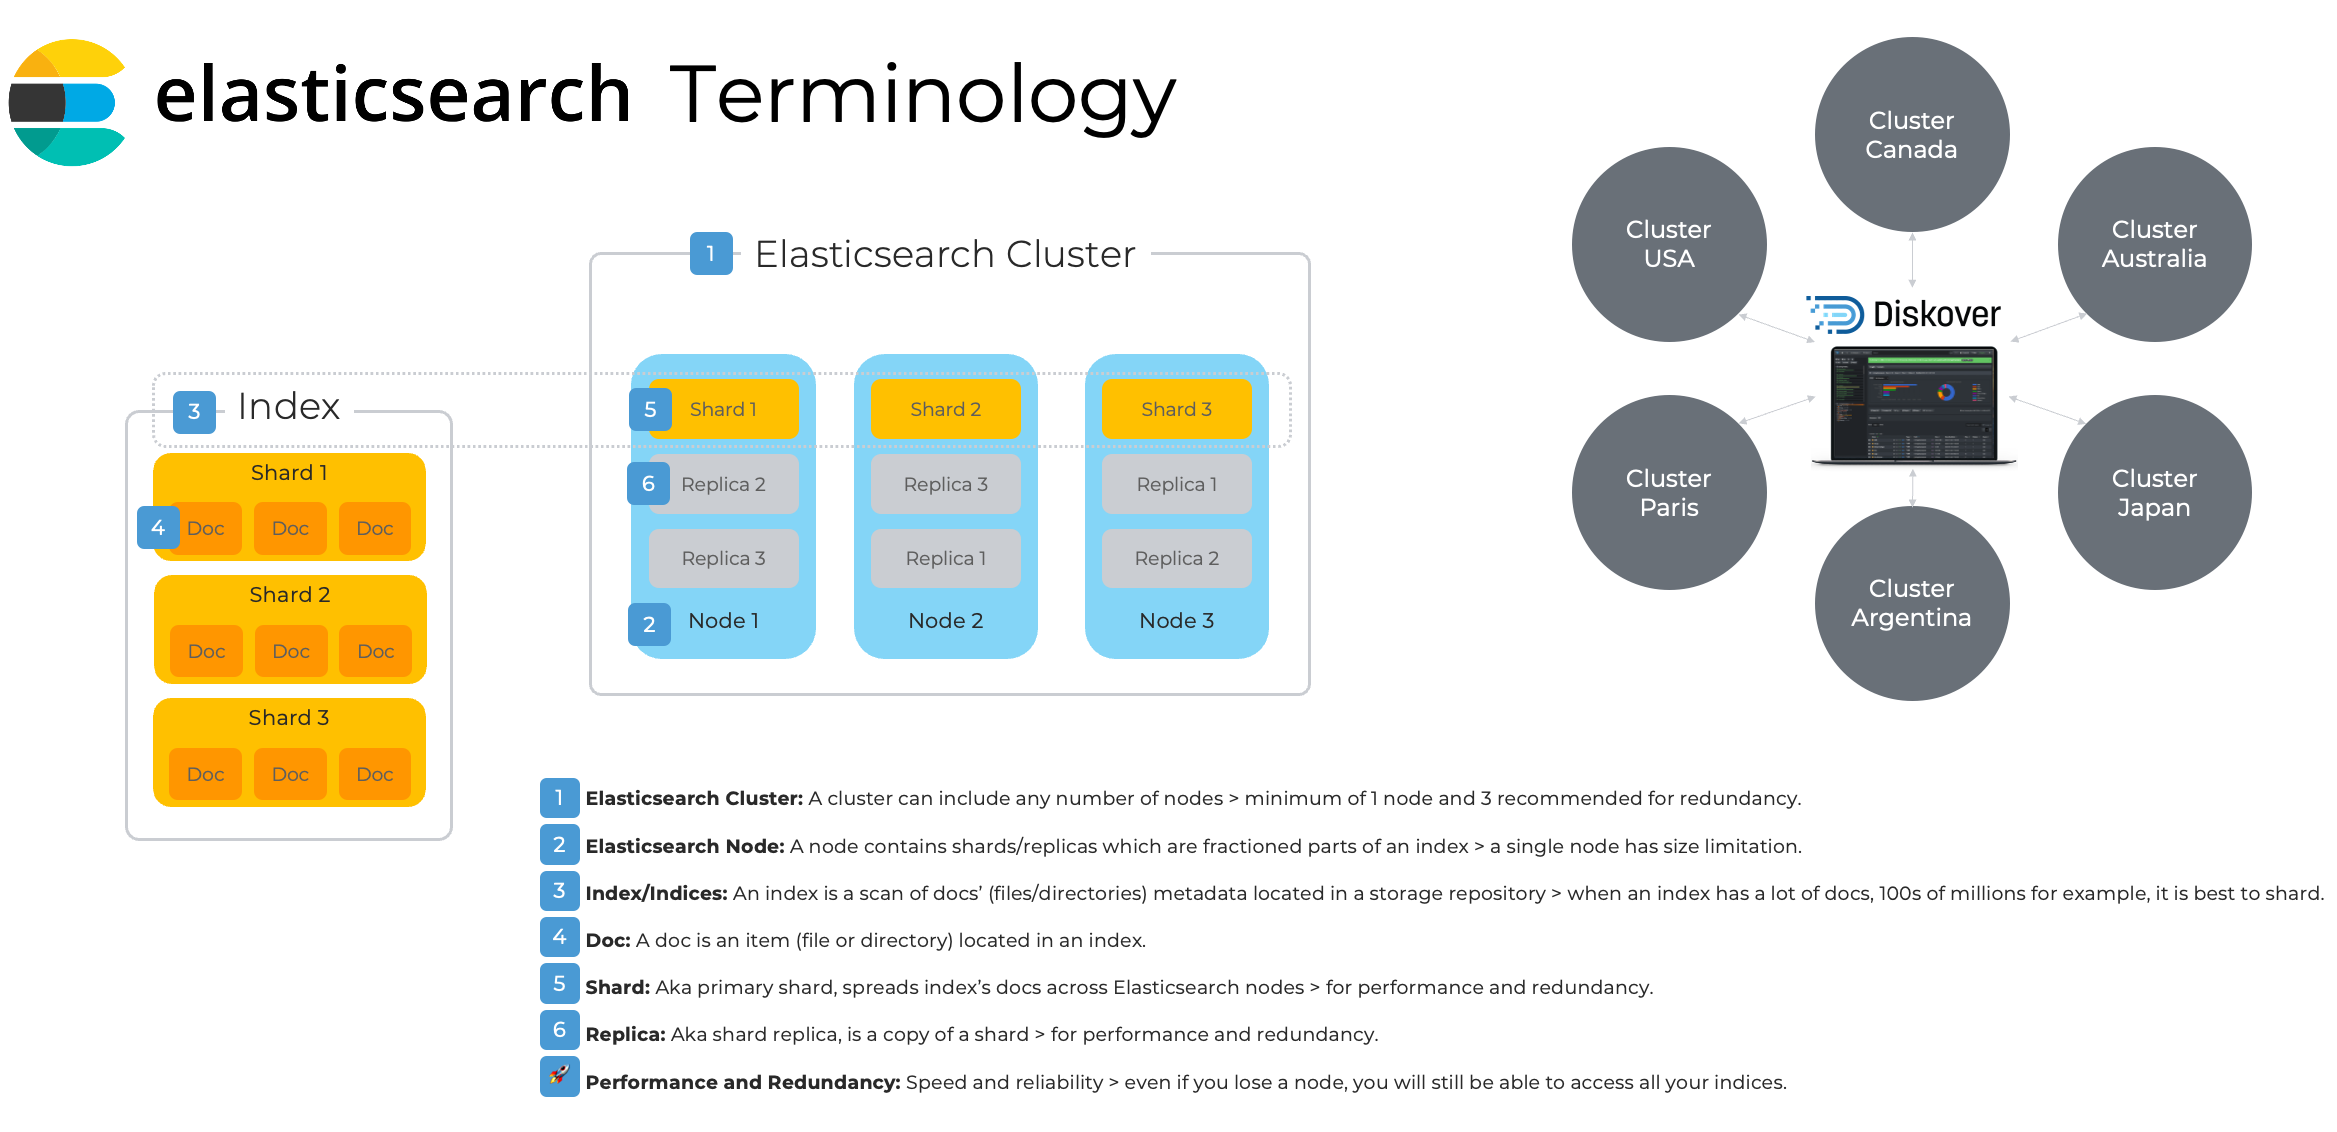 Click here for a full-screen view of the Elasticsearch Architecture diagram.
Elasticsearch Cluster
- The foundation of the Diskover platform consists of a series of Elasticsearch indexes, which are created and stored within the Elasticsearch endpoint.
- An important configuration for Elasticsearch is that you will want to set Java heap mem size - it should be half your Elasticsearch host ram up to 32 GB.
- For more detailed Elasticsearch guidelines, please refer to AWS sizing guidelines.
- For more information on resilience in small clusters.
Requirements for POC and Deployment
| Proof of Concept | Production Deployment | |
|---|---|---|
| Nodes | 1 node | 3 nodes for performance and redundancy are recommended |
| CPU | 8 to 32 cores | 8 to 32 cores |
| RAM | 8 to 16 GB (8 GB reserved to Elasticsearch memory heap) | 64 GB per node (16 GB reserved to Elasticsearch memory heap |
| DISK | 250 to 500 GB of SSD storage per node (see Elasticsearch Storage Requirements below) | 500 to 1 TB of SSD storage per node (see Elasticsearch Storage Requirements below) |
AWS Sizing Resource Requirements
Please consult the Diskover AWS Customer Deployment Guide for all details.
| AWS Elasticsearch Domain | AWS EC2 Web-Server | AWS Indexers | |
|---|---|---|---|
| Minimum | i3.large | t3.small | t3.large |
| Recommended | i3.xlarge | t3.medium | t3.xlarge |
Indices
Rule of Thumb for Shard Size
- Try to keep shard size between 10 – 50 GB
- Ideal shard size approximately 20 – 40 GB
Once you have a reference for your index size, you can decide to shard if applicable. To check the size of your indices, from the user interface, go to → ⛭ → Indices:
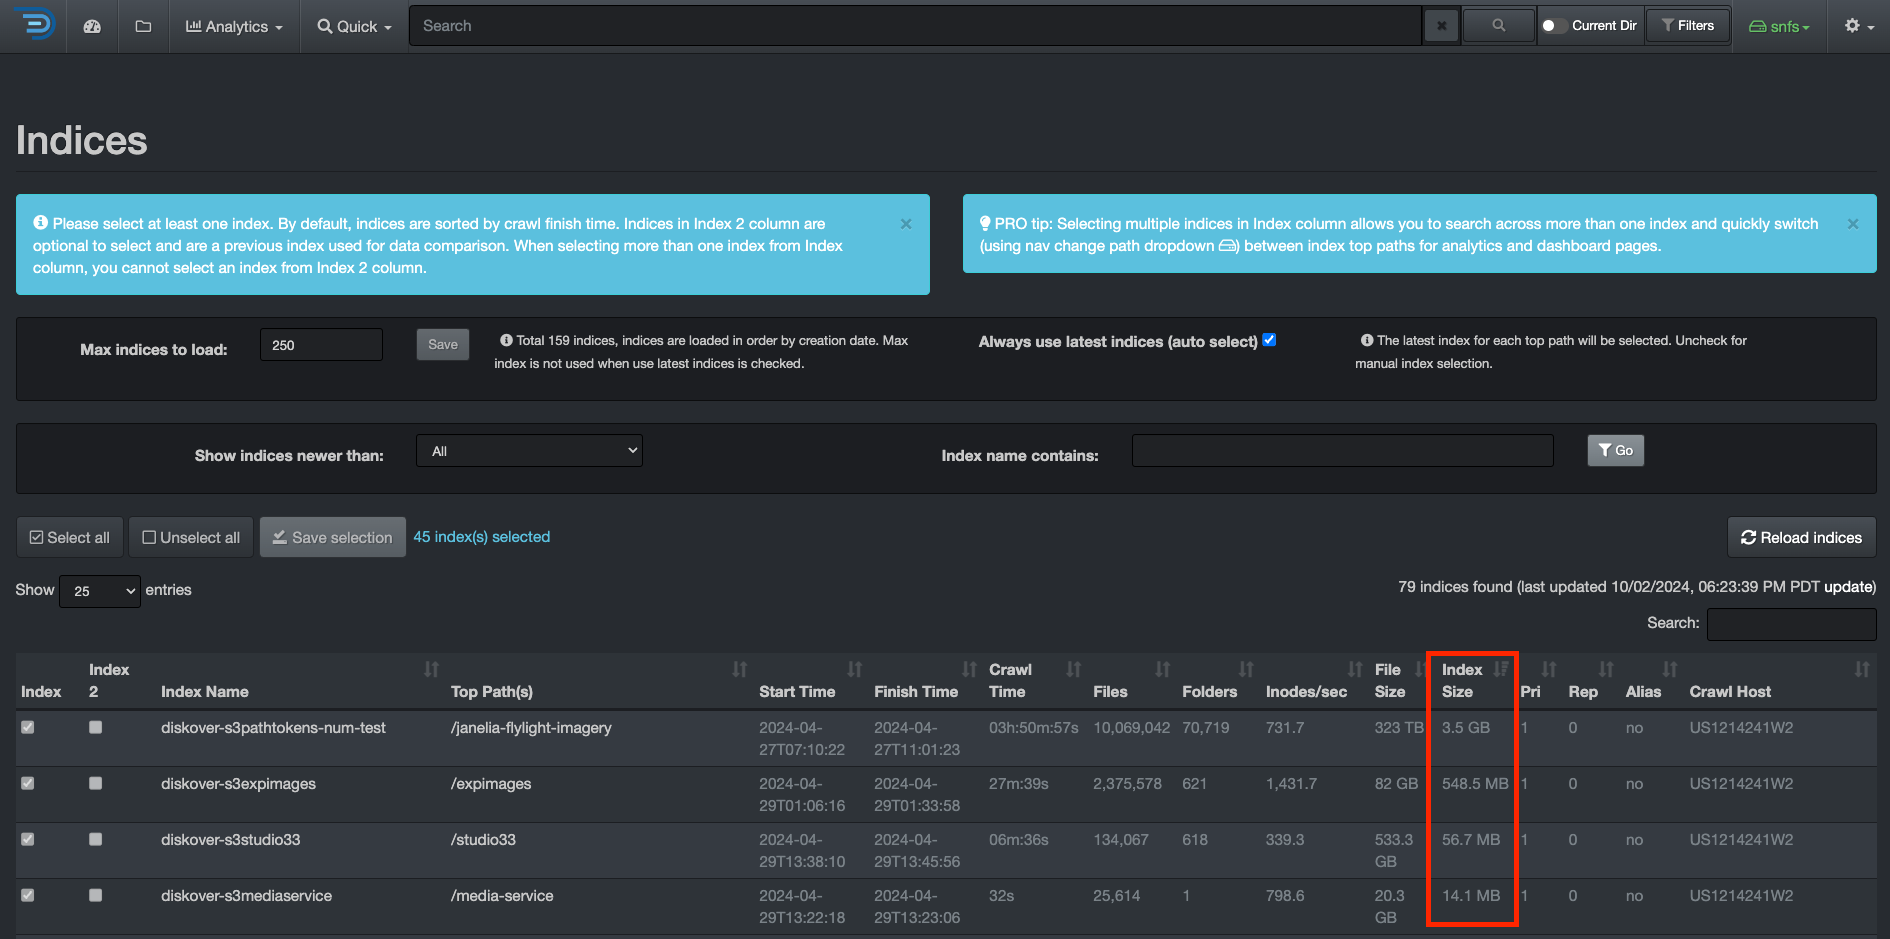 Click here for a full-screen view of this image.
Examples
- An index that is 60 GB in size: you will want to set shards to 3 and replicas* to 1 or 2 and spread across 3 ES nodes.
- An index that is 5 GB in size: you will want to set shards to 1 and replicas* to 1 or 2 and be on 1 ES node or spread across 3 ES nodes (recommended).
⚠️ Replicas help with search performance, redundancy and provide fault tolerance. When you change shard/replica numbers, you have to delete the index and re-scan.
Estimating Elasticsearch Storage Requirements
Individual Index Size
- 1 GB for every 5 million files/folders
- 20 GB for every 100 million files/folders
⚠️ The size of the files is not relevant.
Replicas/Shard Sizes
Replicas increase the size requirements by the number of replicas. For example, a 20 GB index with 2 replicas will require a total storage capacity of 60 GB since a copy of the index (all docs) is on other Elasticsearch nodes. Multiple shards do not increase the index size, as the index's docs are spread across the ES cluster nodes.
⚠️ The number of docs per share is limited to 2 billion, which is a hard Lucene limit.
Rolling Indices
- Each Diskover scan results in the creation of a new Elasticsearch index.
- Multiple indexes can be maintained to keep the history of storage indices.
- Elasticsearch overall storage requirements will depend on history index requirements.
- For rolling indices, you can multiply the amount of data generated for a storage index by the number of indices desired for retention period. For example, if you generate 2 GB for a day for a given storage index, and you want to keep 30 days of indices, 60 GB of storage is required to maintain a total of 30 indices.
Diskover-Web Server Requirements
The Diskover-Web HTML5 user interface requires a Web server platform. It provides visibility, analysis, workflows, and file actions from the indexes that reside on the Elasticsearch endpoint.
Requirements for POC and Deployment
| Proof of Concept | Production Deployment | |
|---|---|---|
| CPU | 8 to 32 cores | 8 to 32 cores |
| RAM | 8 to 16 GB | 8 to 16 GB |
| DISK | 250 to 500 GB SSD | 250 to 500 GB SSD |
Diskover Scanners Requirements
You can install Diskover scanners on a server or virtual machine. Multiple scanners can be run on a single machine or multiple machines for parallel crawling.
The scanning host uses a separate thread for each directory at level 1 of a top crawl directory. If you have many directories at level 1, you will want to increase the number of CPU cores and adjust max threads in the diskover config. This parameter, as well as many others, can be configured from the user interface, which contains help text to guide you.
Requirements for POC and Deployment
| Proof of Concept | Production Deployment | |
|---|---|---|
| CPU | 8 to 32 cores | 8 to 32 cores |
| RAM | 8 to 16 GB | 8 to 16 GB |
| DISK | 250 to 500 GB SSD | 250 to 500 GB SSD |
Skills and Knowledge Requirements
This document is intended for Service Professionals and System Administrators who install the Diskover software components. The installer should have strong familiarity with:
- Operating System on which on-premise Diskover scanner(s) are installed.
- Basic knowledge of:
- EC2 Operating System on which Diskover-Web HTML5 user interface is installed.
- Configuring a Web Server (Apache or NGINX).
⚠️ Attempting to install and configure Diskover without proper experience or training can affect system performance and security configuration.
⏱️ The initial install, configuration, and deployment of the Diskover are expected to take 1 to 3 hours, depending on the size of your environment and the time consumed with network connectivity.
Software Download
Community Edition
There are 2 ways to download the free Community Edition, the easiest being the first option.
Download from GitHub
🔴 From your GitHub account: https://github.com/diskoverdata/diskover-community/releases
🔴 Download the tar.gz/zip
Download from a Terminal
🔴 Install git on Centos:
yum install -y git
🔴 Install git on Ubuntu:
apt install git
🔴 Clone the Diskover Community Edition from the GitHub repository:
mkdir /tmp/diskover
git clone https://github.com/diskoverdata/diskover-community.git /tmp/diskover
cd /tmp/diskover
Annual Subscription Editions


We are currently moving to a new platform for software download. Meanwhile, please open a support ticket and we will send you a link, whether you need the OVA or the full version of Diskover.
Click these links for information on how to create an account and how to create a support ticket.
AWS Environment Security
The information in this section outlines how to manage identities and access the distributed components of the Diskover curation platform. This includes both AWS Identity and Access Management (IAM) resources, as well as access mechanisms.
AWS IAM Best Practices
Security begins with protecting your AWS Root account. The AWS root user has unlimited access to your AWS account and its resources; using it only by exception helps protect your AWS resources. The AWS root user must not be used for task associated with the installation and configuration of the Diskover curation platform components referenced in Chapter 3. Architecture Overview. Instead, adhere to the best practice of using the root user only to create your first AWS Identity and Access Management (IAM). An AWS IAM user with sufficient administrator privileges should be used for the installation and configuration of resources used with the Diskover curation platform.
For more information and details please refer to AWS best practices link below.
https://docs.aws.amazon.com/IAM/latest/UserGuide/best-practices.html
Configuring IAM Roles for Diskover
Diskover Data recommends following AWS “least privilege access” policies when configuring AWS access policies among Diskover indexer(s), AWS Elasticsearch endpoint, and Diskover-Web server. Please refer to the documentation below.
https://docs.aws.amazon.com/wellarchitected/latest/security-pillar/permissions-management.html
Once the initial install is validated and functioning, then the access to a policy will be modified to increase security. Create an IP Based Access Policy for ES Cluster, outlined in the Modify Access Policy section. The specific IP address or subnet will need to be added for each:
- AWS Elasticsearch Domain.
- AWS Diskover-Web Server.
- Diskover indexer.
AWS Elasticsearch Environment
Choose Deployment Type
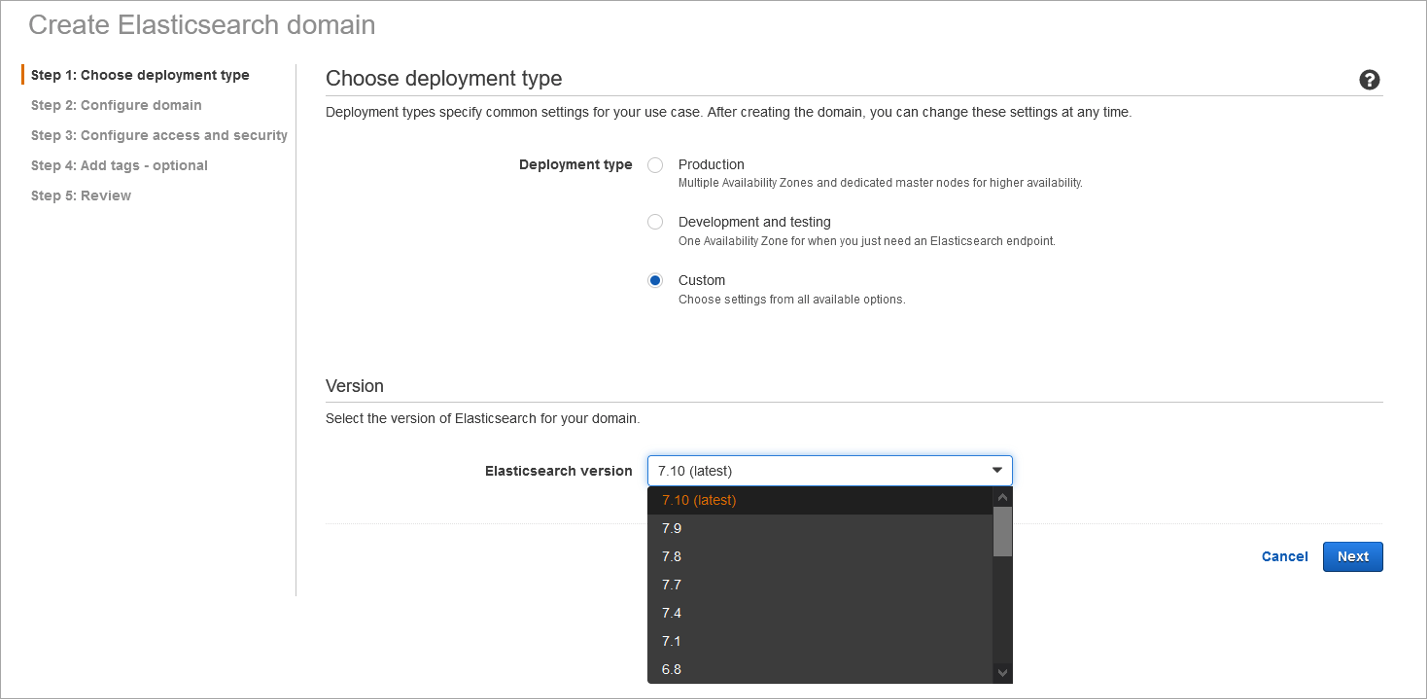
🔴 Diskover requires an Elasticsearch 7.X environment - Select custom for deployment type:
Configure Domain
- One node is sufficient for initial testing.
- Production deployments should be configured with a minimum of 3 nodes to achieve redundancy in the Elasticsearch configuration.
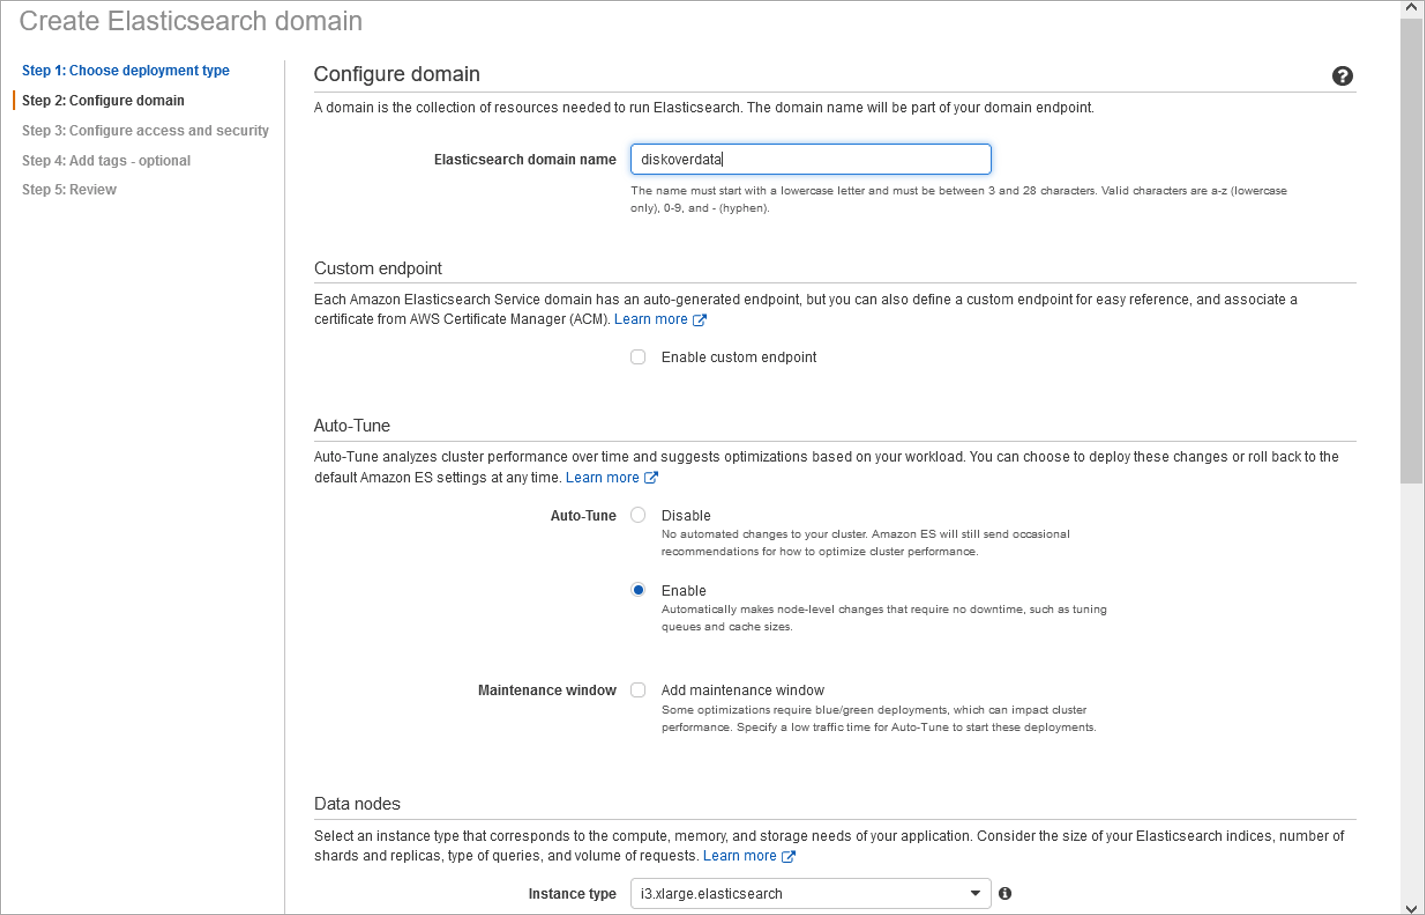
🔴 Select node type - Diskover recommends i3.xlarge Elasticsearch:
Configure Access and Security
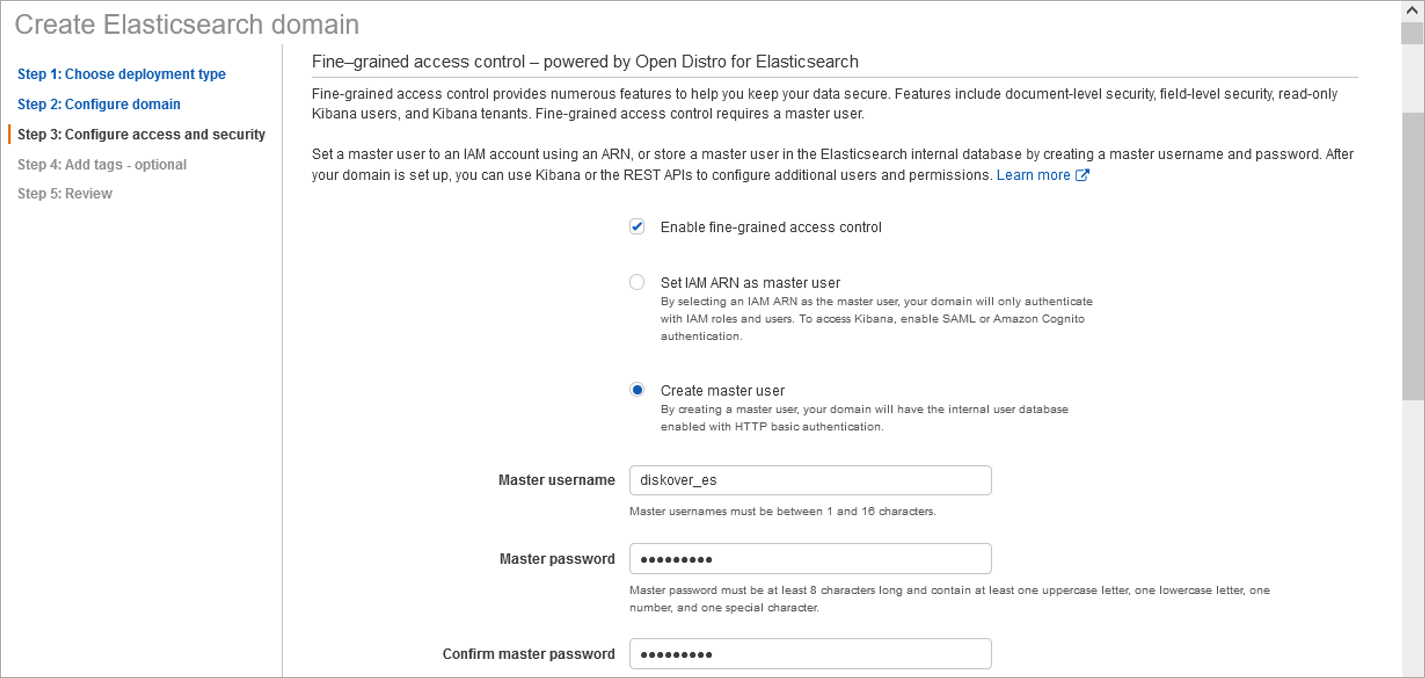
🔴 Create a master username with strong password. The Elasticsearch master user credentials should align with the strong password policy adopted for IAM users.
More information can be found here:
https://docs.aws.amazon.com/IAM/latest/UserGuide/id_credentials_passwords_account-policy.html

🔴 Initially, allow open access to the domain during install to confirm all components are operational (master username and strong password are still required during setup of configuration). This reduces initial troubleshooting that may be required during setup of configuration. Once confirmed working configuration, the access policy will be modified to increase security.
Modify Access Policy
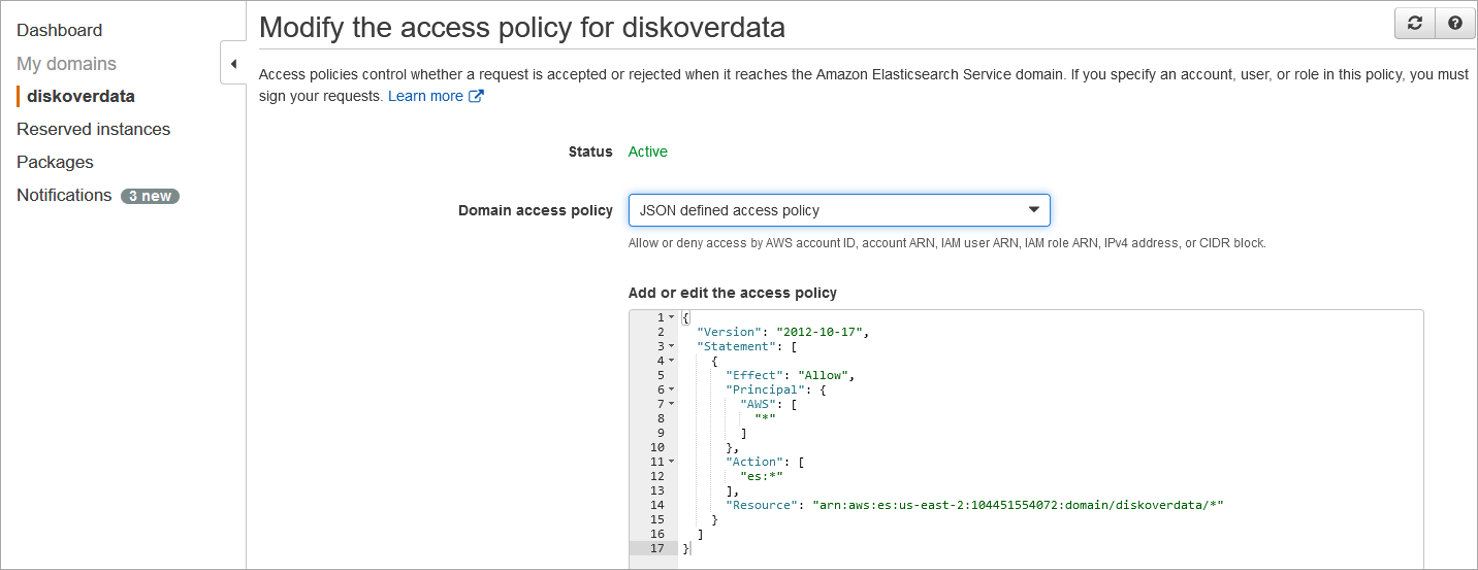
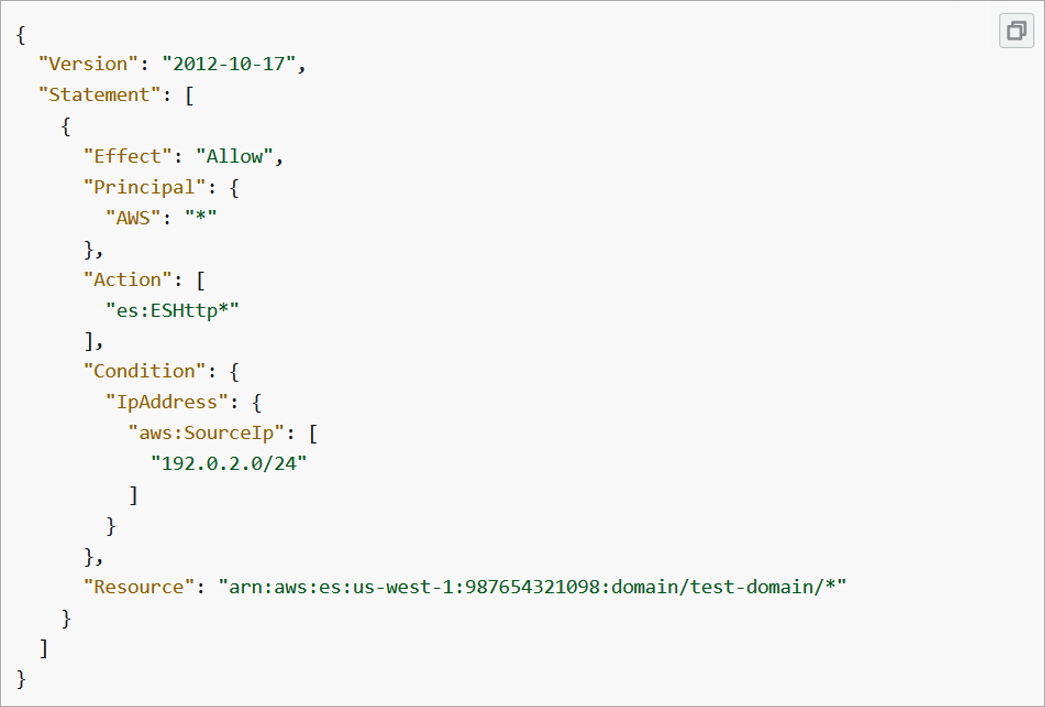
🔴 Modify access policy to restrict access to known IP address / subnets of Diskover indexer(s) and Diskover-Web server.
The IP addresses/subnets will be known after completion of Diskover-Web for Amazon Linux installation and Install Diskover On-Premise Indexer(s) installation. If additional Diskover indexer(s) are deployed in the future, the access policy should be modified to align with deployment of Diskover indexer(s).
For more information visit:
https://docs.aws.amazon.com/opensearch-service/latest/developerguide/what-is.html
Diskover-Web for Amazon Linux
The web server component required to serve the Diskover-Web HTML5 user interface (Components 5, 6, and 7 in the architecture diagram in the Architecture Overview Chapter) can be configured to run on an EC2 instance running Amazon Linux.
Configure EC2 Instance as a Web Server
🔴 Configure the EC2 instance as a Web server:
       __|  __|_  )
       _|  (  /  Amazon Linux 2 AMI
       ___|\___|___|
🔴 Elevate from EC2-user to root:
sudo -s
Install NGINX
🔴 The following will install the NGINX Web server application:
amazon-linux-extras install epel -y
yum -y install http://rpms.remirepo.net/enterprise/remi-release-7.rpm
yum -y install nginx
systemctl enable nginx
systemctl start nginx
systemctl status nginx
Install PHP 7 and PHP-FPM (FastCGI)
Note: PHP 8.1 can also be used instead of PHP 7.4, replace php74/php7.4 with php81/php8.1
🔴 Perform the following commands to install PHP:
yum-config-manager --enable remi-php74
amazon-linux-extras install php7.4
yum -y install php php-common php-fpm php-opcache php-cli php-gd php-mysqlnd php-ldap php-zip php-xml php-xmlrpc php-mbstring php-json php-sqlite3
🔴 Set PHP configuration settings for NGINX:
vi /etc/php-fpm.d/www.conf
🔴 Change ownership to nginx:
user = nginx
group = nginx
🔴 Uncomment and change the NGINX listen parameters:
listen.owner = nginx
listen.group = nginx
🔴 Change the NGINX listen socket:
listen = /var/run/php-fpm/php-fpm.sock
🔴 Change file system ownership, enable and start PHP-FPM service:
chown -R root:nginx /var/lib/php
mkdir /var/run/php-fpm
chown -R nginx:nginx /var/run/php-fpm
systemctl enable php-fpm
systemctl start php-fpm
systemctl status php-fpm
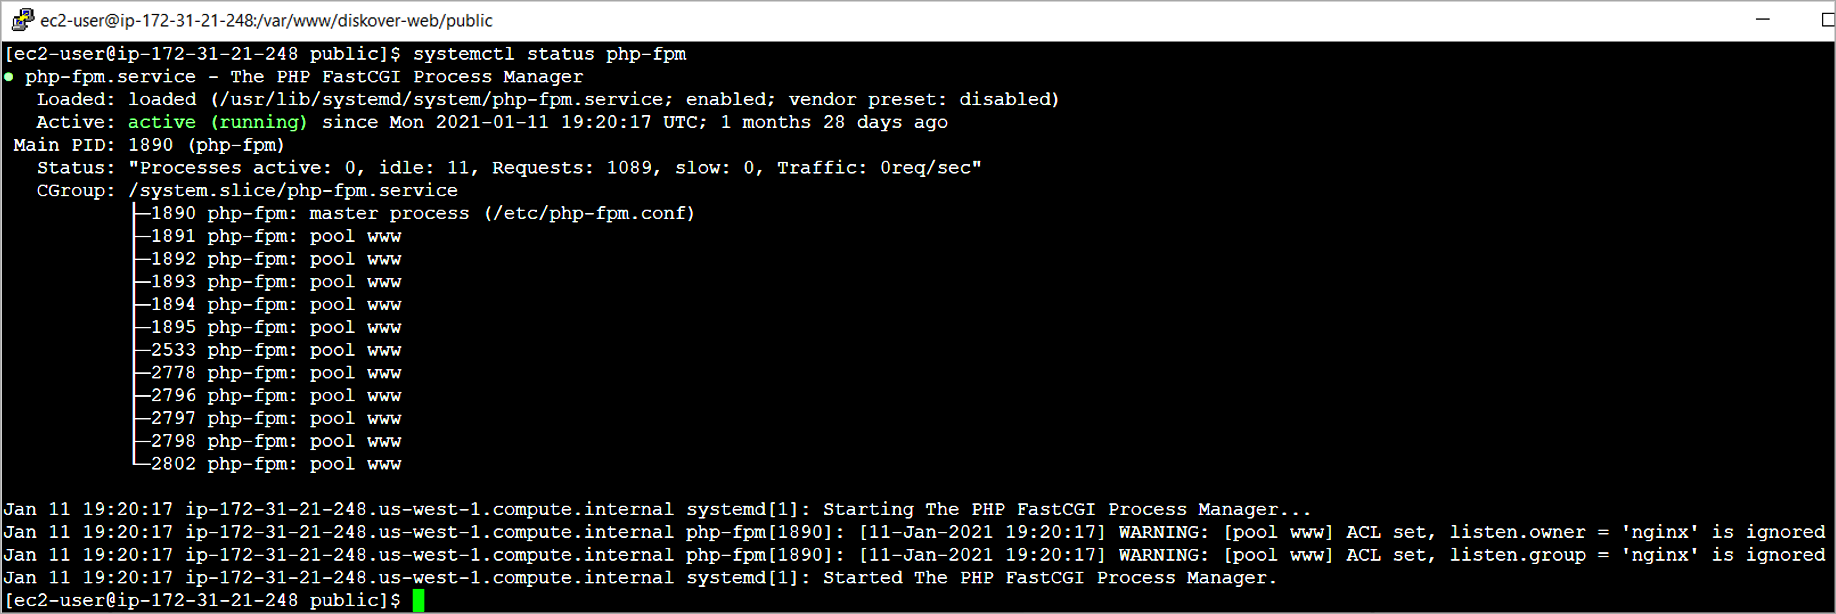
Note: The following warning will not affect ability to for Diskover-Web to launch.
WARNING: [pool www] ACL set, listen.owner = 'nginx' is ignored
Install Diskover-Web Software
🔴 Copy Diskover-Web files:
cp -a diskover-web /var/www/
🔴 Edit the Diskover-Web configuration file Constants.php to authenticate against your Elasticsearch endpoint:
cd /var/www/diskover-web/src/diskover
cp Constants.php.sample Constants.php
vi Constants.php
🔴 Set your Elasticsearch endpoint, port, username, and password:
        aws: True
        host: aws_opensearch_endpoint.us-east-1.es.amazonaws.com
        port: 443

const ES_USER = 'strong_username';
const ES_PASS = 'strong_password';

Note: Diskover-Web uses a number of files to store the profiles of preferences and tasks. The default install has sample files, but not the actual files. The following will copy the sample files and create default starting point files.
🔴 Create actual files from the sample files filename.txt.sample:
cd /var/www/diskover-web/public
for f in *.txt.sample; do cp $f "${f%.*}"; done
chmod 660 *.txt
🔴 Create actual task files from the sample task files filename.json.sample:
cd /var/www/diskover-web/public/tasks/
🔴 Copy default/sample JSON files:
for f in *.json.sample; do cp $f "${f%.*}"; done
chmod 660 *.json
🔴 Set the proper ownership on the default starting point files:
chown -R nginx:nginx /var/www/diskover-web
🔴 Configure the NGINX Web server with diskover-web configuration file:
vi /etc/nginx/conf.d/diskover-web.conf
🔴 Add the following to the /etc/nginx/conf.d/diskover-web.conf file:
server {
        listen   8000;
        server_name  diskover-web;
        root   /var/www/diskover-web/public;
        index  index.php index.html index.htm;
        error_log  /var/log/nginx/error.log;
        access_log /var/log/nginx/access.log;
        location / {
            try_files $uri $uri/ /index.php?$args =404;
        }
        location ~ \.php(/|$) {
            fastcgi_split_path_info ^(.+\.php)(/.+)$;
            set $path_info $fastcgi_path_info;
            fastcgi_param PATH_INFO $path_info;
            try_files $fastcgi_script_name =404;
            fastcgi_pass unix:/var/run/php-fpm/php-fpm.sock;
            #fastcgi_pass 127.0.0.1:9000;
            fastcgi_index index.php;
            include fastcgi_params;
            fastcgi_param SCRIPT_FILENAME $document_root$fastcgi_script_name;
            include fastcgi_params;
            fastcgi_read_timeout 900;
            fastcgi_buffers 16 16k;
            fastcgi_buffer_size 32k;
        }
}
🔴 Restart NGINX:
systemctl restart nginx
Open Firewall Ports for Diskover-Web
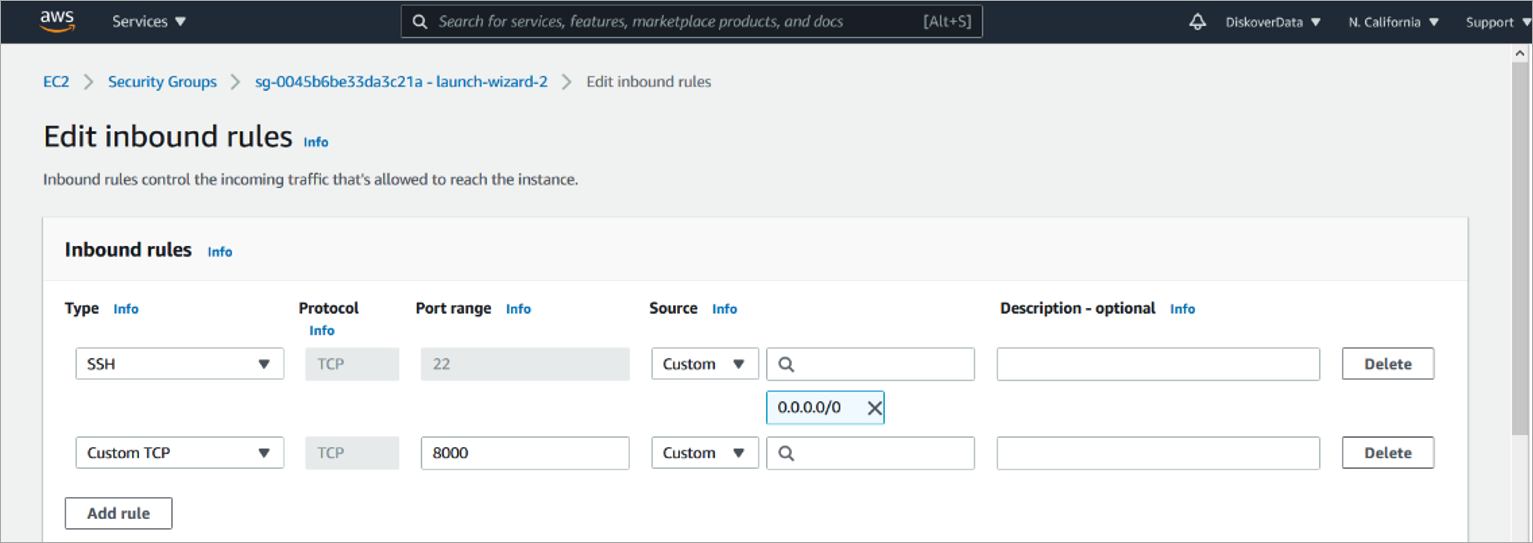
🔴 Diskover-Web listens on port 8000 by default. From AWS Instance Console open port 8000:
Create a Test Web Page to Verify NGINX Configuration for Linux
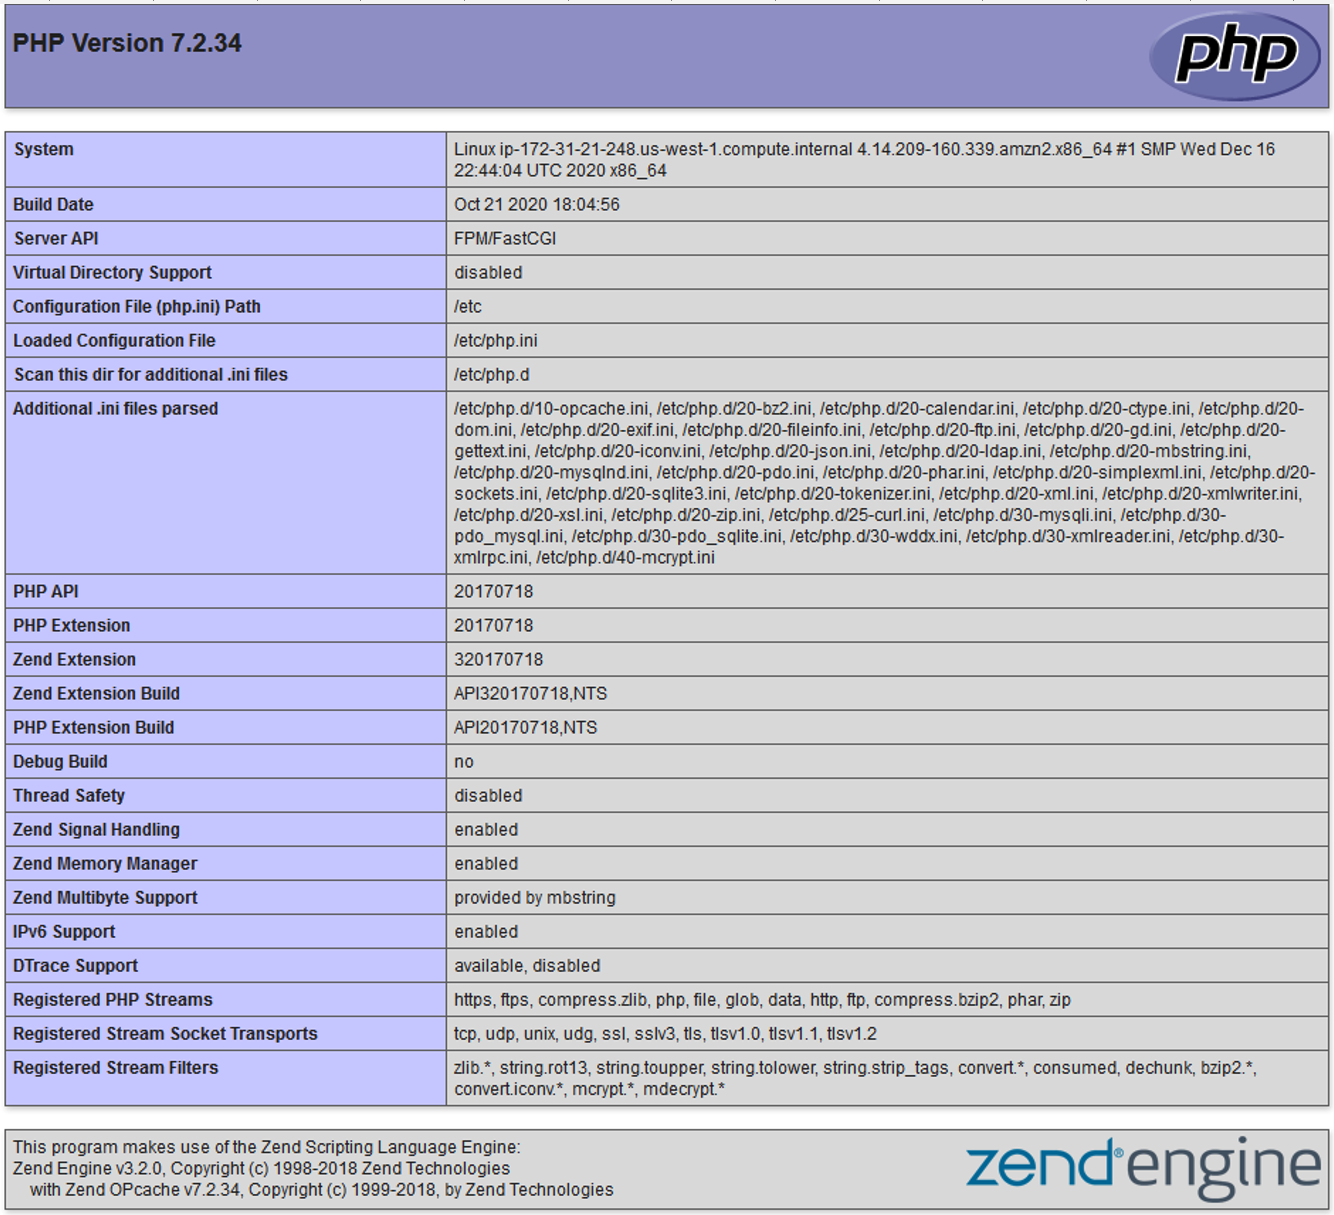
🔴 The following will create a test page to verify if the NGINX Web server configuration is properly configured (independent of the Diskover-Web application):
vi /var/www/diskover-web/public/info.php
🔴 Insert the following text:
<?php
phpinfo();
🔴 Open a test page:
http://< diskover_web_host_ip >:8000/info.php
Launch Diskover-Web
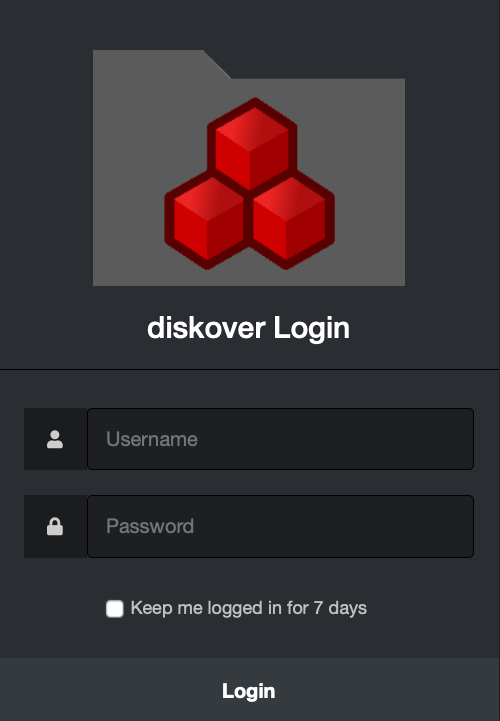
Login to Diskover:
🔴 Open Diskover-Web page: http://localhost:8000
http://<diskover_web_host_ip>:8000/
🔴 Use the default username and password or set new ones in the Constants.php config file as described in this chapter for Linux or Windows:
Default username: admin
Default password: darkdata
Diskover On-Premise Indexers Installation
The Diskover indexers are often distributed to index on-premise storage systems. The following section outlines installing the Diskover indexer component.
Diskover can run on all flavors of Linux, although only CentOS, RHEL, and Ubuntu are covered in this guide.
At time of installation, the config file is located in:
- Linux:
~/.config/diskover/config.yaml - Windows:
%APPDATA%\diskover\config.yaml - MacOS:
~/Library/Application Support/diskover/config.yaml
Install Diskover Indexers
Install Python 3.x, pip and Development Tools
🔴 Install Python and pip:
yum -y install python3 python3-devel gcc
python3 -V
pip3 -V
Install Diskover Indexer
🔴 Extract diskover compressed file (from ftp server) - replace <version number> with only the number, do not use the <>:
mkdir /tmp/diskover
tar -zxvf diskover-v<version number>.tar.gz -C /tmp/diskover-v<version number>/
cd /tmp/diskover-v<version number>
🔴 Copy diskover files to opt folder:
cp -a diskover /opt/
cd /opt/diskover
🔴 Install required Python dependencies:
pip3 install -r requirements.txt
🔴 If indexing to AWS Elasticsearch run:
pip3 install -r requirements-aws.txt
🔴 Copy default/sample configs:
for d in configs_sample/*; do d=`basename $d` && mkdir -p ~/.config/$d && cp configs_sample/$d/config.yaml ~/.config/$d/; done
🔴 Edit Diskover config file:
vi ~/.config/diskover/config.yaml
🔴 Configure indexer to create indexes in your AWS Elasticsearch endpoint in the following section of the config.yaml file:
databases:
    elasticsearch:

Mount File Systems
🔴 NFS Mount:
yum -y install nfs-utils
mkdir /mnt/nfsstor1
mount -t nfs -o ro,noatime,nodiratime server_name:/export_name /mnt/nfsstor1
🔴 Windows SMB/CIFS Mount:
yum -y install cifs-utils
mkdir /mnt/smbstor1
mount -t cifs -o username=user_name //server_name/share_name /mnt/smbstor1
Create Index of File System
🔴 To run the Diskover indexing process from a shell prompt:
cd /opt/diskover
🔴 Install your license files as explained in the Software Activation chapter.
🔴 Start your first crawl:
python3 diskover.py -i diskover-<indexname> <storage_top_dir>
Software Activation


Licensing Overview
The Diskover Community Edition doesn't require a license key and can be used for an unlimited time.
The Diskover Editions/paid subscriptions require a license. Unless otherwise agreed:
- A trial license is valid for 30 days and is issued for 1 Elasticsearch node.
- A paid subscription license is valid for 1 year. Clients will be contacted about 90 days prior to their license expiration with a renewal proposal.
Please reach out to your designated Diskover contact person or contact us directly for more information.
License Issuance Criteria
Licenses are created using these variables:
- Your email address
- Your hardware ID number
- Your Diskover Edition
- The number of Elasticsearch nodes.
Generating a Hardware ID
After installing Diskover and completing the basic configuration, you will need to generate a hardware ID. Please send that unique identifier along with your license request.
🔴 To create your hardware ID:
cd /opt/diskover
python3 diskover_lic.py -g
🟨 IMPORTANT!
- Check that you have configured your Elasticsearch host correctly, as it is part of the hardware ID encoding process.
- Note that if your Elasticsearch cluster ID changes, you will need new license keys.
License Key Locations
Linux
Place the license keys in the following locations.
🔴 Copy diskover.lic file to:
/opt/diskover/diskover.lic
🔴 Copy diskover-web.lic file to:
/var/www/diskover-web/src/diskover/diskover-web.lic
🔴 Check that the diskover-web.lic file is owned by NGINX user and permissions are 644:
chown nginx:nginx diskover-web.lic && chmod 644 diskover-web.lic
🔴 After you have installed your license keys, you can see the info about the license using diskover_lic.py:
cd /opt/diskover
python3 diskover_lic.py -l
Windows
🔴 Place the license keys in the following locations. Copy diskover.lic file to:
C:\Program Files\diskover\
🔴 Copy diskover-web.lic file to folder:
C:\Program Files\diskover-web\src\diskover\
Mac
🔴 Copy diskover.lic file to folder:
/Applications/Diskover.app/Contents/MacOS/diskover/
Configuration Following Installation


Many parameters can and should be configured once Diskover has been installed, so you can benefit from all the features. At the minimum, the following should be configured:
Health Check
The following section outlines health checks for the various components of the Diskover Data curation platform.
Diskover-Web
To validate health of the Diskover-Web, basically ensures the Web serving applications are functioning properly.
Diskover-Web for Linux
🔴 Check status of NGINX service:
systemctl status nginx

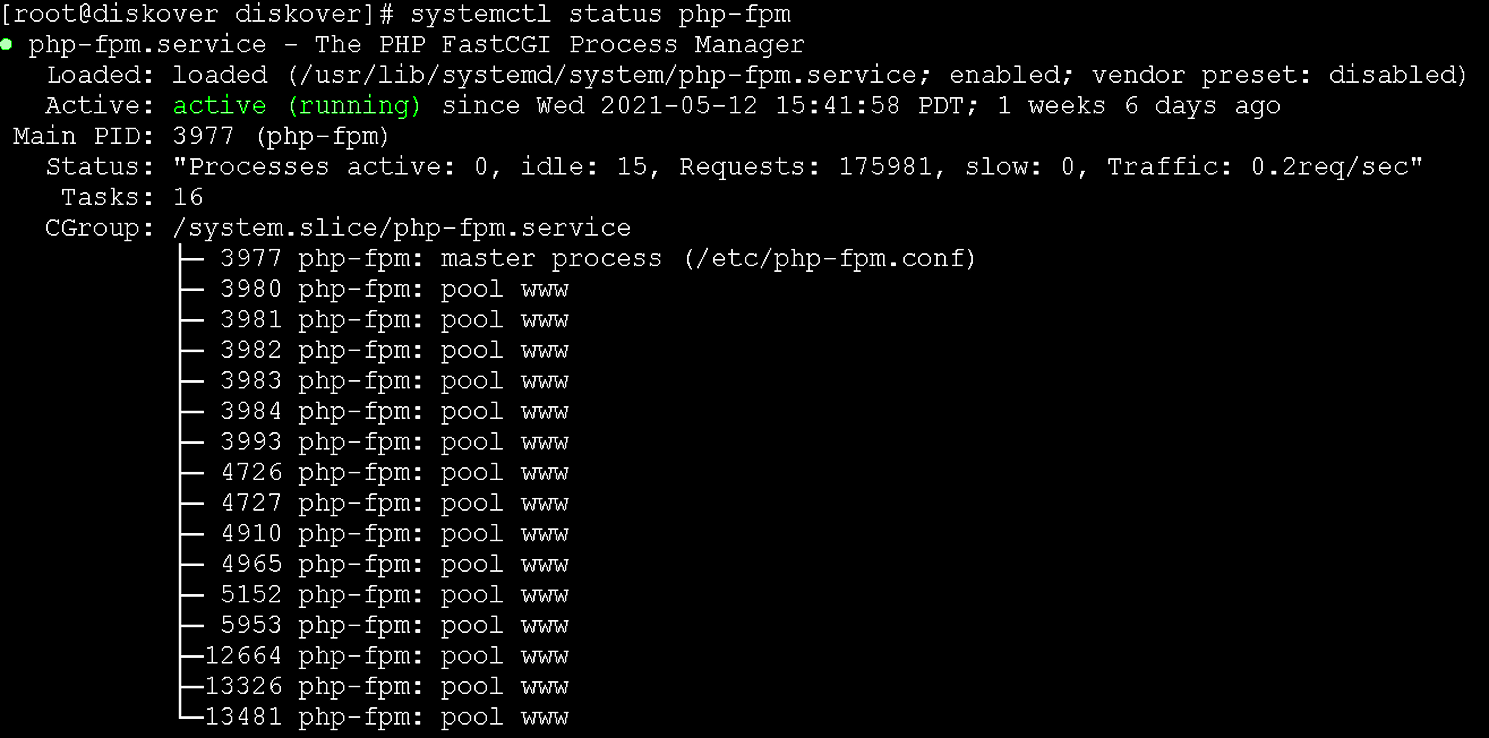
🔴 Check status of PHP-FPM service:
systemctl status php-fpm
Elasticsearch Domain
Status of Elasticsearch Service for Linux
🔴 Check status of Elasticsearch service:
systemctl status elasticsearch.service

Backup and Recovery
Setup Backup Environment for Linux
The following explains how to create a backup of all data components of the Diskover environment.
🔴 First, we need to create/identify the directory location where the backup will be stored. The following provides a location example, but it can be changed to meet the organizations standards for backup locations.
mkdir -p /var/opt/diskover/backups/
mkdir -p /var/opt/diskover/backups/elasticsearch/
🔴 We need to provide the Elasticsearch user access to the location so that the Elasticsearch user can write snapshots:
chown -R elasticsearch /var/opt/diskover/backups/elasticsearch
mkdir -p /var/opt/diskover/backups/diskover/
mkdir -p /var/opt/diskover/backups/diskover-web/
mkdir -p /var/opt/diskover/backups/diskover-web/tasks/
Elasticsearch Backup
The following explains how to create a snapshot of a single index or multiple indices and how to restore the snapshot. Elasticsearch provides a snapshot and restore API.
The following example will manually walk you through creating an Elasticsearch backup, more information can also be found at the following AWS location:
https://docs.aws.amazon.com/opensearch-service/latest/developerguide/managedomains-snapshots.html
To create the backup, we need to do the following to configure the location to store the snapshots.
Configure Elasticsearch Snapshot Directory Location Settings
Now we need to tell Elasticsearch that this is our snapshot directory location. For that, we need to add the repo.path setting in elasticsearch.yml file.
🔴 Edit the following file:
/etc/elasticsearch/elasticsearch.yml
🔴 Add the repo path setting to the paths section:
path.repo: ["/var/opt/diskover/backups/elasticsearch"]

🔴 Restart Elasticsearch:
systemctl restart elasticsearch
Configure Elasticsearch File System-Based Snapshot Settings
In this example we are using the local file system directory for storing the snapshot but the same can be stored on the cloud as well. The following is focused on file system-based snapshot only.
🔴 Install the curl utilities:
yum install curl
🔴 Create the repository which would be used for taking a snapshot and to restore. We can create the repository using the following expression:
curl -X PUT "http://192.168.10.119:9200/_snapshot/2021052401_es_backup?pretty" -H 'Content-Type: application/json' -d'
{
  "type": "fs",
  "settings": {
    "location": "/var/opt/diskover/backups/elasticsearch"
  }
}
'

🔴 After creating the repository, we can take the snapshot of all indices using the following expression:
curl -X PUT http://192.168.10.119:9200/_snapshot/2021052401_es_backup/snapshot_all_indices
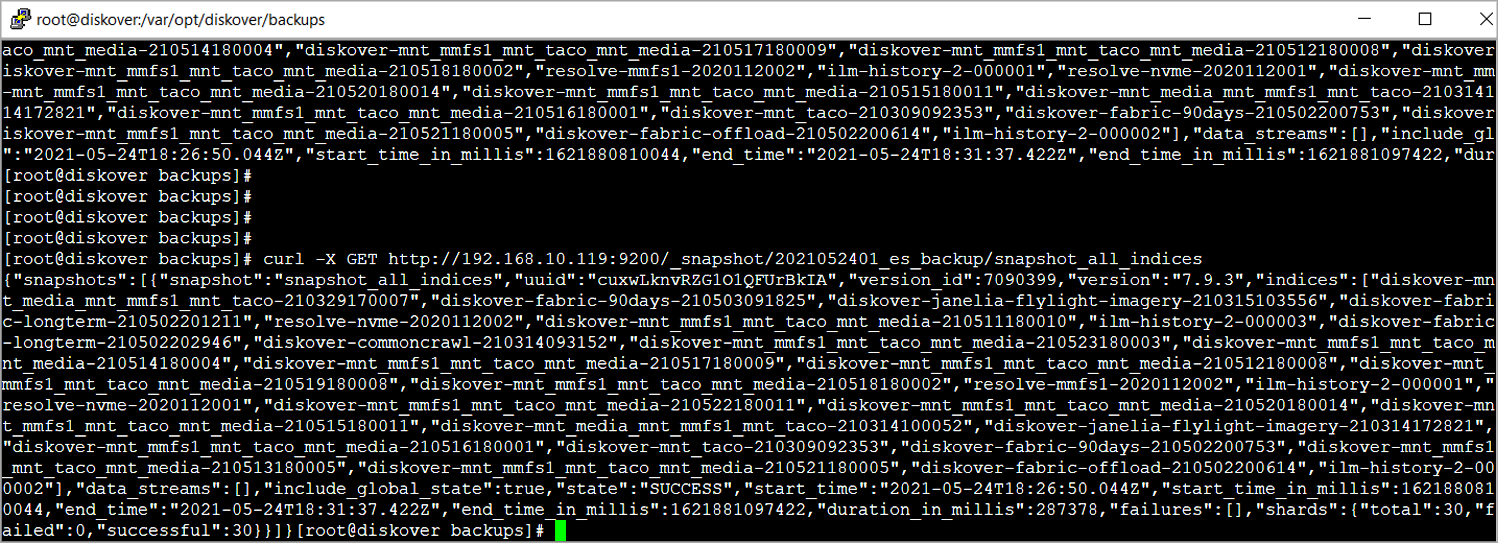
🔴 Run the following expression to review the details of the above snapshot:
curl -X GET http://192.168.10.119:9200/_snapshot/2021052401_es_backup/snapshot_all_indices
Restoring Indexes from Snapshot
🔴 Indexes can be restored from the snapshot by appending the _restore endpoint after the snapshot name:
curl -X POST http://192.168.10.119:9200/_snapshot/2021052401_es_backup/snapshot_all_indices/_restore
Diskover Indexer(s) Backup
Diskover Indexer(s) Backup for Linux
The Diskover indexer can be distributed among multiple hosts. Each indexer stores the user configured settings in a series of yaml files located within directories named diskover under /root/.config/*
🔴 A backup of the user configured settings will need to be completed for each distributed indexer(s). The following provides an example to back up a single indexer:
rsync -avz /root/.config/diskover* /var/opt/diskover/backups/diskover/$(date +%Y%m%d)/
🔴 Backup the Diskover indexer license file:
rsync -avz /opt/diskover/diskover.lic /var/opt/diskover/backups/diskover/$(date +%Y%m%d)/
Diskover-Web Backup
The Diskover-Web stores the user configured settings in the following series of files:
/var/www/diskover-web/src/diskover/Constants.php
/var/www/diskover-web/public/*.txt
/var/www/diskover-web/public/tasks/*.json
Perform the following commands to backup the Diskover-Web user configured settings.
🔴 Make a directory date for collection of backups:
mkdir -p /var/opt/diskover/backups/diskover-web/$(date +%Y%m%d)/src/diskover/
mkdir -p /var/opt/diskover/backups/diskover-web/$(date +%Y%m%d)/public/tasks/
🔴 Backup user configured settings:
rsync -avz /var/www/diskover-web/src/diskover/Constants.php /var/opt/diskover/backups/diskover-web/$(date +%Y%m%d)/src/diskover/
rsync -avz /var/www/diskover-web/public/*.txt /var/opt/diskover/backups/diskover-web/$(date +%Y%m%d)/public/
rsync -avz /var/www/diskover-web/public/tasks/*.json /var/opt/diskover/backups/diskover-web/$(date +%Y%m%d)/public/tasks/
🔴 Backup the Diskover-Web license file:
rsync -avz /var/www/diskover-web/src/diskover/diskover-web.lic /var/opt/diskover/backups/diskover-web/$(date +%Y%m%d)/src/diskover/
Routine Maintenance
Routine maintenance of Diskover consists of ensuring your environment is updated and current with software versions as they become available.
Upgrade Diskover and Diskover-Web
🔴 To update Diskover and Diskover-Web to the latest version, see update instructions.
🔴 To make sure you always run the latest version of Diskover, please subscribe to our newsletter.
AWS Elasticsearch Domain
Routine maintenance of the AWS Elasticsearch environment consists of two components: 1) managing indices, and 2) upgrading Elasticsearch versions as they become available.
Managing Indices
Refer to Elasticsearch Index Management for managing your AWS Elasticsearch/OpenSearch indices.
Upgrading Elasticsearch Versions
AWS recommends upgrading to the latest Elasticsearch versions as they become available on Amazon Elasticsearch Service. Information on upgrading your AWS Elasticsearch cluster can be found here:
https://docs.aws.amazon.com/opensearch-service/latest/developerguide/version-migration.html
Emergency Maintenance
The following section describes how to troubleshoot and perform emergency maintenance on the components that comprise the Diskover curation platform.
Diskover-Web
This topic describes how to identify and solve Diskover-Web issues.
Can’t Access Diskover-Web from Browsers:
🔴 Ensure the Web server components are running:
systemctl status nginx
systemctl status php-fpm
🔴 Check the NGINX Web server error logs:
tail -f /var/log/nginx/error.log
🔴 Trace access from Web session by reviewing NGINX access logs. Open a Web browser and attempt to access Diskover-Web, the access attempt should be evident in the access log:
tail -f /var/log/nginx/access.log
AWS Elasticsearch Domain
To identify and solve common Amazon Elasticsearch Service (Amazon ES) issues, refer to the AWS guide on how to troubleshoot the AWS Elasticsearch environment here:
https://docs.aws.amazon.com/opensearch-service/latest/developerguide/handling-errors.html
Cost Components
AWS Costs
Please refer to the prerequisites and requirements section for the minimum and recommended nodes and instances.
Please visit the AWS website for pricing based on your requirements: https://aws.amazon.com/opensearch-service/pricing/
Diskover Annual Subscriptions
Please contact us for pricing and refer to our solutions page to read about our different offerings.
Support
Support Options
| Support & Ressources | Free Community Edition | Annual Subscription* |
|---|---|---|
| Online Documentation | ✅ | ✅ |
| Slack Community Support | ✅ | ✅ |
| Diskover Community Forum | ✅ | ✅ |
| Knowledge Base | ✅ | ✅ |
| Technical Support | ✅ | |
Phone Support
|
✅ | |
| Remote Training | ✅ |
* 


Feedback
We'd love to hear from you! Email us at info@diskoverdata.com
Warranty & Liability Information
Please refer to our Diskover End-User License Agreements for the latest warranty and liability disclosures.
Contact Diskover
| Method | Coordinates |
|---|---|
| Website | https://diskoverdata.com |
| General Inquiries | info@diskoverdata.com |
| Sales | sales@diskoverdata.com |
| Demo request | demo@diskoverdata.com |
| Licensing | licenses@diskoverdata.com |
| Support | Open a support ticket with Zendesk 800-560-5853 | Mon-Fri 8am-6pm PST |
| Slack | Join the Diskover Slack Workspace |
| GitHub | Visit us on GitHub |
| AJA Media Edition | 530-271-3190 sales@aja.com support@aja.com |
© Diskover Data, Inc. All rights reserved. All information in this manual is subject to change without notice. No part of the document may be reproduced or transmitted in any form, or by any means, electronic or mechanical, including photocopying or recording, without the express written permission of Diskover Data, Inc.