![]()
Diskover Configuration and Administration Guide
For version 2.2.x or previous
This guide is intended for Service Professionals and System Administrators.
Introduction
Overview
Diskover Data is a web-based platform that provides single-pane viewing of distributed digital assets. It provides point-in-time snapshot indexes of data fragmented across cloud and on-premise storage spread across an entire organization. Users can quickly and easily search across company files. Diskover is a data management application for your digital filing cabinet, providing powerful granular search capabilities, analytics, file-based workflow automation, and ultimately enables companies to scale their business and be more efficient at reducing their operating costs.
For more information, please visit diskoverdata.com
Diskover Use Cases
Diskover addresses unstructured data stored across various storage repositories. Data curation encompasses the manual and automated processes needed for principled and controlled data creation, maintenance, cleanup, and management, together with the capacity to add value to data.
System Administrators
The use case for System Administrators is often centered around data cleanup, data disposition, ensuring data redundancy, and automating data. System Administrators are often tasked with controlling costs associated with unstructured data.
Line of Business Users
The use cases for Line of Business users are often centered around adding value to data, finding relevant data, correlating, analyzing, taking action on data sets, and adding business context to data.
Approved AWS Technology Partner
Diskover Data is an official AWS Technology Partner. Please note that AWS has renamed Amazon Elasticsearch Service to Amazon OpenSearch Service. Most operating and configuration details for OpenSearch Service should also be applicable to Elasticsearch..
![]()
Document Conventions
Easy Code Snippets Copy/Paste
Throughout this document, all the lines displayed in a different font are designed for users to copy to a clipboard using the copy icon on the far right and paste directly into a terminal session:
code snippet - use icon on the far right to copy me
Proposed Actions
🔴 All proposed action items are preceded by a red dot.
Important Notes and Warnings
🟨 All important notes and warnings are preceded by a yellow square.
Restricted Diskover Editions
The appropriate label(s) will be displayed for features and/or sections of the guide that apply to specific Diskover editions.


User Roles and Authentication
This chapter discusses setting up authenticated user access to Diskover-Web.
Local User Configuration
Diskover-Web currently has two local users: 1) admin, and 2) data user. To change the login details for the two sets of users:
vim /var/www/diskover-web/src/diskover/Constants.php
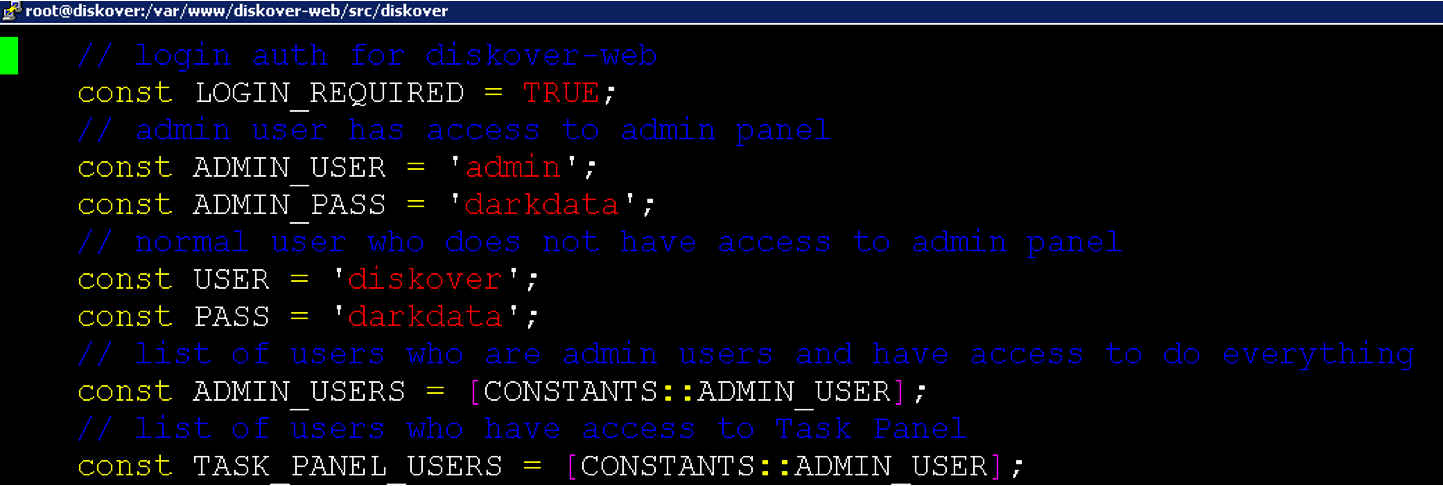
Note: The passwords stored in the web config file (Constants.php) are only used as the default initial passwords when first logging in to Diskover-Web. On first login, you will be asked to change the password, and the password will be stored and encrypted in
sqlite db, and the default password in web config will no longer be used.
LDAP/Active Directory Authentication
Diskover-Web supports authenticating users from Active Directory over Lightweight Directory Access Protocol (LDAP). LDAP integration can be used to authenticate users against a Microsoft Domain Controller (DC).
🔴 To configure AD / LDAP login authentication:
vim /var/www/diskover-web/src/diskover/Constants.php
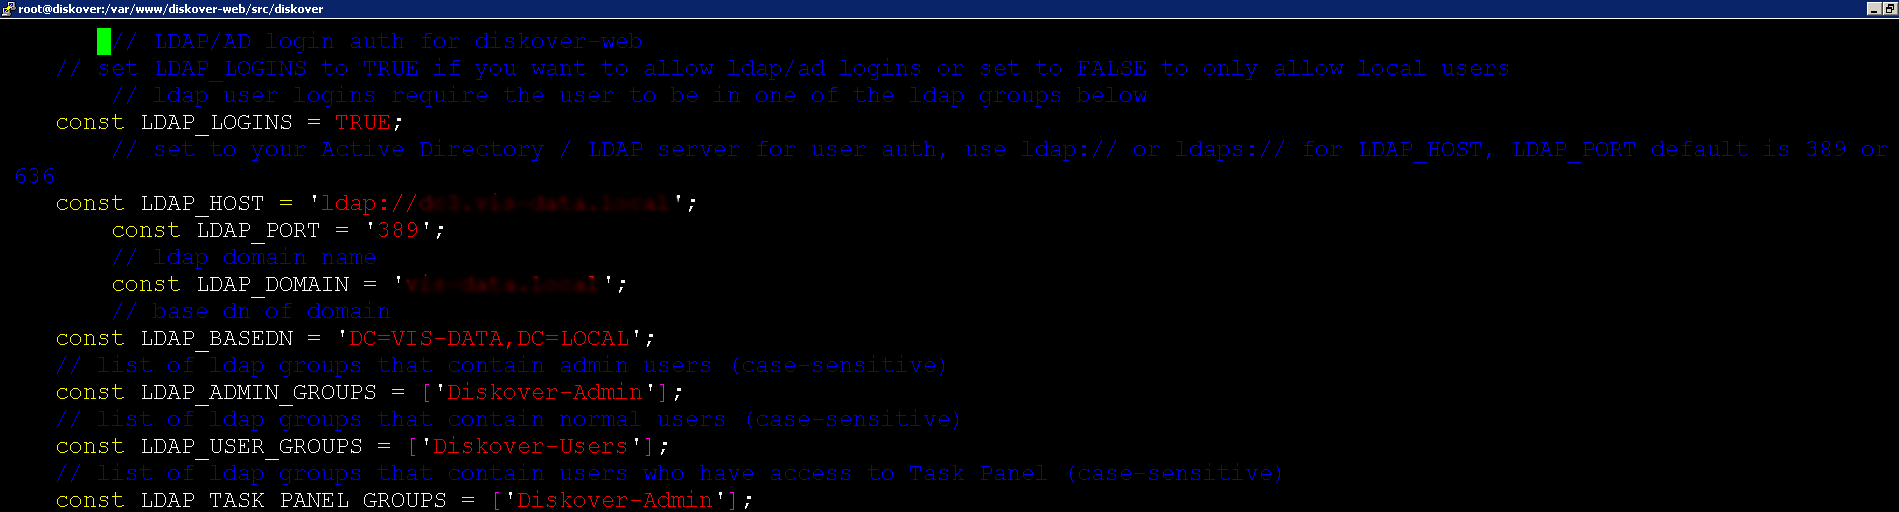
🔴 The following information is required to configure LDAP authentication:
| FIELD | DESCRIPTION |
|---|---|
| LDAP_LOGINS | Set to TRUE to enable and use ldap logins |
| LDAP_HOST | The full LDAP URI, ex: ldap://dc.domain.com:389 or ldaps://dc.domain.com:636 for SSL encryption Note: You can also provide multiple LDAP-URIs separated by a space as one string. |
| LDAP_PORT | Ex: 389 or 636 |
| LDAP_DOMAIN | The LDAP domain name, ex: domain.com |
| LDAP_BASEDN | The LDAP base dn of domain, ex: dc=DOMAIN,dc=COM |
🔴 At least three AD groups should be established for Diskover and set in web config. Note that at login, the ad/ldap user will be checked if they are in one of the ad/ldap groups below. If they are not in any of these groups, they will be denied access to log in.
| GROUP | DESCRIPTION |
|---|---|
| LDAP_ADMIN_GROUPS | To add admin group |
| LDAP_USER_GROUPS | To add user group |
| LDAP_TASK_PANEL_GROUPS | To add task panel group |
Okta Authentication
Diskover-Web supports authenticating/authorizing users using Okta Identity.
Note: This section does not cover adding an application to the Okta admin page. You will need to first add an Oauth application (Web app) to your Okta admin page for Diskover-Web
🔴 To configure Okta logins:
vim /var/www/diskover-web/src/diskover/Constants.php
🔴 The following information is required to configure Okta authentication/authorization:
| FIELD | DESCRIPTION |
|---|---|
| OAUTH2_LOGINS | Set to TRUE to enable and use Okta Oauth2 login Note: When using Oauth2 login, local and ldap login is not used |
| OAUTH2_CLIENT_ID | Your Okta Oauth2 application client id |
| OAUTH2_CLIENT_SECRET | Your Okta Oauth2 application client secret |
| OAUTH2_REDIRECT_URI | Your Okta Oauth2 login redirect URI, ex: https://diskover.domain.com/login.php?callbackNote: login.php page handles the redirect URI when using callback parameter |
| OAUTH2_LOGOUT_REDIRECT_URI | Your Okta Oauth2 post logout redirect URI, ex: https://diskover.domain.com/ |
| OAUTH2_AUTH_ENDPOINT | Your Okta Oauth2 API Authorization Server Issuer URI authorization endpoint, ex: https://diskover.domain.com/oauth2/default/v1/authorize |
| OAUTH2_TOKEN_ENDPOINT | Your Okta Oauth2 API Authorization Server Issuer URI token endpoint, ex: https://diskover.domain.com/oauth2/default/v1/token |
| OAUTH2_LOGOUT_ENDPOINT | Your Okta Oauth2 API Authorization Server Issuer URI logout endpoint, ex: https://diskover.domain.com/oauth2/default/v1/logout |
| OAUTH2_API_TYPE | Oauth2 API Type, types are Okta or Azure (Graph API), set this to Okta |
| OAUTH2_API_URL_BASE | Your Okta Oauth2 API URL for getting user/group info, ex: https://diskover.domain.com/api/v1/ |
| OAUTH2_API_TOKEN | Your Okta Oauth2 API Token |
🔴 At least two Okta Oauth2 groups should be established for Diskover and set in web config. Note that at login, the Okta Oauth2 user will be checked if they are in one of the following Okta Oauth2 groups.
| GROUP | DESCRIPTION |
|---|---|
| OAUTH2_ADMIN_GROUPS | To add admin group |
| OAUTH2_TASK_PANEL_GROUPS | To add task panel group |
Azure AD Oauth2 OIDC SSO Authentication
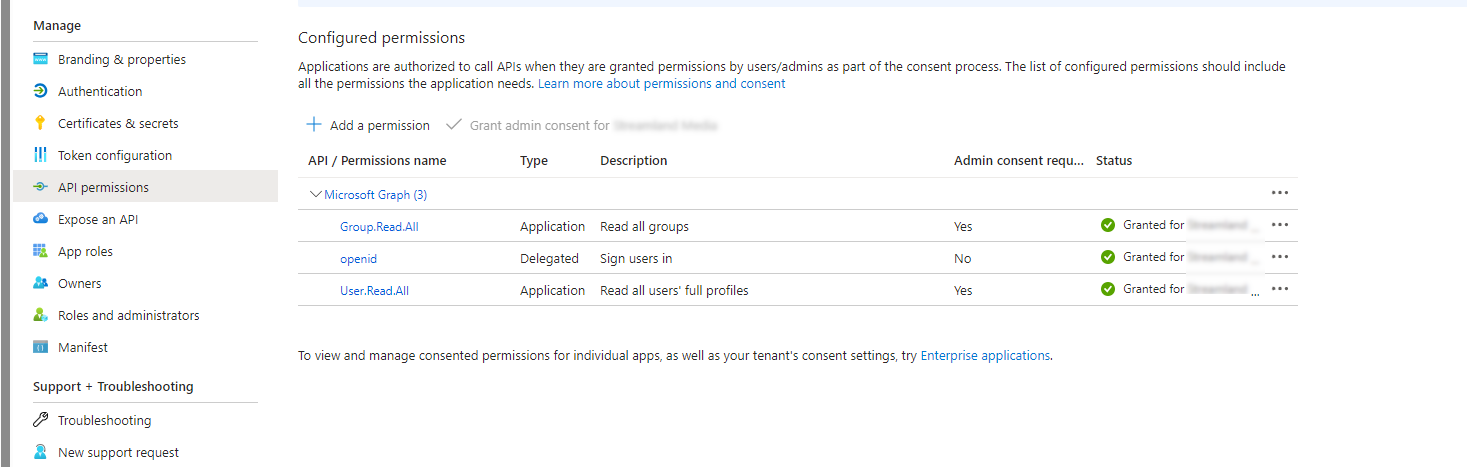
Diskover-Web supports authenticating/authorizing users using Azure Active Directory OIDC SSO.
🔴 Set up an App Registration in Azure with the following API Permissions:
🔴 To configure Oauth2 logins:
vim /var/www/diskover-web/src/diskover/Constants.php
🔴 The following information is required to configure Azure Oauth2 OIDC SSO authentication/authorization:
| FIELD | DESCRIPTION |
|---|---|
| OAUTH2_LOGINS | Set to TRUE to enable and use Azure oauth2 login Note: When using Oauth2 login, local and ldap login is not used |
| OAUTH2_CLIENT_ID | Your Azure Oauth2 application client ID |
| OAUTH2_CLIENT_SECRET | Your Azure Oauth2 application client secret |
| OAUTH2_REDIRECT_URI | Your Azure Oauth2 login redirect URI, ex: https://diskover.domain.com/login.php?callbackNote: login.php page handles the redirect URI when using callback parameter |
| OAUTH2_LOGOUT_REDIRECT_URI | Your Azure Oauth2 post logout redirect URI, ex: https://diskover.domain.com/ |
| OAUTH2_AUTH_ENDPOINT | Your Azure Oauth2 API Authorization Server Issuer URI authorization endpoint, ex: https://diskover.domain.com/oauth2/default/v1/authorize |
| OAUTH2_TOKEN_ENDPOINT | Your Azure Oauth2 API Authorization Server Issuer URI token endpoint, ex: https://diskover.domain.com/oauth2/default/v1/token |
| OAUTH2_LOGOUT_ENDPOINT | Your Azure Oauth2 API Authorization Server Issuer URI logout endpoint, ex: https://diskover.domain.com/oauth2/default/v1/logout |
| OAUTH2_API_TYPE | Oauth2 API Type, types are Okta or Azure (Graph API), set this to Azure |
| OAUTH2_API_URL_BASE | Your Azure Oauth2 API URL for getting user/group info, ex: https://diskover.domain.com/api/v1/ |
🔴 At least two Azure Oauth2 groups should be established for Diskover and set in web config. Note that at login, the Azure Oauth2 user will be checked if they are in one of these above Azure Oauth2 groups.
| GROUP | DESCRIPTION |
|---|---|
| OAUTH2_ADMIN_GROUPS | To add admin group |
| OAUTH2_TASK_PANEL_GROUPS | To add task panel group |
Restricting Visibility and Access
Diskover-Web uses multiple levels to limit Elasticsearch index and directory visibility and access:
1) Index mappings can be configured and set to control what indices groups and users are allowed to see. Excluded dirs and ES search query can also be added to index mappings for more granular control.
2) AD/LDAP and Oauth2 group directory permissions.
3) Unix directory permissions.
🔴 Visibility can be limited by users/groups to specific indexes or branches within a given index. To limit index visibility by users/groups:
vim /var/www/diskover-web/src/diskover/Constants.php
// group/user index mappings
// controls what indices and paths groups/users are allowed to view
// enable index mappings, set to TRUE or FALSE
const INDEX_MAPPINGS_ENABLED = FALSE;
// index_patterns key is a list of index names user/group is allowed access to view
// index_patterns_exclude key is a list of index names user/group is not allowed to view
// index pattern wildcards * and ? are allowed, example diskover-* or diskover-indexname-*
// to not exclude any indices/dirs, use empty list [] for index_patterns_exclude, excluded_dirs, and excluded_query
// excluded_dirs use absolute paths and are recursive, example /top_path/dir_name
// excluded_query uses ES query string including regular expression syntax
// group/user names, excluded_dirs, and excluded_query are case-sensitive
// group/user name wildcards * and ? are allowed

const INDEX_MAPPINGS = [
    CONSTANTS::ADMIN_USER => [
      [
            'index_patterns' => [
                'diskover-*'
           ],
           'index_patterns_exclude' => [],
           'excluded_dirs' => [],
           // allow access to projectA directory only in /mnt/stor1/projects
           'excluded_query' => ['((parent_path:\/mnt\/stor1\/projects AND name:/project[^A]/) OR parent_path:/\/mnt\/stor1\/projects\/project[^A]*/)']
       ]
   ],
   CONSTANTS::USER => [
       ['index_patterns' => ['diskover-*'], 'index_patterns_exclude' => [], 'excluded_dirs' => [], 'excluded_query' => []]
   ],
   'diskover-admins' => [
       ['index_patterns' => ['diskover-*'], 'index_patterns_exclude' => [], 'excluded_dirs' => [], 'excluded_query' => []]
   ],
   'diskover-users' => [
       ['index_patterns' => ['diskover-*'], 'index_patterns_exclude' => [], 'excluded_dirs' => [], 'excluded_query' => []]
   ],
   'diskover-powerusers' => [
       ['index_patterns' => ['diskover-*'], 'index_patterns_exclude' => [], 'excluded_dirs' => [], 'excluded_query' => []]
   ]
];
🔴 Visibility can also be limited by AD/LDAP and Oauth2 group permissions. To limit index visibility by AD/LDAP or Oauth2 group membership:
vim /var/www/diskover-web/src/diskover/Constants.php
// AD/ldap group permission filtering
// controls if files/directories get fitered based on AD/ldap groups membership of the user logged in
// local users admin and diskover always see all directories in the index
// aws s3 indices are not filtered
// enable ldap filtering, set to TRUE or FALSE
const LDAP_FILTERING_ENABLED = TRUE;
// AD/ldap groups that are excluded from filtering
// if a user is a member of one of these groups, they will see all files/directories
// group names are case-sensitive
const LDAP_GROUPS_EXCLUDED = ['diskover-admins', 'diskover-powerusers'];

// Oauth2 SSO group permission filtering
// controls if files/directories get fitered based on Oauth2 SSO groups membership of the user logged in
// local users admin and diskover always see all directories in the index
// aws s3 indices are not filtered
// Diskover Pro license required
// enable Oauth2 filtering, set to TRUE or FALSE
const OAUTH2_FILTERING_ENABLED = FALSE;

// Oauth2 SSO groups that are excluded from filtering
// if a user is a member of one of these groups, they will see all files/directories
// group names are case-sensitive
const OAUTH2_GROUPS_EXCLUDED = ['diskover-admins', 'diskover-powerusers'];

// lower case group names when filtering
const GROUPNAME_FILTERING_LOWERCASE = FALSE;
🔴 To limit index visibility by Unix file permissions:
Note: To use Unix permissions filtering, you will need to enable and use the Unix Permissions plugin when indexing, for both file and directory.
vim /var/www/diskover-web/src/diskover/Constants.php
// use UNIXPERMS_FILTERING_STRING as well as group membership to determine filtering
const UNIXPERMS_FILTERING_ENABLED = TRUE;

// unix perms filtering ES search string
// could also use other fields besides unix_perms such as owner, group, etc
//const UNIXPERMS_FILTERING_STRING = 'owner:root AND group:root AND unix_perms:755'
const UNIXPERMS_FILTERING_STRING = 'unix_perms:/..[57]/';
Restricting Diskover-Web API Access
Enable HTTP Basic Authentication
You can turn on HTTP Basic Auth for the Diskover-Web API. This will make it required to use a username and password to access the API.
🔴 Enable API auth and set a username and password:
vim /var/www/diskover-web/src/diskover/Constants.php
// HTTP Basic Auth for REST API
// api authentication, set to TRUE to enable or FALSE to disable
const API_AUTH_ENABLED = TRUE;
// api username and password
const API_USER = 'diskoverapi';
const API_PASS = 'apisecret';
🔴 The API password API_PASS in web config is only used as a default password and this password needs to be changed. To login to Diskover-Web as admin, go to the Settings page and scroll to the API Password section and click change password. Set a new password and the password will be securely stored in sqlite db.
Note: When changing API Auth settings, remember to update diskoverd task worker daemon config to use the new auth settings.
Restricting API Access By LDAP/AD login
You can use LDAP/AD logins using HTTP Basic Auth for the Diskover-Web API.
🔴 Enable API LDAP auth:
vim /var/www/diskover-web/src/diskover/Constants.php
// LDAP/AD Auth for REST API
// api ldap/ad authentication, set to TRUE to enable or FALSE to disable
const API_AUTH_LDAP_ENABLED = TRUE;
Note: When enabling API LDAP auth, config index/ldap filter settings are used, see Restricting Visibility and Access.
Restricting API Access By Host/IP
🔴 To limit API access to certain hosts or networks, you can add an additional location block with allow/deny rules to your Diskover-Web NGINX config /etc/nginx/conf.d/diskover-web.conf.
vi /etc/nginx/conf.d/diskover-web.conf
The NGINX location block below needs to go above the other location block that starts with:
location ~ \.php(/|$) {
🔴 Change 1.2.3.4 to the IP address you want to allow access to the API. You can add additional lines if you want to allow more hosts/networks to access the API. The deny all line needs to come after all allow lines:
location ~ /api\.php(/|$) {
    allow 1.2.3.4;
    deny all;
    fastcgi_split_path_info ^(.+\.php)(/.+)$;
    set $path_info $fastcgi_path_info;
    fastcgi_param PATH_INFO $path_info;
    try_files $fastcgi_script_name =404;
    fastcgi_pass unix:/var/run/php-fpm/php-fpm.sock;
    #fastcgi_pass 127.0.0.1:9000;
    include fastcgi_params;
    fastcgi_param SCRIPT_FILENAME $document_root$fastcgi_script_name;
    include fastcgi_params;
    fastcgi_read_timeout 900;
    fastcgi_buffers 16 16k;
    fastcgi_buffer_size 32k;
}
🔴 Restart NGINX:
systemctl restart nginx
🔴 Then verify you can access API with curl or web browser on an allowed host:
curl http://<diskover-web-host>:<port>/api.php
🔴 You should see this:
{
    "status": true,
    "message": {
        "version": "diskover REST API v2.0-b.3",
        "message": "endpoint not found"
    }
}
Others will now be blocked with a 403 forbidden http error page.
Path Translation
The path translation feature is designed to support heterogenous client environments like Windows, MacOS, and Linux. The path for each client to access or locate a file or directory will vary depending on client operation system. For example, Linux operating systems use the backslash slash \ and Windows operating systems use a forward slash /. Path translation provides the capability to translate paths within Diskover to appropriate the client’s operating system. The following describes two mechanisms for translating paths within Diskover.
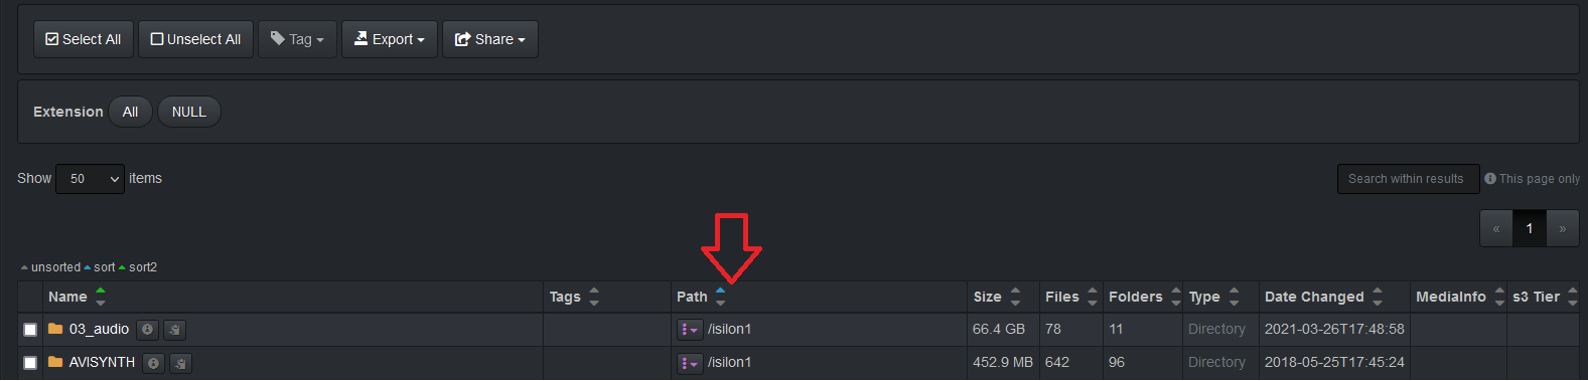
Translating Paths Stored in Elasticsearch Index
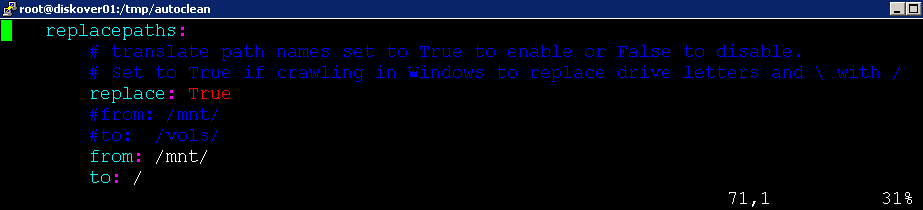
To translate paths that get stored within the Elasticsearch document, for example removing /mnt from a path like /mnt/isilon1
🔴 Open a terminal session:
vi /root/.config/diskover/config.yaml
🔴 Set replace: to True
🔴 Configure desired from: and to:
Which results in the following path displayed within the Diskover-Web user interface:
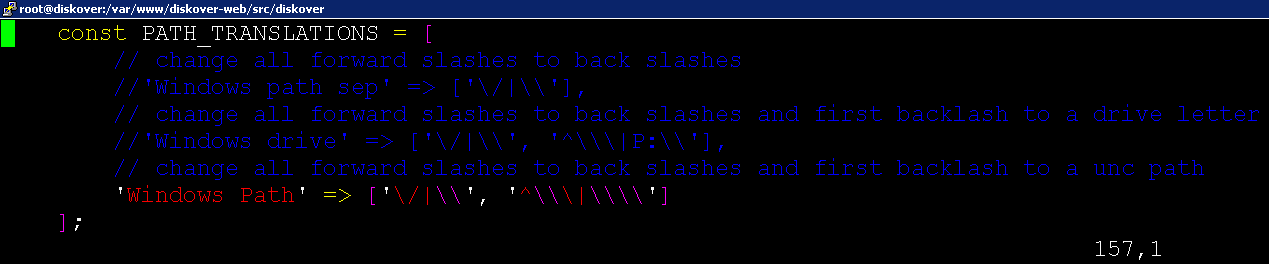
Path Translation in Diskover-Web for Copy/Paste
To set client profiles that get translated when a user copies a path within the Diskover-Web user interface.
🔴 For example, to translate from /isilon1/data/dm/tools/staging files.xls to \\isilon1\data\dm\tools\staging files.xls
vi /var/www/diskover-web/src/diskover/Constants.php
🔴 Configure client profile within the Diskover-Web user interface under the Settings page:
![]()
🔴 Copy a path within the Diskover-Web user interface for testing:
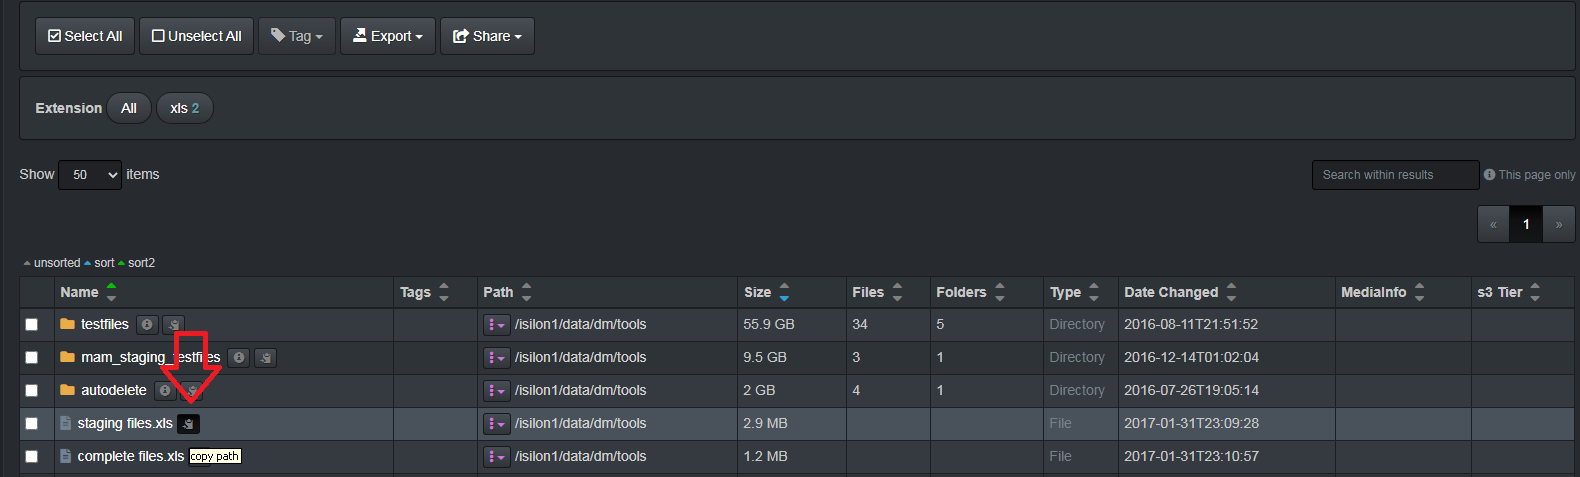
🔴 Resulting path within clipboard:

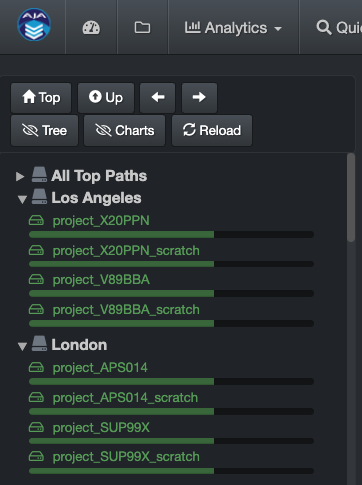
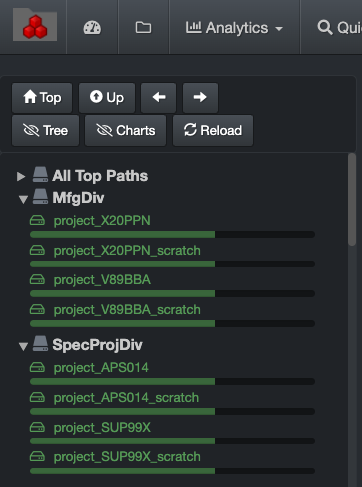
Top Paths
By default, users will see a list of all volumes indexed by Diskover in the left pane of the user interface. You can however create Top Paths to organize your volumes (by location, project, etc.).
Here are two examples. Note that the first collapsible option will always be All Top Paths and will list all your repositories. The collapsible choices/labels after that are customizable.
🔴 Open the TOPPATH_TREE constants.php file:
/var/www/diskover-web/src/diskover/Constants.php
🔴 Edit the file and change for your storage locations, the example below using tokyo_stor and van_stor*:
// top path collapsible tree/menu
// top path tree displayed in search file tree and top path drop down menu in nav bar
// default is have all top paths under All tree
// set to [] to use defaults
// uses php's preg_match for reg exp of top paths
// Example to set /mnt/tokyo_stor* to be nested under Tokyo and /mnt/van_stor* to be nested under Vancouver:
// const TOPPATH_TREE = [ 'Tokyo' => ['/\/mnt\/tokyo_stor*/'], 'Vancouver' => ['/\/mnt\/van_stor*/'] ];
const TOPPATH_TREE = [ 'Stor' => ['/\/mnt\/tokyo_stor*/', '/\/mnt\/van_stor*/']];
🔴 To organize and edit the top path labels:
// alternate top path labels to display in search file tree and top path drop down menu in nav bar
    // default is to display the basename of top path directory
    // set to [] to use defaults
    // Example to set /mnt/stor1 to vol1 label and /mnt/stor2 to vol2 label:
    // const TOPPATH_LABELS = ['/mnt/stor1' => 'vol1', '/mnt/stor2' => 'vol2'];
    const TOPPATH_LABELS = [];
Tags
One of the powerful features of Diskover is the ability to add business context to the index of files. Business context enables:
- Increased findability and searchability based on one or more combinations of fields, for example, name and tag value.
- More informed and accurate data curation decisions.
- Ability to build an approval process (or RACI model) for data curation decisions.
- Reporting aligned to business purpose change reports from “disk language” of size, age, extension, etc. to “business language” of projects, clients, status, etc.
Methods for Tags Application
The following sections describes the various methods for tags application within Diskover. You will learn about:
- Autotagging.
- Tags application via Diskover API.
- Tags application via Harvest Plugins.
- Manual tagging.
Tag Application via Autotag
Tags can be applied automatically via a series of rules applied to directories or files. The rules can be very powerful based on a combination of file name, extension, path, age, size, etc.
- Auto-tagging rules can be found in the
diskover_autotagconfig file for tagging files and directories. - Auto-tagging can also be done during a crawl by enabling autotag in diskover config and setting rules in the diskover config file.
- All tags are stored in the
tagsfield in the index - there is no limit to the number of tags.
Autotag During Indexing
To enable tags to be applied during the index process, autotagging must be enabled and a series of rules configured to determine what tags to apply and under what conditions.
🔴 Set autotag to True and define tagging rules.
vim /root/.config/diskover/config.yaml

In the following example, the rules will:
- Apply the expired tag to files in the netflix folder with a ctime (change time) 60 days or older
- Apply the autoclean tag to files in $RECYCLE.BIN folder
files: [
        {
        # autotag retention for /mnt/isilon2/sources/platforms/netflix
        'name': [],
        'name_exclude': [],
        'ext': [],
        'path': ['^/isilon2/sources/platforms/netflix'],
        'path_exclude': [],
        'ctime': 60,
        'mtime': 0,
        'atime': 0,
        'tags': ['expired']
        },
        # autotag daily deletions for $RECYCLE.BIN
        {
        'name': [],
        'name_exclude': ['desktop.ini'],
        'ext': [],
        'path': ['^/*/$RECYCLE.BIN'],
        'path_exclude': [],
        'ctime': 0,
        'mtime': 0,
        'atime': 0,
        'tags': ['autoclean']
        }
    ]
Autotag Keys:
name: a list of file/directory names (case-sensitive)name_exclude: a list of file/directory names to exclude (case-sensitive)ext: a list of file extensions (without the .) (use lowercase - all file extensions are stored as lowercase in the index)path: a list of paths (parent_path field, case-sensitive)path_exclude: a list of paths to exclude (parent_path field, case-sensitive)ctime: change time at least this number or older (days)mtime: modified time at least this number or older (days)atime: access time at least this number or older (days)tags: a list of tags to apply if the item matches
Note: name, name_exclude, path, path_exclude, and ext all use Python re.search (regular expression). All list items should be in quotes and separated by comma
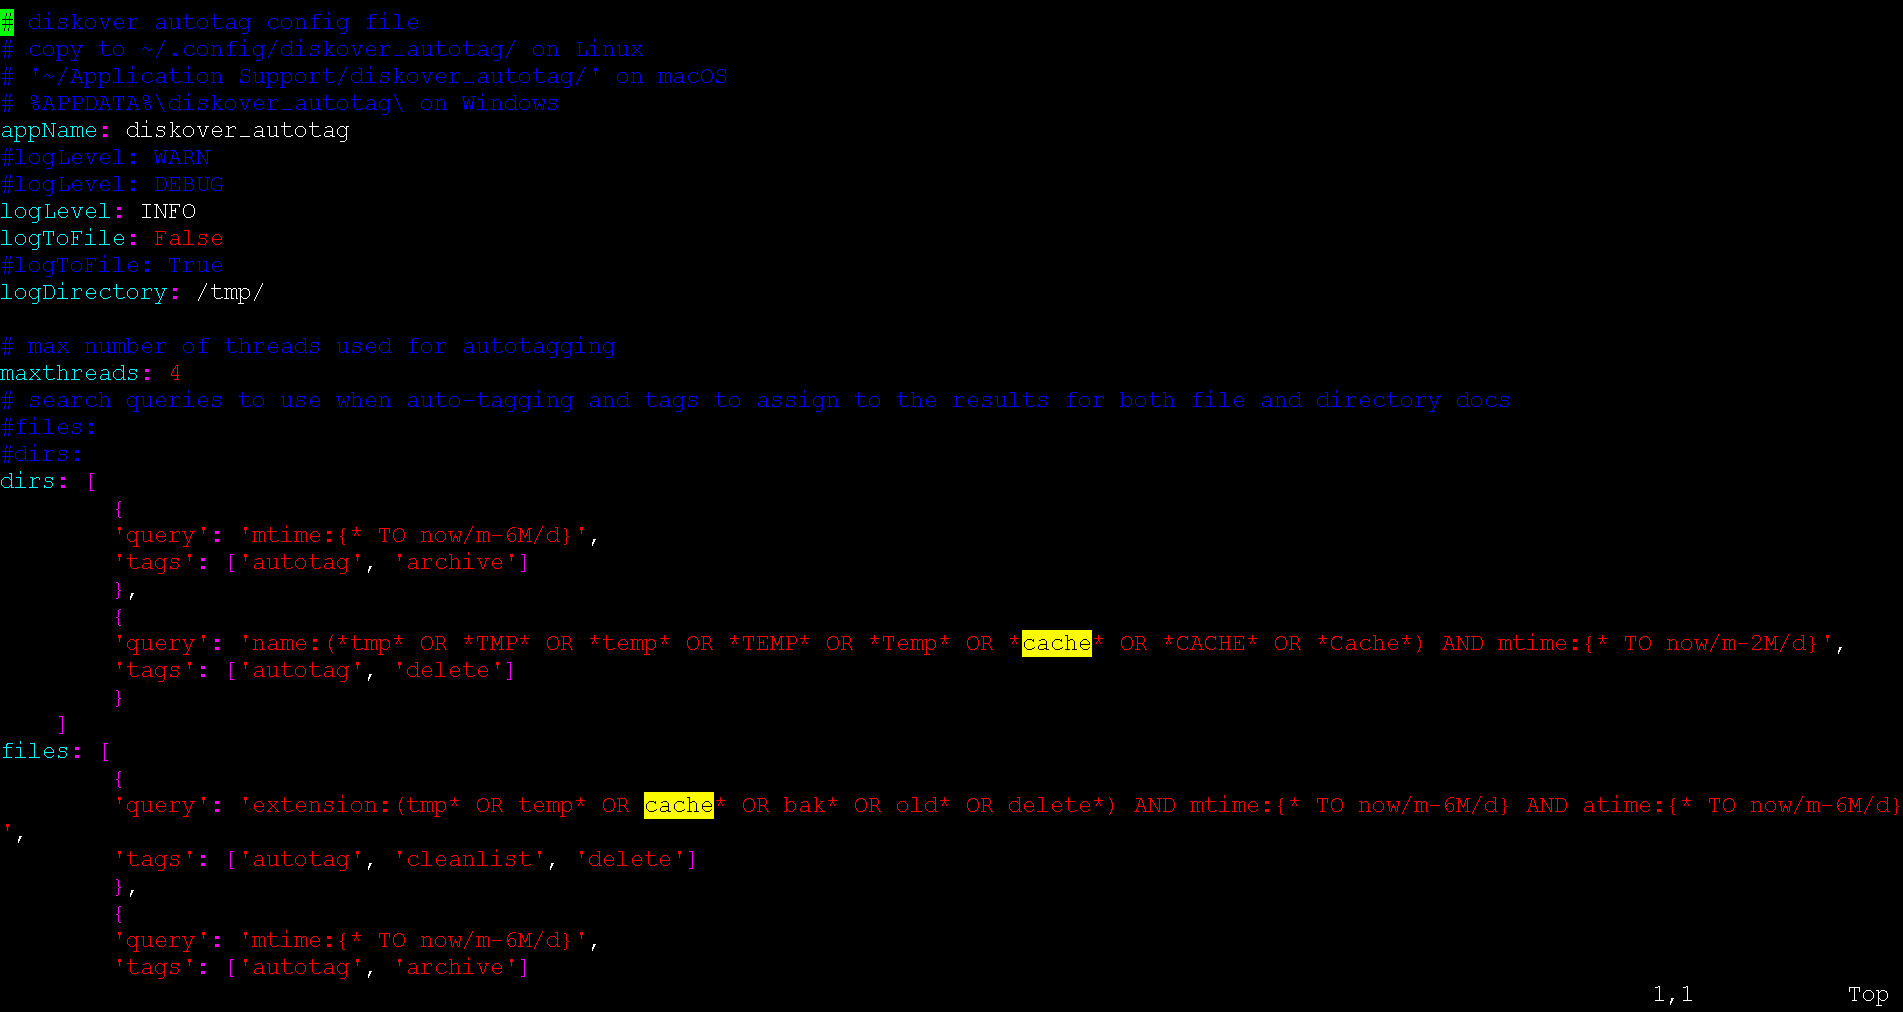
Autotag an Existing Index (Post Index Process)
Tag application can be executed via a shell to an existing index (post actual index process).
🔴 Check that you have the config file in ~/.config/diskover_autotag/config.yaml, if not, copy from the default config folder in configs_sample/diskover_autotag/config.yaml.
🔴 To configure post index autotag rules:
vi /root/.config/diskover_autotag/config.yaml
🔴 Run manually from shell:
cd /opt/diskover
🔴 Post indexing plugins are located in plugins_postindex/ directory.
python3 diskover-autotag.py diskover-<indexname>
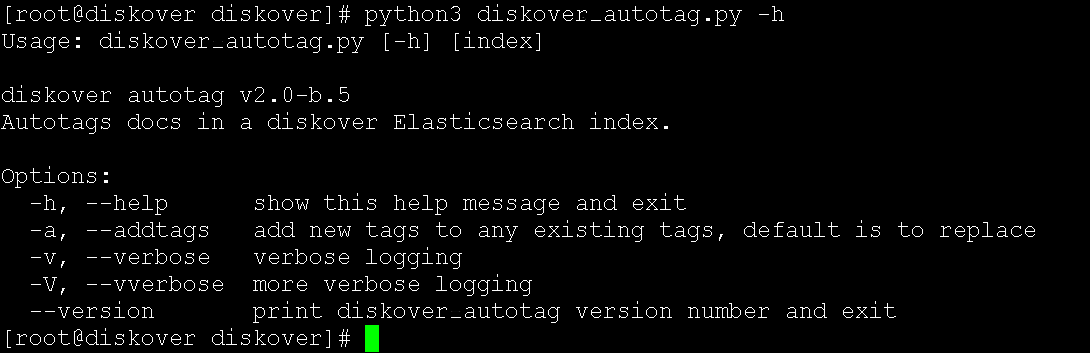
🔴 Usage:
python3 diskover_autotag.py -h
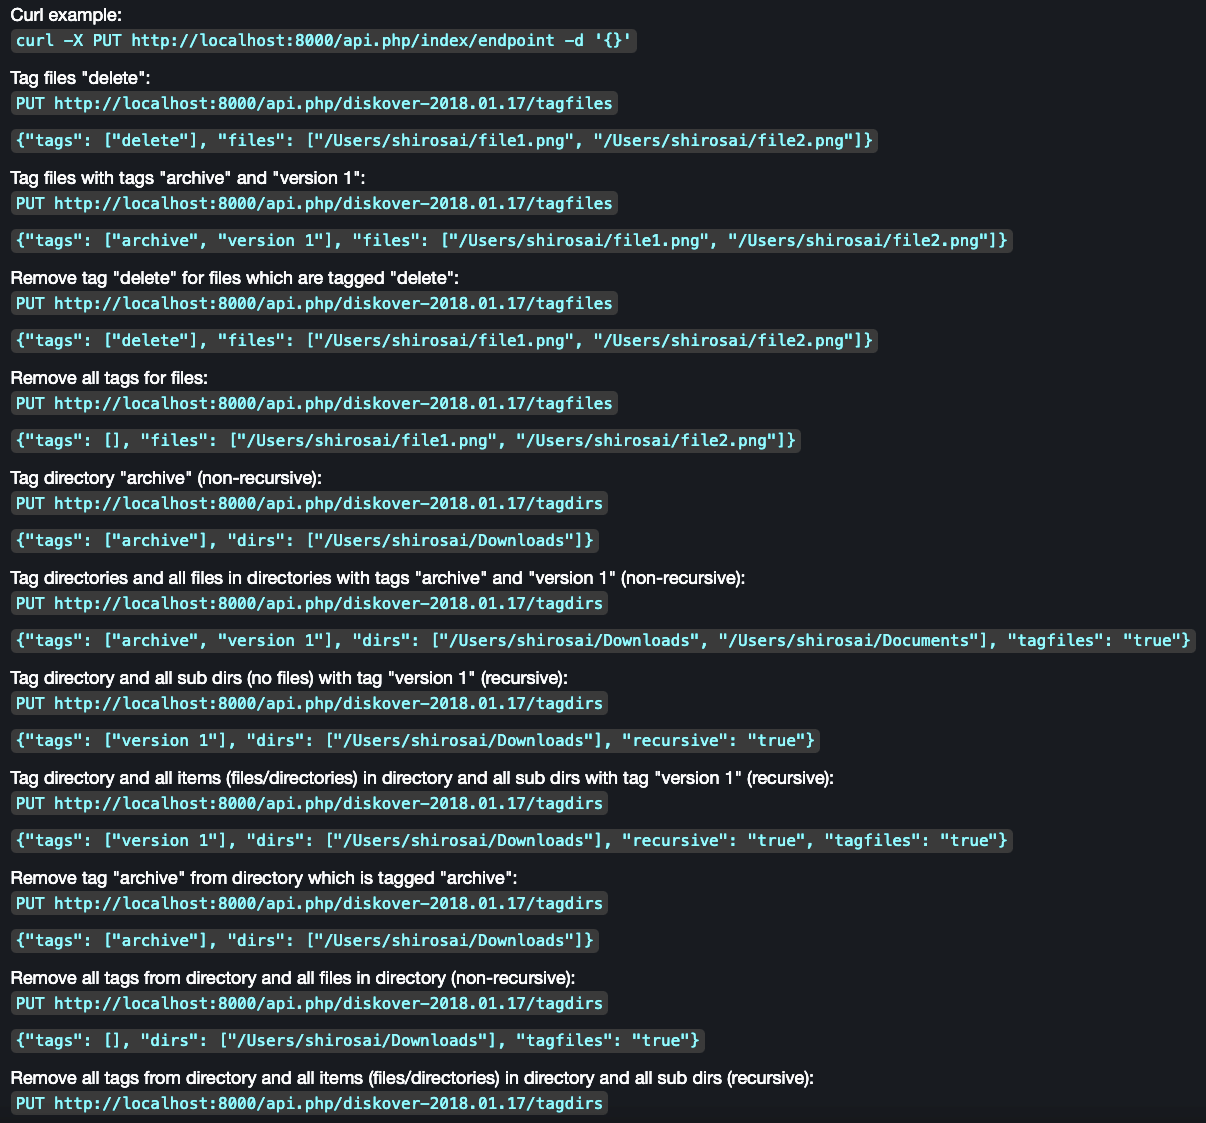
Tag Application via Diskover API
Tags can be applied via the Diskover API. Updating file/directory tags is accomplished with the PUT method. A JSON object is required in the body of PUT method. The call returns the status and number of items updated.
Examples of tag application that can be found in the Diskover-Web user interface under gear icon > Help page, as well as in the Diskover SDK and API Guide.
Tag Application via Harvest Plugins
Harvest plugins are typically designed to:
- Harvest metadata from file headers, for example the media info plugin .
- Correlate the Diskover index to some other business application, for example an order management or scheduling system.
These plugins typically run a) during index process, or b) on a scheduled basis. Harvest plugins designed to correlate various systems or applications typically use a key identifier within a directory/filename (example: research grant ID) to harvest additional metadata from another database (for example: Primary Investigator for specific grant ID). Therefore, tags will be reapplied if a key identifier and connection to external database exists at time of re-index/harvest.
Tag Application via Manual Processes
In general, manual processes are a) difficult to scale, and 2) prone to inconsistencies. Therefore, careful consideration must be applied when determining when to use manual tag application. Ideally, manual tags should be used sparingly or as part of a workflow “approval” or RACI model. The following outlines sample tag configuration when used as part of workflow approval processes.
Apply a Tag Manually
From the file search page > select one or multiple files and/or directories > select the Tag drop-down list > apply a tag.
Note: A file or directory can be assigned several tags.
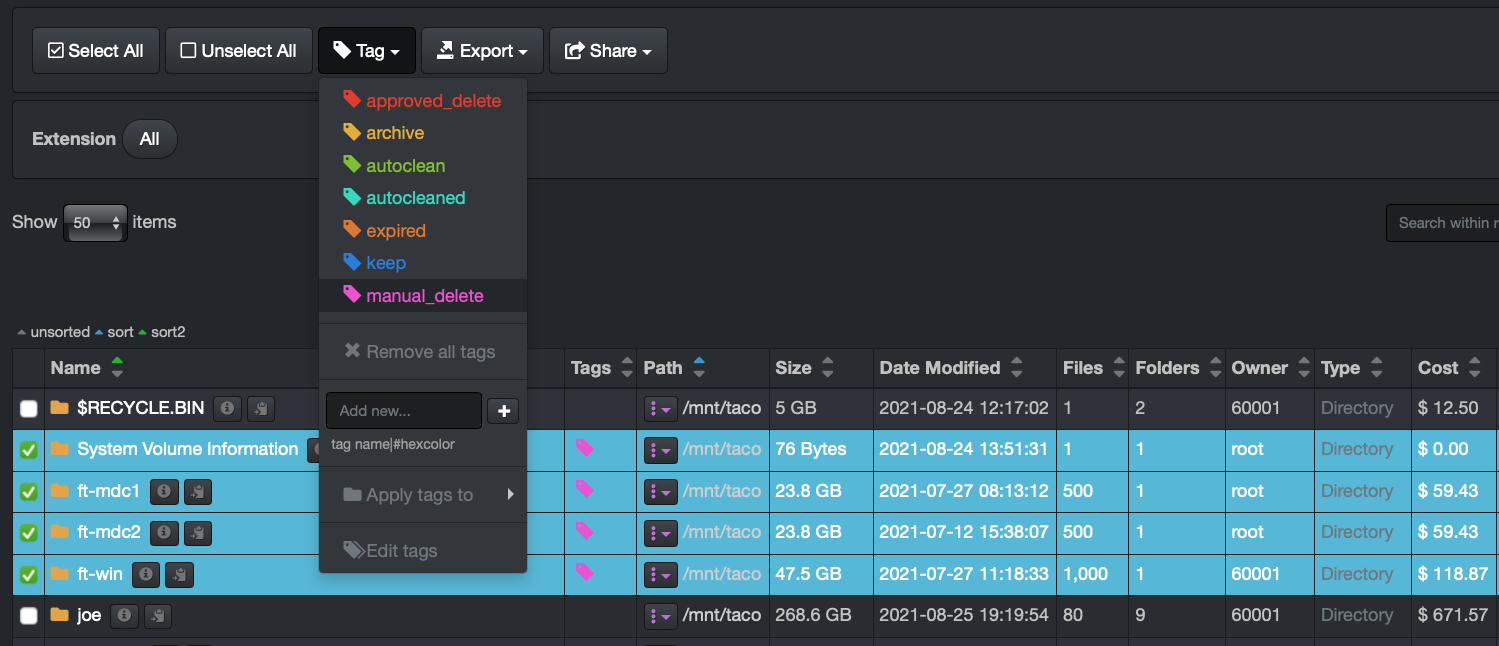
Removal of a Single Tag Manually
Basically, redo the same steps as above > from the file search page > select one or multiple files and/or directories with the specific tag that you want to remove > select the Tag drop-down list > select the tag you want to remove.
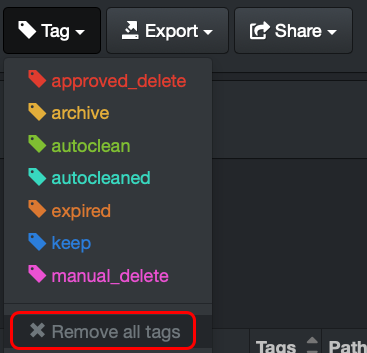
Removal of All Tags Manually
From the file search page > select one or multiple files and/or directories with any tag(s) that you want to remove > select the Tag drop-down list > select Remove all tags.
WARNING! This operation cannot be undone.
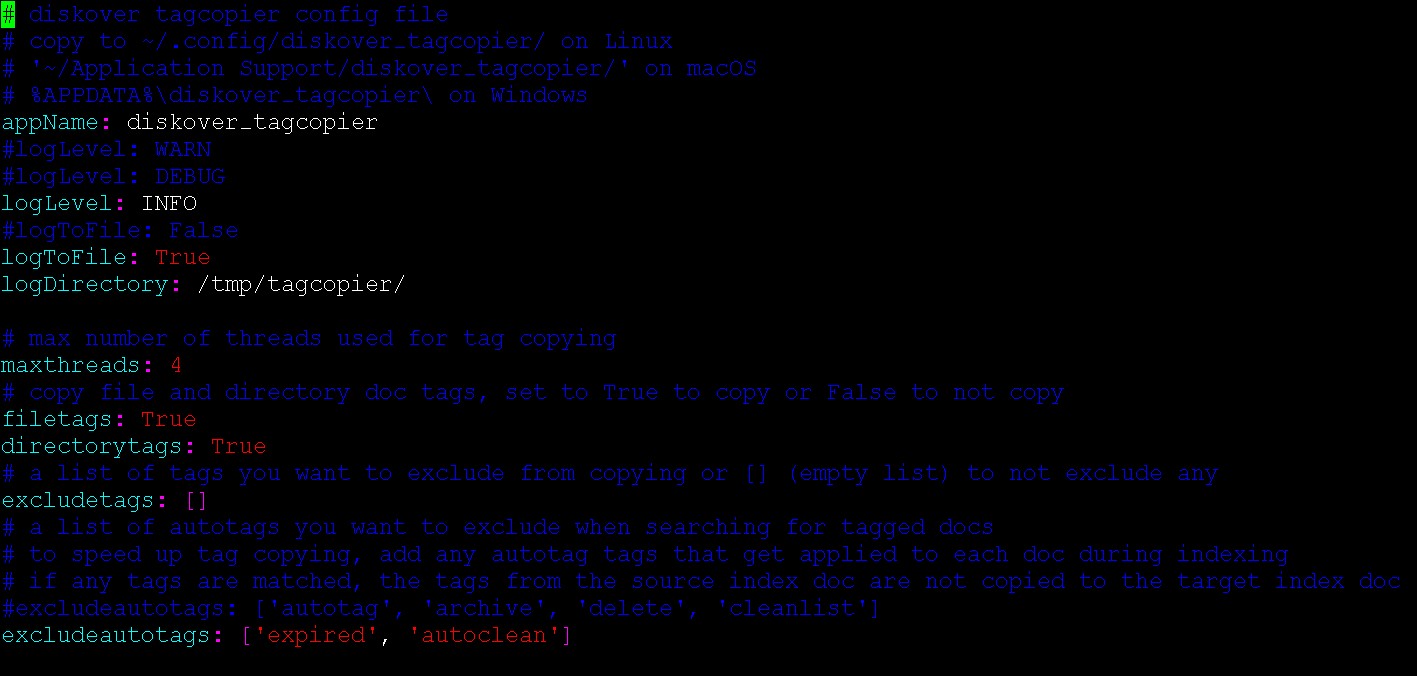
Tags Migration via Tag Copier Plugin | Copying from One Index to Another
The Diskover indexing process creates a new index or point in time snapshot of the volume at time of index. Tags that are applied during the indexing process via autotag rules will be automatically re-applied based on the configuration rules in the configuration file.
However, the Diskover indexer has no knowledge of tags applied outside of the indexing process, those tags that have been applied: a) manually, b) via Diskover API, or c) via plugins thru the API. Therefore, these tags must be migrated from one index to the next.
Please refer to our dedicated chapter Tag Copier Plugin for more information.
Tag Migration / Copy from Previous Index via Shell
The following describes how to initial a tag migration/copy from a shell.
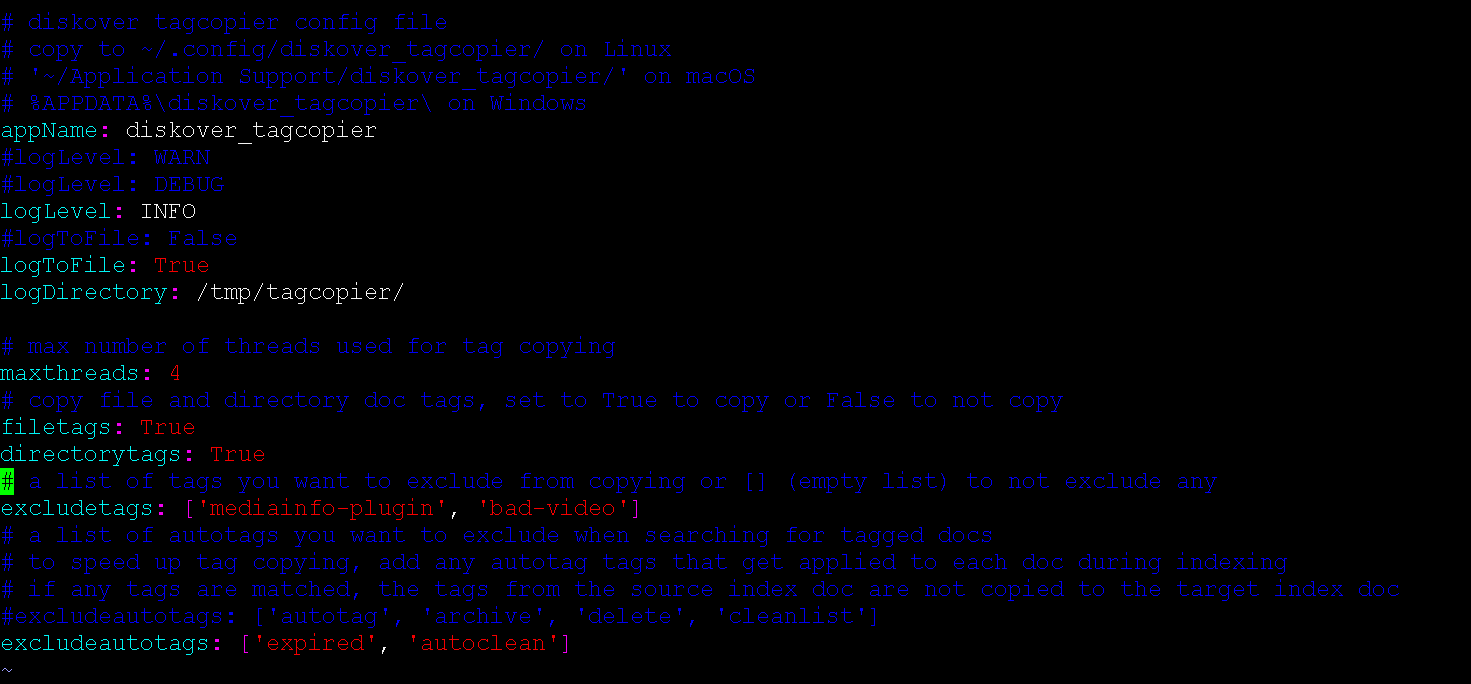
🔴 Confirm existing of tagcopier configuration file:
cat /root/.config/diskover_tagcopier/config.yaml
🔴 If the file does not exist:
mkdir /root/.config/diskover_tagcopier/
cp /opt/diskover/configs_sample/diskover_tagcopier/config.yaml /root/.config/diskover_tagcopier/
🔴 Configure any tags or tags applied via autotag process to exclude from migration:
🔴 Copy tags from source to destination index:
cd /opt/diskover/
python3 diskover_tagcopier.py diskover-<source_indexname> diskover-<dest_indexname>
🔴 To view usage options:
python3 diskover_tagcopier.py -h
Tag Migration / Copy from Previous Index via Task Panel
Tags can also be migrated from one index to the next index via the Diskover-Web task panel, see how to Configure Indexing Tasks to Migrate Tags from Previous Index.
Tags Display and Editor within Diskover-Web User Interface
The tags displayed within the Diskover-Web user interface can be customized by users with an admin account and can be achieved from 1) the file search page or 2) Analytics menu > Tags.
Format to follow for tags: tag name|#hexcolor (instead of #hexcolor code, you can also type a simple color name, ex: red)
Note: Autotags have a gray color by default in the user interface.
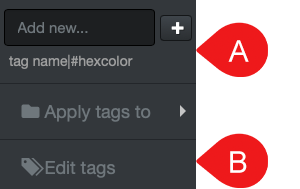
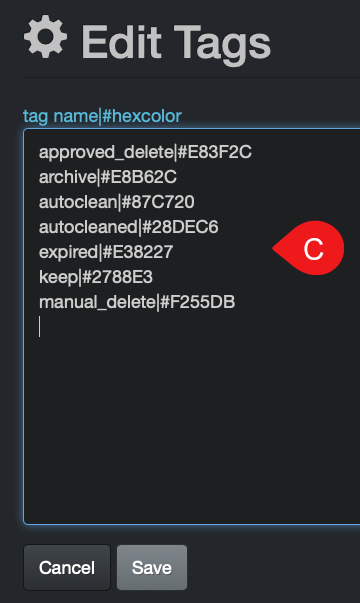
A) From the file search page > select any file and/or directory > Tag drop-down list > type/add a new tag in the Add new field.
B) From the file search page > select any file and/or directory > Tag drop-down list > Edit tags will open a C) window and allow you to add, delete or edit exiting tags > Save when done editing.
C) From Analytics menu > select Tags > Edit tags button > will open C) window and allow you to add, delete or edit exiting tags > Save when done editing.
Reporting
Diskover provides powerful reporting capabilities. Reports can be generated to align with business context and can be constructed from any Elasticsearch query. Therefore, any combination of names, tags, metadata fields, etc. can be used to construct business facing reports.
Smart Searches
Smart Searches provide a mechanism to create repeatable reports or bookmarks based on search queries. Any combination of names, tags, metadata fields, etc. can be used to construct business facing reports.
Any users can access Smart Searches, but only users with an admin level account can add, edit or delete queries.
Accessing Smart Searches
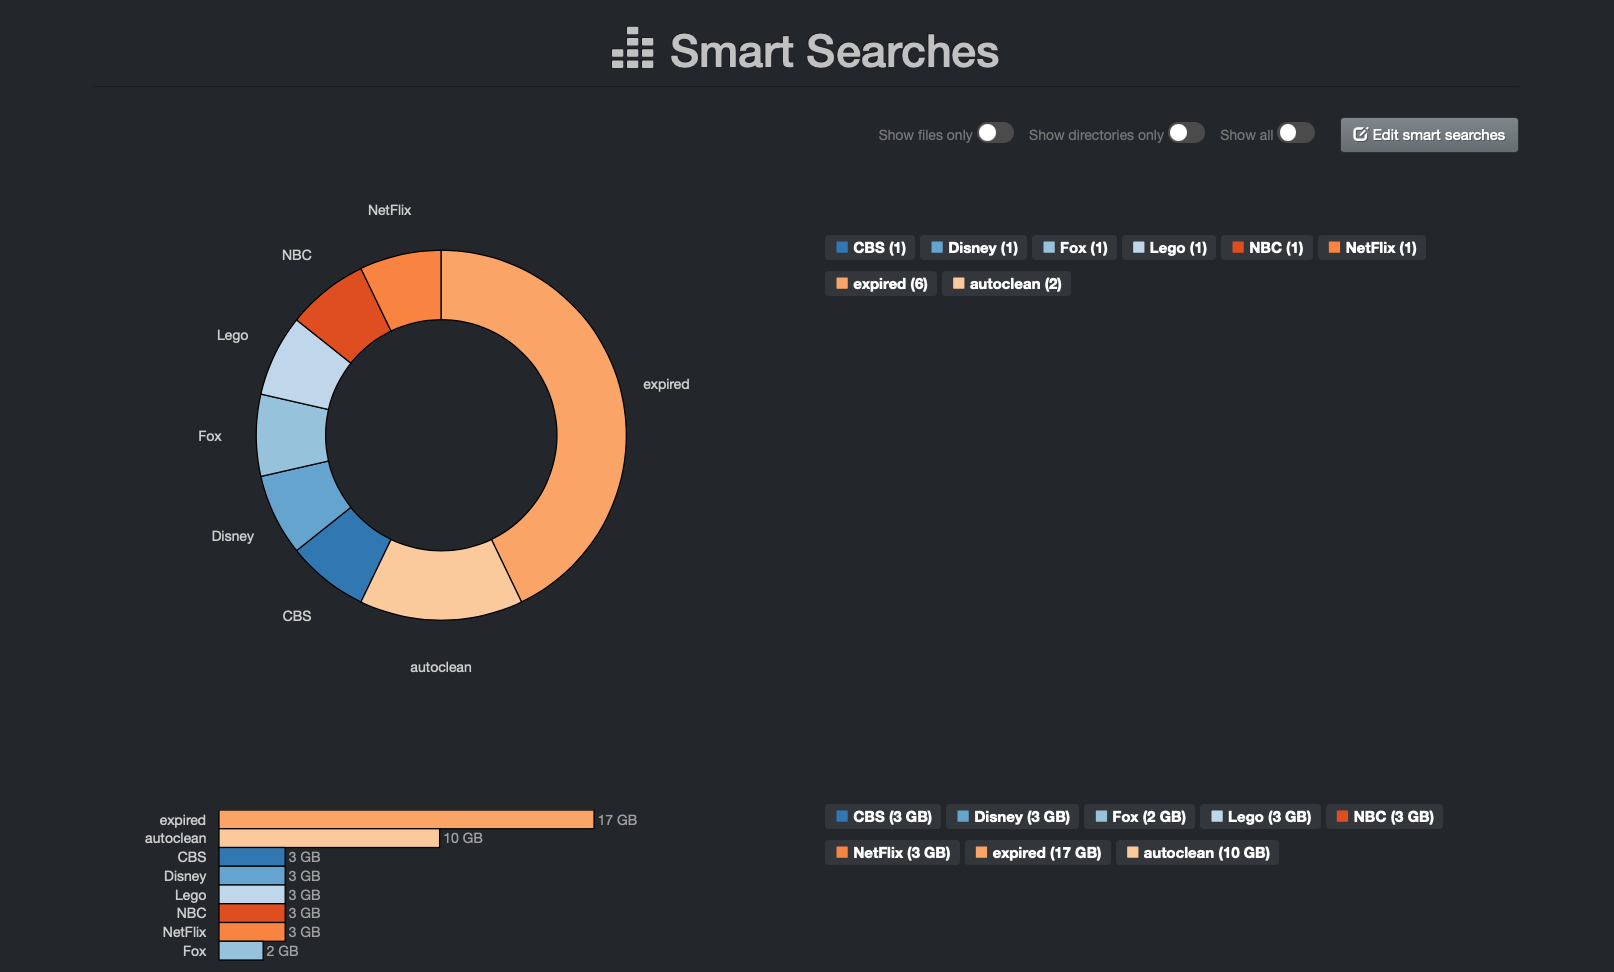
Within the Diskover-Web user interface, Smart Searches is located under Analytics > Smart Searches.
The following provides an example smart search configuration by client - The names in the report are fictitious and for demonstration only:
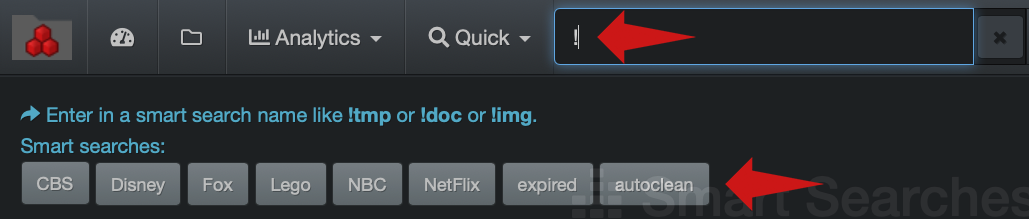
Business users can click on a report link in the Smart Searches page and/or launch the query by typing the queryname in the search bar starting with !, ex: !queryname
When typing a ! in the search bar, the list of existing Smart Searches reports will appear under the search bar and you can just click on the one you want to launch or type the rest of the name of the report in the search bar:
Using Smart Searches
Please refer to the Diskover User Guide for information on how to use Smart Searches.
Smart Searches Configuration
By default, Diskover has preconfigured reports by file types/extensions, but any type of queries with single or mixed criteria can be added.
- To add, edit or delete a report > Analytics > Smart Searches > click the Edit smart searches button.
- For queries syntax and rules, please refer to the Diskover User Guide:
- Queries with built-in search tools
- Syntax and rules for manual queries
Smart searches queries need to be built in the following format: !report name|query
The above example report by client was configured using these smart search logic queries - you can copy the following queries and replace by your company's own variables to achieve similar results:
CBS|(parent_path:\/mnt\/taco\/projects\/CBS OR  parent_path:\/mnt\/mmfs1\/NVME\/projects\/CBS) AND tags:expired
Disney|(parent_path:\/mnt\/taco\/projects\/Disney OR  parent_path:\/mnt\/mmfs1\/NVME\/projects\/Disney) AND tags:expired
Fox|(parent_path:\/mnt\/taco\/projects\/Fox OR  parent_path:\/mnt\/mmfs1\/NVME\/projects\/Fox) AND tags:expired
Lego|(parent_path:\/mnt\/taco\/projects\/Lego OR  parent_path:\/mnt\/mmfs1\/NVME\/projects\/Lego) AND tags:expired
NBC|(parent_path:\/mnt\/taco\/projects\/NBC OR  parent_path:\/mnt\/mmfs1\/NVME\/projects\/NBC) AND tags:expired
NetFlix|(parent_path:\/mnt\/taco\/projects\/Disney OR  parent_path:\/mnt\/mmfs1\/NVME\/projects\/NetFlix) AND tags:expired
expired|tags:expired
autoclean|tags:autoclean

Reports
Reports provide a mechanism to create repeatable reports and search/analyze top results.
Any users can access Reports, but only users with an admin level account can add, edit or delete queries.
Accessing Reports
Within the Diskover-Web user interface, Reports is located under Analytics > Reports.
The following report provides an example configured by order status when using the Xytech Order Status Plugin.
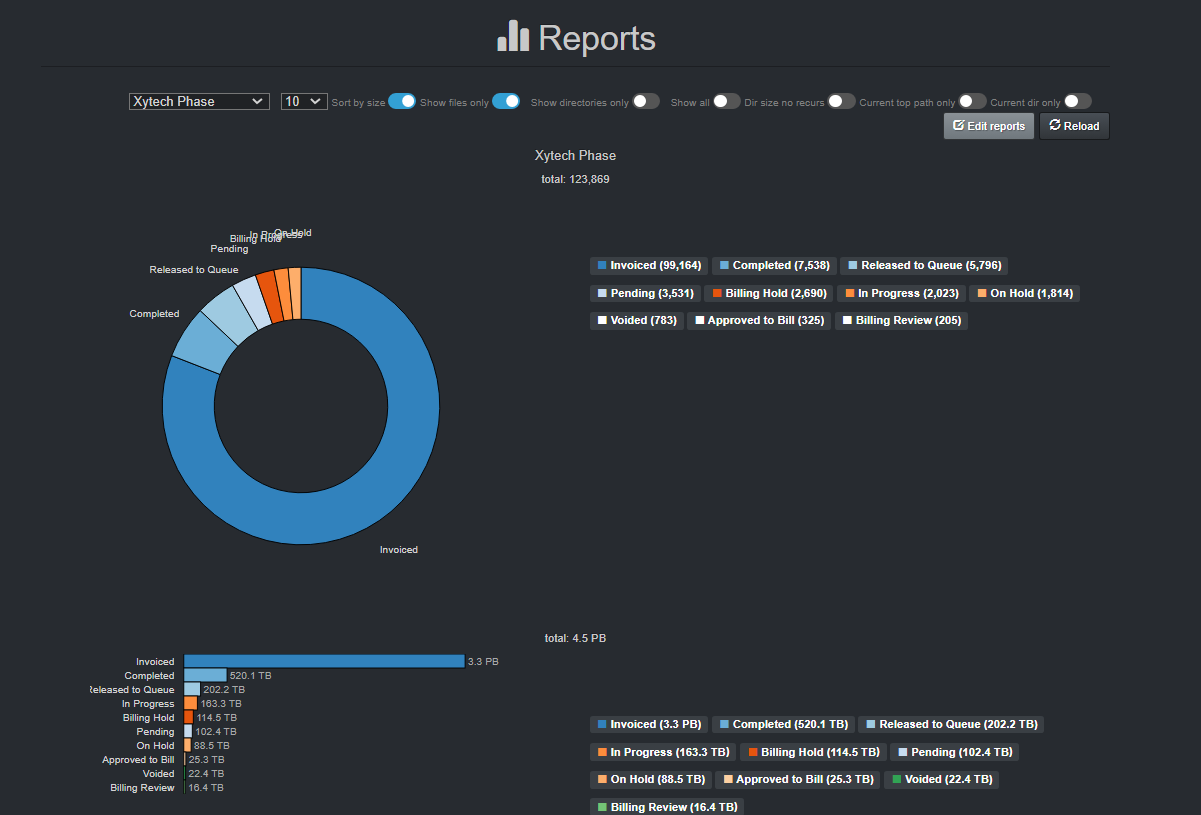
Click here for a full-screen view.
Using Reports
Please refer to the Diskover User Guide for information on how to use Reports.
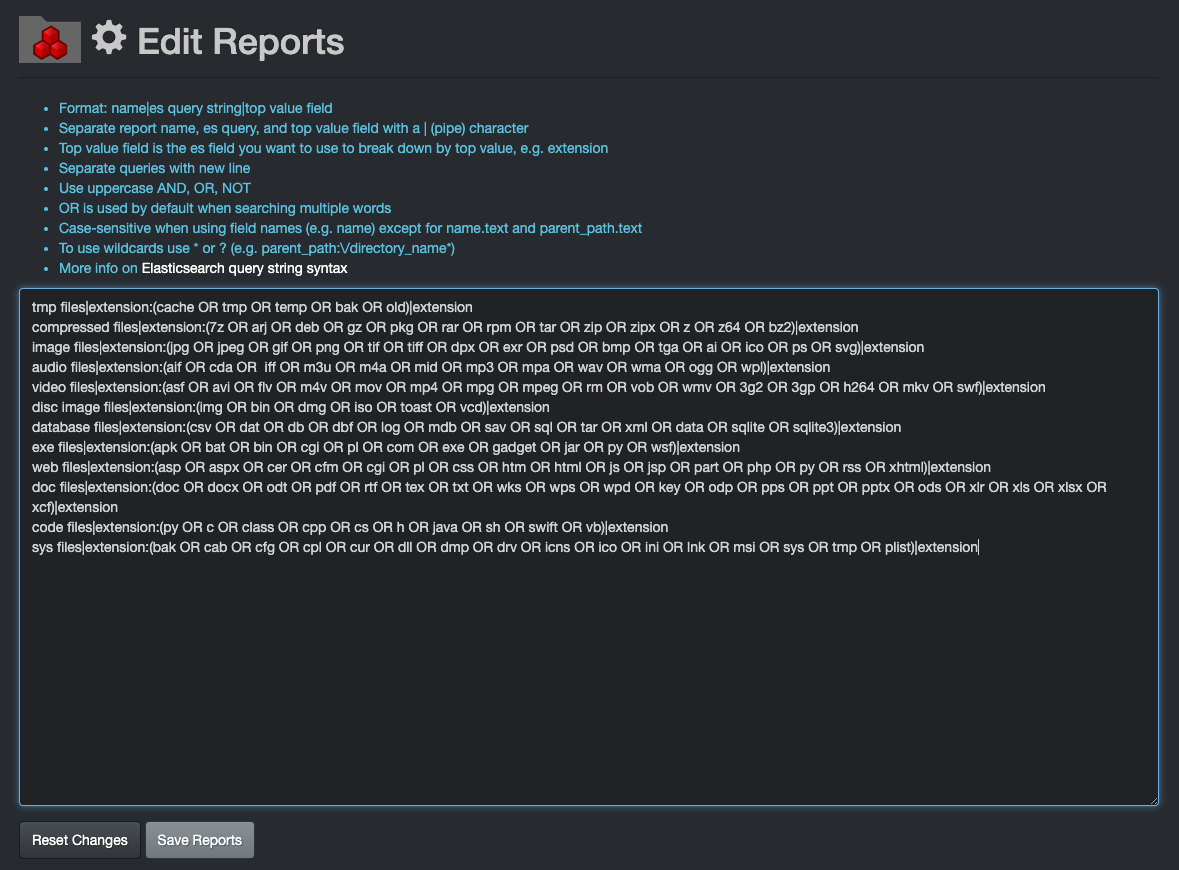
Reports Configuration
By default, Diskover has preconfigured reports by file types/extensions, but any type of queries with single or mixed criteria can be added and/or replace the default queries.
- To add, edit or delete a query > Analytics > Reports > click the Edit reports button.
- For queries syntax and rules, please refer to the Diskover User Guide:
- Queries with built-in search tools
- Syntax and rules for manual queries
Reports queries need to be built in the following format: report name|query|top value
🔴 This is the query that was used in the example above to report on the Xytech order phase:
Xytech Phase|xytech:*|xytech.phase
🔴 The example below is the default query by file type the first time you open Reports:
tmp files|extension:(cache OR tmp OR temp OR bak OR old)|extension
compressed files|extension:(7z OR arj OR deb OR gz OR pkg OR rar OR rpm OR tar OR zip OR zipx OR z OR z64 OR bz2)|extension
image files|extension:(jpg OR jpeg OR gif OR png OR tif OR tiff OR dpx OR exr OR psd OR bmp OR tga OR ai OR ico OR ps OR svg)|extension
audio files|extension:(aif OR cda OR  iff OR m3u OR m4a OR mid OR mp3 OR mpa OR wav OR wma OR ogg OR wpl)|extension
video files|extension:(asf OR avi OR flv OR m4v OR mov OR mp4 OR mpg OR mpeg OR rm OR vob OR wmv OR 3g2 OR 3gp OR h264 OR mkv OR swf)|extension
disc image files|extension:(img OR bin OR dmg OR iso OR toast OR vcd)|extension
database files|extension:(csv OR dat OR db OR dbf OR log OR mdb OR sav OR sql OR tar OR xml OR data OR sqlite OR sqlite3)|extension
exe files|extension:(apk OR bat OR bin OR cgi OR pl OR com OR exe OR gadget OR jar OR py OR wsf)|extension
web files|extension:(asp OR aspx OR cer OR cfm OR cgi OR pl OR css OR htm OR html OR js OR jsp OR part OR php OR py OR rss OR xhtml)|extension
doc files|extension:(doc OR docx OR odt OR pdf OR rtf OR tex OR txt OR wks OR wps OR wpd OR key OR odp OR pps OR ppt OR pptx OR ods OR xlr OR xls OR xlsx OR xcf)|extension
code files|extension:(py OR c OR class OR cpp OR cs OR h OR java OR sh OR swift OR vb)|extension
sys files|extension:(bak OR cab OR cfg OR cpl OR cur OR dll OR dmp OR drv OR icns OR ico OR ini OR lnk OR msi OR sys OR tmp OR plist)|extension
Storage Cost Reporting
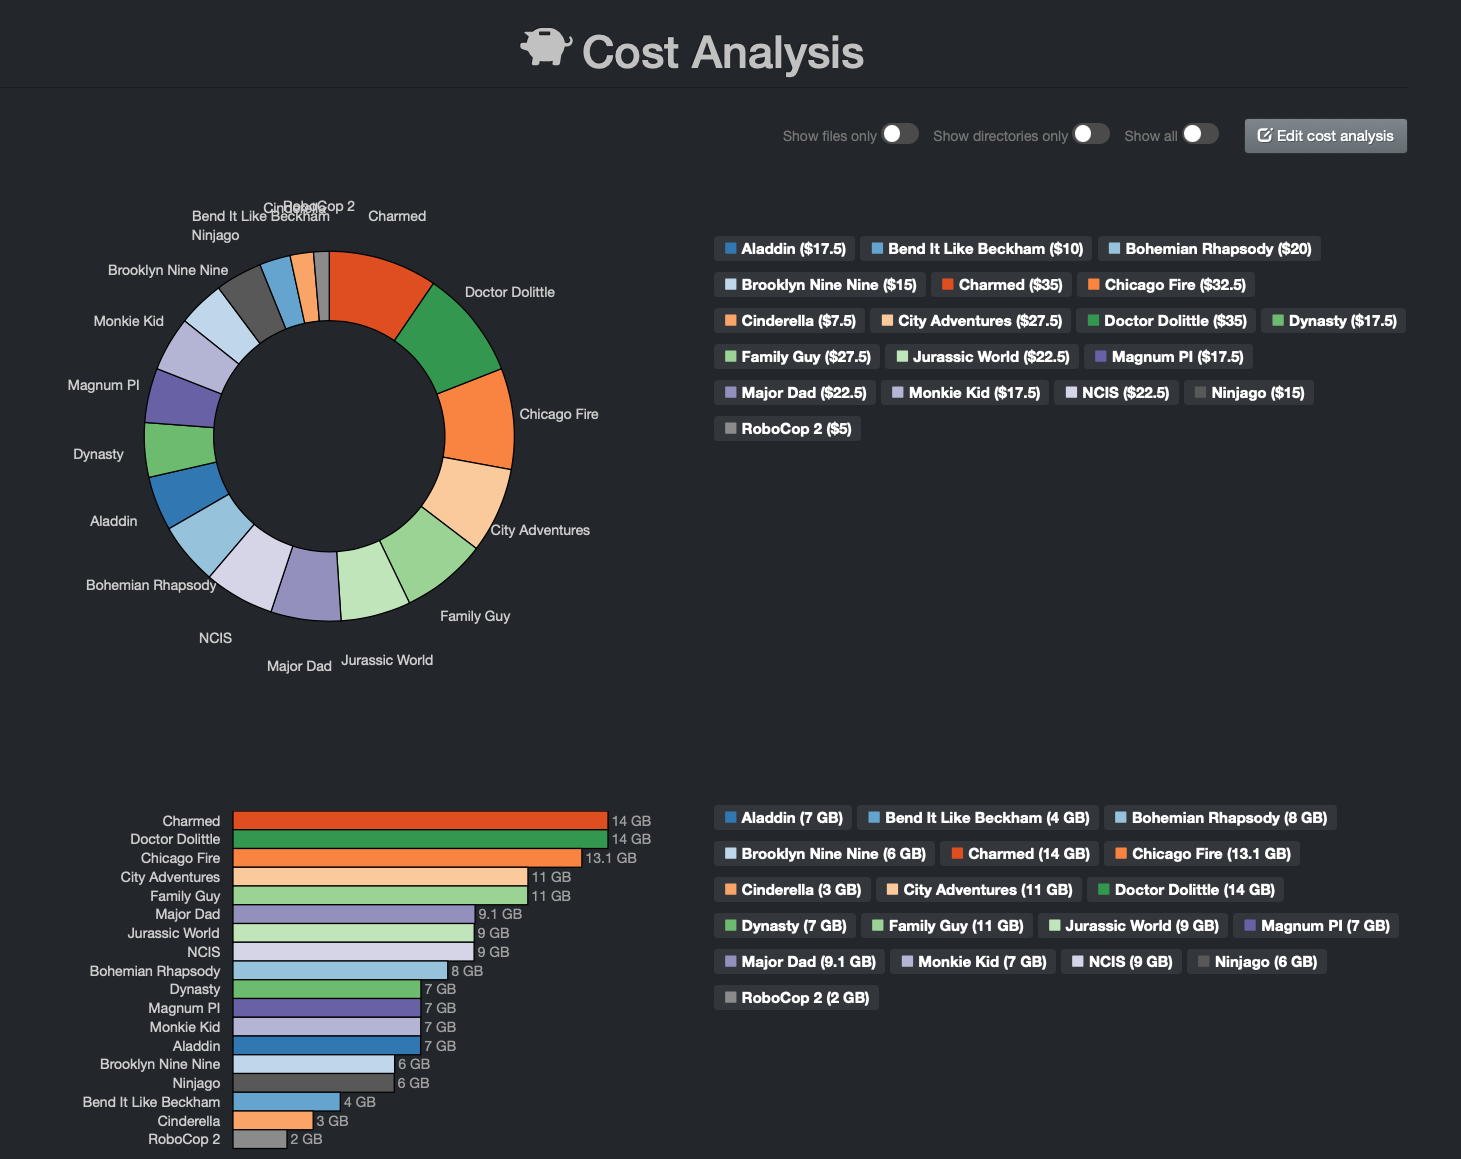
Cost reporting can be generated to align with business context and can be constructed from any Elasticsearch query. Therefore, any combination of names, tags, metadata fields, etc. can be used to construct business facing reports.
Storage cost can be set globally or per storage volume, directory, etc. This tool is designed to control operating costs by 1) charging clients accurately for storage of their projects, and 2) clean-up/data curation incentivizing.
The following report provides an example of cost analysis by client - The names in the report are fictitious and for demonstration only:
Storage Cost Configuration Overview Diagram
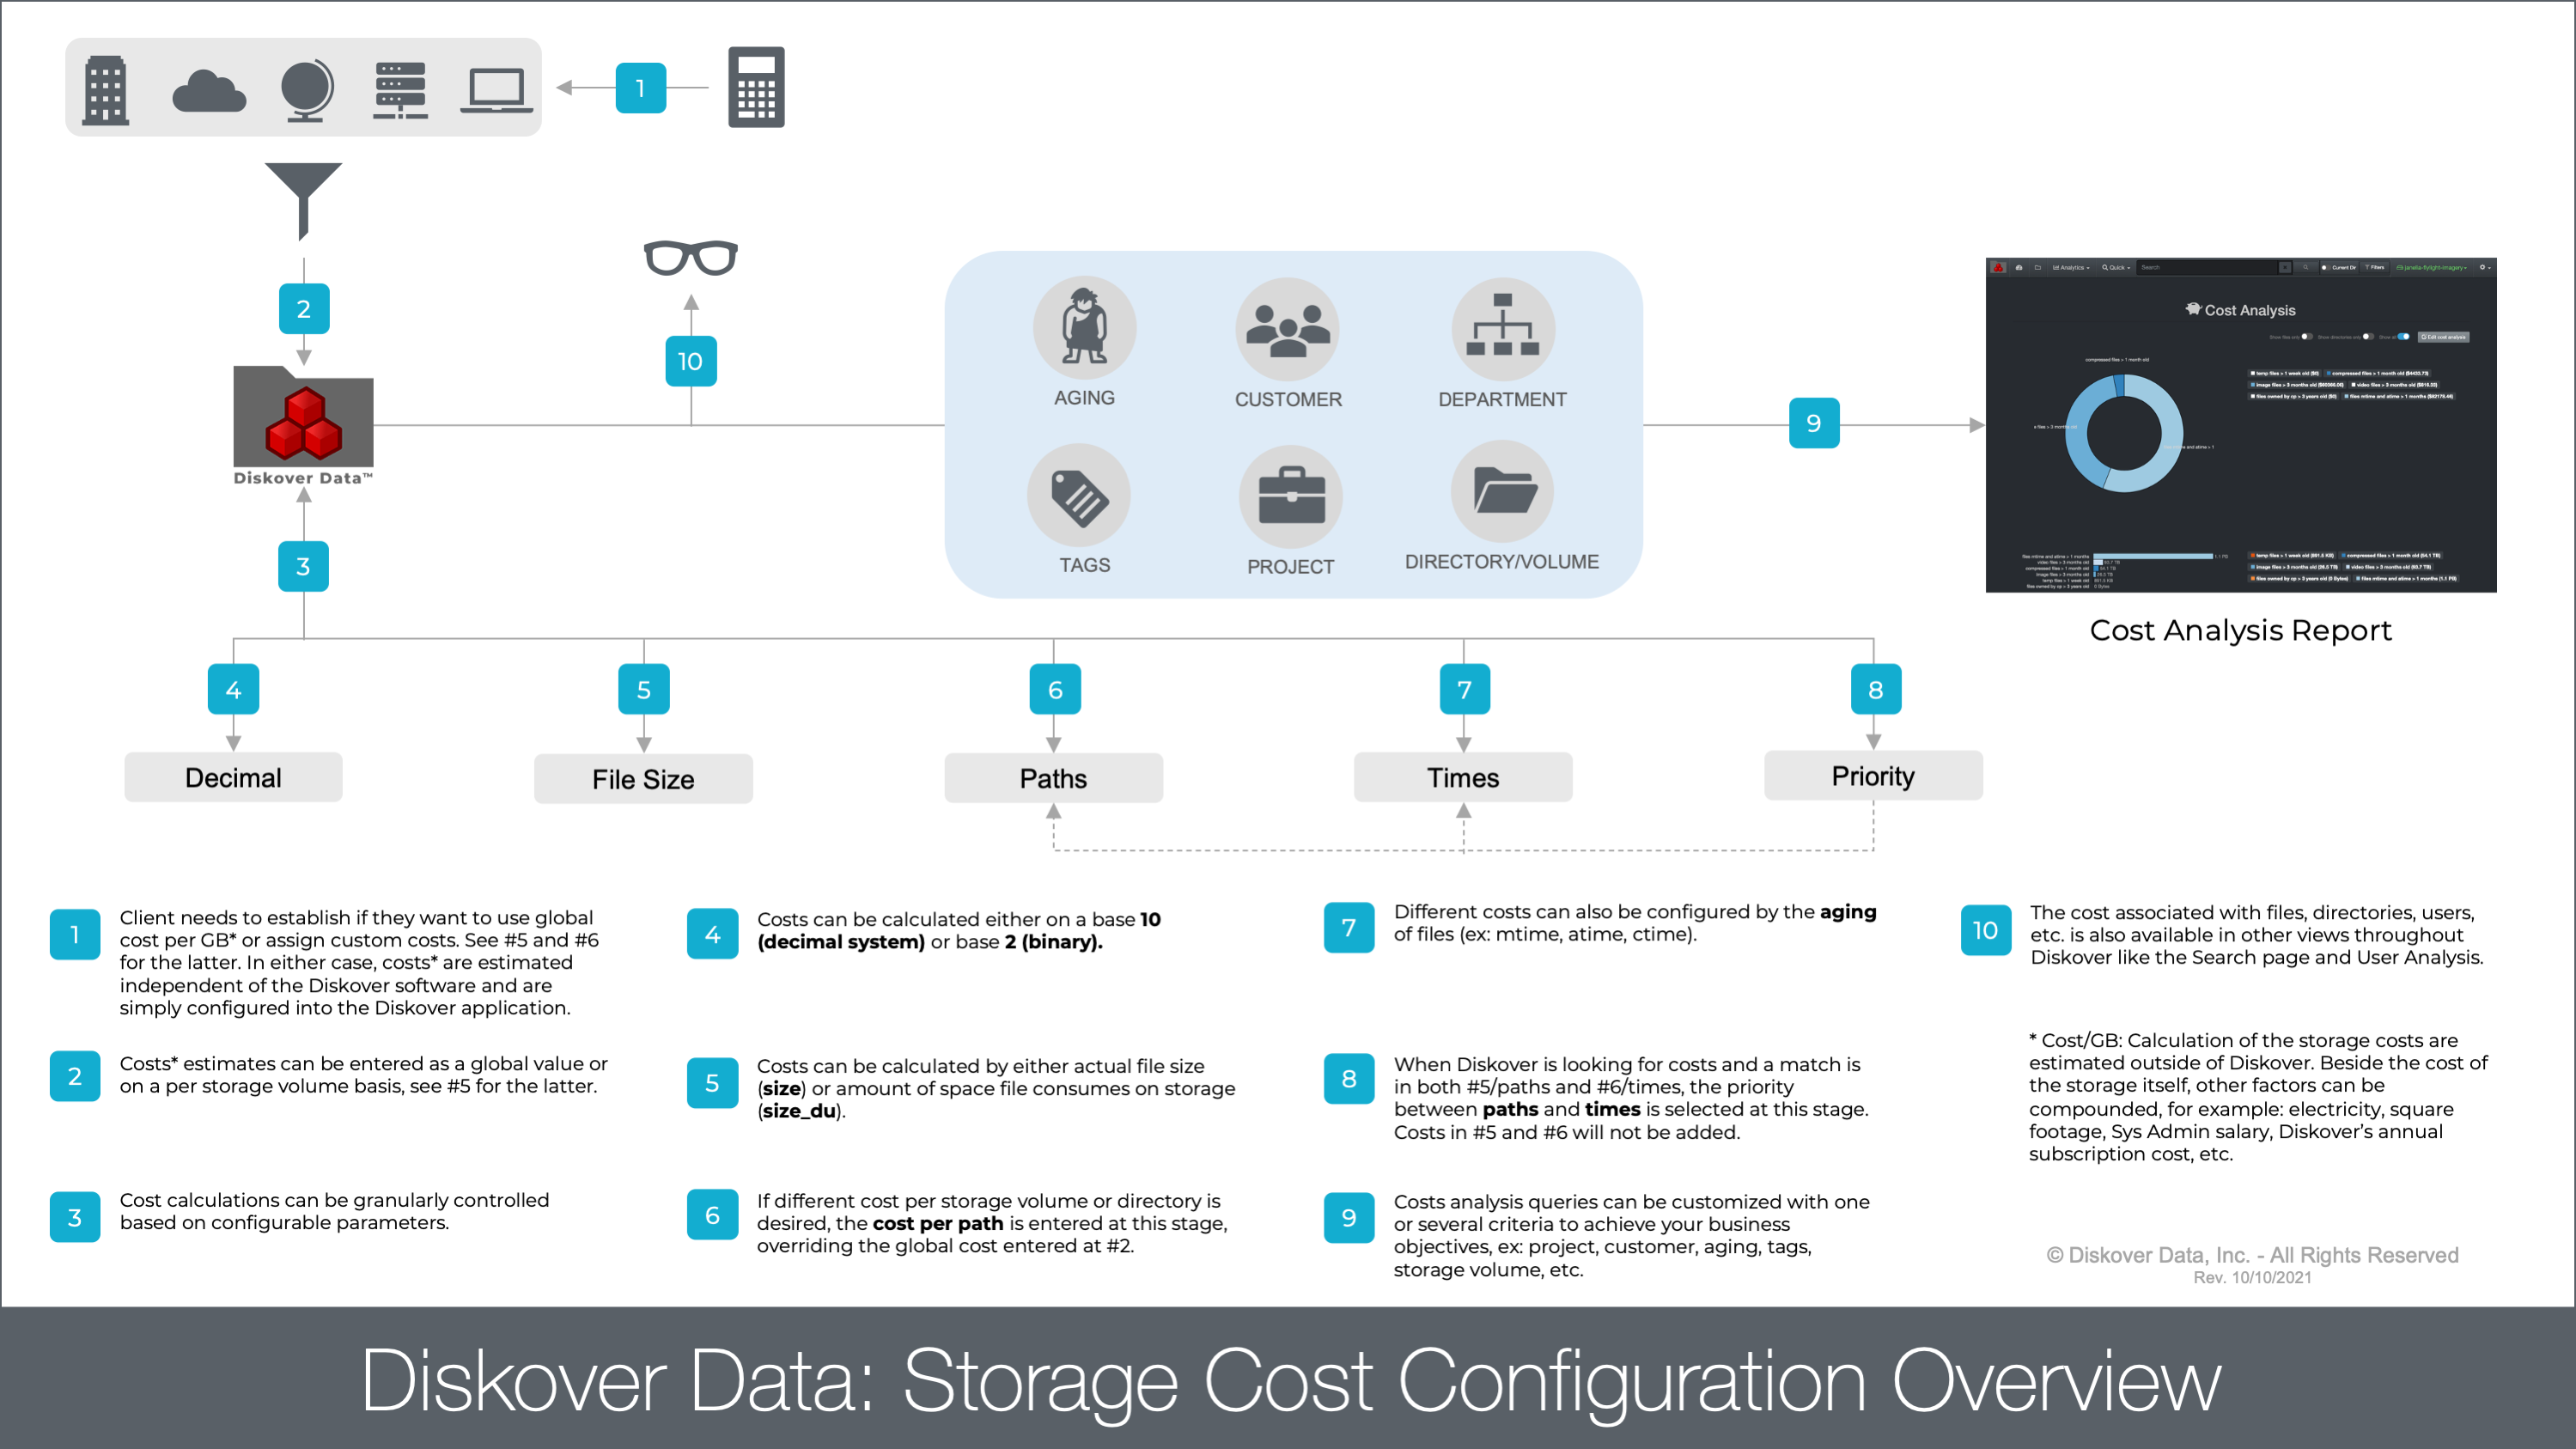
Click here for a full view of the diagram.
Calculation of Cost Estimates
The storage cost can either be estimated globally or by storage volume, directory, etc. The estimations need to be done outside of Diskover. Beside the cost of the storage itself, other factors can be compounded like electricity, service contract, System Administrator’s salary, subscription fees, etc.
Estimation needs to be estimated and configured per gigabyte.
Storage Cost Configuration
🔴 Once the estimation per GB is achieve, open a terminal session:
vim /root/.config/diskover/config.yaml

🔴 Enable storagecost by changing to True:
enable: True
🔴 Enter global estimated cost per GB, example below at $2.50 per GB:
costpergb: 2.50
🔴 Enter base preference by typing 10 for decimal or 2 for binary, example below is set for binary:
base: 2
🔴 Enter size preference by typing size for file size or size_du for disk usage, example below is set for file size:
sizefield: size
🔴 Different costs can be assigned to specific paths, overriding the global cost per GB as described above, providing for very granular cost calculations:
paths: [{'path': ['*fast_storage*'], 'path_exclude': [], 'costpergb': 4.50}]
Different costs can also be configured by file aging, costs can be assigned based on age of data to incentivize movement of older data to less expensive storage:

🔴 In the case where storage cost could read either the paths or times override, you need to assign a priority preference either by path or time, example below is set for time:
priority: time
Accessing Storage Costs
Within the Diskover-Web user interface, cost information is displayed in different locations:
- File search page > Cost column in search results pane (Cost column might need to be unhidden from your Settings > Hide fields in search results)
- Analytics > Cost Analysis > to access a report, users can click on a report link.
- Analytics > User Analysis
Using Cost and User Analysis Reports
Please refer to the Diskover User Guide:
Cost Analysis Reports Configuration
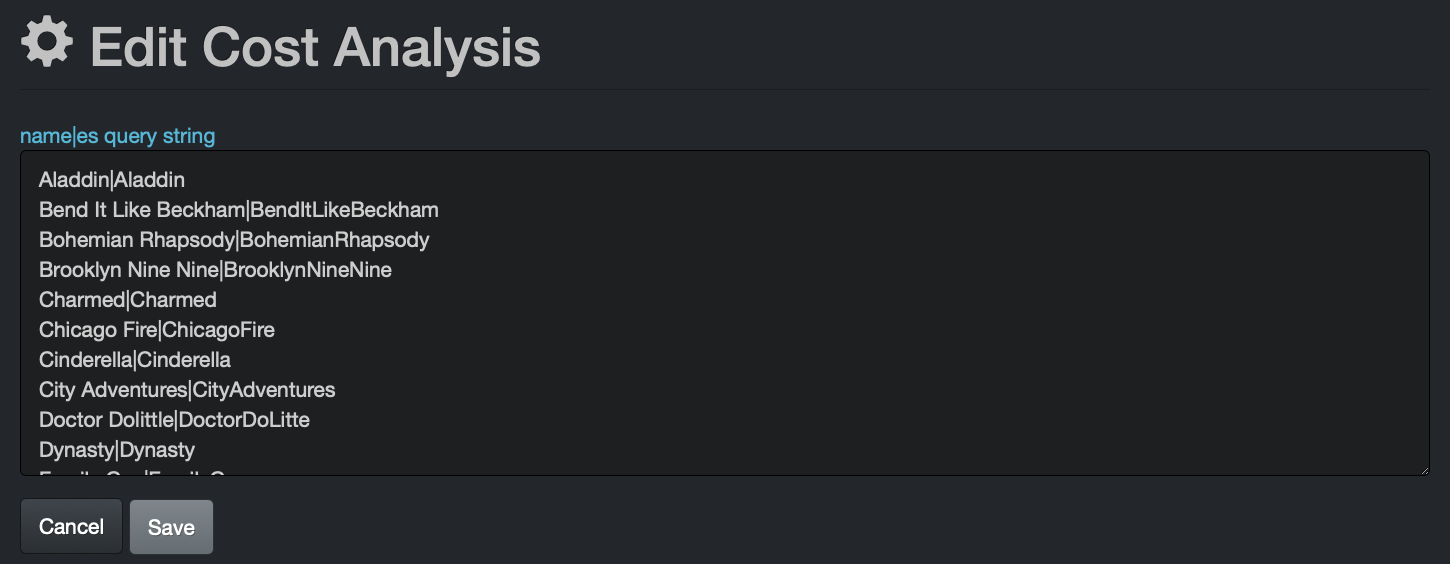
The Cost Analysis reports are repeatable queries which can be customized and are located in Analytics > Cost Analysis. Any users can access the reports, but only users with an admin level account can add/edit/delete reports.
- To add, edit or delete a report > Analytics > Cost Analysis > click the Edit cost analysis button.
- For queries syntax and rules, please refer to the Diskover User Guide:
- Queries with built-in search tools
- Syntax and rules for manual queries
Cost Analysis queries need to be built in the following format: report name|querycriteria
Here are the very simple queries from the example displayed at the beginning of this section - you can copy the following queries and replace by your company's variables to achieve similar results:
Aladdin|Aladdin
Bend It Like Beckham|BendItLikeBeckham
Bohemian Rhapsody|BohemianRhapsody
Brooklyn Nine Nine|BrooklynNineNine
Charmed|Charmed
Chicago Fire|ChicagoFire
Cinderella|Cinderella
City Adventures|CityAdventures
Doctor Dolittle|DoctorDoLitte
Dynasty|Dynasty
Family Guy|FamilyGuy
Jurassic World|JurassicWorld
Magnum PI|MagnumPI
Major Dad|MajorDad
Monkie Kid|MonkieKid
NCIS|NCIS
Ninjago|Ninjago
RoboCop 2|RoboCop2
Task Configuration Files
Configuration of File Locations
Diskover worker nodes use a series of YAML files for various configuration settings. A worker node can be a local distributed node that can perform a variety of tasks from indexing, tagging, check for duplicates, autoclean, or any other custom task. YAML is a human-readable data serialization standard that can be used in conjunction with all programming languages and is often used for configuring file settings.
Diskover task workers use a separate directory for each config file. At time of installation, example config.yaml files are located in /opt/diskover/configs/
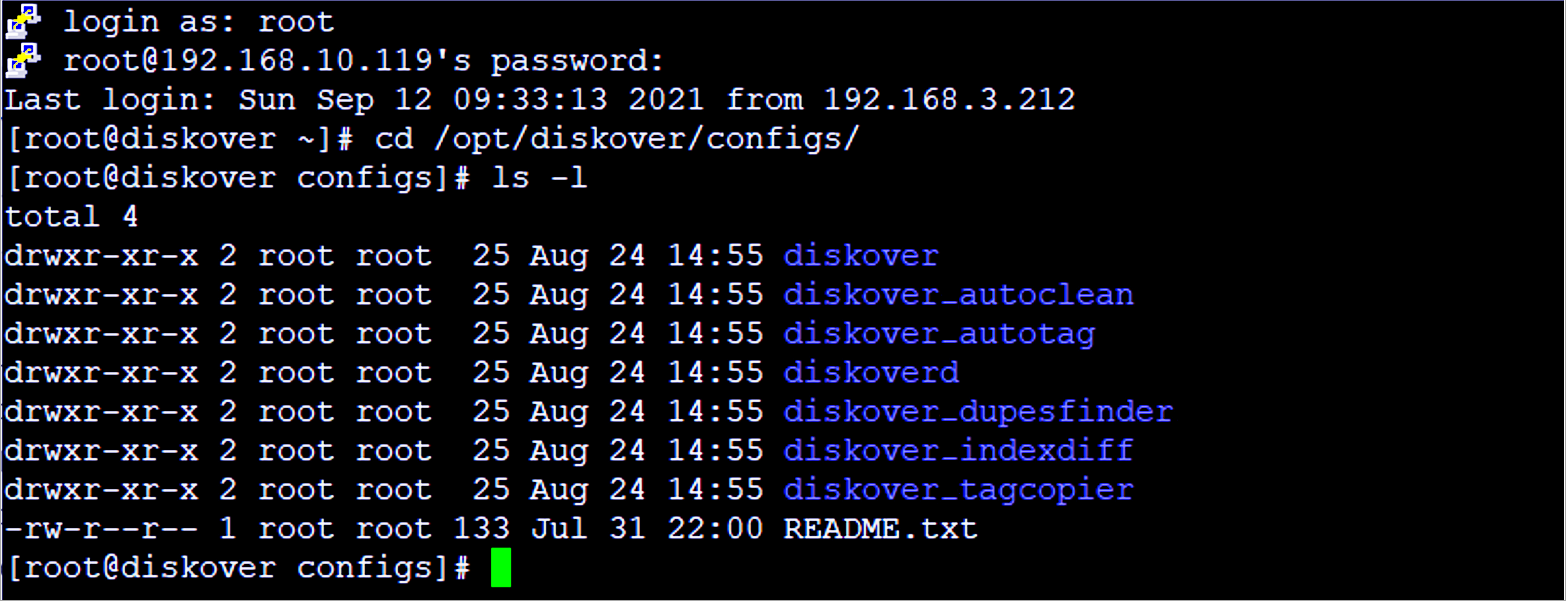
At time of installation, these files are copied to:
- Linux:
/root/.config/ - Windows:
%APPDATA%\ - MacOS:
~/.config/
During installation, at least one index worker is configured, that configuration file is located at: /root/.config/diskover/config.yaml
Using Alternate Configuration Files
Diskover provides default configuration files for tasks which are located in /opt/diskover/configs_sample
Diskover provides the ability for tasks to use alternate configuration files to match the task requirements via the altconfig variable. Alternate configuration files can be invoked both via the command line and with the Diskover Task Panel.
Alternate Configuration Invocation Via Command Line
Worker nodes typically launch tasks from the Diskover application directory. Depending on the worker’s task, different environment variables need to be exported to invoke usage of the desired alternate configuration file. The convention for exporting alternate configuration files is:
Alternate Configuration Export Variable: Is the DISKOVER_NAMEOFTASKDIR where NAMEOFTASK equals the name of python executable, for example the export variable for diskover_autoclean.py is DISKOVER_AUTOCLEANDIR
There are separate configs for diskover crawler, autotag, dupes-finder, diskoverd, etc. The default config files are not used by diskover crawler, etc., they are default/sample configs and need to be copied to the appropriate directory based on the OS.
For example, in Linux the config files are in ~/.config/<appName>/config.yaml. Each config file has a setting appName that matches the directory name where the config file is located. For diskover dupes-finder for example, this would be ~/.config/diskover_dupesfinder/config.yaml.
Note: When editing config.yaml files, use spaces in config files, not tabs.
If you get an error message when starting diskover.py like
Config ERROR: diskover.excludes.dirs not found, check config for errors or missing settings from default config., check that your config file is not missing any lines from default/sample config or there are no errors in your config like missing values.
To invoke alternate configuration files instead of the default configuration files:
🔴 Indexing tasks: The DISKOVERDIR variable is used to invoke the alternative configuration file for indexing tasks:
export DISKOVERDIR=/someconfigfile.yaml
🔴 Autoclean tasks: The DISKOVER_AUTOCLEANDIR variable is used to invoke the alternative configuration file for autoclean tasks.
export DISKOVER_AUTOCLEANDIR=/path/alt_config_dir/
🔴 Autotag tasks: The DISKOVER_AUTOTAGDIR variable is used to invoke the alternative configuration file for post-index autotag tasks.
export DISKOVER_AUTOTAGDIR=/path/alt_config_dir/
🔴 Duplicate finder tasks: The DISKOVER_DUPESFINDERDIR variable is used to invoke the alternative configuration file for duplicate finder tasks.
export DISKOVER_DUPESFINDERDIR=/path/alt_config_dir/
🔴 Tag copier tasks: The DISKOVER_TAGCOPIERDIR variable is used to invoke the alternative configuration file for tag copier tasks.
export DISKOVER_TAGCOPIERDIR=/path/alt_config_dir/
Note: It is recommended to test any changes to alternative configuration files via the command line for errors. If you get an error message when starting
diskover.pylike Config ERROR: diskover.excludes.dirs not found, check config for errors or missing settings from the default configuration file. Ensure that your config file is not missing any lines from default/sample config or there are no errors in your config like syntax errors or missing values.
Alternate Configuration Invocation Via Task Panel
Detailed discussion on configuration and administration of Diskover Task Management functionality can be found in the Task Management Chapter. To maintain context, the following describes how to use alternate configuration files within the Diskover Task Panel.
Indexing Tasks
🔴 To invoke the use of alternate configuration file for indexing tasks > Uncheck Use default diskover config file and enter alternate configuration directory in Alternate Config Directory dialog box.

Custom Tasks
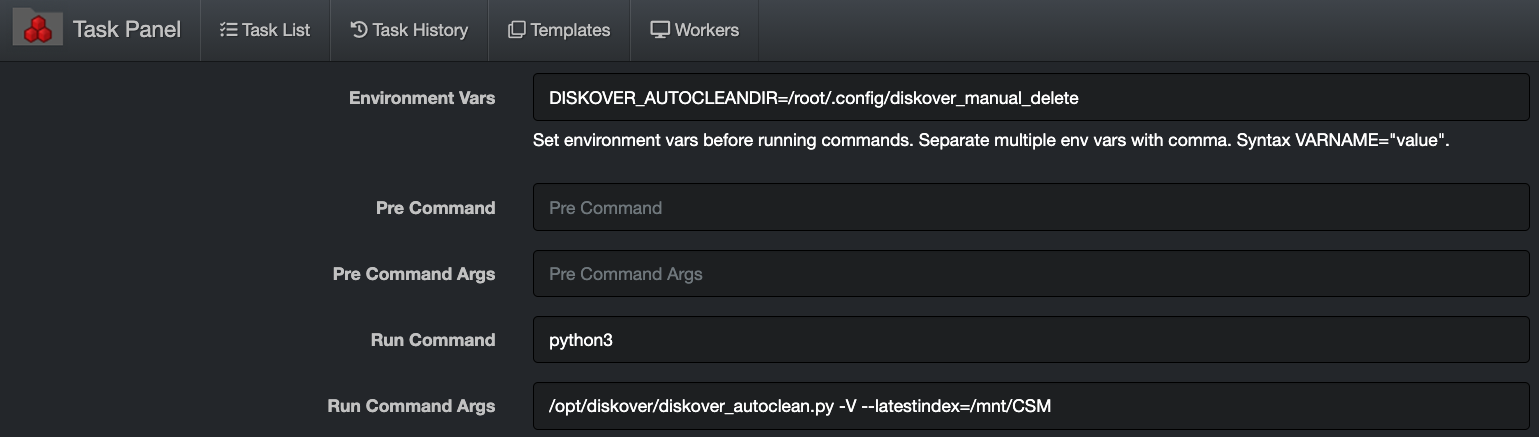
🔴 To invoke the use of alternate configuration file for custom tasks > Enter alternate configuration export command in Environment Vars dialog box.
Task Management
The task panel can be used to schedule building indices or running any type of file action task such as copying files, running duplicate file finding, checking permissions on directories, etc. The task panel is a swiss-army knife for data management.
Distributed Architecture and Management
Diskover has a distributed task system where workers can be distributed among many resources. For each resource providing a task worker, services will need to have diskoverd installed. Please refer to instructions on how to set up the the diskoverd task service in the Diskover Installation Guide - Setting Up Diskover Task Worker Daemon. This section will describe setting up both indexing and custom tasks within the Diskover-Web Task Panel.
Validate Task Management System has Task Worker(s)
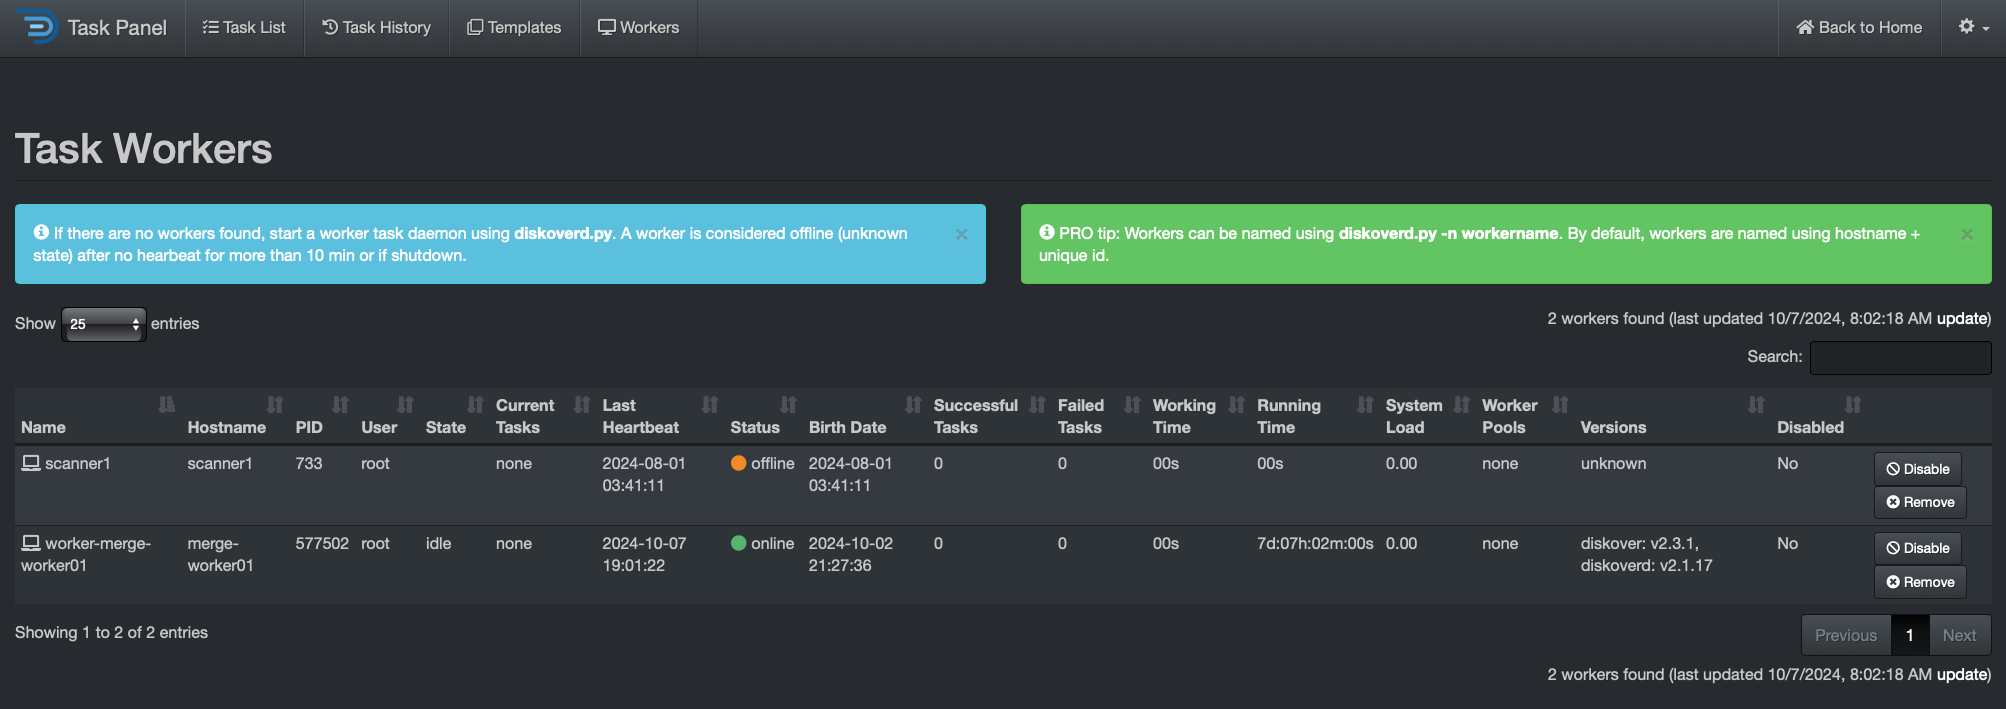
🔴 Open the Task Panel within the Diskover-Web user interface > gear icon > Task Panel and go to Workers tab.
🔴 Ensure the presence of at least one online task worker under Status column.
Managing Diskover Tasks via the Task Panel
The following will illustrate how to create basic indexing and custom tasks via the Diskover Task Panel.
Index Tasks
A default indexing task is provided in the task panel. The configuration of indexing tasks is different for Posix File Systems and S3 based object storage, the following will illustrate setting up basic indexing tasks for each.
Posix File System Indexing Task
🔴 Select New Index Task from > Task Panel > Task List tab:
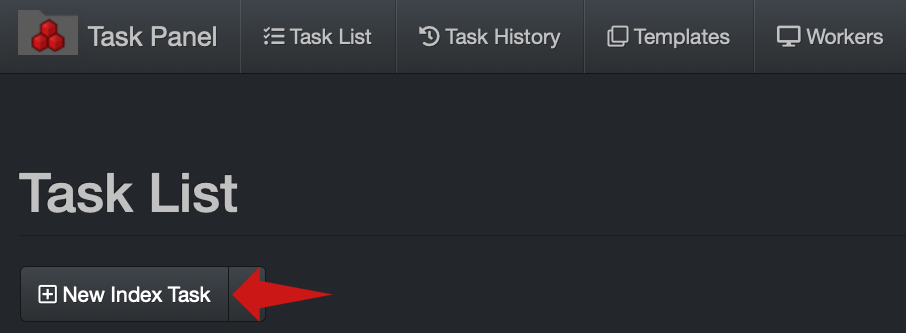
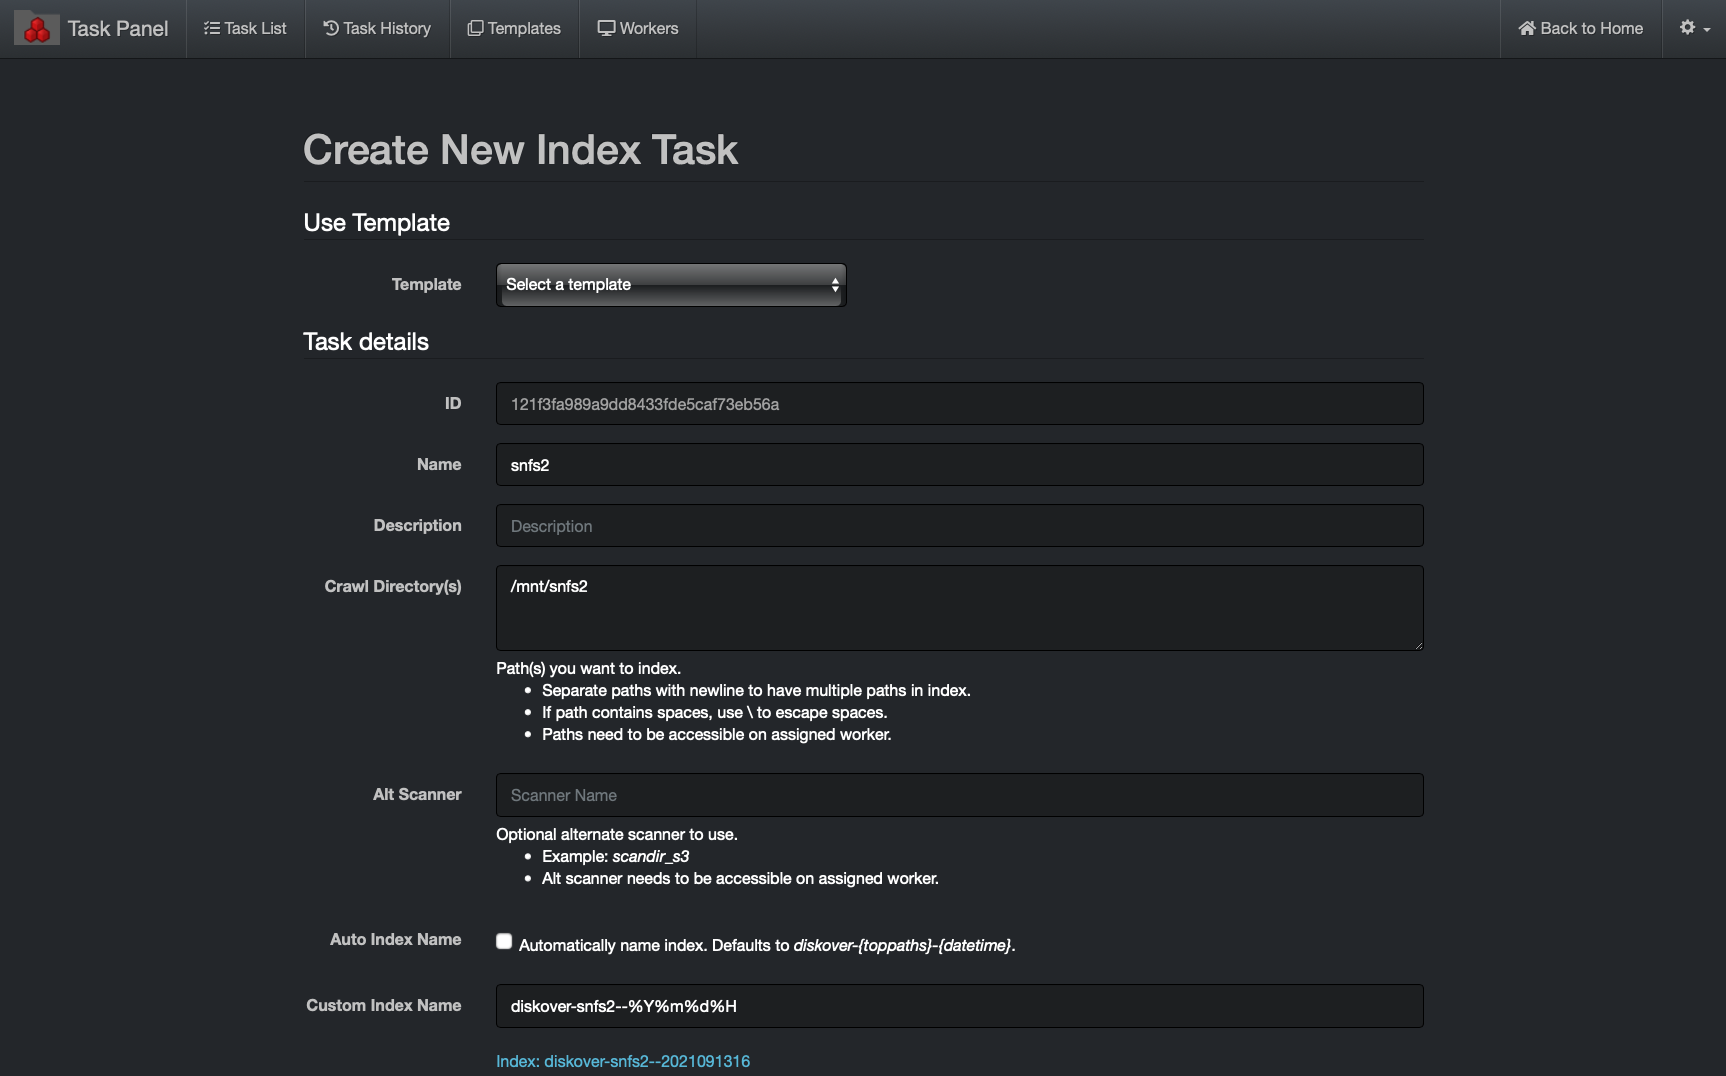
The following Create New Index Task dialog box will appear. Configure as follow:
🔴 Name: index-volumename (where volumename is the name of volume, in this example snfs2)
🔴 Crawl Directory(s): /mnt/volumedir (where volumedir is the volume mountpoint, in this example /mnt/snfs2)
Note: Paths are case sensitive and must exist on the indexing task worker host. For Windows task worker, set the crawl directory to for example
H:\\SomefolderorC:\\using double backslashes (escaped) or for UNC paths use\\\\UNC\\share.
🔴 Auto Index Name: unselect box
🔴 Custom Index Name: diskover-volumename-%Y%m%d%H
🔴 A schedule is required to create the indexing task. The example below > Hour > 1 will run the indexing task every day at 1:00 am.
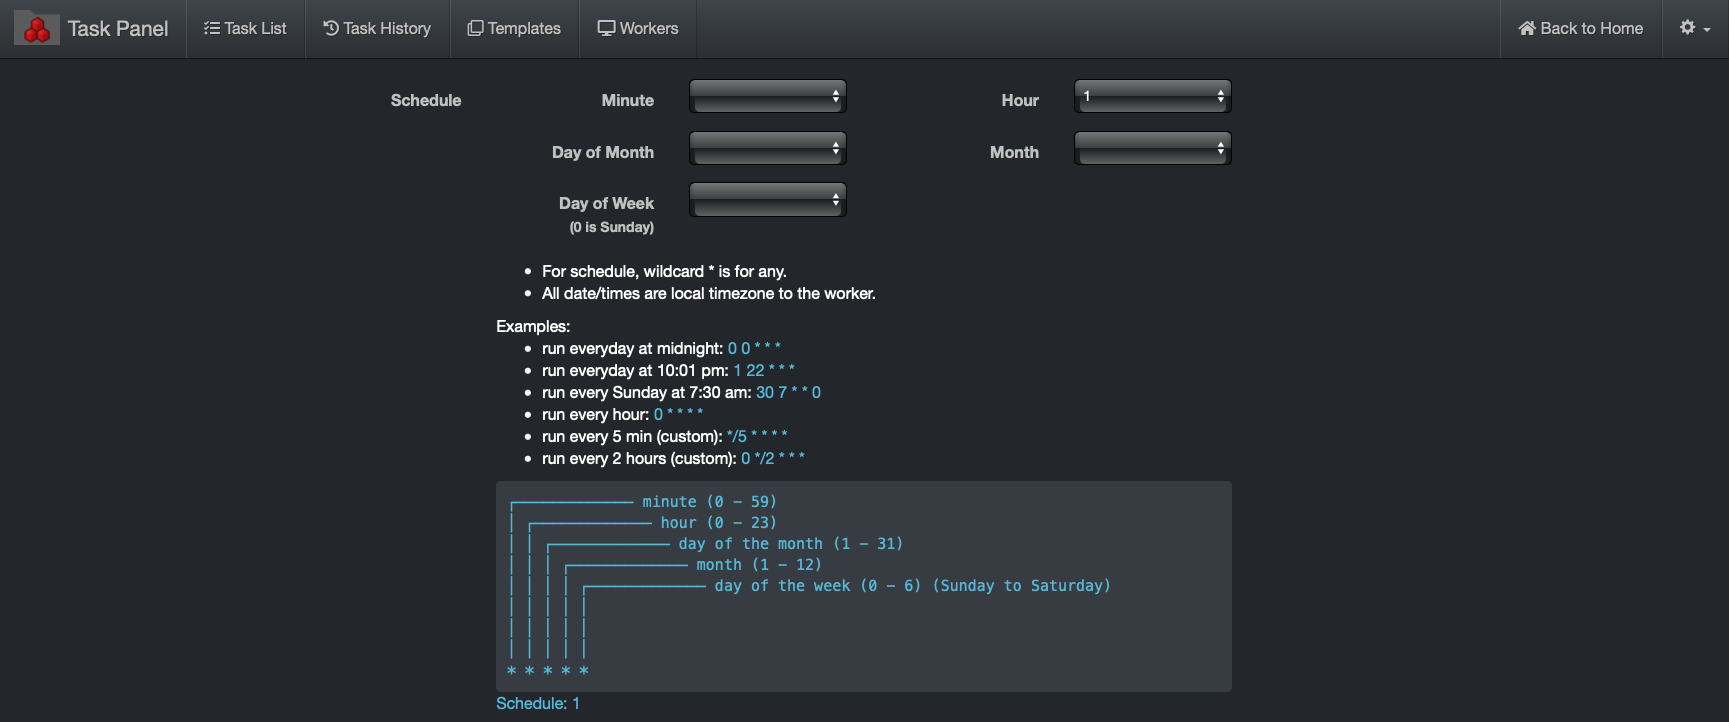
🔴 To use a custom schedule to set the volume to index every hour from 7 am to 11pm for example, enter the following in the Custom Schedule box:
0 7-23 * * *

🔴 Then select Create Task:

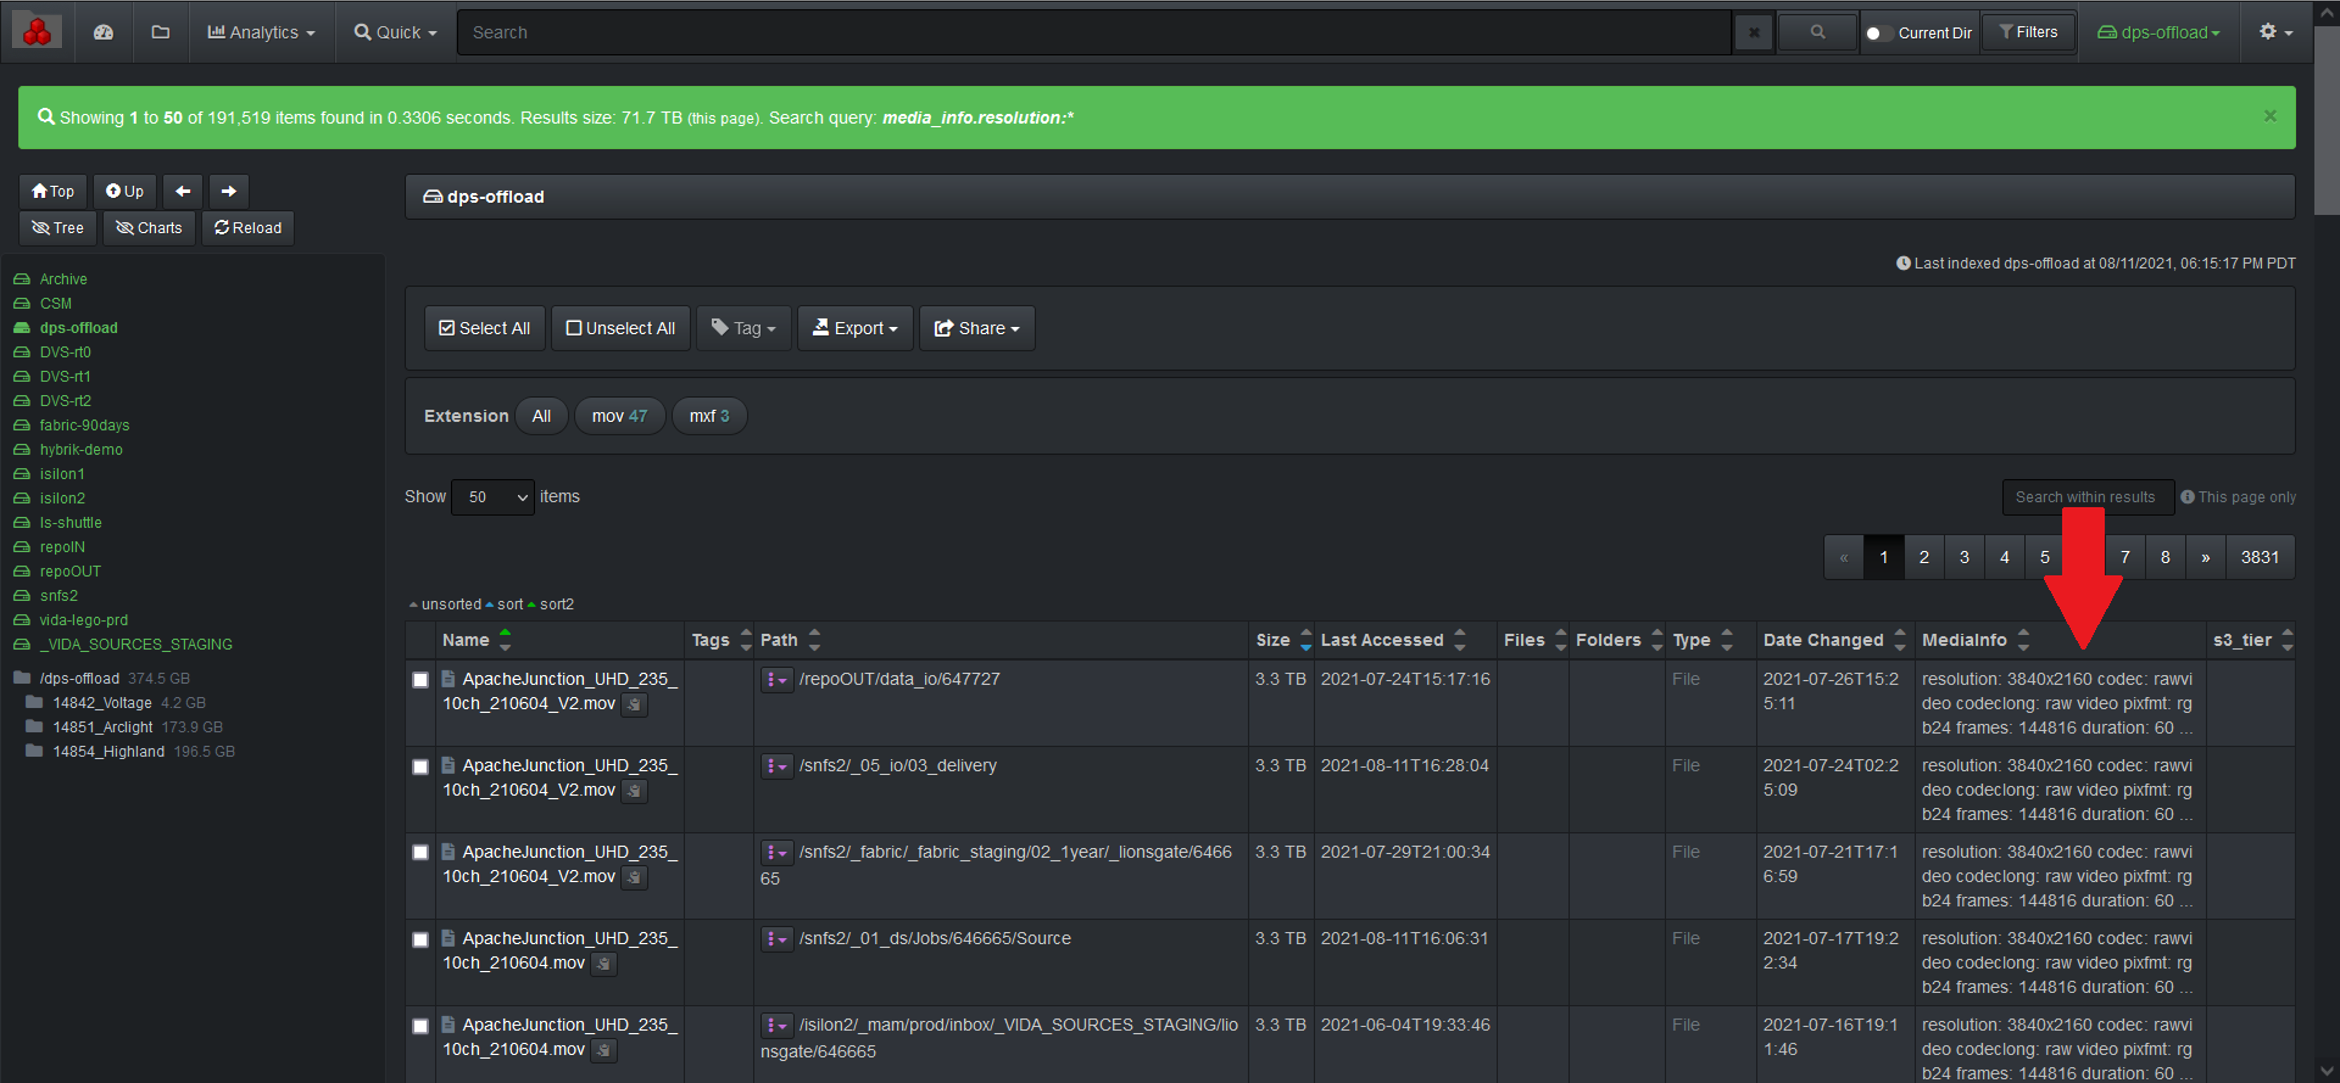
S3 Bucket Indexing Task
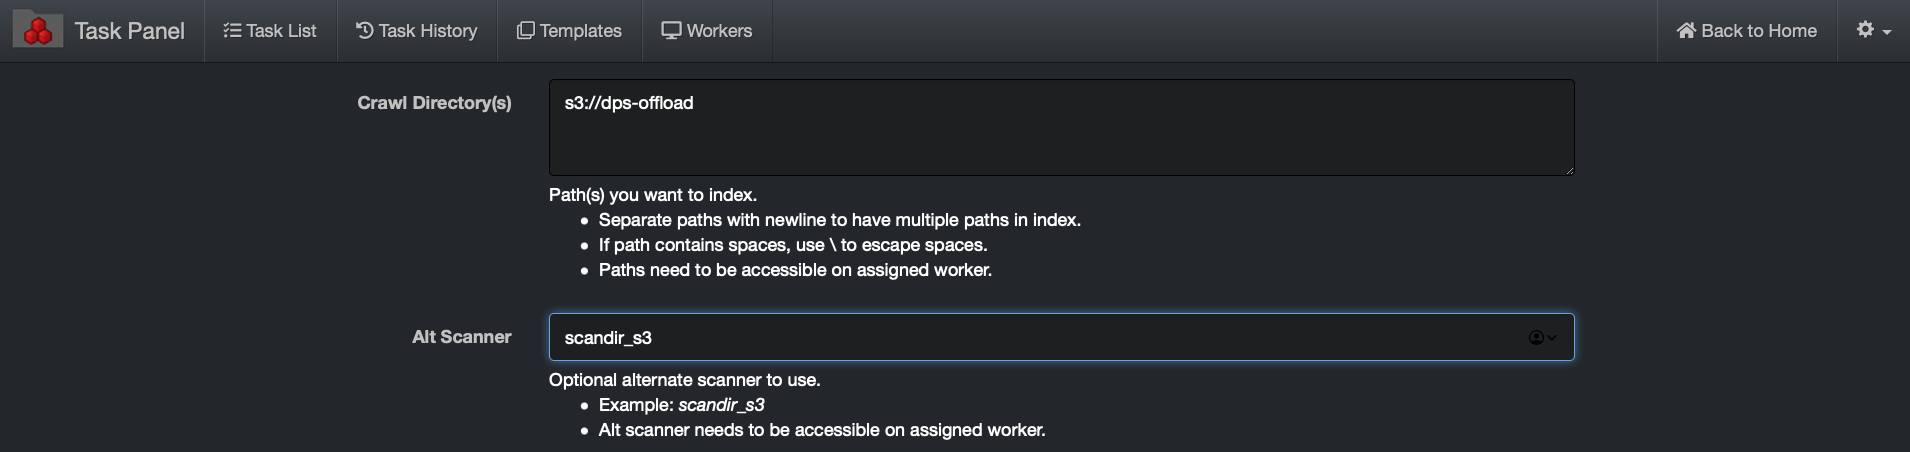
Indexing tasks for S3 buckets are slightly different than Posix File systems, the following outlines the configuration differences required in the Create New Index Task in the Task Panel.
Configure the following differences for indexing S3 buckets:
🔴 Crawl Directory(s): s3://bucketname
Where bucketname is the actual name of the S3 bucket desired for indexing, in example below, the bucket name is dps-offload:
🔴 If the media info plugin is enabled in the default config.yaml file, then configure the following to disable the media info plugin for S3 based storage as described in Task Configuration Files chapter.

Non S3 Bucket Indexing Task
Indexing tasks for non-AWS S3 buckets is slightly different than the previous section. The following outlines the configuration differences required for alternate credentials and endpoints.
In addition, you need to configure the Environment Vars for non-AWS S3 buckets:
🔴 Where profile is the name of desired_profile, as found in /root/.aws/credentials (where desired_profile in this example is wasabi-us)
🔴 Where alternate_endpoint.com is the URL of the S3 bucket (where alternate_endpoint.com in this example is https://s3.us-central-1.wasabisys.com)
AWS_PROFILE=profile,S3_ENDPOINT_URL=https://alternate_endpoint.com

Diskover Plugins
Diskover is designed for extensibility. The open-source architecture is designed to promote extensibility via plugins.
Plugins Installation and Config Files Location
There are two invocation methods for plugins; 1) plugin executed at time of index, 2) plugin executed post index as CRON like tasks.
Diskover config file are located in:
- Linux:
~/.config/diskover/config.yaml - Windows:
%APPDATA%\diskover\config.yaml - MacOS:
~/Library/Application Support/diskover/config.yaml
The default configs are located in configs_sample/. There are separate configs for diskover autotag, dupes-finder, etc. They are default/sample configs and need to be copied to the appropriate directory based on the OS.
For example, in Linux the config files are in ~/.config/<appName>/config.yaml. Each config file has a setting appName that matches the directory name where the config file is located. For Diskover dupes-finder for example, this would be ~/.config/diskover_dupesfinder/config.yaml.
Autoclean Plugin
The autoclean plugin is designed to move, copy, delete, rename or run custom commands on files and/or directories based on a set of highly configurable criteria. Any Elasticsearch query (tags, age, size, path, filename, etc.) can be used for the criteria providing very granular actions.
With the use of tags, the autoclean plugin can be used to implement a RACI model or approval process for archive and deletion (approved_archive, approved_delete, etc.) tag application. The plugin criteria can then be set to meet desired set of tags (times, etc.) to invoke action.
🔴 Check that you have the config file in ~/.config/diskover_autoclean/config.yaml, if not, copy from default config folder in configs_sample/diskover_autoclean/config.yaml.
🔴 The autoclean plugin runs post as scheduled job operating on completed indices, to enable:
vim /root/.config/diskover_autoclean/config.yaml
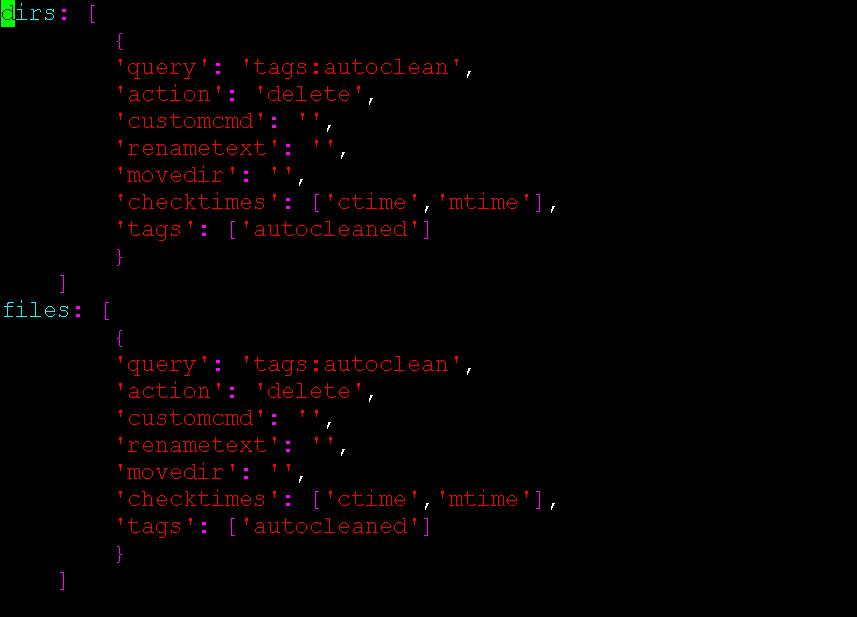
🔴 Configure desired rules:
- Query can be any valid Elasticsearch query using query string query.
- Action can be: delete, rename, move, copy or custom. Custom can be used to run a command or script.
Note: When using custom action,
custocmdvalue is required. The full file/directory path is passed asargtocustomcmd.
Example using custom action:
Set action to custom and specifiy customcmd, in this example we are using a bash script:
dirs: [
    {
    'query': 'tags:archive AND type:directory',
    'action': 'custom',
    'customcmd': './scripts/autoclean_rsync_dir.sh',
    'renametext': '',
    'movedir': '',
    'copydir': '',
    'checktimes': ['ctime', 'mtime'],
    'tags': ['autocleaned', 'custommove']
    }
]
Create bash script and make it executable for customcmd:
touch autoclean_rsync_dir.sh
chmod +x autoclean_rsync_dir.sh
vim autoclean_rsync_dir.sh
#!/bin/bash
#
# Sync directory using Linux rsync command.
#
# Note: We don't need to check if source directory exists since autoclean
# takes care of that before calling this script.
#

# get source path from arg 1
SRC_PATH=$1

# set destination directory
DST_PATH=/mnt/nas2/archive/

# make destination directory if it does not exist
if [ ! -d "$DST_PATH" ]; then
  mkdir -p "$DST_PATH"
  # check if mkdir worked
  if [ $? -gt 0 ]; then
    >&2 echo ERROR could not make destination directory $DST_PATH !
    exit 1
  fi
fi

# use rsync command to sync directory
echo Syncing "$SRC_PATH" to "$DST_PATH" ...
rsync -avz "$SRC_PATH" "$DST_PATH"
# check if rsync worked
if [ $? -gt 0 ]; then
  >&2 echo ERROR syncing directory!
  exit 1
else
  echo Done.
fi
exit 0
Run Autoclean from cli
🔴 Run autoclean and get help to see cli options:
cd /opt/diskover/plugins_postindex
python3 diskover_autoclean.py -h
Add Autoclean Task to Diskover-web
🔴 Create custom task in Task Panel to run on scheduled basis.
🔴 Set the following:
- Run Command Args: python3
- Post Command: /opt/diskover/diskover-autoclean.py -V -l /mnt/snfs2
🔴 Change /mnt/snfs2 to the desired top_level_path, for example, if the desired volume to index is isilon, then the path would be /mnt/isilon

BAM Info Harvest Plugin
🍿 Watch Demo Video
The BAM info harvest plugin is designed to provide BAM metadata attributes about a file without granting the Diskover user any read/write file system access. The BAM info plugin enables additional metadata for the SAM and BAM file formats to be harvested at time of index, and are therefore searchable within Diskover.
The specification for the SAM file format can be found here:
https://samtools.github.io/hts-specs/SAMv1.pdf
The BAM info plugin uses the Python pysam to harvest attributes about the BAM and SAM files:
https://pysam.readthedocs.io/en/latest/
New indices will use the plugin and any SAM or BAM file will get additional info added to the Elasticsearch index’s bam_info field.
The attributes provide the ability to view storage and file system content from a workflow perspective, for example, all the frame rates on any given storage.
You can view and search on BAM info attributes in Diskover-Web since it will store it in a new field for video files, the field name is bam_info.
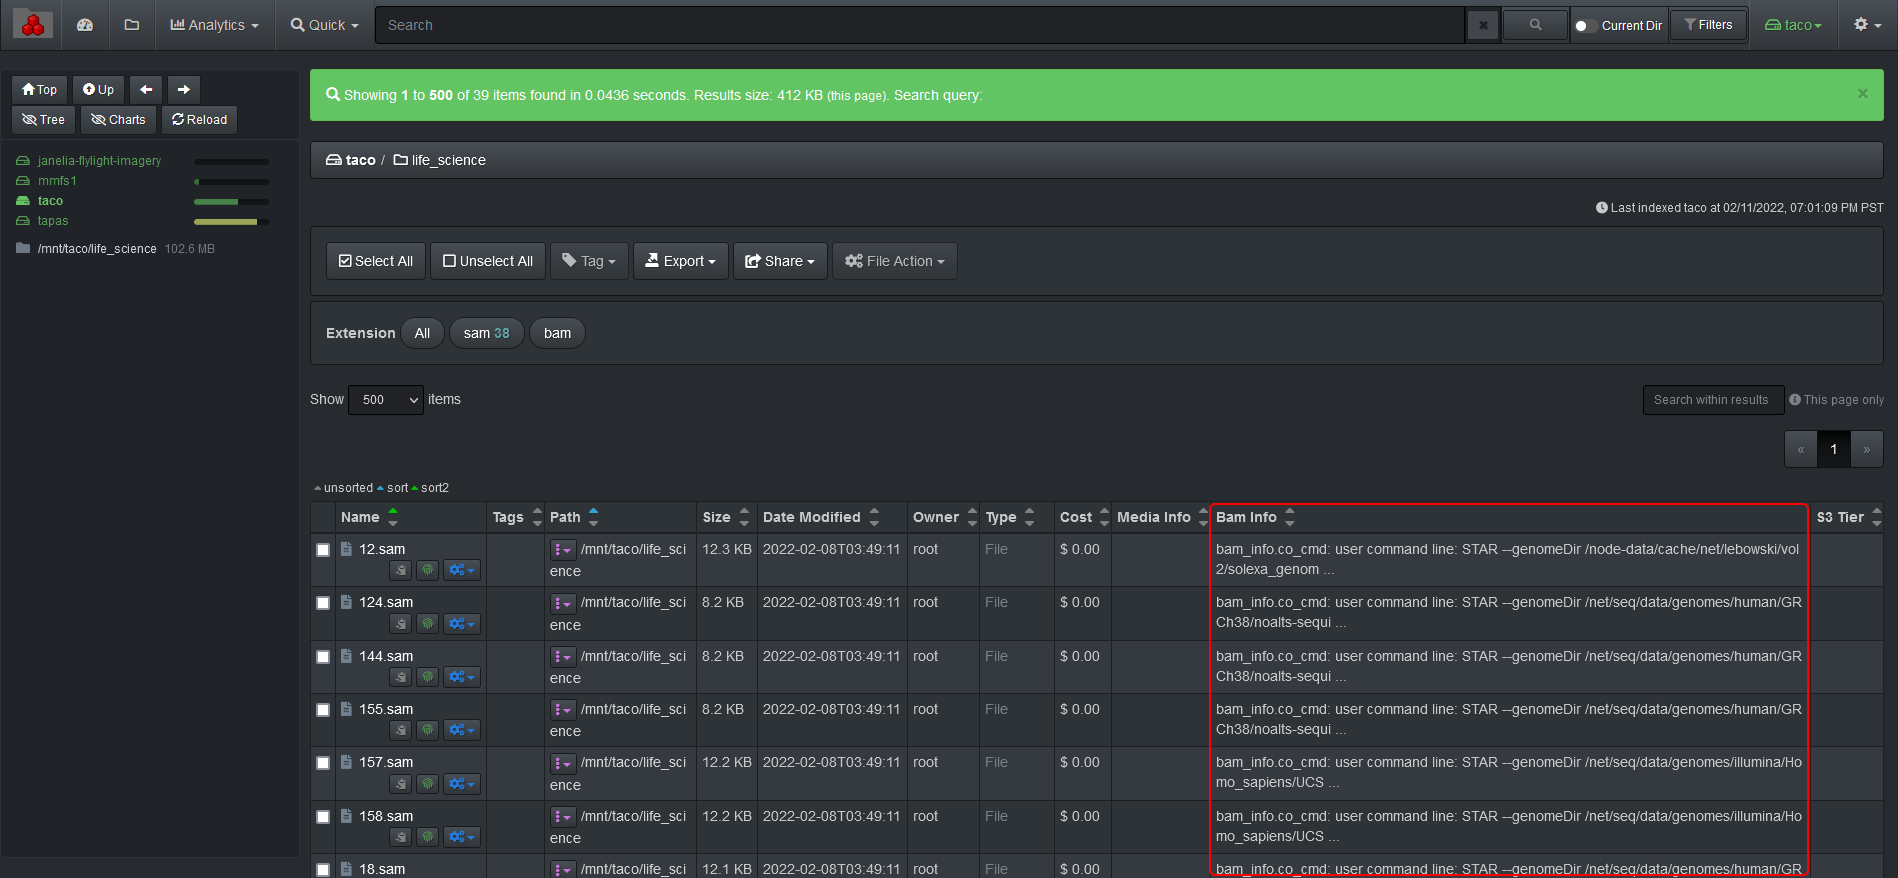
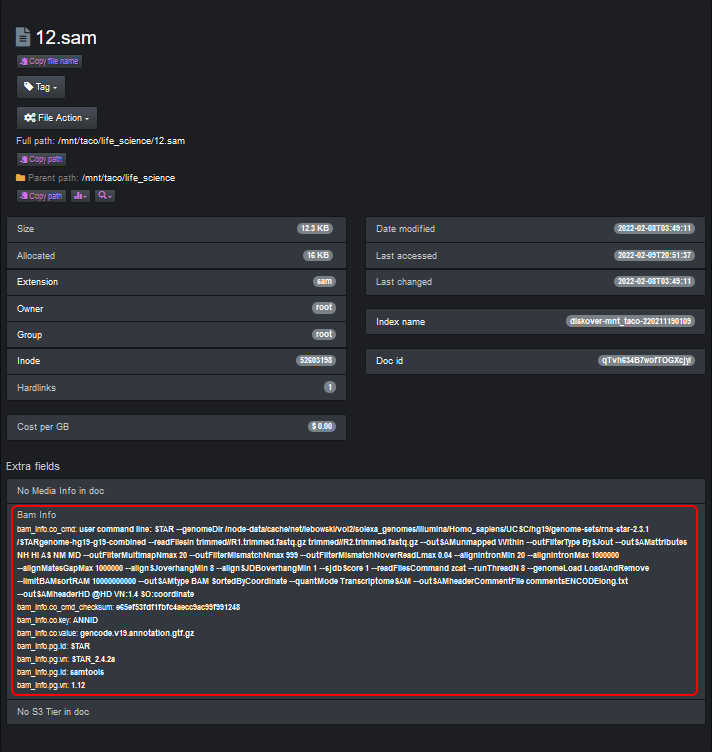
The BAM info fields are shown as additional searchable attributes to each file. You can view detailed attributes when opening up a file in Diskover.
Install BAM Info Dependencies
🔴 Copy the BAM info content in the install location:
cp __init__.py /opt/diskover/plugins/baminfo/
cp README.rnd /opt/diskover/plugins/baminfo/
cp requirements.txt /opt/diskover/plugins/baminfo/
mkdir /root/.config/diskover_baminfo/
cp config.yaml /root/.config/diskover_baminfo/
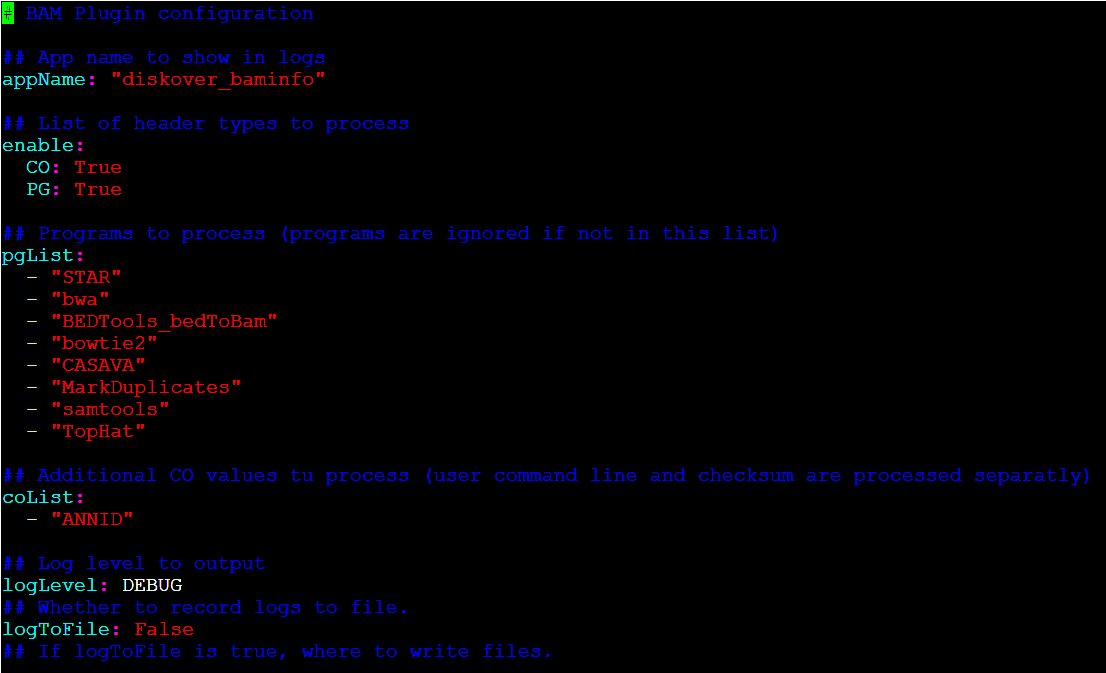
🔴 Edit the BAM info plugin to specify programs used within the software pipeline, in the example below the following programs are used:
  - "STAR"
  - "bwa"
  - "BEDTools_bedToBam"
  - "bowtie2"
  - "CASAVA"
  - "MarkDuplicates"
  - "samtools"
  - "TopHat"
🔴 The BAM info plugin requires the following dependencies on CentOS:
yum install  zlib-devel -y
yum install bzip2-devel
yum install xz-devel

cd /opt/diskover/plugins/baminfo/
pip3 install -r requirements.txt
🔴 The BAM info plugin runs as part of the indexing process, to enable:
vim /root/.config/diskover/config.yaml
🔴 Set > enable: True
🔴 Set > files: [‘baminfo’]

Note: The BAM info plugin is currently not supported for S3 based object storage. If the BAM info plugin is enabled in the default configuration file, an alternate configuration file must be created where the media info plugin is disabled. The alternate configuration file must be invoked when indexing S3 based volumes:
/root/.config/diskover_pluginsdisabled

BAM Info Field within Diskover-Web
🔴 To display the bam_info fields within Diskover-Web, edit the Contants.php configuration:
vim /var/www/diskover-web/src/diskover/Constants.php
🔴 Add the following under EXTRA_FIELDS:
const EXTRA_FIELDS = [
    'Bam Info' => 'bam_info'
];
Search BAM Attributes within Diskover-Web
The BAM attributes can be used in a manual search query by using the BAM field name bam_info. The structure is as follow:
bam_info.<key>:<value>
For example:
bam_info.pg.id:STAR
Duplicates Finder Plugin
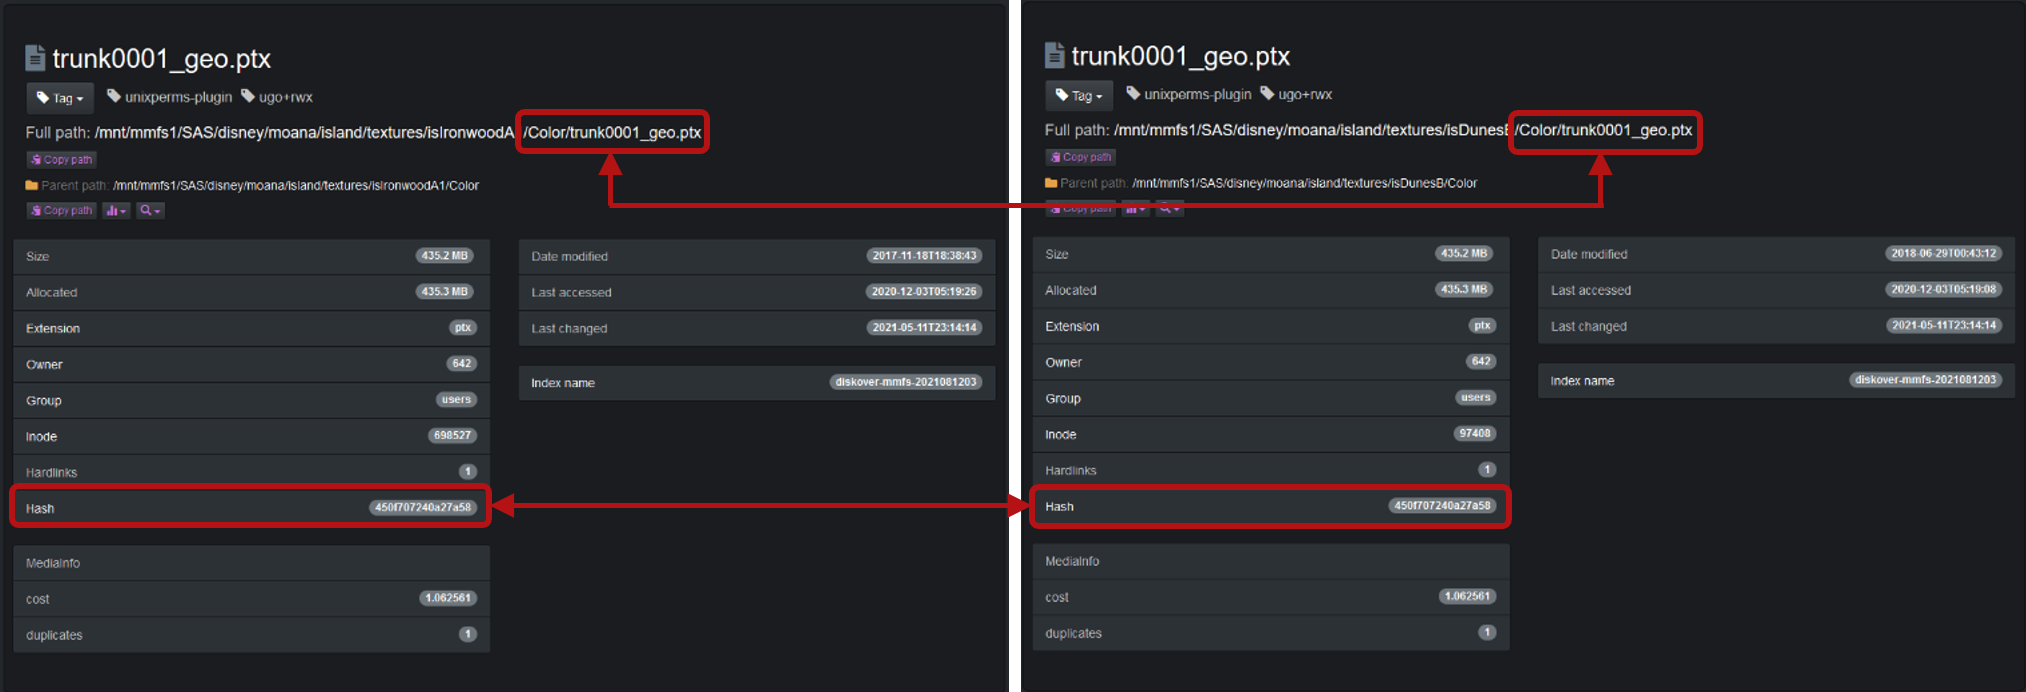
The Diskover duplicates finder plugin (dupes-finder) leverages post processing of index to check for duplicates, across all file systems, or subset thereof. The plugin supports xxhash, md5, sha1, and sha256 checksums. The plugin is designed for multiple use cases:
- To check for duplicate files across a single or all file systems (single or multiple indices) and indexing the file docs in index that are dupes
- Calculating file checksums/hashes for all duplicate files or all files and indexing hashes to file docs in index
Calculating file hash checksums is an expensive CPU/disk operation. The dupes-finder provides configuration options to control what files in the index get a hash calculated and marked as a dupe (is_dupe field in file docs set to true). In addition, the dupes-finder provides additional optimization mechanisms:
- The diskover-cache sqlite3 db can be used to store file hashes (-u cli option).
- An existing index can be used to lookup file hashes (-U cli option).
- The Elasticsearch fields for file type that get updated are
hashandis_dupe.hashis an object field type and each hash type is stored in a sub-field:hash.xxhash,hash.md5,hash.sha1,hash.sha256.is_dupeis a boolean field and only gets added and set totrueif the file is a duplicate file.
🔴 To use the default hashing mode xxhash, you will first need to install the xxhash Python module. Post indexing plugins are located in plugins_postindex/ directory.
pip3 install xxhash
The dupes-finder can also be used to add file hashes to all the files in the index, not just the duplicates found.

The duplicates plugin will store hash values that can be stored only for duplicates or for all files.
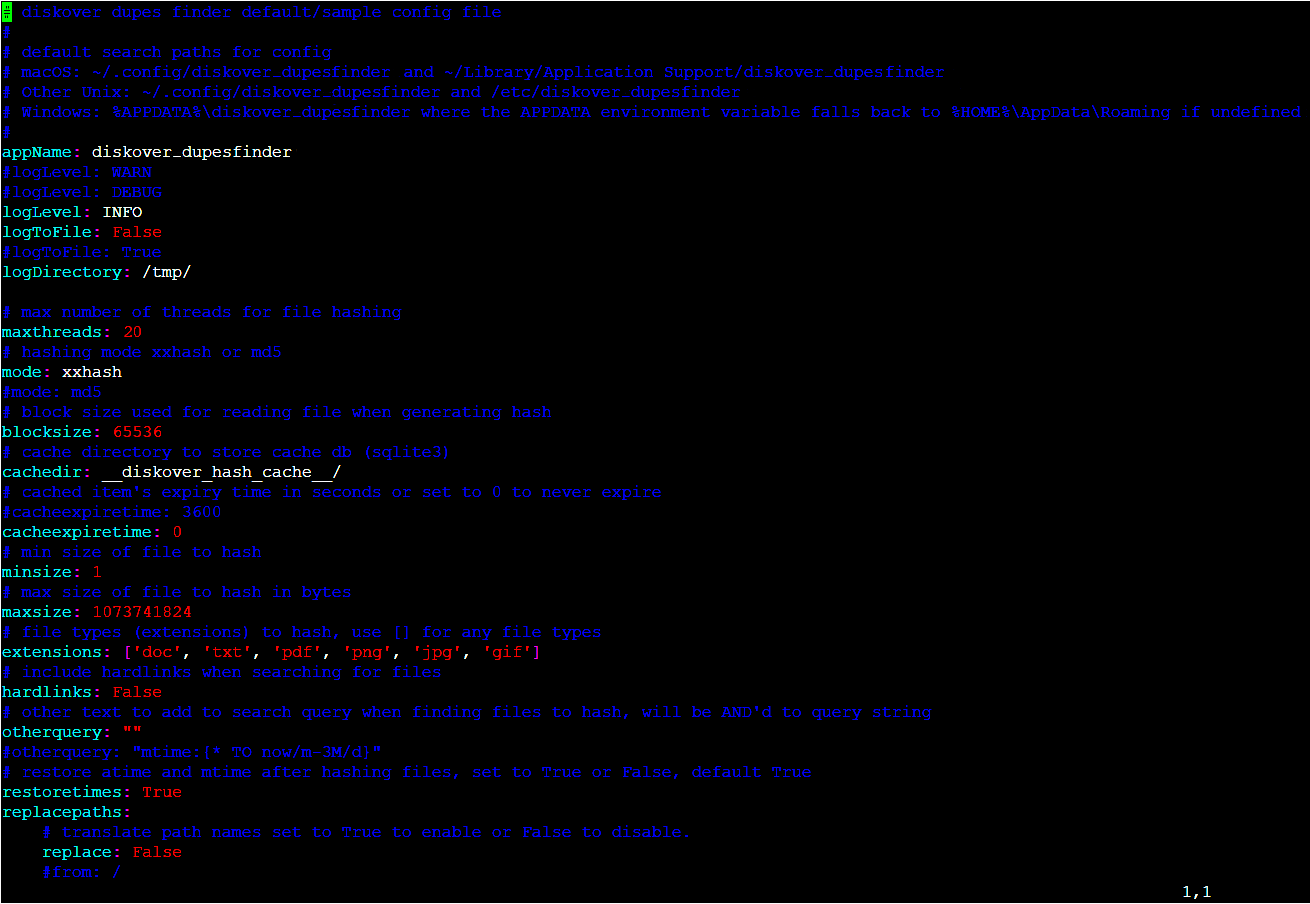
🔴 Check that you have the config file in /root/.config/diskover_dupesfinder/config.yaml, if not, copy from the default config folder in configs_sample/diskover_dupesfinder/config.yaml.
mkdir /root/.config/diskover_dupesfinder
cd /opt/diskover/configs_sample/diskover_dupes_finder
cp config.yaml /root/.config/diskover_dupesfinder/
🔴 The dupes-finder plugin runs post index and operates on completed indices as a scheduled job or on demand job to provide duplicates analysis on completed indices, to enable:
vim /root/.config/diskover_dupesfinder/config.yaml
🔴 At minimum configure the following:
- mode: desired checksum xxhash, md5, sha1, or sha256, can also be set using -m cli option
- minsize and maxsize: minimum and maximum size (in bytes) of files to hash
- extensions: desired file extensions to check, for all files use
[]
🔴 Some additional settings:
- maxthreads: maximum number of threads to use for file hashing, leave empty/blank to auto-set based on number of cpu cores
- otherquery: additional Elasticsearch query when searching an index for which files to hash
- restoretimes: restore atime/mtime file times after hashing file
- replacepaths: for translating paths from index path to real path, example translating
/to/mnt/. This is required if path translations were done in index or needing to convert to a Windows path.
🔴 To run the duplicates check via command line:
cd /opt/diskover/plugins_postindex
python3 diskover_dupesfinder.py diskover-<indexname>
🔴 To run the duplicates check and cache duplicate file hashes in sqlite cache db:
python3 diskover_dupesfinder.py diskover-<indexname> -u
🔴 To run the duplicates check and cache all file hashes in sqlite cache db, and hash all files (not just dupe files):
python3 diskover_dupesfinder.py diskover-<indexname> -u -a
🔴 To run the duplicates check and cache all file hashes in sqlite cache db, use hash mode sha1, and save all dupe files to csv:
python3 diskover_dupesfinder.py diskover-<indexname> -u -m sha1 -c
🔴 To run the dupes finder for multiple completed indices and compare dupes between indices:
python3 diskover-dupesfinder.py diskover-<indexname1> diskover-<indexname2>
🔴 Get help and see all cli options:
python3 diskover-dupesfinder.py -h
Index ES Query Report Plugin
The index Elasticsearch (ES) query report plugin is designed to search for es query string in an existing completed index and create a csv report with the ability to to send the report to one or more email recipients.
🔴 The index ES query report plugin runs post index and operates on completed indices as a scheduled job or on demand job to search for docs in an index.
🔴 Copy default/sample config:
mkdir /root/.config/diskover_esqueryreport
cd /opt/diskover
cp configs_sample/diskover_esqueryreport/config.yaml /root/.config/diskover_esqueryreport/
🔴 Edit the ES query report config and edit for your environment:
vim /root/.config/diskover_esqueryreport/config.yaml
Note: By default report csv files are saved in
/tmp folder
🔴 To run es query report plugin via command line:
cd /opt/diskover/plugins_postindex
python3 diskover-esqueryreport.py -q "es query string" indexname
🔴 To get help and see all cli options:
python3 diskover-esqueryreport.py -h
Index Illegal File Name Plugin
🍿 Watch Demo Video
The index illegal file name plugin is designed to search for illegal file names and directory names in an existing completed index.
🔴 The index illegal file name plugin runs post index and operates on completed indices as a scheduled job or on demand job to search for and tag docs in an index.
🔴 Copy default/sample config:
mkdir /root/.config/diskover_illegalfilename
cd /opt/diskover
cp configs_sample/diskover_illegalfilename/config.yaml /root/.config/diskover_illegalfilename/
🔴 Edit the illegal file name config and edit defaults if needed:
vim /root/.config/diskover_illegalfilename/config.yaml
Note: By default any illegal file names are tagged with illegalname and any long file names are tagged with longname
🔴 To run illegal file name plugin via command line:
cd /opt/diskover/plugins_postindex
python3 diskover-illegalfilename.py indexname
🔴 To get help and see all cli options:
python3 diskover-illegalfilename.py -h
Index Auto Tag Plugin
The index auto tag plugin is designed to auto tag an existing completed index. Auto-tagging can also be done during crawl time by adding tag rules in the diskover config file.
🔴 The index auto tag plugin runs post index and operates on completed indices as a scheduled job or on demand job to auto tag docs in an index.
🔴 Copy default/sample config:
mkdir /root/.config/diskover_autotag
cd /opt/diskover
cp configs_sample/diskover_autotag/config.yaml /root/.config/diskover_autotag/
🔴 Edit the autotag config and set the directory and file tag rules:
vim /root/.config/diskover_autotag/config.yaml
🔴 To run auto tag via command line:
cd /opt/diskover/plugins_postindex
python3 diskover-autotag.py indexname
🔴 To get help and see all cli options:
python3 diskover-autotag.py -h
Index Differential Plugin
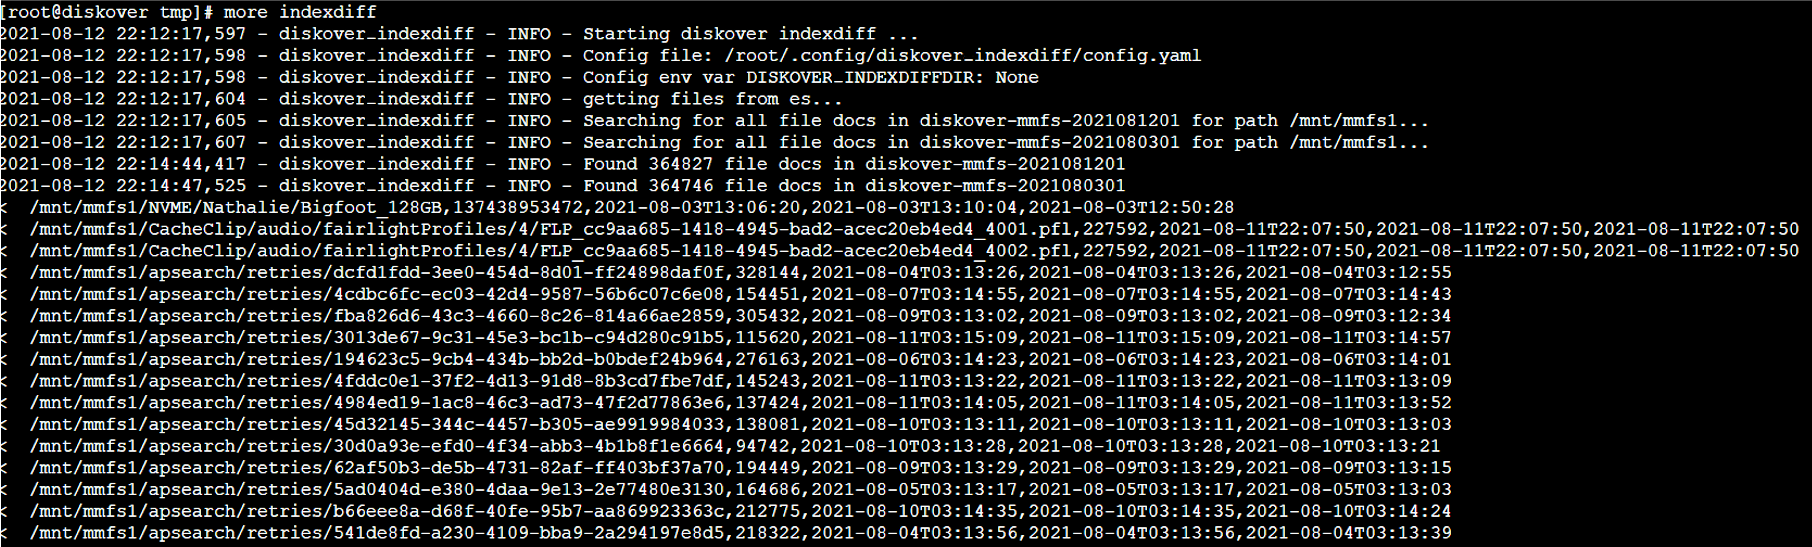
The index differential plugin is designed to provide a list of file differences between two indices (or points in time). The differential list can be used to feed synchronization tools (i.e. rsync) or identify deltas where two repositories should be identical. Outputs a CSV file containing the diffs between the two indices. It can also be used to compare checksums/hashes of files between two indices.
🔴 The index differential plugin runs post index and operates on completed indices as a scheduled job or on demand job to provide differences between two indices.
🔴 Copy default/sample config:
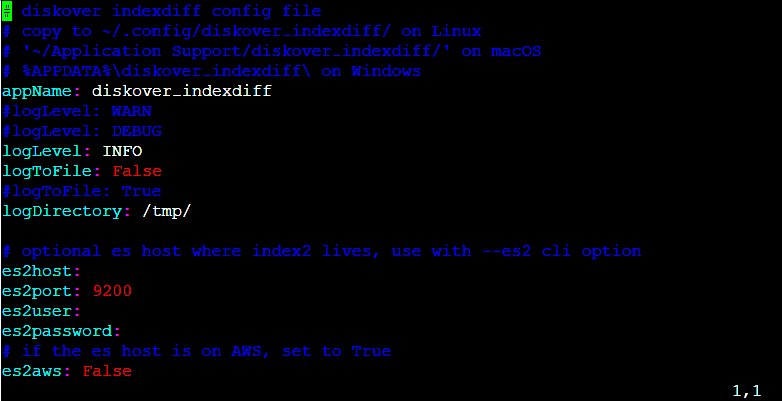
mkdir /root/.config/diskover_indexdiff
cd /opt/diskover
cp configs_sample/diskover_indexdiff/config.yaml /root/.config/diskover_indexdiff/
vim /root/.config/diskover_indexdiff/config.yaml
🔴 No configuration changes are usually required to the configuration file unless comparison involves indices from different Elasticsearch clusters, or changing default settings.
🔴 To run the index diff via command line and compare two indices with same top paths and output all diffs to csv file:
cd /opt/diskover/plugins_postindex
python3 diskover-indexdiff.py -i indexname1 -I indexname2 -d /mnt/stor1/foo
🔴 Compare two indices with different top paths and also compare file sizes (not just file names):
python3 diskover-indexdiff.py -i indexname1 -I indexname2 -d /mnt/stor1/foo -D /mnt/stor2/foo -s
🔴 Compare two indices and compare xxhash hash of files, tag indexname1 with diffs, and don't create csv file of diffs:
python3 diskover-indexdiff.py -i indexname1 -I indexname2 -d /mnt/stor1/foo -D /mnt/stor2/foo -c xxhash --tagindex --nocsv
🔴 To get help and see all cli options:
python3 diskover-indexdiff.py -h
Media Info Harvest Plugin
The media info harvest plugin is designed to provide media metadata attributes about a file without granting the Diskover user any read/write file system access.
The media info plugin enables additional metadata for video files to be harvested at time of index or post-index. The media info plugin uses ffmpeg/ffprobe to harvest attributes about the media file.
New indices will use the plugin and any video file will get additional media info added to the Elasticsearch index’s media_info field.
The attributes provide the ability to view storage and file system content from a workflow perspective, for example all the frame rates on any given storage.
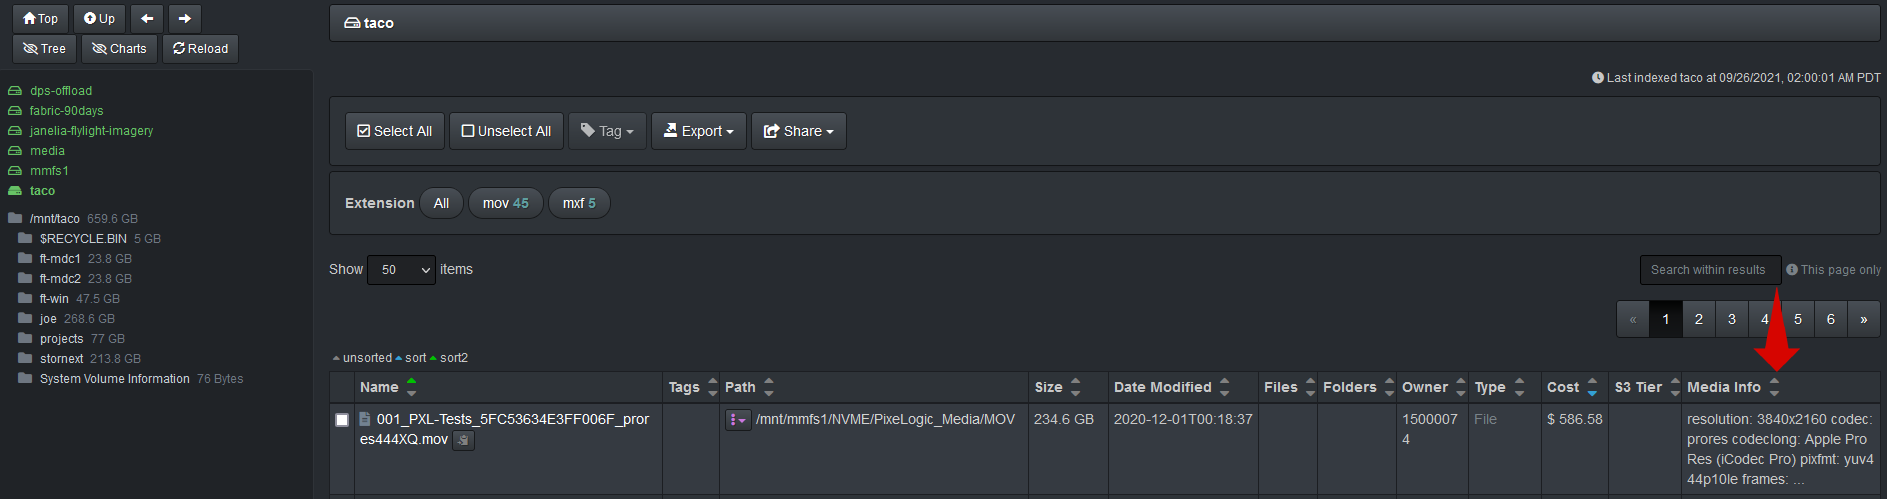
You can view and search on media info attributes in Diskover-Web since it will store it in a new field for video files, the field name is media_info.
Install Media Info Dependencies
🔴 The media info plugin uses the ffmpeg https://www.ffmpeg.org/ open-source package to harvest media attributes for media file types.
Install ffmpeg on Centos 7.x:
yum install epel-release
yum localinstall --nogpgcheck https://download1.rpmfusion.org/free/el/rpmfusion-free-release-7.noarch.rpm
yum install ffmpeg ffmpeg-devel
ffmpeg -version
Install ffmpeg on Centos 8.x:
dnf install epel-release dnf-utils
yum-config-manager --set-enabled PowerTools
yum-config-manager --add-repo=https://negativo17.org/repos/epel-multimedia.repo
dnf install ffmpeg
ffmpeg -version
Install ffmpeg on Ubuntu 18.x/20.x:
apt update
apt install ffmpeg
ffmpeg -version
🔴 The media info plugin runs as part of the indexing process. To enable:
vim /root/.config/diskover/config.yaml

🔴 enable: set to True
🔴 files: [‘mediainfo’]
🔴 Copy the default/sample media info config file:
mkdir /root/.config/diskover_mediainfo_plugin
cp /opt/diskover/configs_sample/diskover_mediainfo_plugin/config.yaml /root/.config/diskover_mediainfo_plugin
🔴 Edit the media info config file:
vim /root/.config/diskover_mediainfo_plugin/config.yaml
Note: The media info plugin is currently not supported for S3 based object storage. If the media info plugin is enabled in the default configuration file, an alternate configuration file must be created where the media info plugin is disabled. The alternate configuration file must be invoked when indexing S3 based volumes.

🔴 For reference, here are all the media info fields that are currently stored in the Elasticsearch index:
mediatext = {
                'resolution': str(stream['width']) + 'x' + str(stream['height']) if 'width' in stream and 'height' in stream else None,
                'codec': stream['codec_name'] if 'codec_name' in stream else None,
                'codeclong': stream['codec_long_name'] if 'codec_long_name' in stream else None,
                'codectag': stream['codec_tag_string'] if 'codec_tag_string' in stream else None,
                'pixfmt': stream['pix_fmt'] if 'pix_fmt' in stream else None,
                'frames': int(stream['nb_frames']) if 'nb_frames' in stream else None,
                'duration': duration,
                'framerate': framerate,
                'bitrate': bitrate
            }
🔴 Here is the ffprobe command used:
ffprobe -v quiet -print_format json -show_format -show_streams <file_path>
Visibility of the Media Info Field in Diskover UI
Technically at this point, the media info fields should be visible and searchable in the Diskover UI, but if it's not:
🔴 Globally expose that column in the user interface:
cd /var/www/diskover-web/src/diskover/
vi Constants.php
🔴 Uncomment the EXTRA_FIELDS array to look something like this:
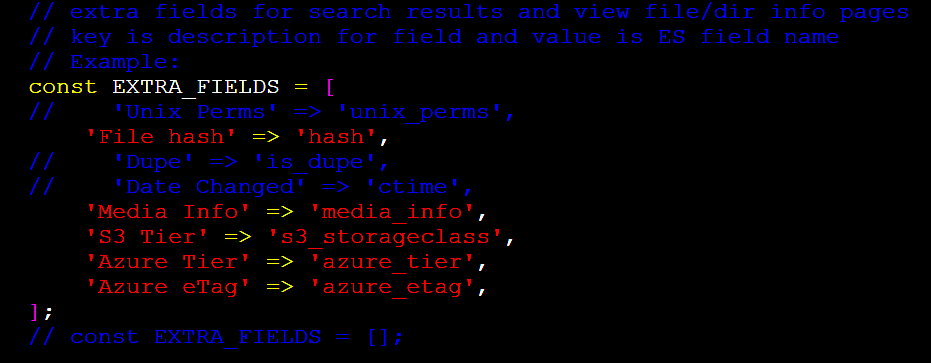
Tag Copier Plugin
The tag copier plugin is designed to migrate tags from one index to the next. Generally, these tags are not applied at time of index via autotag functionality, but are applied post index through:
- Manual tag application.
- Plugin tag application (harvest, duplicate hashes, etc.)
🔴 Check that you have the config file in ~/.config/diskover_tagcopier/config.yaml, if not, copy from default config folder in configs_sample/diskover_tagcopier/config.yaml.
🔴 The tag copier runs post as scheduled job or immediately after index process copying tags from previous index to new index. To enable:
vim /root/.config/diskover_tagcopier/config.yaml
🔴 Configure for directories, files, or both.
🔴 Configure any tags to exclude from migration.
Invoke Tag Migration via Command Line
🔴 Tag migration can be invoked via a command line:
cd /opt/diskover
python3 diskover_tagcopier.py diskover-<source_indexname> diskover-<dest_indexname>
🔴 See all cli options:
python3 diskover-tagcopier.py -h
Configure Indexing Tasks to Migrate Tags from Previous Index
🔴 Create post command script to invoke tag roller:
cd /opt/diskover/scripts
cp cp task-postcommands-example.sh task-postcommands.sh
Set the following indexing tasks in Task Panel to migrate tasks from one index to the next:
🔴 In the post-crawl command add:
/bin/bash
🔴 In the post-crawl command Args add:
./scripts/task-postcommands.sh {indexname}

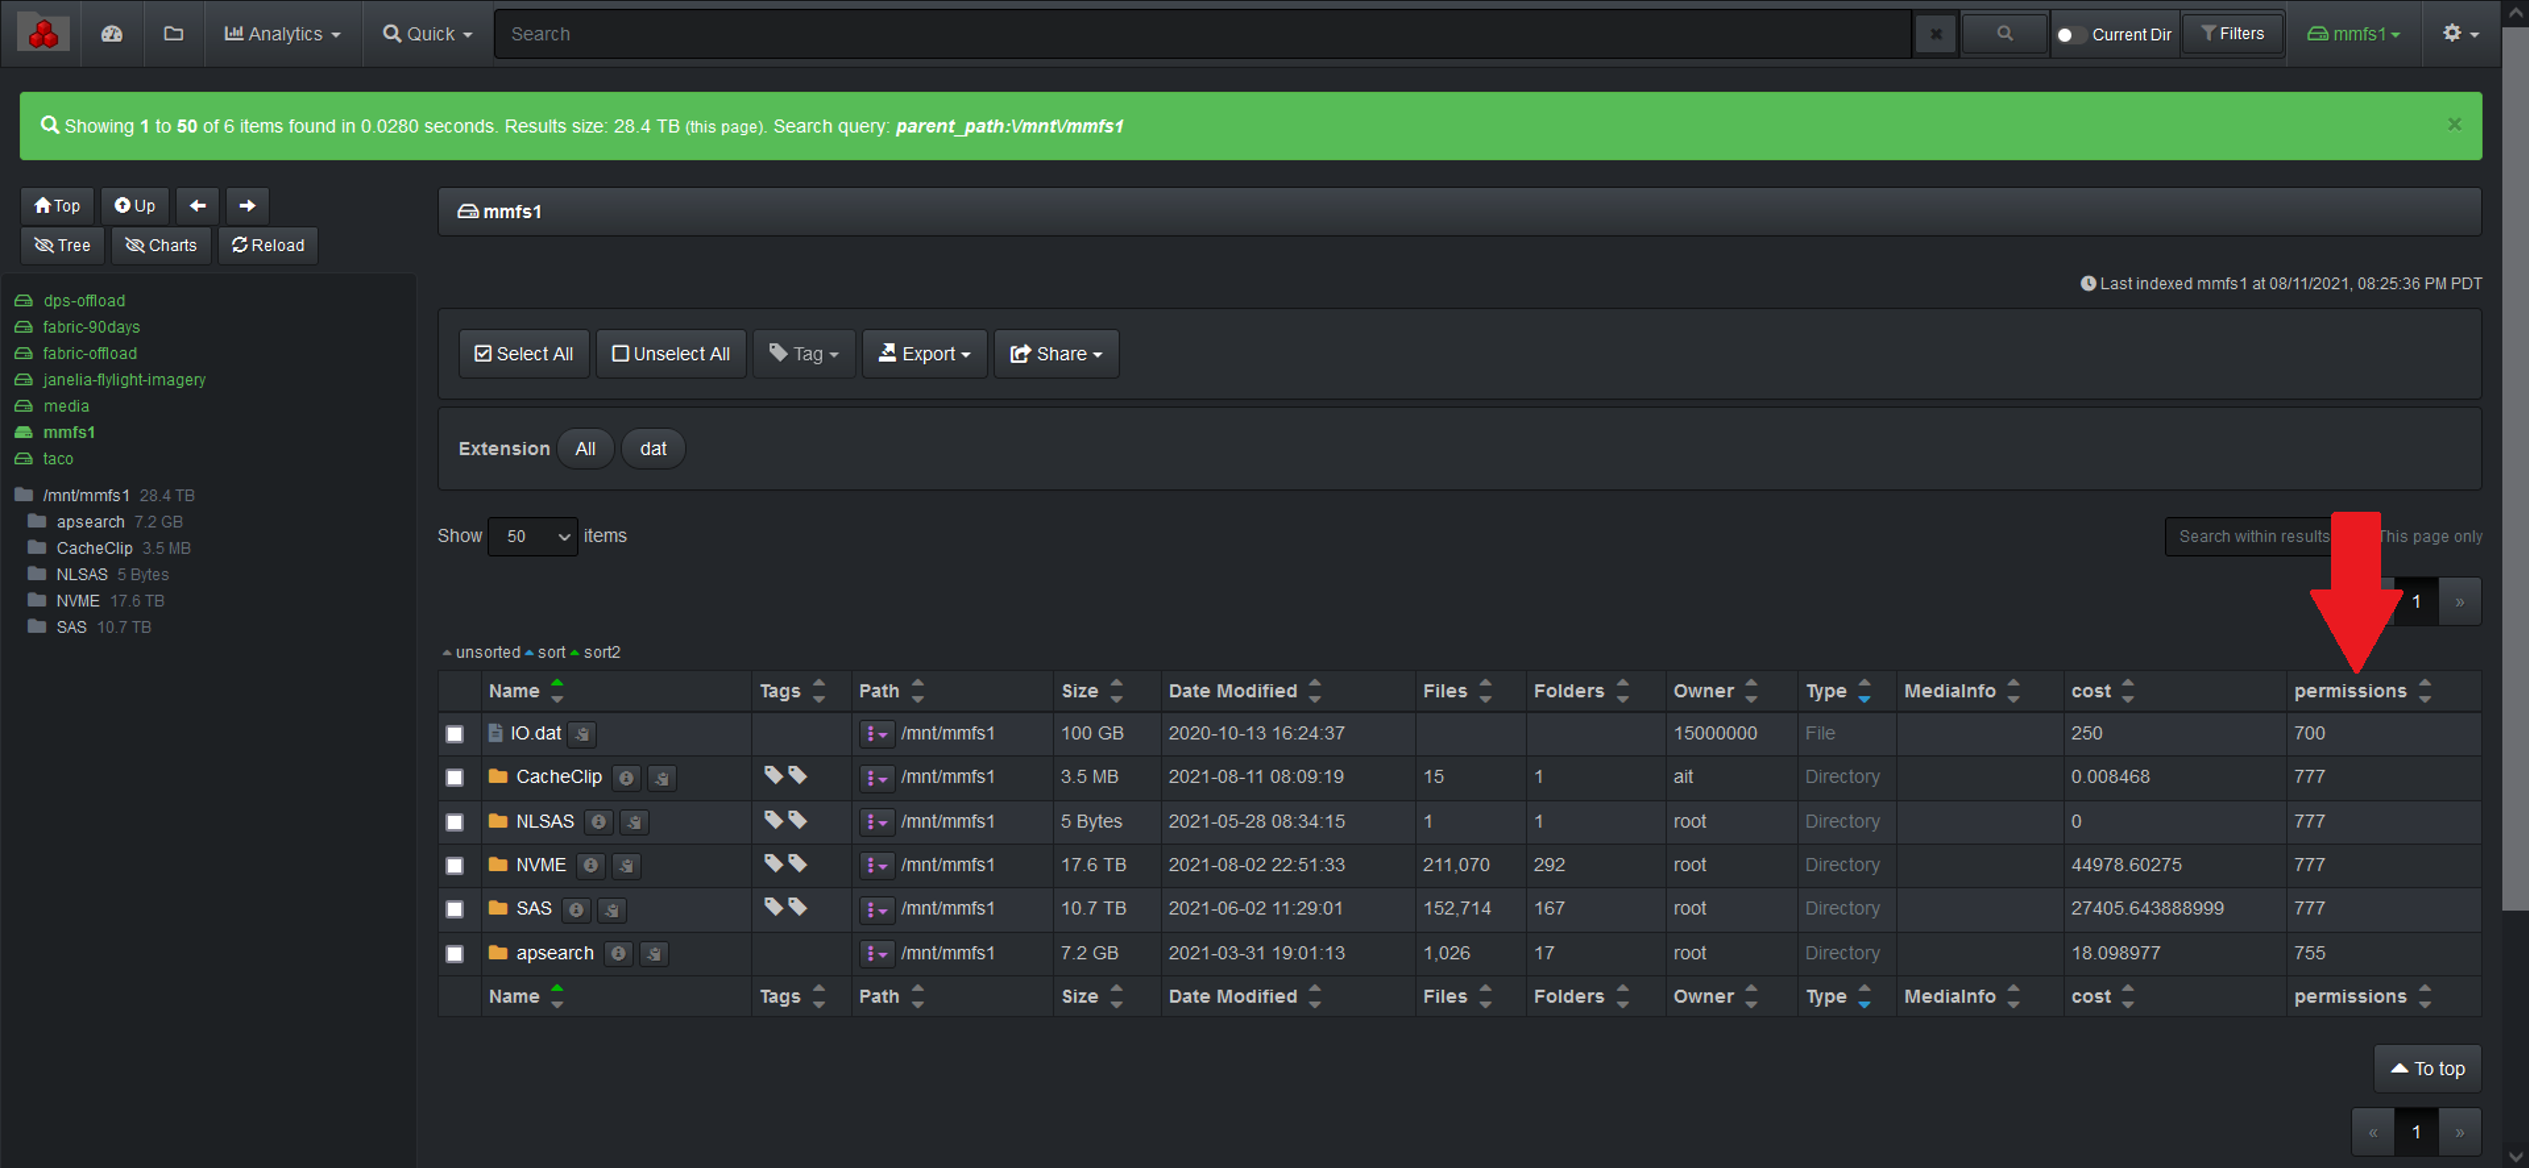
Unix Permissions Plugin
The Unix permissions plugin adds the Unix permissions of each file and directory to the Diskover index at time of indexing. Two tags are added, unixperms-plugin and ugo+rwx, if a file or directory is found with fully open permissions (777 or 666).
🔴 The unixperms runs as part of the indexing process. To enable:
vim /root/.config/diskover/config.yaml
🔴 enable: set to True
🔴 dirs: [‘unixperms’]
🔴 files: [‘unixperms’]

Windows Owner Plugin
The Windows Owner plugin adds the Windows file owner and primary group of each file and directory to the Diskover index at time of indexing. It replaces all docs showing username 0 with the Windows file/directory owner name.
Note: Using this plugin increases scanning time due to name/sid lookups.
🔴 Requirements:
- This plugin works in Windows only
- pywin32 python module, install with pip https://pypi.org/project/pywin32/
🔴 The windows-owner runs as part of the indexing process. To enable edit diskover config:
notepad %APPDATA%\diskover\config.yaml
🔴 enable: set plugins enable to True
🔴 dirs: [‘windows-owner’]
🔴 files: [‘windows-owner’]
plugins:
    # set to True to enable all plugins or False to disable all plugins
    enable: True
    # list of plugins (by name) to use for directories
    dirs: ['windows-owner']
    # list of plugins (by name) to use for files
    files: ['windows-owner']
🔴 There are a few settings at the top of the windows-owner plugin:
-
INC_DOMAIN: include domain in owner/group names, set to True or False -
GET_GROUP: get group info (primary group) as well as owner, set to True or False -
USE_SID: store sid if owner/group lookup returns None, set to True or False
Windows Attributes Plugin
The Windows Attributes plugin adds the Windows file owner, primary group and ACE's of each file and directory to the Diskover index after indexing is complete. It replaces all docs showing owner 0 and group 0 with the Windows file/directory owner name and primary group. It updates owner, group and windacls fields meta data of each file or directory to diskover index after indexing with the Windows owner, primary group and acl info.
Note: The plugin can take a long time to run due to name/sid lookups.
🔴 Requirements:
- This plugin works in Windows only
- pywin32 python module, install with pip https://pypi.org/project/pywin32/
- enable long path support in Windows if long paths being scanned https://docs.microsoft.com/en-us/windows/win32/fileio/maximum-file-path-limitation?tabs=cmd
🔴 Check that you have the config file in %APPDATA%\diskover_winattrib\config.yaml, if not, copy from default config folder in configs_sample\diskover_winattrib\config.yaml.
🔴 Edit win-attrib plugin config and modify as needed:
notepad %APPDATA%\diskover_winattrib\config.yaml
🔴 Run windows-attrib plugin and get help to see cli options:
cd "C:\Program Files\diskover\plugins_postindex"
python diskover-winattrib.py -h
🔴 Run windows-attrib plugin using index name:
cd "C:\Program Files\diskover\plugins_postindex"
python diskover-winattrib.py diskover-index1
🔴 Run windows-attrib plugin using latest index found for top path and using sqlite db cache:
cd "C:\Program Files\diskover\plugins_postindex"
python diskover-winattrib.py -l /somepath -u
Xytech Asset Creation Plugin
🍿 Watch Demo Video
Xytech Asset Creation Plugin Overview
Post facilities often have customer assets stored on LTO tape media. However, these assets are difficult to discover within the Xytech Media Operations Platform if there is no Asset ID in the customers vault of assets. The plugin is designed to use the Diskover indexer to discover newly restored customer assets from any media. The assets are restored into a folder with naming convention CustomerNumber_CustomerName.
The Xytech Asset Creation plugin then uses the Xytech API to create an asset for the customer in the vault library. The path location is added to the asset within Xytech and the asset # is assigned as a tag to the file/object within the Diskover index.
Xytech Asset Creation Plugin Installation
🔴 Extract DiskoverXytechPlugin-master.zip:
cd /tmp
unzip DiskoverXytechPlugin-master.zip
cd /tmp/DiskoverXytechPlugin-master.zip
🔴 Make destination directories:
mkdir /root/.config/diskover_xytech_asset
mkdir /opt/diskover/plugins_postindex/xytech_plugin
🔴 List plugin contents:
ls -l /tmp/DiskoverXytechPlugin-master

🔴 Copy files to proper locations:
cd /tmp/DiskoverXytechPlugin-master
mv config.yaml /root/.config/diskover_xytech_asset/
mv diskover-xytech-asset.py /opt/diskover/plugins_postindex/xytech_plugin/
mv wsdl/ /opt/diskover/plugins_postindex/xytech_plugin/
🔴 Install Python dependencies:
pip3 install suds-community
🔴 Configure plugin settings:
vim /root/.config/diskover_xytech_asset/config.yaml
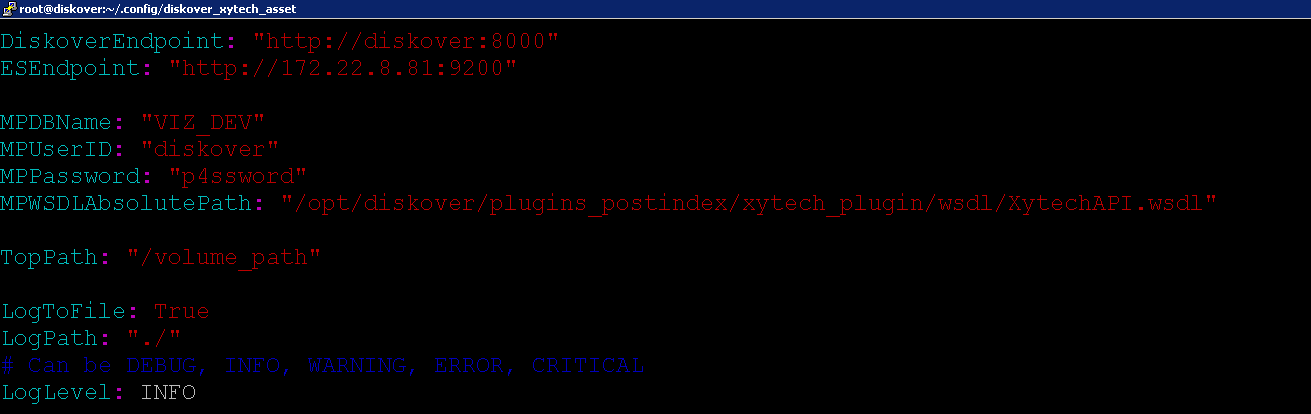
Diskover Endpoint:
DiskoverEndpoint: http://localhost:8000
ElasticSearch Endpoint:
ESEndpoint: http://172.22.8.31:9200
Xytech Credentials:
MPDBName: VIZ_DEV
MPUserID: diskover
MPPassword: p4ssword
Xytech WSDL file ABSOLUTE path:
MPWSDLAbsolutePath: /opt/diskover/plugins_postindex/xytech_plugin/wsdl/XytechAPI.wsdl
Diskover top path where assets will be restored:
TopPath: /volume_path
Plugin logging:
LogToFile: True
LogPath: ./
LogLevel: INFO
🔴 Configure Xytech API Endpoint
vim /opt/diskover/plugins_postindex/xytech_plugin/XytechAPI.wsdl

Set Xytech API Endpoint:
<soap:address location="http://172.23.1.154:8008/XytechAPI" />
🔴 Run Xytech Asset Creation Plugin:
cd /opt/diskover/plugins_postindex/xytech_plugin/
🔴 Run Command:
./diskover-xytech-asset.py

Display Extra Fields on File Search Page
To display additional columns within the file search page of the Diskover-Web user interface, using Media Info as an example:
vim /var/www/diskover-web/src/diskover/Constants.php
🔴 Change ownership to EXTRA_FIELDS:
'Media Info' => 'media_info'
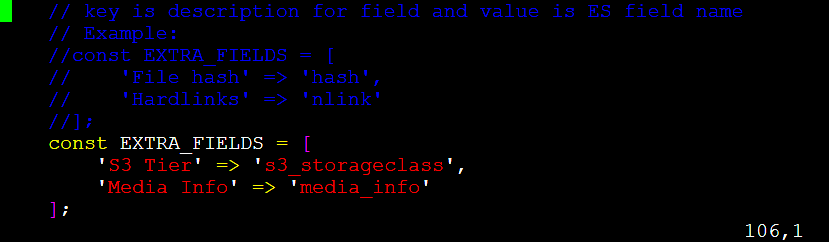
The Media Info column will now be displayed on the file search page of Diskover-web use interface:
List of Extra Fields
For an exhaustive list of extra fields, please refer to the Diskover-Web user interface > gear icon > Help > Default index fields.
Diskover-Web Plugins | File Actions
Diskover-web is designed for extensibility. The open-source architecture is designed to promote extensibility via web plugins known as File Actions.
File Actions are located in the public/fileactions directory.
File Actions are written in PHP and have the extension .php. Diskover-web includes a few example file actions in the fileaction_samples directory. Any sample files that you wish to use need to be copied to public/fileactions.
After you have created a new File Action with an extension .php, you will need to add the File Action to the web config file in src/diskover/Constants.php. Edit the config file and look for the section titled File Actions. You will need to add the file action to the const FILE_ACTIONS array. There are some examples in the Constants.php.sample default config file and below.
Here is an example of adding a File Action:
const FILE_ACTIONS = [
    'find file sequences' => [
        'webpage' => 'filesequence.php',
        'allowed_users' => [Constants::ADMIN_USER, Constants::USER],
        'allowed_ldap_groups' => ['diskover-admins', 'diskover-powerusers', 'diskover-users'],
        'menu_icon_class' => 'far fa-images'
    ]
];
🔴 Each File Action is stored as an associative array with the key being the file action name:
-
webpage : the filename of the File Action
-
allowed_users : list of allowed local and/or AD/LDAP user names that can run the File Action
-
allowed_ldap_groups : list of allowed AD/LDAP group names that can run the File Action
-
menu_icon_class : Font Awesome css class name for icon https://fontawesome.com/
Other File Action examples:
const FILE_ACTIONS = [
    'list dir' => [
        'webpage' => 'listdir.php',
        'allowed_users' => [Constants::ADMIN_USER, Constants::USER],
        'allowed_ldap_groups' => ['diskover-admins', 'diskover-powerusers', 'diskover-users'],
        'menu_icon_class' => 'far fa-folder-open'
    ],
    'newer subdirs' => [
        'webpage' => 'newersubdirs.php',
        'allowed_users' => [Constants::ADMIN_USER, Constants::USER],
        'allowed_ldap_groups' => ['diskover-admins', 'diskover-powerusers', 'diskover-users'],
        'menu_icon_class' => 'fas fa-folder-minus'
    ],
    'get image http' => [
        'webpage' => 'getimagehttp.php',
        'allowed_users' => [Constants::ADMIN_USER, Constants::USER],
        'allowed_ldap_groups' => ['diskover-admins', 'diskover-powerusers', 'diskover-users'],
        'menu_icon_class' => 'far fa-file-image'
    ],
    'rclone sync local' => [
        'webpage' => 'rclone.php?flags=sync -v -P -n&dest=/tmp/',
        'allowed_users' => [Constants::ADMIN_USER, Constants::USER],
        'allowed_ldap_groups' => ['diskover-admins', 'diskover-powerusers', 'diskover-users'],
        'menu_icon_class' => 'far fa-copy'
    ],
    'python print path' => [
        'webpage' => 'pythonprintpath.php',
        'allowed_users' => [Constants::ADMIN_USER, Constants::USER],
        'allowed_ldap_groups' => ['diskover-admins', 'diskover-powerusers', 'diskover-users'],
        'menu_icon_class' => 'fab fa-python'
    ],
    'open in Glim' => [
        'webpage' => 'glim.php',
        'allowed_users' => [Constants::ADMIN_USER, Constants::USER],
        'allowed_ldap_groups' => ['diskover-admins', 'diskover-powerusers', 'diskover-users'],
        'menu_icon_class' => 'far fa-file-image'
    ],
    'find file sequences' => [
        'webpage' => 'filesequence.php',
        'allowed_users' => [Constants::ADMIN_USER, Constants::USER],
        'allowed_ldap_groups' => ['diskover-admins', 'diskover-powerusers', 'diskover-users'],
        'menu_icon_class' => 'far fa-images'
    ],
    'submit to Vantage' => [
        'webpage' => 'vantageproxyjob.php',
        'allowed_users' => [Constants::ADMIN_USER, Constants::USER],
        'allowed_ldap_groups' => ['diskover-admins', 'diskover-powerusers', 'diskover-users'],
        'menu_icon_class' => 'far fa-file-video'
    ]
];
File Action Logging
All File Actions log in the public/fileactions/logs directory. If you do not have that directory, create the logs directory and chown the directory to be owned by NGINX, so NGINX can write log files into the directory.
File Action > CineViewer Player
🍿 Watch Demo Video
CineViewer is a video playback and management system designed for video and broadcast professionals. It is designed to securely view high-resolution media from a remote browser, without giving users access to the source files, as well as play content that may not be supported by standard web browsers, including file formats such as ProRes and MXF. Additionally, Cineviewer allows users to play back image sequences in formats such as DPX and EXR. The player can be launched in one click from the AJA Diskover Media Edition user interface, allowing for seamless validation of media assets, therefore increasing productivity, while safeguarding your production network.
With its timecode-accurate playback and seeking capabilities, CineViewer enables users to navigate through content with precision. The system also supports up to 16 channels of audio, providing a variety of audio configuration options to accommodate different projects. Furthermore, Cineviewer includes closed captioning functionality, ensuring an accessible experience for all users.
The following sections will guide you through the installation and configuration of CineViewer, helping you utilize this tool effectively for your video and broadcast needs.
The CineViewer Player is developed by CineSys LLC, a major technological and channel partner working with both Diskover Data and AJA Video Systems. For more information, support, or to purchase the CineViewer Player, please contact CineSys.io.

Supported Files & Systems
Platforms: CentOS 7x, other distro’s to follow (AWS EC2s, Mac, Windows, etc.)
Browsers: Chrome, Safari, Firefox
File Formats: The video player uses FFMPEG under the hood for real-time transcoding of creative content. CineViewer supports a wide range of file types and codecs including Animation, AVC-Intra, AVI, Cineform, DNxHD, DNxHR, DV, DVCPPRO HD, H.264, HEVC/H.265, IMX, MKV, MOV/QT, MP4/M4V, MPEG/M2V/MPG, TS, MPEG-2, MXF, OGG, ProRes, OGG, ProRes, VP-8, VP-9, WebM
Linux Installation
CineViewer runs best on Centos 7 Linux.
🔴 Untar the distribution:
tar xf cineviewer_dev_20230410-4.tgz
🔴 Run the install script:
$ cd cineviewer_dev_20230410/

$ sudo ./install

Cineviewer cineviewer_dev_20230410-4 Installer

Install Destination [/opt/cinesys/cineviewer]

Directory /opt/cinesys/cineviewer/releases exists.

Created directory /opt/cinesys/cineviewer/releases/cineviewer_dev_20230410-4
Copying directory . to /opt/cinesys/cineviewer/releases/cineviewer_dev_20230410-4
Linking /opt/cinesys/cineviewer/app to /opt/cinesys/cineviewer/releases/cineviewer_dev_20230410-4

Write systemd startup script ? [y/n] y
Writing systemd startup script /etc/systemd/system/cineviewer.service
usage: systemctl [start,stop,status,restart] cineviewer
Restarting cineviewer
restarting cineviewer

To start stop cineviewer use the systemctl command.
sudo systemctl [start,stop,restart,status] cineviewer

Version cineviewer_dev_20230410-4 installed successfully.
Default url is http://localhost:3000
🔴 At this point you should be able to browse to the CineViewer page.
License Key Request and Installation
When CineViewer is first installed or the license expires you will see the license key page appear.
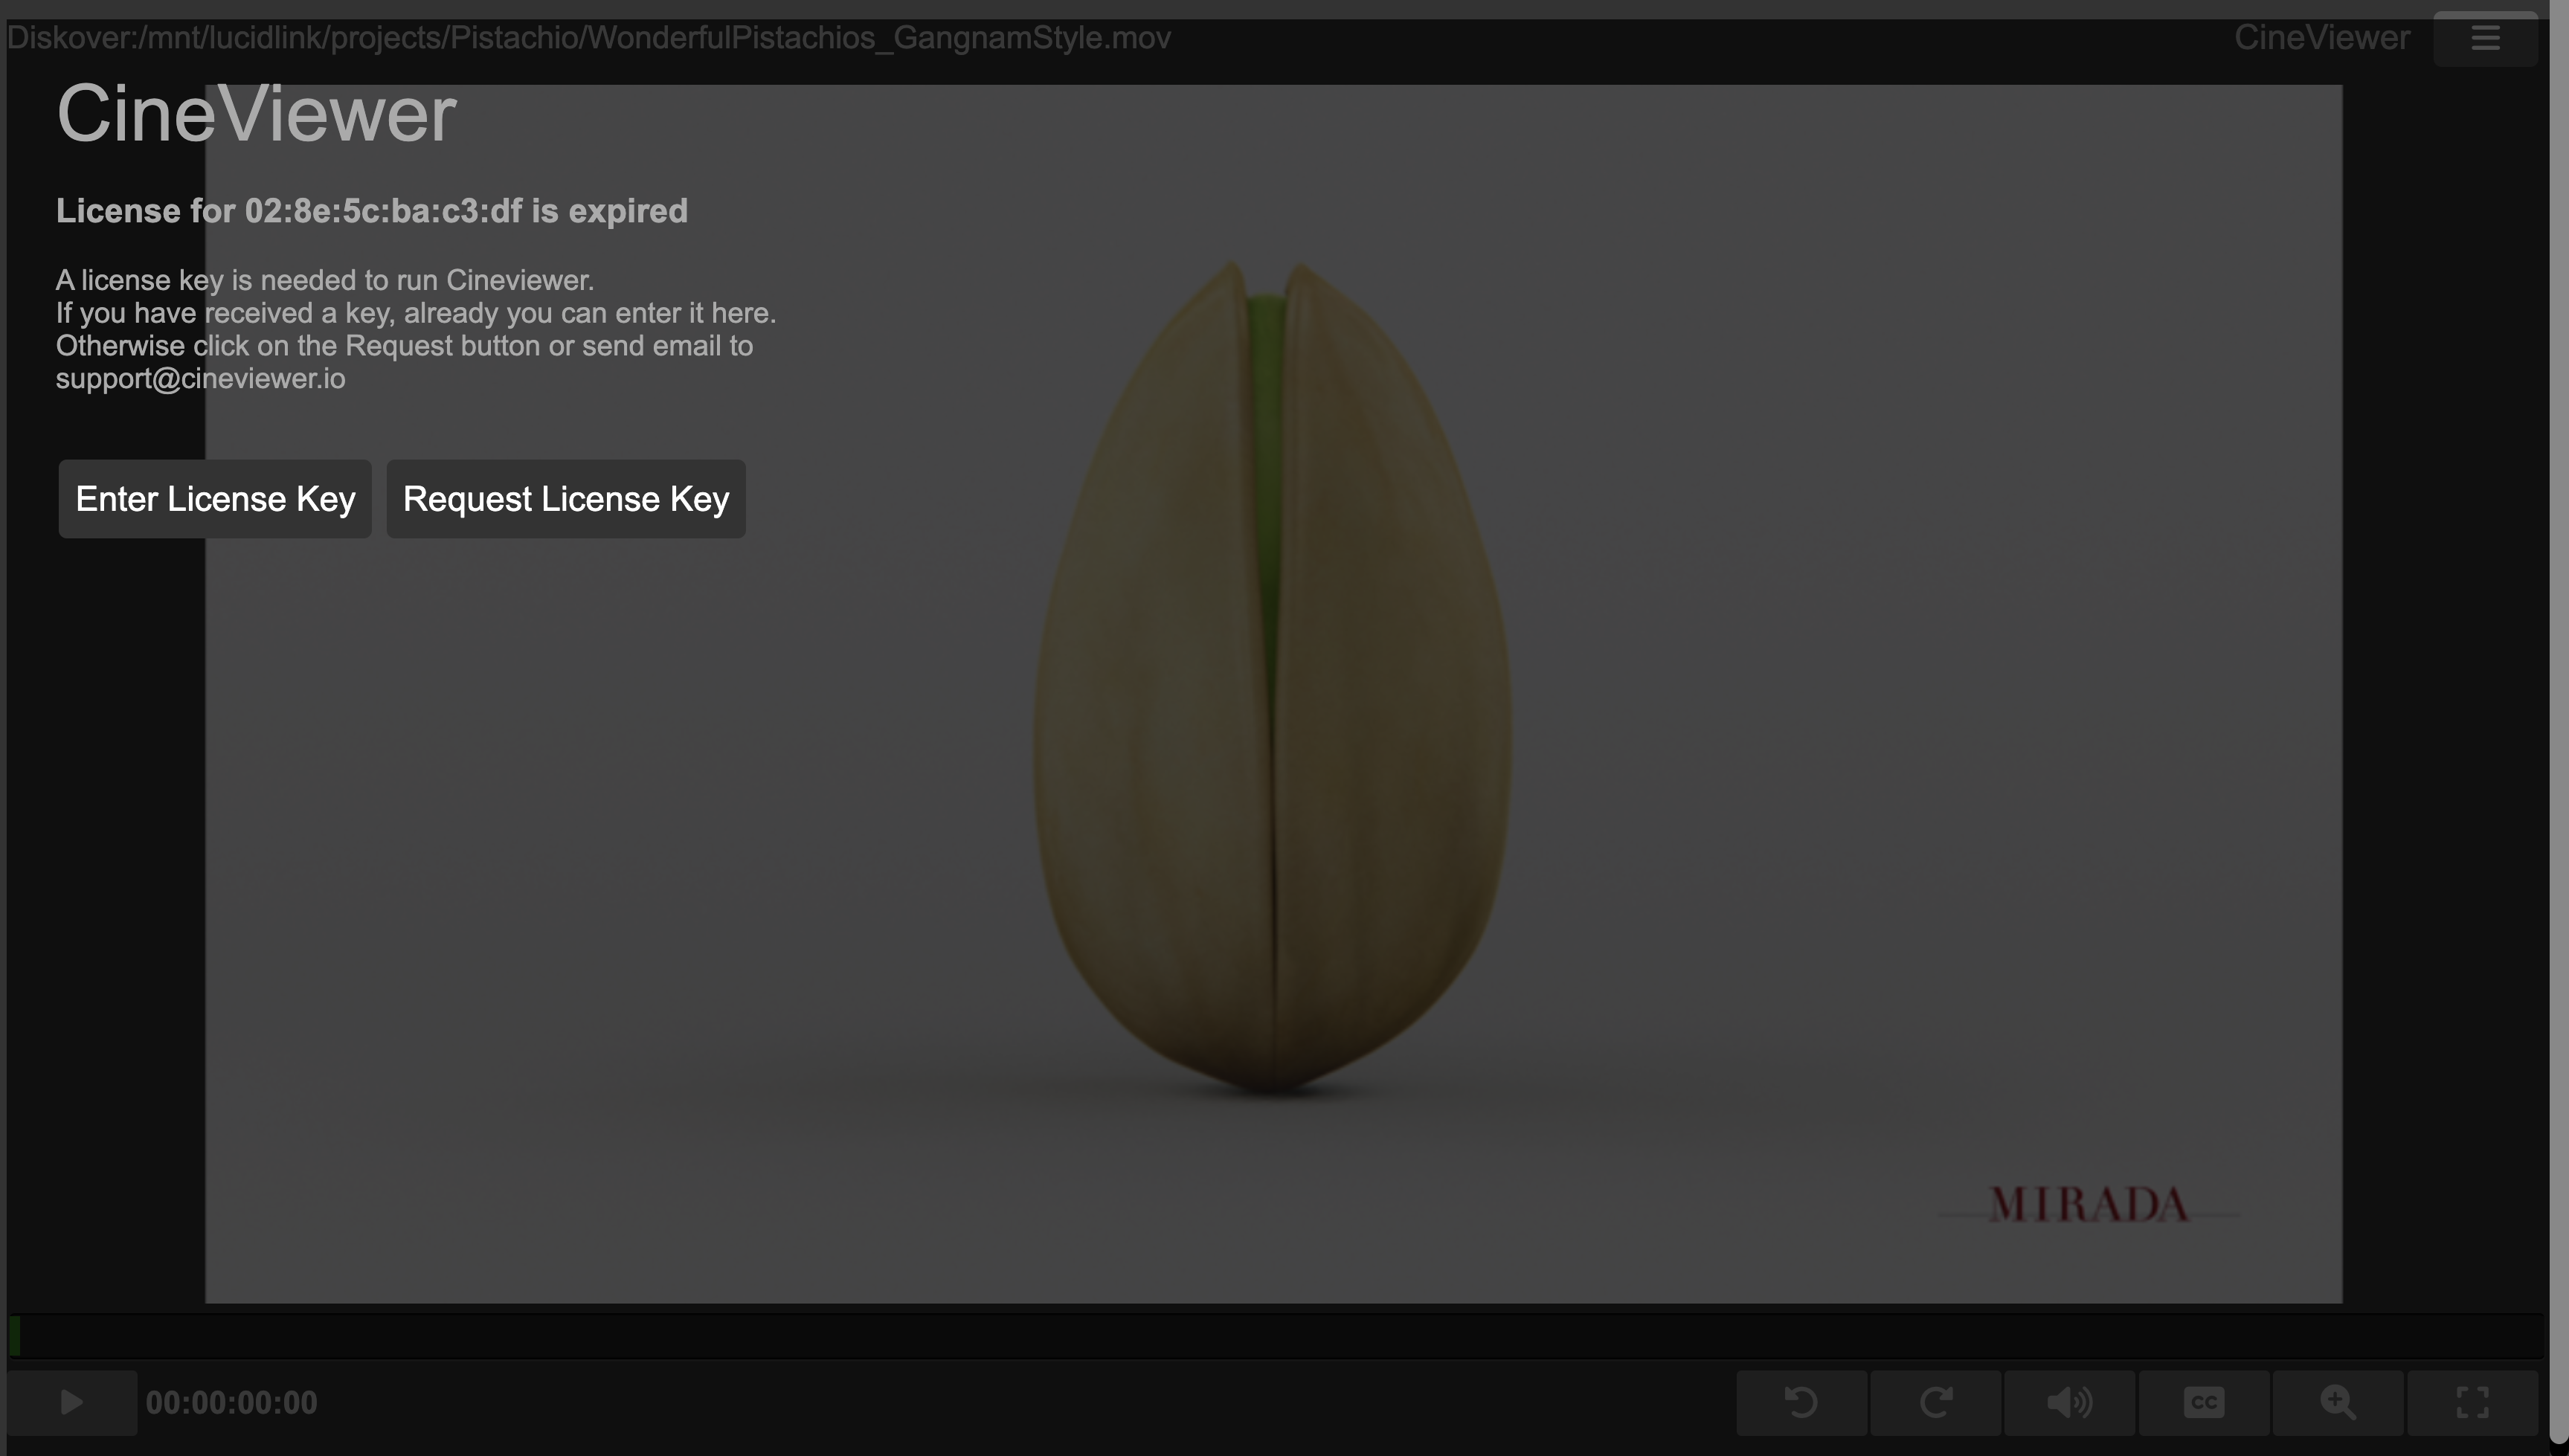
🔴 To get a license key start by clicking the Request License Key button and fill out the required fields.
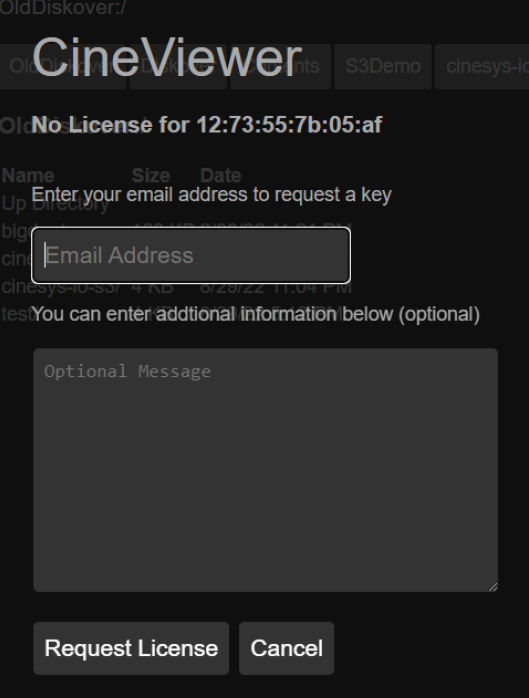
🔴 After clicking the Request License button you should the screen below.
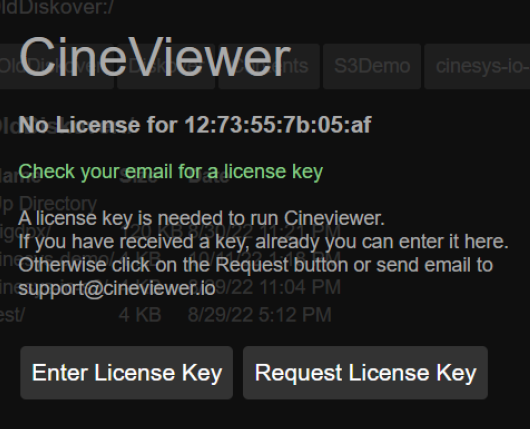
🔴 The license key will be emailed to the address you entered in the previous step. Click Enter License Key and paste all the lines including ====BEGIN LICENSE KEY==== and ====END LICENSE KEY==== as shown in this example. Click Update License:
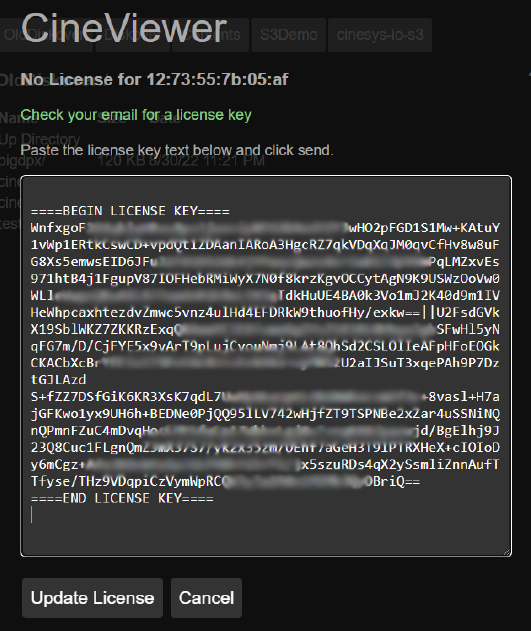
🔴 CineViewer should reload the page and be operational.
Command Line Key Management
You can also edit the license file directly.
🔴 Locate the keyfile at the install directory, by default:
/opt/cinesys/cineviewer/license.dat
🔴 Edit the file using nano or vi… after saving the file, you may need to restart Cinevieiwer using the following command:
sudo systemctl restart cineviewer
Command Line Process Management
Linux with systemctl.
🔴 To get application status:
systemctrl status cineviewer
🔴 To restart the application:
systemctrl restart cineviewer
🔴 To stop the application:
systemctrl stop cineviewer
🔴 To see logs in while the app is running:
journalctl --lines 0 --follow _SYSTEMD_UNIT=cineviewer.service
Configuration
CineViewer has two configuration files to control the app. The first is the app default configuration, usually /opt/cinesys/cineveiwer/app/configure-default.json which contains all the default values for the app.
The other configuration file, usually /opt/cinesys/cineveiwer/configure.json contains the changes specific to the installation.
🔴 A configure.json only needs to assign values that are different from the defaults. For example, the configure file to change the port used:
{
    "app": {
        "port": "3001"
    }
}
🔴 A quick overview of some of the settings:
| SETTING | PURPOSE |
|---|---|
| transcode | For switching out transcoders ffmpeg or ffprobe |
| cineplay | For controlling the cache location |
| toast | For adding file mounts and access |
User Configuration | Login Credentials
By default, CineViewer is not login protected. To enable basic logins a users' config setting can be added. Note the app can also make use of the Active Directory module to enable logins at larger facilities.
"users": {
    "users": [
         { "name":"admin", "groups":["admin"], "pass":"******" },
         { "name":"guest", "groups":["staff"], "pass":"******" }
    ]
}
🔴 Once the user config settings are added, users will be prompted to enter their login credentials.
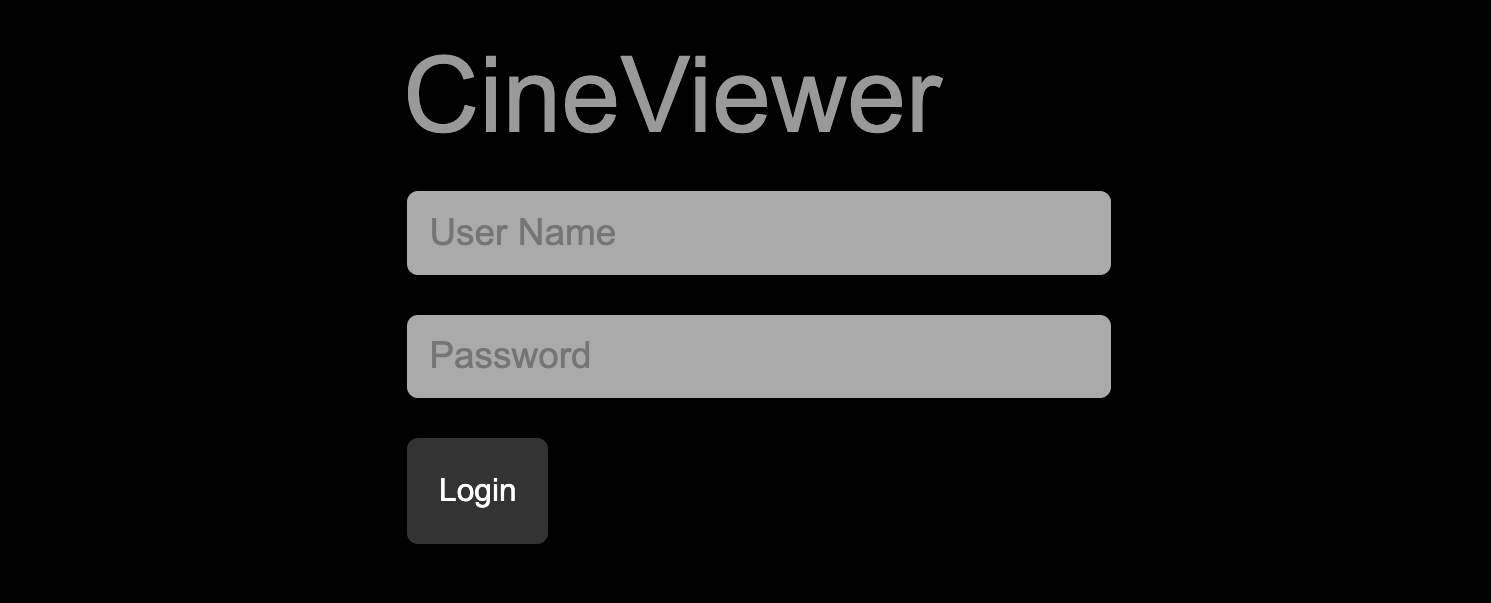
Transcoding Settings
🔴 By default, Cineviewer uses ffmpeg to do most transcoding. The paths can se modified to ffprobe using the transcode settings:
"transcode": {
    "ffmpeg":"./bin/ffmpeg/ffmpeg",
    "ffprobe":"./bin/ffmpeg/ffprobe"
}
Player Cache
"cineplay": {
    "cache": "./cache",
    "cache_expire": "120"
},
File Mounts
"toast": {
    "sortable": ["dpx", "exr"],
    "find_max_files": "2048",
    "mounts": [
    {
        "type":"fs",
        "prefix":"Diskover:",
        "name":"Diskover",
        "path": "/"
    }
   ]
}
Modes of Operation
Cineviewer has basically two modes of operation, the file browser and the viewer.
Using the File Browser
One of Cineviewer's biggest strengths is its file system abstraction layer called Toast. Toast allows the app to treat files on the local file system the same as files on S3 or even in an asset management system such as Portal or Iconik. Toast directories are configured via the toast.mounts configuration.
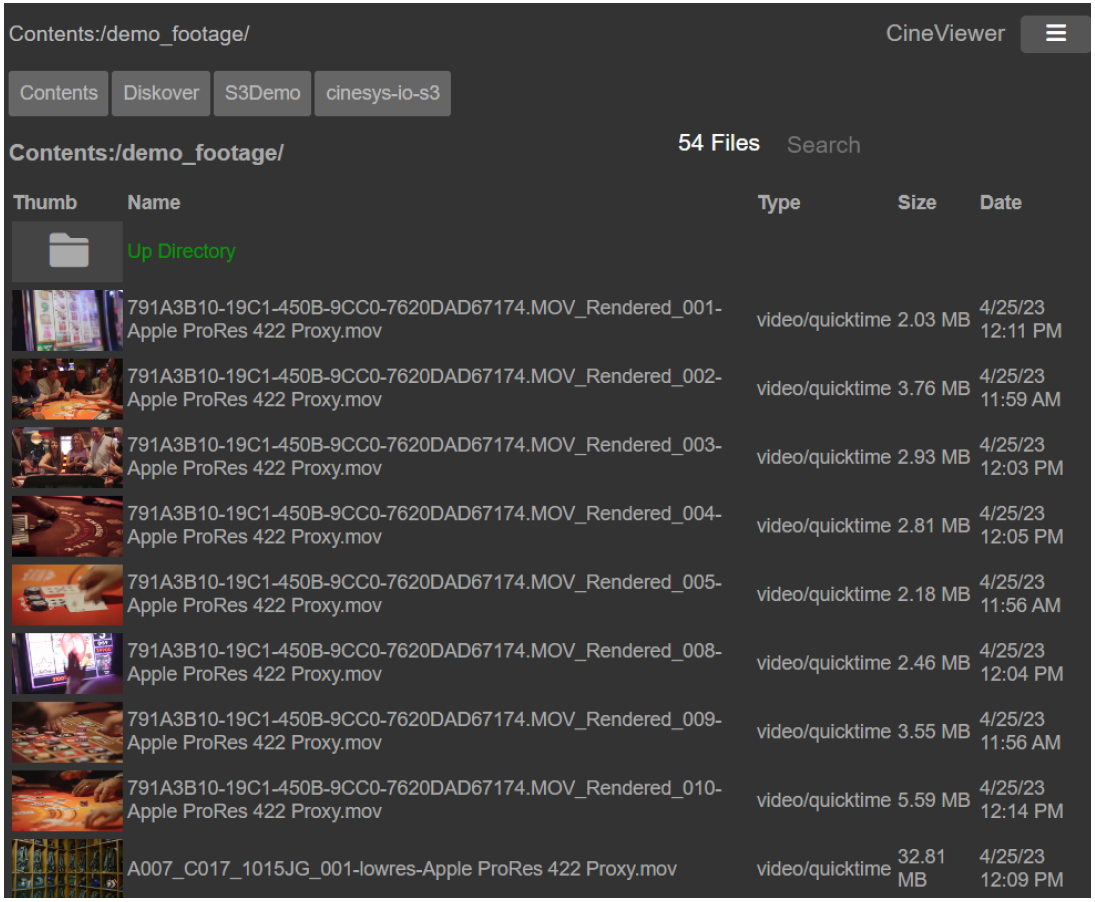
Configuring Different Types of File System
All file system mounts have 3 common fields:
| FIELD | PURPOSE |
|---|---|
| type | File system type |
| prefix | Prefix shown on the Path |
| name | Name shown on the navigation button |
File System Mounts
To make files on a standard operating system available use the FS mount. The FS mount uses the field path to point toward the desired directory.
"toast": {
    "mounts": [
    {
        "type":"fs",
        "prefix":"Production:",
        "name":"Production",
        "path": "/mnt/production"
    },
    {
        "type":"fs",
        "prefix":"Records:",
        "name":"Record",
        "path": "/mnt/records"
    },
 }
AWS S3 Mounts
    {
         "type":"s3",
         "prefix":"S3:",
         "name":"cinesys-io-s3",
         "path": "cinesys-io-s3",
         "bucket": "cinesys-io",
         "path": "support",
         "region": "us-east-1",
         "key": "XXXXXXXXXXXXXXXXXXXXXXXXXXXX",
         "secret": "XXXXXXXXXXXXXXXXXXXXXXXXXXXXXXXXXXXXXXXXX"
    },
   ]
}
Navigating and Finding Content
- You can click on a directory to change to that directory.
- Clicking on a media file will open the viewer.
- You can sort the current directory by clicking on the headers above the file list, clicking twice will reverse the order.
- On the right side, there is a Search field where you can search from the current directory.
- To go back up a directory you can click the Up Directory button in the file list or click on the Path text in the upper left corner of the app.
One great feature of Cineviewer is that when you move through directories or view content, the browser URL updates to link to that directory or content. This way simply copying the URL allows you to share a particular directory, video, or even a single frame of content.

Diskover Module for CineViewer
The Diskover File Action Plugin Module for Cineviewer allows you to open files or directories seamlessly from the Diskover user interface. Inside Cineviewer the user can also take advantage of Diskover high-speed indexed search.
Installing CineViewer Plugin for Diskover
This plugin adds open in CineViewer to the File Action menu in Diskover.
🔴 Copy cineviewer.php to the /var/www/diskover-web/public/fileactions directory
<div style='overflow:wrap;'>
<pre style='overflow:wrap;'>
     sudo cp /opt/cinesys/cineviewer/app/modules/diskover/diskover_install/cineviewer.php /var/www/diskover-web/public/fileactions
     sudo chown nginx  /var/www/diskover-web/public/fileactions/cineviewer.php
</pre>
</div>
🔴 Depending on your web setup you may need to edit cineviewer.php and adjust the following line:
$cineviewer_host = "http://" + $_SERVER['HTTP_HOST'] + ":3000";
🔴 Edit the Diskover Constants.php file and add a file action:
sudo vi /var/www/diskover-web/src/diskover/Constants.php
🔴 Add File Actions:
       const FILE_ACTIONS = [
        'open in CineViewer' => [
            'webpage' => 'cineviewer.php',
            'allowed_users' => [Constants::ADMIN_USER, Constants::USER],
            'allowed_ldap_groups' => ['diskover-admins', 'diskover-powerusers', 'diskover-users'],
            'menu_icon_class' => 'far fa-file-image'
           ]
       ];
🔴 Test the installation by finding a file in Diskover and using the open in CineViewer under the File Action menu.
Diskover Module Settings
The Diskover module option has multiple settings. The most important is the diskover_url.
"diskover": {
        "login":   false,
        "strict":   true,
        "path":    "/var/www/diskover-web",
        "sessdir": "/var/lib/php/session",
        "self_url": "https://diskover-demo.cinesys.io/cineplayer/",
        "diskover_url": "https://diskover-demo.cinesys.io/",
        "search_url": "https://diskover-demo.cinesys.io/searchjson.php",
        "login_page":   "https://diskover-demo.cinesys.io/login.php"
}
Installing the Diskover Search Feature for CineViewer
This config change for CineViewer will allow you to search Diskover from Cineviewer.
🔴 Edit your CineViewer configuration file /opt/cinesys/cineviewer/configure.json and make sure there is a setting for diskover_url that points
to your local diskover:
    sudo vi /opt/cinesys/cineviewer/configure.json

    "diskover": {
        "diskover_url": "http://127.0.0.1/"
    }
Searching Diskover Within CineViewer
🔴 After restarting CineViewer, your mounts/paths should appear:
🔴 Click on a volume to open the search tools, then click on a search result to load into CineViewer:
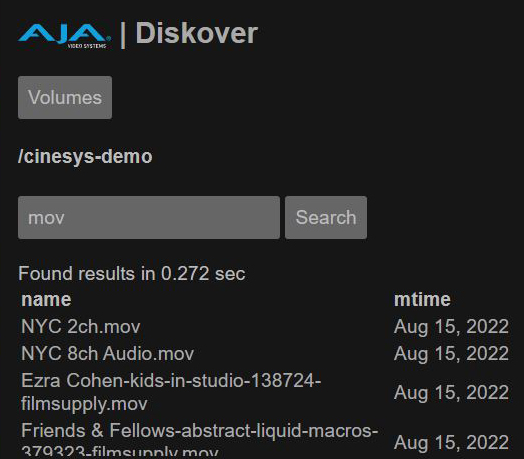
File Action > Find File Sequences
The File Sequence web plugin File Action is designed to list out any file sequences in a directory or from a single file in a sequence. File sequences are printed out with %08d to show the 0 padding and number of digits in the sequence. Each sequence, whole or broken, are put into a [ ] list.
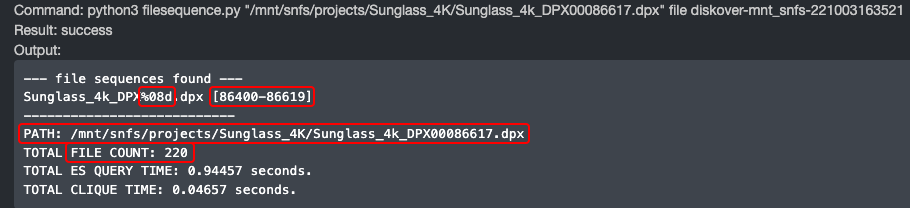
🔴 Copy default/sample files:
cd /var/www/diskover-web/public/fileactions/fileaction_samples
cp filesequence.php /var/www/diskover-web/public/fileactions/
cp filesequence.py /var/www/diskover-web/public/fileactions/
cp ajaxexec.php /var/www/diskover-web/public/fileactions/
chown nginx:nginx /var/www/diskover-web/public/fileactions/*
cp filesequence_settings.py.sample /var/www/diskover-web/src/diskover/filesequence_settings.py
chown nginx:nginx /var/www/diskover-web/src/diskover/filesequence_settings.py
Note: On Ubuntu, change chown nginx user to www-data
🔴 Configure file sequence settings file:
vi /var/www/diskover-web/src/diskover/filesequence_settings.py
🔴 Set Elasticsearch settings.
🔴 Install clique python module with pip as required by File Sequence File Action:
pip3 install clique
🔴 If you are running diskover-web on a different host than Diskover, you will need to install the Elasticsearch python module (required by File Sequence File Action). Check the version to install on your Diskover host in /opt/diskover/requirements.txt:
pip3 install elasticsearch==7.x.x
🔴 Add file sequence to diskover-web config file.
File Action > IMF Package Validator
🍿 Watch Demo Video
The IMF package validator plugin allows organizations to validate IMF packages before delivery from a remote platform, saving immense amounts of man-hours over the course of a business year.
Oxagile’s IMF Package Validator Plugin, exclusively designed for the AJA Diskover Media Edition, allows users to scan and validate IMF packages before delivery from any location, regardless of the location of the IMF package data.
IMF stands for Interoperable Master Format, which is a technical standard used in the Media and Entertainment industry for the exchange of digital content between different platforms and systems. The IMF format is used by content creators, distributors, and broadcasters to deliver high-quality video content to a variety of devices, including TVs, mobile devices, and web browsers.
Netflix, for example, requires all their content to be delivered in IMF format, which undergoes rigorous validation to ensure compliance with industry standards. The validation process involves extensive testing of the content's video, audio, and metadata to ensure that it meets the technical specifications and can be delivered to viewers in the highest quality possible.
Once the content has been validated, it is then encoded into various formats, including 4K and HDR, and made available for streaming on various platforms. The IMF validation process is a critical step in the content delivery pipeline.
Trial and Purchase of the plugin
The IMF Package Validator plugin is developed and sold exclusively by Oxagile, a major technological partner working with both Diskover Data and AJA Video Systems. For more information, to start a 30 day trial, or to purchase the IMF Package Validator plugin, please contact Oxagile.
Functional Limitations
The following are the limitations of the current plugin version:
- Verification capabilities are limited with those of the latest version of Netflix Photon tool.
- Validation by schedule is not supported.
- Cloud storage is not supported.
- Archives are not supported.
- DCP packages are not supported.
IMPORTANT! Notes For Installation Instructions
Please refer to the Read Me document and any other documentation attached to the plugin, like the Secure FTP Server Settings you will receive from Oxagile, as they may contain more recent information.
IMF Package Validator Plugin Installation
Python / Diskover Folder
There are no changes in python part and/or diskover folder.
PHP Diskover-Web Folder
For PHP diskover-web folder:
🔴 Copy the new file action from /src/diskover/Constants.php.sample and add file action validate IMF package. For more information on adding a file action.
🔴 Copy file imfvalidate.php from /public/fileactions/fileaction_samples into /public/fileactions
🔴 Copy new task template with "type": "imf_validation" from /public/tasks/templates.json.sample into /public/tasks/templates.json
🔴 Copy new custom tags imf valid and imf not valid from /public/customtags.txt.sample into /public/customtags.txt
🔴 There are files that should be updated from this archive if it's not a fresh install:
      /src/diskover/Diskover.php
      /public/css/diskover.css
      /public/js/diskover.js
      /public/tasks/index.php
      /public/api.php
      /public/d3_data_search.php
      /public/d3_inc.php
      /public/export.php
      /public/export_imf_report.php
      /public/imfreport.php
      /public/results.php
      /public/view.php
Java IMF-Plugin
Important
- The IMF-Plugin must be on the same machine as the python worker and validation files.
- The optimal versions of ElasticSearch against which the plugin was tested are 7.17.9 and 7.10.2
🔴 If ElasticSearch is configured with security enabled username and password for connection, then you need to set the appropriate username and password values in these files, depending on the deployment method:
imf-plugin.properties
Or
docker-compose.yml
🔴 From Linux Docker container, create folder:
/root/imf-plugin
🔴 Copy the following files from /imf-plugin into the folder created during the previous step:
imfplugin-0.0.1.jar
Dockerfile
docker-compose.yml
🔴 In docker-compose.yml file, change the URL for Diskover DISKOVER_URL, host and port (username and password if needed) for ELASTICSEARCH_HOST and ELASTICSEARCH_PORT in the environment block. For example:
DISKOVER_URL=http://192.189.117.68:8000
ELASTICSEARCH_HOST=192.189.117.68
ELASTICSEARCH_PORT=9200
🔴 If the shared folder for validation is not /media on your host machine, then you need to change volumes in docker-compose.yml. For example, if the folder for validation is /usr/imf, then the volumes should be like this:
/usr/imf:/media
🔴 In order to launch the IMF plugin, we have to mount local directory to a container:
./:/home/imf-plugin
🔴 From /root/imf-plugin build:
docker build -t imf-plugin:0.0.1 .
🔴 From /root/imf-plugin run:
docker compose up -d
Setting Up Application As Windows Service
🔴 Unzip archive jdk1.8.0_152.zip to folder C:\Program Files\Java\
🔴 Copy imf-plugin folder (with jar and imf-plugin.properties files) into work folder, for example: C:\aja\imf-plugin
🔴 If necessary, configure the imf-plugin.properties file.
🔴 Setting up application as windows service - if there is already nssm.exe file in the plugin folder and you have 64bit system, then you can skip steps 1 to 3:
1) Download NSSM application from https://nssm.cc/download, for example nssm-2.24.zip
2) Unzip archive to temporary folder and copy nssm.exe file from win64 or win32 folder relative to your system version.
3) Paste nssm.exe file into folder where imf-plugin jar file is located.
4) Run cmd as administrator and go to folder with nssm.exe file.
5) Run command nssm install (.\nssm install for PowerShell) and you will see a window with nssm settings.
6) In the Application tab, insert the following settings:
Path: path to
java.exefile, for example:
C:\Program Files\Java\jdk1.8.0_152\bin\java.exeStartup directory: path to any work folder with imf-plugin, for example:
C:\aja\imf-pluginArguments: path to jar file with property file path parameter for property file path, for example:
-jar "C:\aja\imf-plugin\imfplugin-0.0.1.jar" --spring.config.location=C:/aja/imf-plugin/imf-plugin.propertiesService name: name of service, for example just
imf-plugin
7) Click Install service.
8) Open Windows services (Windows search by "services"), find your service by name and start it.
Setting Up Application As Linux Service
🔴 Install Open JDK 8:
sudo apt-get update
sudo apt-get install openjdk-8-jdk -y
java -version
🔴 Create a folder for IMF plugin:
mkdir ~/imfplugin
🔴 Unzip archive:
sudo apt-get install unzip -y
mv imfplugin.zip ~/imfplugin/
cd ~/imfplugin/
unzip imfplugin.zip
rm imfplugin.zip
🔴 Update imf-plugin.properties for your environment.
🔴 Create a service by first customizing imfplugin.service to your environment with the following comments:
mv imfplugin.service /etc/systemd/system/
sudo systemctl daemon-reload
sudo systemctl start imfplugin.service
🔴 Check service status:
sudo systemctl status imfplugin.service
🔴 Enable a service and start it immediately:
sudo systemctl enable imfplugin.service
File Action > Live View
🍿 Watch Quick Tips
The File Action Live View plugin is designed to provide a live view of the file system between indexing intervals. It provides users with a live view of the file system at that moment in time.
The Live View plugin requires mounts to the indexed storage in order to list the directories. The mounts do not need to be on the diskover-web server, they can be on a remote web server. See Live View mounts on remote web server below.
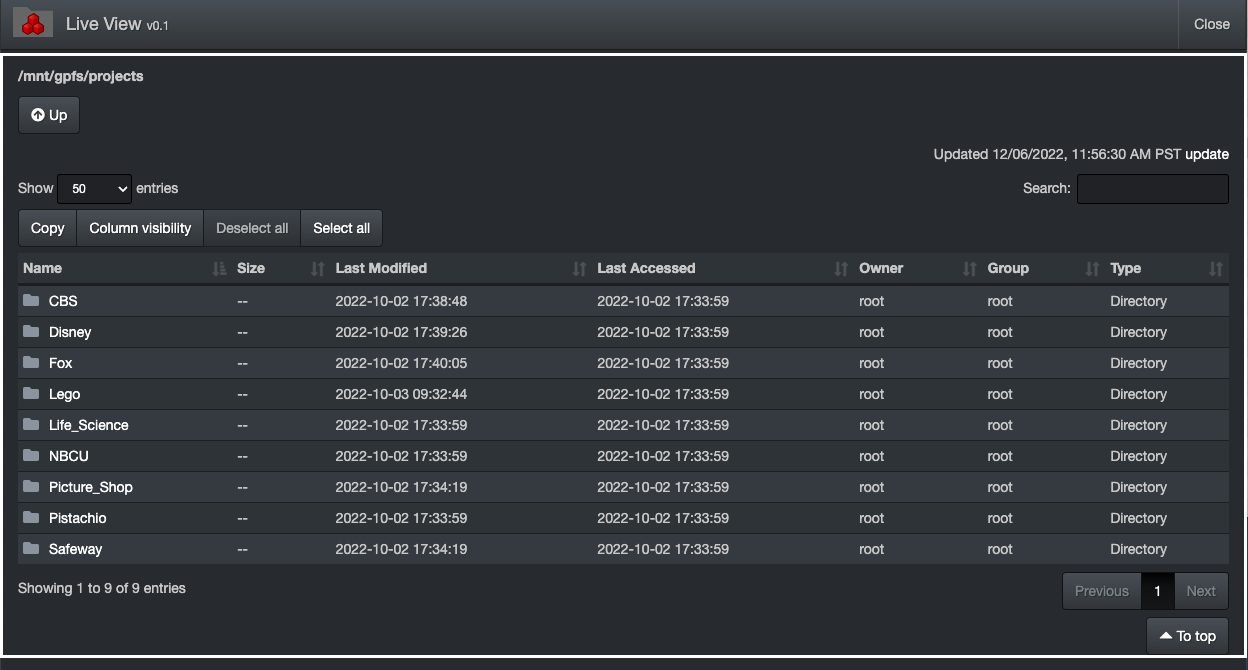
🔴 Install php-process with yum as required by Live View File Action's scandir.php:
yum install php-process
Note: This needs to be installed on the web host serving scandir.php
🔴 Restart php-fpm service:
systemctl restart php-fpm
🔴 Copy default/sample files:
cp /var/www/diskover-web/public/fileactions/fileaction_samples/liveview.php /var/www/diskover-web/public/fileactions/
cp -a /var/www/diskover-web/public/fileactions/fileaction_samples/liveview /var/www/diskover-web/public/fileactions/
🔴 Set timezone in scandir.php:
vi /var/www/diskover-web/public/fileactions/liveview/scandir.php

// Timezone for file times
// set to your local time zone https://www.php.net/manual/en/timezones.php
$timezone = 'America/Vancouver';
🔴 Set if you want to hide hidden dot files in scandir.php:
// Ignore if file or folder is hidden (starts with .)
$ignorehidden = TRUE;
🔴 Set any path translations (from index path to mount path) in scandir.php:
// Path translation for listing files
$path_translations = array(
    '/^\//' => '/mnt/'
);
🔴 Set any path clipboard copy translations in scandir.php:
// Path translation for path copied to clipboard
$path_clipboard_translations = array(
    '/^\/mnt\//' => '/'
);
🔴 Add Live View to diskover-web config file:
vi /var/www/diskover-web/src/diskover/Constants.php

🔴 Set proper ownership:
chown -R nginx:nginx /var/www/diskover-web
Live View mounts on remote web server
If you do not want to mount all your storage on the diskover-web host, you can set Live View to use a remote web server which has the mounted file systems.
There are two options for remote scandir:
1) web browser client to remote web server communication 2) diskover-web web server to remote web server communication
Option 1
🔴 Edit the liveview.js file and change scandir_url located near the top of the file to be the url to your remote web server hosting scandir.php:
vi /var/www/diskover-web/public/fileactions/liveview/js/liveview.js

// location of ajax url to scandir.php
var scandir_url = 'https://<web server>:<port>/scandir.php';
Note: When using https, you will need to set up and configure a valid ssl cert on the remote web server hosting scandir.php
🔴 Copy fileactions/liveview/scandir.php to the remote web server used in liveview.js file.
🔴 See above for setting timezone, path translations, etc for scandir.php.
Option 2
🔴 Edit the liveview.js file and change scandir_url located near the top of the file to be remotescandir.php:
vi /var/www/diskover-web/public/fileactions/liveview/js/liveview.js

// for web server to web server communication using php cURL instead of web browser ajax to remote web server use remotescandir.php
var scandir_url = 'liveview/remotescandir.php';
🔴 Edit the remotescandir.php file and change remote_server_url located near the top of the file to your remote web server host url:
vi /var/www/diskover-web/public/fileactions/liveview/remotescandir.php

// remote web server host url hosting scandir.php
$remote_server_url = "https://<web server host>";
Note: When using https, you will need to set up and configure a valid ssl cert on the remote web server hosting scandir.php
🔴 Copy fileactions/liveview/scandir.php to the remote web server used in remotescandir.php file.
🔴 See above for setting timezone, path translations, etc for scandir.php.
Index Management
The Diskover curation platform creates indexes within an Elasticsearch endpoint. Each index is basically a snapshot of a point in time of any given volume (filesystem of S3 Bucket). These indexes require management:
- Indexes can’t be stored infinitely as ultimately the Elasticsearch environment will exhaust available storage space causing undesired cluster states.
- The index retention policy should reflect the requirements to:
- Search across various points in time within Diskover-web.
- Perform heatmap differential comparison.
- Perform index differential comparisons via indexdiff plugin, etc.
Diskover-Web Index Management
The Diskover-Web user interface provides manual index management capabilities. By default, Diskover-Web is configured to always use the latest indices when production user login to Diskover.
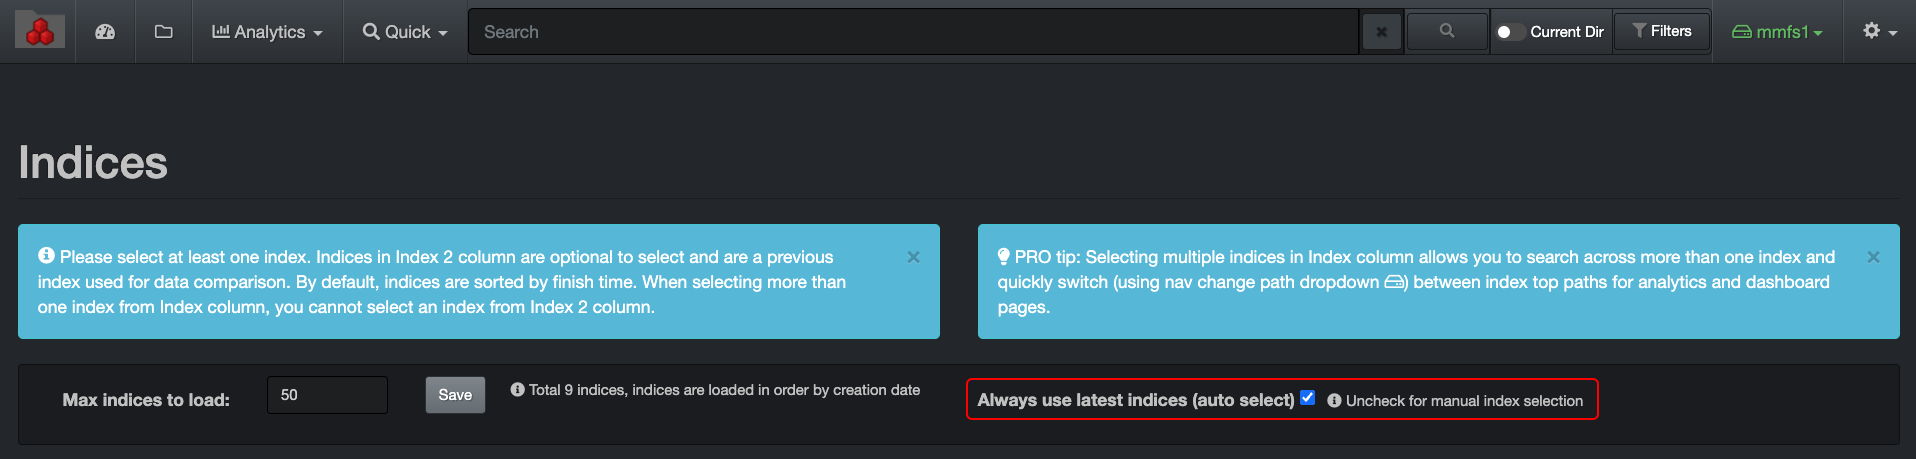
Loading / Unloading Indexes within Diskover-Web User Interface
🔴 To manually manage indexes thru the Diskover-Web user interface, uncheck the Always Use Latest Indices.
Index management can’t be performed on an actively loaded index.
🔴 Unselect all indices:
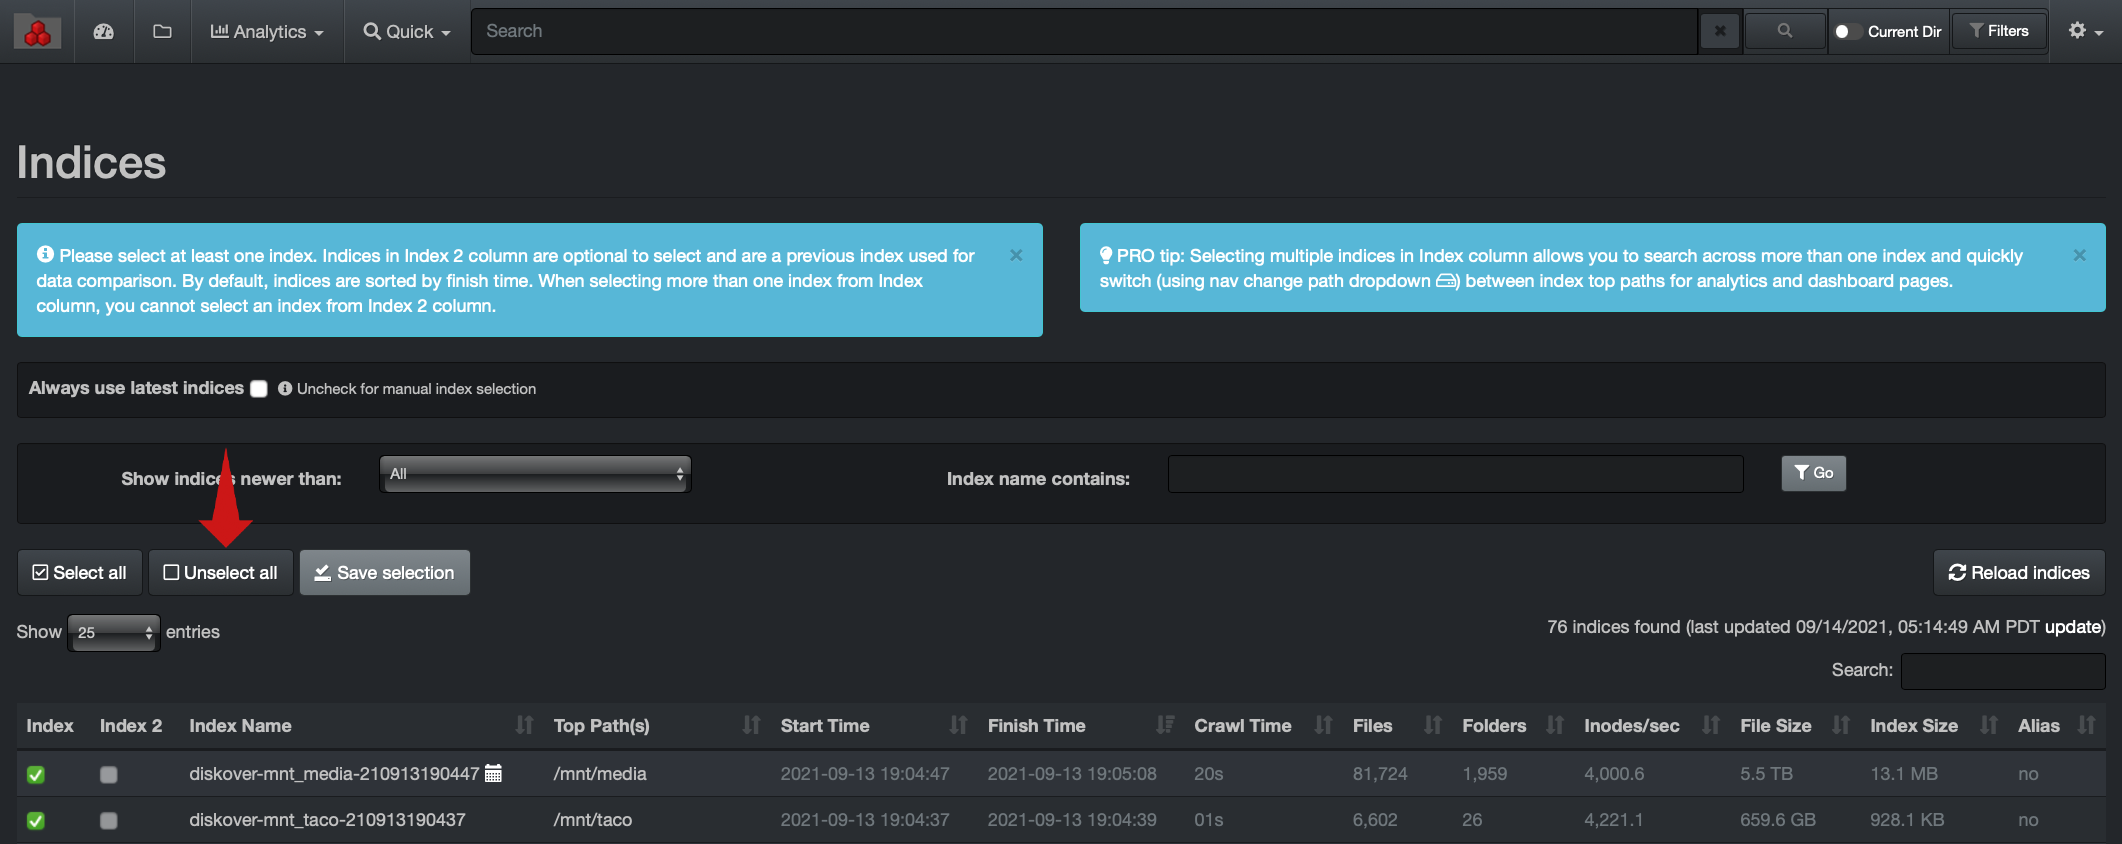
To manage an index that is actively loaded, the desired index can be unloaded by selecting any other index and clicking Save selection.
🔴 Select another index from Index column > Save selection and load in Diskover-Web user interface:

The following confirmation will be displayed upon successful index load:
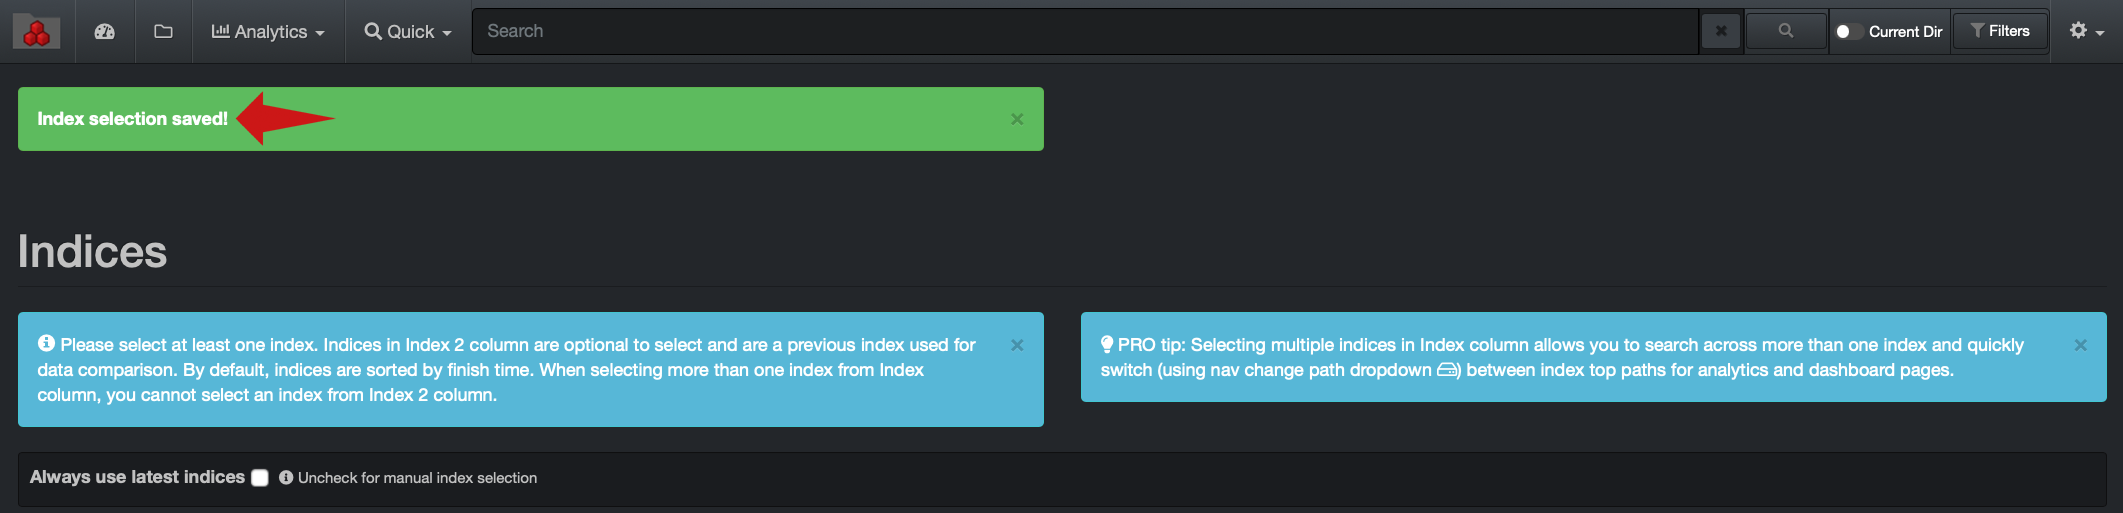
Deleting Indices within Diskover-Web User Interface
🔴 To manually delete indices thru the Diskover-Web user interface, follow the steps in the previous section to ensure the index targeted for deletion is not “loaded” within the Diskover-Web user interface.
🔴 Select index targeted for deletion and select Delete.

🔴 Confirm desired index deletion:

The following confirmation of successful index deletion will be displayed:

🔴 Select the Reload Indices button to ensure recently deleted index is not displayed in the list of available indices:
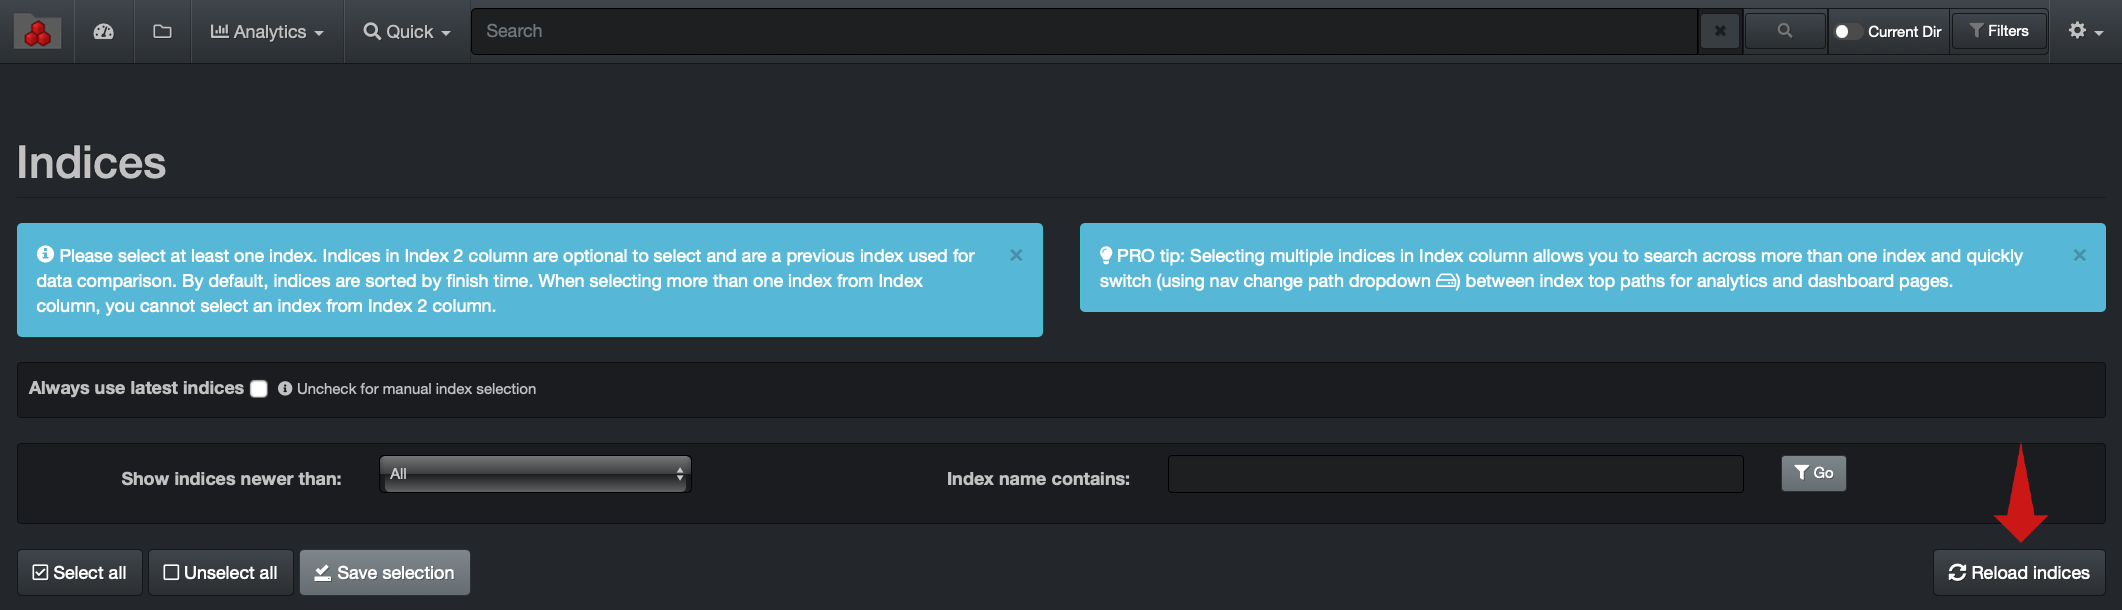
Note: Attempting to delete an index that is actively loaded in the Diskover-Web will result in the error message below. The index must first be unloaded as described in this section.

Elasticsearch Index Management
Indices can be managed by policy and manually with Elasticsearch using curl from the command line. Indices can also be managed using Kibana index management which is not covered in this guide.
Note: For AWS ES/OpenSearch see Index State Management on AWS ES/OpenSearch below.
Note: It may be easier and less prone to shell issues, to put the json text (text after -d in the single quotes), into a file first and then use that file for -d using
curl -X PUT -H "Content-Type: application/json" -d @FILENAME DESTINATION.
Elasticsearch Index Lifecycle Management
You can create and apply Index Lifecycle Management (ILM) policies to automatically manage your Diskover indices according to your performance, resiliency, and retention requirements.
More information on index lifecycle management can be found on elastic.co here:
https://www.elastic.co/guide/en/elasticsearch/reference/current/index-lifecycle-management.html
The following provides an example for managing Diskover indices on your Elasticsearch cluster, by creating a policy that deletes indices after 30 days for new Diskover indices:
🔴 Your Elasticsearch server is accessible at http://elasticsearch:9200
🔴 Your Elasticsearch service endpoint url is <aws es endpoint>
🔴 You want your indices to be purged after seven days 7d
🔴 Your policy name will be created as cleanup_policy_diskover
curl -X PUT "http://elasticsearch:9200/_ilm/policy/cleanup_policy_diskover?pretty" \
     -H 'Content-Type: application/json' \
     -d '{
      "policy": {
        "phases": {
          "hot": {
            "actions": {}
          },
          "delete": {
            "min_age": "7d",
            "actions": { "delete": {} }
          }
        }
      }
    }'
🔴 Apply this policy to all existing Diskover indices based on index name pattern:
curl -X PUT "http://elasticsearch:9200/diskover-*/_settings?pretty" \
     -H 'Content-Type: application/json' \
     -d '{ "lifecycle.name": "cleanup_policy_diskover" }'
🔴 Create a template to apply this policy to new Diskover indices based on index name pattern:
    curl -X PUT "http://elasticsearch:9200/_template/logging_policy_template?pretty" \
     -H 'Content-Type: application/json' \
     -d '{
      "index_patterns": ["diskover-*"],
      "settings": { "index.lifecycle.name": "cleanup_policy_diskover" }
    }'
Index State Management on AWS ES/OpenSearch
Helpful links:
Example:
- Your AWS Elasticsearch Service endpoint url is
<aws es endpoint> - You want your indices to be purged after seven days 7d
- Your policy name will be created as cleanup_policy_diskover
🔴 Create a policy that deletes indices after one month for new diskover indices
curl -u username:password -X PUT "https://<aws es endpoint>:443/_opendistro/_ism/policies/cleanup_policy_diskover" \
     -H 'Content-Type: application/json' \
     -d '{
      "policy": {
        "description": "Cleanup policy for diskover indices on AWS ES.",
        "schema_version": 1,
        "default_state": "current",
        "states": [{
          "name": "current",
          "actions": [],
          "transitions": [{
            "state_name": "delete",
            "conditions": {
              "min_index_age": "7d"
            }
          }]
          },
          {
            "name": "delete",
            "actions": [{
              "delete": {}
            }],
            "transitions": []
          }
        ],
        "ism_template": {
          "index_patterns": ["diskover-*"],
          "priority": 100
        }
      }
        }'
🔴 Apply this policy to all existing diskover indices
curl -u username:password -X POST "https://<aws es endpoint>:443/_opendistro/_ism/add/diskover-*" \
     -H 'Content-Type: application/json' \
     -d '{ "policy_id": "cleanup_policy_diskover" }'
Elasticsearch Manual Index Management
Indexes can be manually listed and deleted in Elasticsearch via:
🔴 List indices:
See Elasticsearch cat index api for more info.
curl -X GET http://elasticsearch_endpoint:9200/_cat/indices
🔴 Delete indices:
See Elasticsearch delete index api for more info.
curl -X DELETE http://elasticsearch_endpoint:9200/diskover-indexname
🔴 Delete indices on AWS ES/OpenSearch:
curl -u username:password -X DELETE https://endpoint.es.amazonaws.com:443/diskover-indexname
Advanced Index Creation and Manipulation for Diskover Indexers
This chapter discusses ways to improve indexing performance.
We recommend you have more/smaller indices than a few very large ones. Rather than indexing at the very top level of your storage mounts, you could index 1 level down into multiple indices and then run parallel diskover.py index processes which will be much faster to index a really large share with 100’s of millions of files.
You can optimize your indices by setting the number of shards and replicas in the Diskover config file. By default in Diskover config, shards are set to 1 and replicas are set to 0. It is important to note that these settings are not meant for production as they provide no load balancing or fault tolerance.
Please refer to the Diskover User Guide for more information on requirements and recommendations.
Building Indices
🔴 Run a crawl in the foreground printing all log output to screen:
python3 diskover.py -i diskover-<indexname> <tree_dir>
🔴 See all cli options:
python3 diskover.py -h
- Multiple directory trees tree_dir can be set to index multiple top paths into a single index (available for annual subscriptions only).
- UNC paths and drive maps are supported in Windows.
- Index name requires
diskover-prefix. - Recommended index name
diskover-<mountname>-<datetime> - Index name is optional and indices by default will be named
diskover-<treedir>-<datetime> - Log settings, including log level
logLeveland logging to a filelogToFileinstead of screen, can be found in thediskoverconfig.
🔴 On Linux or macOS, to run a crawl in the background and redirect all output to a log file:
nohup python3 diskover.py ... > /var/log/<logname>.log 2>&1 &
Adding Additional Directory Tree(s) to an Existing Index
🔴 To add additional directory tree(s) to an existing index (available for annual subscriptions only):
python3 diskover.py -i diskover-<indexname> -a <tree_dir>
Creating Multiple Indices vs All Top Paths in a Single Index
The advantage of running multiple index tasks is speed; you can run them in parallel (in the background or on separate indexing machines) so you don’t have to wait for some long directory tree to finish scanning in order for the index to be usable in Diskover-Web for example.
🔴 Using these multiple index tasks:
diskover.py -i diskover-nas1 /mnt/stor1
diskover.py -i diskover-nas2 /mnt/stor2
🔴 Will perform better than the following, as stor2 may have a lot more files/directories and you won’t be able to use the diskover-nas index until both finish scanning:
diskover.py -i diskover-nas /mnt/stor1 /mnt/stor2
Scan Threads
Diskover uses threads for walking a directory tree, for example, if maxthreads in the Diskover config is set to 20, up to max 20 sub-directories under the index top path (top directory path/mount point/volume) can scan and index at once. This is important if you have a lot or very few sub-directories at level 1 in /mnt/toppath. If /mnt/toppath has only a single sub-directory at level 1, crawls will be slower since there will ever only be 1 thread running. To handle this, Diskover (available for annual subscriptions only) uses thread directory depth config setting threaddirdepth to start threads deeper than level 1.
Backup and Recovery
Setup Backup Environment for Linux
The following explains how to create a backup of all data components of the Diskover environment.
🔴 First, we need to create/identify the directory location where the backup will be stored. The following provides a location example, but it can be changed to meet the organizations standards for backup locations.
mkdir -p /var/opt/diskover/backups/
mkdir -p /var/opt/diskover/backups/elasticsearch/
🔴 We need to provide the Elasticsearch user access to the location so that the Elasticsearch user can write snapshots:
chown -R elasticsearch /var/opt/diskover/backups/elasticsearch
mkdir -p /var/opt/diskover/backups/diskover/
mkdir -p /var/opt/diskover/backups/diskover-web/
mkdir -p /var/opt/diskover/backups/diskover-web/tasks/
Elasticsearch Backup
The following explains how to create a snapshot of a single index or multiple indices and how to restore the snapshot. Elasticsearch provides a snapshot and restore API.
The following example will manually walk you through creating an Elasticsearch backup, more information can also be found at the following AWS location:
https://docs.aws.amazon.com/opensearch-service/latest/developerguide/managedomains-snapshots.html
To create the backup, we need to do the following to configure the location to store the snapshots.
Configure Elasticsearch Snapshot Directory Location Settings
Now we need to tell Elasticsearch that this is our snapshot directory location. For that, we need to add the repo.path setting in elasticsearch.yml file.
🔴 Edit the following file:
/etc/elasticsearch/elasticsearch.yml
🔴 Add the repo path setting to the paths section:
path.repo: ["/var/opt/diskover/backups/elasticsearch"]
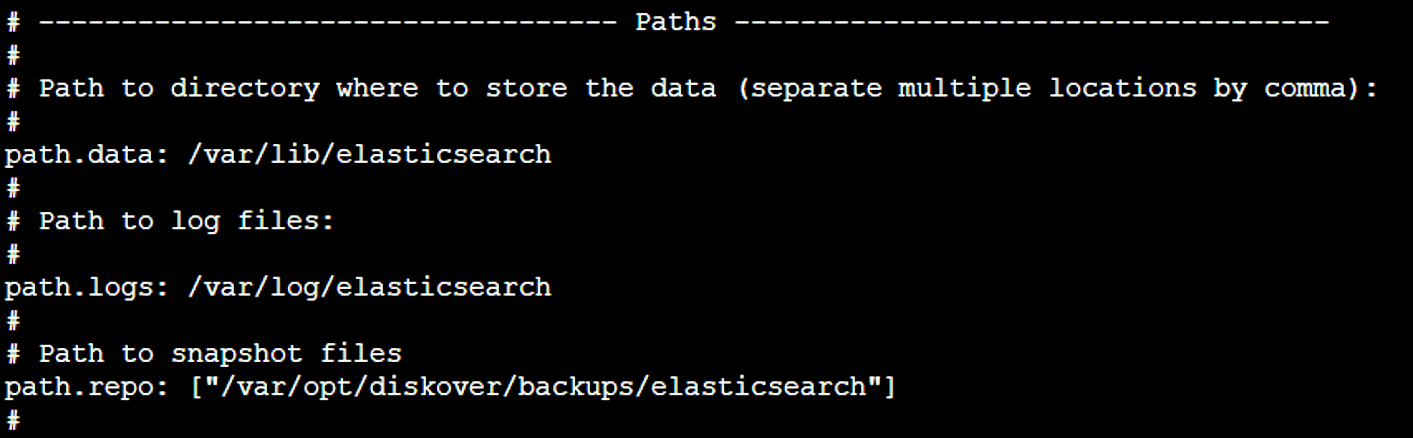
🔴 Restart Elasticsearch:
systemctl restart elasticsearch
Configure Elasticsearch File System-Based Snapshot Settings
In this example we are using the local file system directory for storing the snapshot but the same can be stored on the cloud as well. The following is focused on file system-based snapshot only.
🔴 Install the curl utilities:
yum install curl
🔴 Create the repository which would be used for taking a snapshot and to restore. We can create the repository using the following expression:
curl -X PUT "http://192.168.10.119:9200/_snapshot/2021052401_es_backup?pretty" -H 'Content-Type: application/json' -d'
{
  "type": "fs",
  "settings": {
    "location": "/var/opt/diskover/backups/elasticsearch"
  }
}
'

🔴 After creating the repository, we can take the snapshot of all indices using the following expression:
curl -X PUT http://192.168.10.119:9200/_snapshot/2021052401_es_backup/snapshot_all_indices
🔴 Run the following expression to review the details of the above snapshot:
curl -X GET http://192.168.10.119:9200/_snapshot/2021052401_es_backup/snapshot_all_indices

Restoring Indexes from Snapshot
🔴 Indexes can be restored from the snapshot by appending the _restore endpoint after the snapshot name:
curl -X POST http://192.168.10.119:9200/_snapshot/2021052401_es_backup/snapshot_all_indices/_restore
Diskover Indexer(s) Backup
Diskover Indexer(s) Backup for Linux
The Diskover indexer can be distributed among multiple hosts. Each indexer stores the user configured settings in a series of yaml files located within directories named diskover under /root/.config/*
🔴 A backup of the user configured settings will need to be completed for each distributed indexer(s). The following provides an example to back up a single indexer:
rsync -avz /root/.config/diskover* /var/opt/diskover/backups/diskover/$(date +%Y%m%d)/
🔴 Backup the Diskover indexer license file:
rsync -avz /opt/diskover/diskover.lic /var/opt/diskover/backups/diskover/$(date +%Y%m%d)/
Diskover-Web Backup
The Diskover-Web stores the user configured settings in the following series of files:
/var/www/diskover-web/src/diskover/Constants.php
/var/www/diskover-web/public/*.txt
/var/www/diskover-web/public/tasks/*.json
Perform the following commands to backup the Diskover-Web user configured settings.
🔴 Make a directory date for collection of backups:
mkdir -p /var/opt/diskover/backups/diskover-web/$(date +%Y%m%d)/src/diskover/
mkdir -p /var/opt/diskover/backups/diskover-web/$(date +%Y%m%d)/public/tasks/
🔴 Backup user configured settings:
rsync -avz /var/www/diskover-web/src/diskover/Constants.php /var/opt/diskover/backups/diskover-web/$(date +%Y%m%d)/src/diskover/
rsync -avz /var/www/diskover-web/public/*.txt /var/opt/diskover/backups/diskover-web/$(date +%Y%m%d)/public/
rsync -avz /var/www/diskover-web/public/tasks/*.json /var/opt/diskover/backups/diskover-web/$(date +%Y%m%d)/public/tasks/
🔴 Backup the Diskover-Web license file:
rsync -avz /var/www/diskover-web/src/diskover/diskover-web.lic /var/opt/diskover/backups/diskover-web/$(date +%Y%m%d)/src/diskover/
Routine Maintenance
Routine maintenance of Diskover consists of ensuring your environment is updated and current with software versions as they become available.
Upgrade Diskover and Diskover-Web
🔴 To update Diskover and Diskover-Web to the latest version, see update instructions.
🔴 To make sure you always run the latest version of Diskover, please subscribe to our newsletter.
Emergency Maintenance
The following section describes how to troubleshoot and perform emergency maintenance on the components that comprise the Diskover curation platform.
Diskover-Web
This topic describes how to identify and solve Diskover-Web issues.
Can’t Access Diskover-Web from Browsers:
🔴 Ensure the Web server components are running:
systemctl status nginx
systemctl status php-fpm
🔴 Check the NGINX Web server error logs:
tail -f /var/log/nginx/error.log
🔴 Trace access from Web session by reviewing NGINX access logs. Open a Web browser and attempt to access Diskover-Web, the access attempt should be evident in the access log:
tail -f /var/log/nginx/access.log
Elasticsearch Domain
To identify and solve common Elasticsearch issues, refer to both Elastic.co and Amazon as both provide good information on troubleshooting Elasticsearch clusters.
Helpful Commands
Here are some helpful Elasticsearch commands to get started.
Your Elasticsearch server is accessible at http://elasticsearch:9200
🔴 Check cluster health:
curl [http://elasticsearch:9200/_cat/health?v](http://elasticsearch:9200/_cat/health?v)

🔴 List indices:
curl -X GET http://elasticsearch:9200/_cat/indices
🔴 Delete indices:
curl -X DELETE http://elasticsearch:9200/diskover-indexname
🔴 Username/Password - To query the Elasticsearch cluster with login credentials:
curl -u login:password https://elasticsearch:9200/_cat/indices
Elastic.co Troubleshooting
The elastic.co Elasticsearch troubleshooting information can be found here:
https://www.elastic.co/guide/en/elasticsearch/reference/7.14/cat.html
AWS Elasticsearch Domain
To identify and solve common Amazon Elasticsearch Service (Amazon ES) issues, refer to the AWS guide on how to troubleshoot the AWS Elasticsearch environment here:
https://docs.aws.amazon.com/opensearch-service/latest/developerguide/handling-errors.html
Support
Support Options
| Support & Ressources | Free Community Edition | Subscriptions* |
|---|---|---|
| Online Documentation | ✅ | ✅ |
| Slack Community Support | ✅ | ✅ |
| Diskover Community Forum | ✅ | ✅ |
| Knowledge Base | ✅ | ✅ |
| Technical Support | ✅ | |
Phone Support
|
✅ | |
| Remote Training | ✅ |
*
Feedback
We'd love to hear from you! Email us at info@diskoverdata.com
Warranty & Liability Information
Please refer to our Diskover End-User License Agreements for the latest warranty and liability disclosures.
Contact Diskover
| Method | Coordinates |
|---|---|
| Website | https://diskoverdata.com |
| General Inquiries | info@diskoverdata.com |
| Sales | sales@diskoverdata.com |
| Demo request | demo@diskoverdata.com |
| Licensing | licenses@diskoverdata.com |
| Support | Open a support ticket with Zendesk 800-560-5853 | Mon-Fri 8am-6pm PST |
| Slack | Join the Diskover Slack Workspace |
| GitHub | Visit us on GitHub |
| AJA Media Edition | 530-271-3190 sales@aja.com support@aja.com |
© Diskover Data, Inc. All rights reserved. All information in this manual is subject to change without notice. No part of the document may be reproduced or transmitted in any form, or by any means, electronic or mechanical, including photocopying or recording, without the express written permission of Diskover Data, Inc.