![]()
Diskover Installation Guide for Docker
This guide is intended for Service Professionals and System Administrators.
Introduction
Overview
Diskover Data is a web-based platform that provides single-pane viewing of distributed digital assets. It provides point-in-time snapshot indexes of data fragmented across cloud and on-premise storage spread across an entire organization. Users can quickly and easily search across company files. Diskover is a data management application for your digital filing cabinet, providing powerful granular search capabilities, analytics, file-based workflow automation, and ultimately enables companies to scale their business and be more efficient at reducing their operating costs.
For more information, please visit diskoverdata.com
Diskover Use Cases
Diskover addresses unstructured data stored across various storage repositories. Data curation encompasses the manual and automated processes needed for principled and controlled data creation, maintenance, cleanup, and management, together with the capacity to add value to data.
System Administrators
The use case for System Administrators is often centered around data cleanup, data disposition, ensuring data redundancy, and automating data. System Administrators are often tasked with controlling costs associated with unstructured data.
Line of Business Users
The use cases for Line of Business users are often centered around adding value to data, finding relevant data, correlating, analyzing, taking action on data sets, and adding business context to data.
Approved AWS Technology Partner
Diskover Data is an official AWS Technology Partner. Please note that AWS has renamed Amazon Elasticsearch Service to Amazon OpenSearch Service. Most operating and configuration details for OpenSearch Service should also be applicable to Elasticsearch..
![]()
Document Conventions
Easy Code Snippets Copy/Paste
Throughout this document, all the lines displayed in a different font are designed for users to copy to a clipboard using the copy icon on the far right and paste directly into a terminal session:
code snippet - use icon on the far right to copy me
Proposed Actions
🔴 All proposed action items are preceded by a red dot.
Important Notes and Warnings
🟨 All important notes and warnings are preceded by a yellow square.
Restricted Diskover Editions
The appropriate label(s) will be displayed for features and/or sections of the guide that apply to specific Diskover editions.


Docker Installation | Introduction
This installation produces no-source Docker images that, provided with the application source, will run the full Diskover stack with zero or minimal configuration.
This guide covers:
- Installing Diskover via Docker for our free Community Edition.
- Installing Diskover via Docker for our annual subscription editions using Linux, Windows, and Mac.
- Instructions when migrating from Dell DataIQ.
- Additional references.
Install Diskover Docker for Community Edition
If you want to run Diskover Community Edition in Docker, there is a Docker Hub container built by LinuxServer.io at Diskover Docker Hub and Diskover LinuxServer.io GitHub.
Install Diskover Docker on Linux
🔴 Go to www.docker.com/products/docker-desktop/ and select Download for Linux.
🔴 Installation instructions: [https://docs.docker.com/desktop/install/linux-install/
Instructions coming soon.
Install Diskover Docker on Windows
🔴 Go to www.docker.com/products/docker-desktop/ and select Download for Windows.
🔴 Installation instructions: https://docs.docker.com/desktop/install/windows-install/
🔴 Extract this folder:
diskover-ce-dataiq_docker.zip folder
🔴 Copy diskover-ce-dataiq_docker folder to program files:
cd ' C:\tmp\diskover-ce-dataiq_docker'
mkdir " C:\Program Files\Docker\containers"
Xcopy C:\tmp\ diskover-ce-dataiq_docker\ " C:\Program Files\Docker\containers"
/E /H /C /I
🔴 Build and start the docker container:
cd ' C:\Program Files\Docker\containers\diskover-ce-dataiq_docker'
docker compose up -d
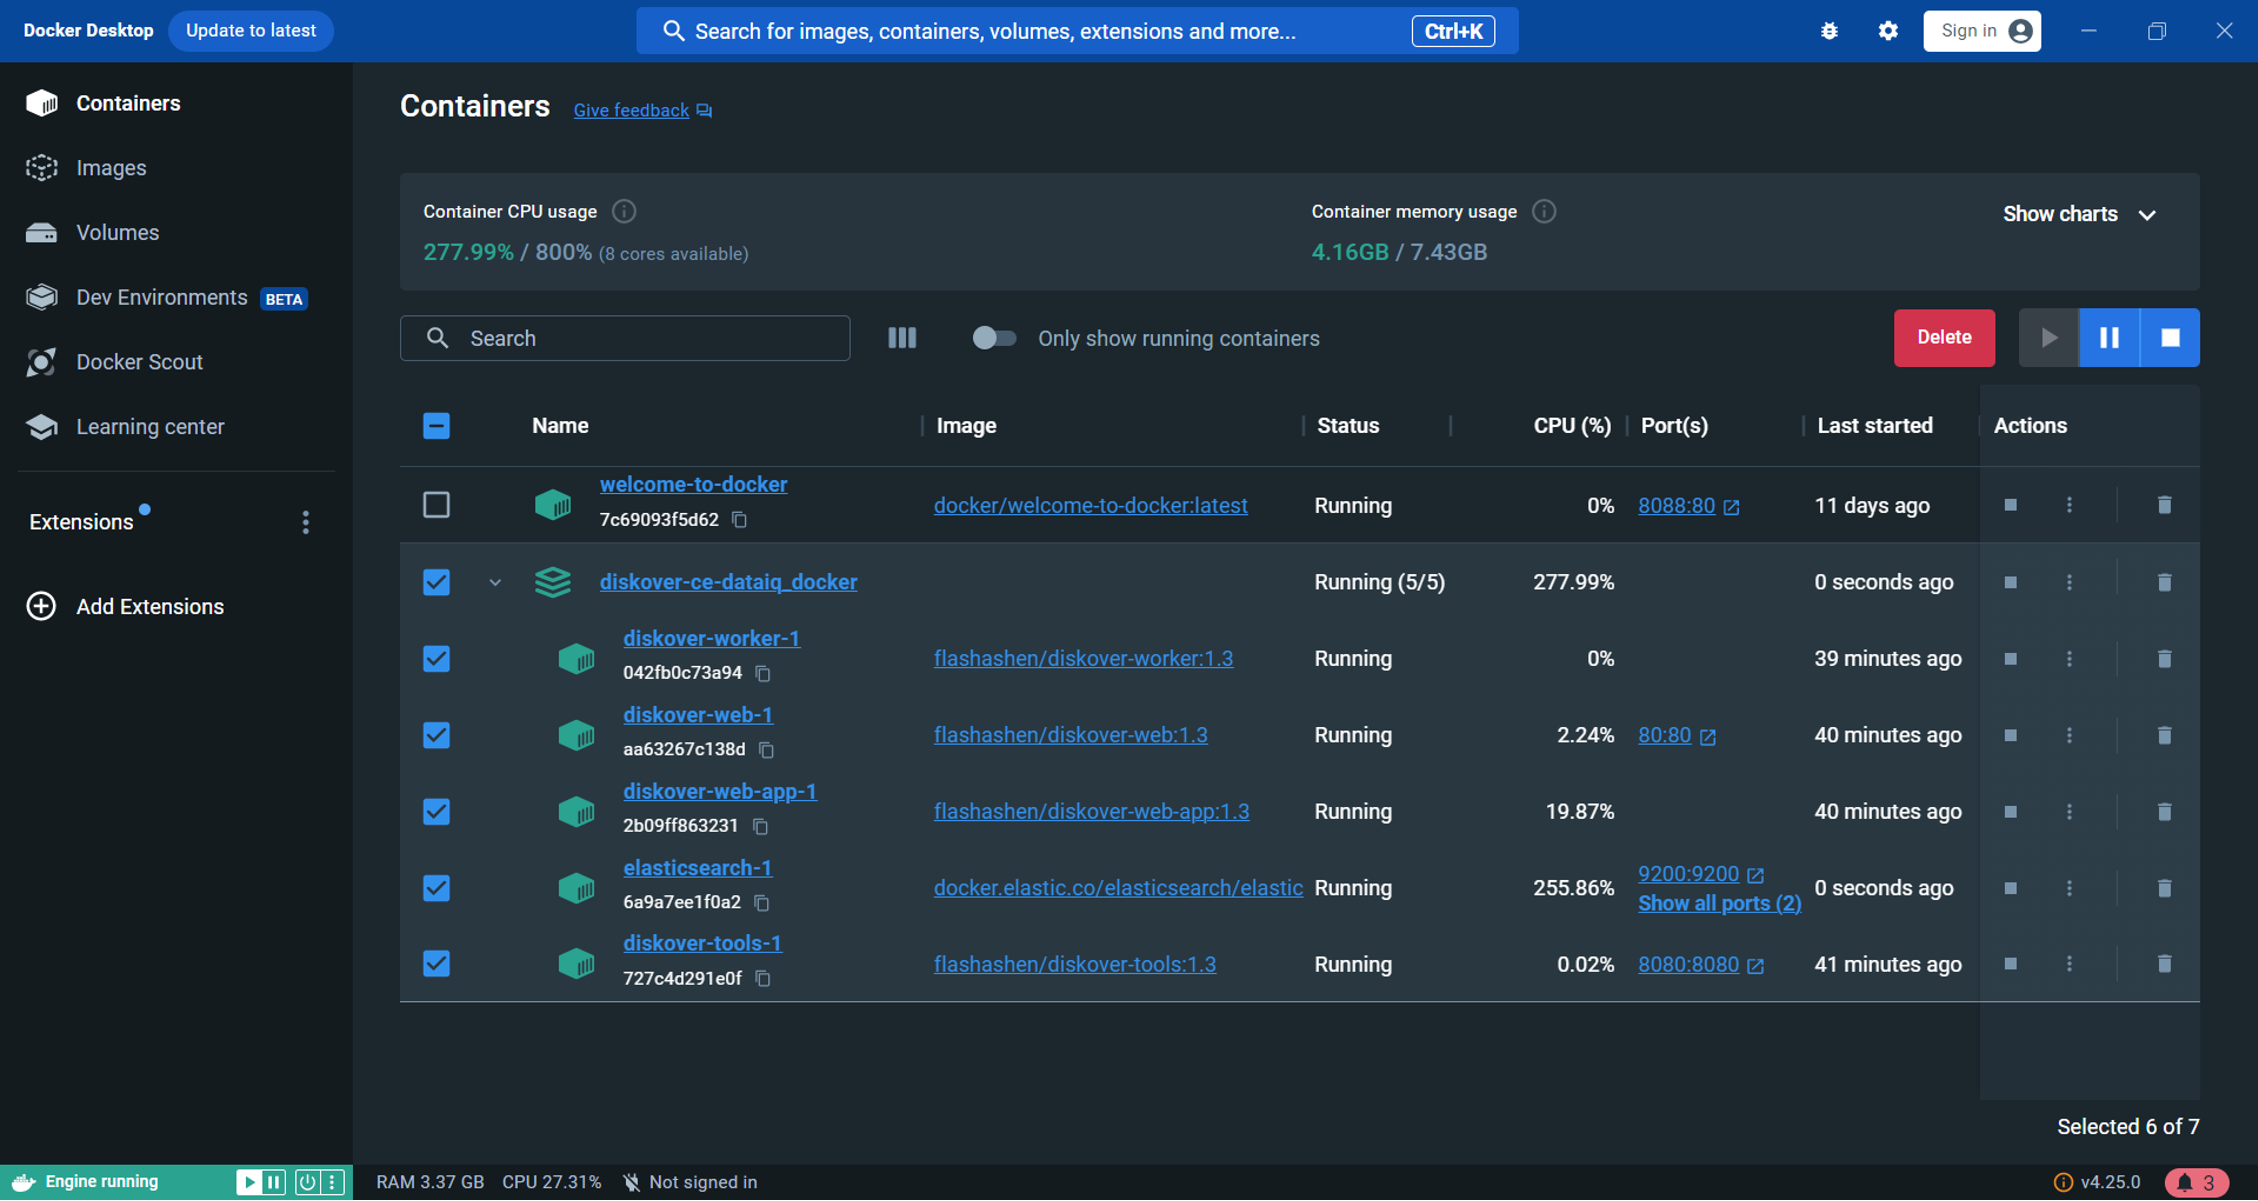
🔴 View Containers Status in Docker Desktop. The image below shows the resulting folder structure:
Install Diskover Docker on Mac
🔴 Go to www.docker.com/products/docker-desktop/ and select Download for Mac.
🔴 Installation instructions: https://docs.docker.com/desktop/install/mac-install/
Instructions coming soon.
Install Diskover Docker | Dell DataIQ Migration
Dell DataIQ Migration to Diskover Community Edition
This section gives additional instructions on how to install the free Diskover Community Edition for Dell DataIQ migration using Docker.
Instructions coming soon.
Dell DataIQ Migration to Diskover Annual Subscription Editions
This section gives additional instructions on how to install Diskover annual subscription editions for Dell DataIQ migration using Docker.
Instructions coming soon.
Diskover Docker | Additional References
The following information is common to all Linux, Windows, and Mac.
Elasticsearch Container
🔴 docker-compose.yml:
version: '3'
services:
  elasticsearch:
    container_name: elasticsearch
    image: docker.elastic.co/elasticsearch/elasticsearch:7.16.1
    environment:

      - discovery.type=single-node
      - bootstrap.memory_lock=true
      - "ES_JAVA_OPTS=-Xms1g -Xmx1g"
    ulimits:
      memlock:
        soft: -1
        hard: -1
    volumes:
      # local ES data directory
      - ./esdata:/usr/share/elasticsearch/data
    ports:
      - 9200:9200
      - 9300:9300
    #depends_on:
    #  - elasticsearch-helper
  #elasticsearch-helper:
  #  image: alpine
  #  command: sh -c "sysctl -w vm.max_map_count=262144"
  #  privileged: true
  #kibana:
  #  image: docker.elastic.co/kibana/kibana:7.16.1
  #  container_name: kibana
  #  ports:
  #    - 5601:5601
  #  depends_on:
  #    - elasticsearch
  #  environment:
  #    ELASTICSEARCH_URL: http://elasticsearch:9200
  #    ELASTICSEARCH_HOSTS: http://elasticsearch:9200
See Elasticsearch Docker docs for more info.
Diskover Container
🔴 Dockerfile:
FROM python:3.7-alpine

# Install additional packages
RUN apk update \
  && apk add --no-cache --virtual build-dependencies \
  build-base \
  gcc \
  python3-dev \
  && apk add --no-cache bash \
  ncurses

# Copy existing application directory contents
COPY . /app/diskover

WORKDIR /app/diskover

# Install required python3 pip modules
RUN pip3 install --no-cache-dir -r requirements.txt

# Start diskoverd task woker (Essential + versions only)
CMD ["python3", "diskoverd.py", "-v"]
🔴 docker-compose.yml:
version: '3'
services:
  #diskover python app
  diskover:
    image: python:3.7-buster
    container_name: diskover
    build:
      context: .
      dockerfile: Dockerfile
    working_dir: /app/diskover
    environment:
      # diskoverd task worker (Essential + versions only)

      -  DISKOVERD_WORKERNAME=docker-worker
    volumes:
      - .:/app/diskover
      # diskover config files
      - ./configs:/root/.config
      # mount points for crawling
      - /mnt/stor1:/data
Diskover-Web Container
🔴 Dockerfile:
FROM php:7.4-fpm

# Install php ldap extension (Essential + versions only)
RUN apt-get update && \
    apt-get install -y libldap2-dev
RUN docker-php-ext-configure ldap
RUN docker-php-ext-install ldap

# Copy php.ini
RUN cp /usr/local/etc/php/php.ini-production /usr/local/etc/php/php.ini

# Copy existing application directory contents
COPY . /var/www

EXPOSE 8000
🔴 docker-compose.yml:
version: '3'
services:
  # diskover-web php app
  diskover-web:
    image: php:7.4-fpm
    container_name: diskover-web-app
    build:
      context: .
      dockerfile: Dockerfile
    working_dir: /var/www
    volumes:

      - .:/var/www
  # Nginx web server
  nginx:
    image: nginx:1.21
    container_name: diskover-web-nginx
    working_dir: /var/www
    volumes:
      - ./diskover-web.conf:/etc/nginx/conf.d/diskover-web.conf
      - .:/var/www
    ports:
      - 8000:8000
Quick Start
Distributions of this project can run as-is, out of the box, with default settings. Custom setup and customizations can be performed as you go.
🔴 For a quick start:
export DISKOVER_SCAN_DIR=<host directory to scan>
tar -xf diskover_docker.tar.gz  # archive file may have a different name
cd diskover_docker
docker compose up -d
Setup
Initial Setup
🔴 Unpack the archive file containing the dockerized application. The file will be named something like diskover_docker.tar.gz:
tar -xf diskover_docker.tar.gz
🔴 Change the current working directory to diskover_docker that was unpacked from the archive file:
cd diskover_docker
🔴 Edit the settings in .env to match the current environment. Pay special attention to the DISKOVER_SCAN_DIR setting as this is the directory that will be accessible to the container for the scan.
vi .env
Note: You can also use execution (shell) environment variables that override those in the
.envfile.
Multiple Directories Cannot be Scanned/Mounted under a Single Parent Directory
🔴 If you have more than one directory to scan and they cannot be mounted under a single parent directory, then you will have to add volumes directly in the
./docker-compose.yml file under the diskover-worker service:
vi docker-compose.yml
🔴 Position the application files/directories. Depending on your dockerized diskover distribution, you will need to do one of the following...
🔴 If the application files are included: No action is required.
🔴 If the application is in separate archive files: Copy application archive files into ./resources:
cp <somewhere on your filesystem>/diskover*.tar.gz ./resources
🔴 If you have an existing application: Edit HOST_MOUNT_* settings in the .env to point to the existing directories:
vi .env # if the HOST_MOUNT_* variables have not already been set
SSL Certificate and Private Key for Diskover
🔴 If you have an ssl certificate and private key for diskover, place them in the resources directory alongside the application tar files. If not, a self-signed cert
will be generated.
cp <somewhere on your filesystem>/your-disover-web.crt ./resources
cp <somewhere on your filesystem>/your-disover-web.key ./resources
Note: If you provide your own files they must have
.crtand.keyextensions or they will be ignored.
Certificate Authority and/or Intermediate Certs
🔴 If you have certificate authority and/or intermediate certs, place them in ./resources/cacerts.
cp <somewhere on your filesystem>/your-root-ca.crt ./resources/cacerts
cp <somewhere on your filesystem>/your-intermediate-ca.crt ./resources/cacerts
Note: Currently, they will only installed in the worker container.
Run
The compose services are categorized into three profiles:
- Web
- Worker
- Elasticsearch
This allows the same docker-compose.yml file to be used to run the application on different hosts or on a single host, as desired.
🔴 To run all, assuming the default setting COMPOSE_PROFILES=web,worker,elasticsearch
docker compose up -d
🔴 To run a specific set of containers, the worker for example:
docker compose --profile worker up -d
NOTE: Docker compose commands on individual services may not work when there are dependencies across profiles and you will see an error like this example below. To work around this just don't specify the individual service and operate on the level of profile.
$ docker-compose --profile web restart diskover-web-app
no such service: elasticsearch
Web Endpoints
- Diskover: http://localhost
- Kibana - indexes: http://localhost:5601/app/management/data/index_management/indices
Configuration and Data Files
This project intends to eventually obviate direct editing of project config files, but that option is still available.
Note: If you do directly edit configuration files, then set the
S6_TEMPLATE_OVERWRITES variable=falsefor the corresponding container if the edited file is templated. To list template files for a given service execute the following:
docker exec <container> find /templates -type f
All application host (bind) mounts are in the mount directory by default. The directory structure of all containers closely follows the standard install paths as detailed in the Diskover Installation Guide. Here is a list of a few core configuration files:
Core settings:
./mount/web/www/src/diskover/Constants.php
Worker scanner:
./mount/worker/config/diskover/config.yaml
Worker daemon:
./mount/worker/config/diskoverd/config.yaml
Software Activation
Licensing Overview
The Diskover Community Edition doesn't require a license key and can be used for an unlimited time.
The Diskover Editions/paid subscriptions require a license. Unless otherwise agreed:
- A trial license is valid for 30 days and is issued for 1 Elasticsearch node.
- A paid subscription license is valid for 1 year. Clients will be contacted about 90 days prior to their license expiration with a renewal proposal.
Please reach out to your designated Diskover contact person or contact us directly for more information.
Download Portal
If not already done, download the latest software version.
- Create an account for the Diskover Download Portal.
- Your account will be validated and approved within 24 hours. Note that we will contact you if we need more information prior to approval.
- Once your account is approved, you can login and download the latest version.
License Issuance Criteria
Licenses are created using these variables:
- Your email address
- Your hardware ID number
- Your Diskover Edition
- The number of Elasticsearch nodes.
Generating a Hardware ID
After installing Diskover and completing the basic configuration, you will need to generate a hardware ID. Please send that unique identifier along with your license request.
🔴 To create your hardware ID:
cd /opt/diskover
python3 diskover_lic.py -g
🟨 IMPORTANT!
- Check that you have configured your Elasticsearch host correctly, as it is part of the hardware ID encoding process.
- Note that if your Elasticsearch cluster ID changes, you will need new license keys.
License Key Locations
Linux
Place the license keys in the following locations.
🔴 Copy diskover.lic file to:
/opt/diskover/diskover.lic
🔴 Copy diskover-web.lic file to:
/var/www/diskover-web/src/diskover/diskover-web.lic
🔴 Check that the diskover-web.lic file is owned by NGINX user and permissions are 644:
chown nginx:nginx diskover-web.lic && chmod 644 diskover-web.lic
🔴 After you have installed your license keys, you can see the info about the license using diskover_lic.py:
cd /opt/diskover
python3 diskover_lic.py -l
Windows
🔴 Place the license keys in the following locations. Copy diskover.lic file to:
C:\Program Files\diskover\
🔴 Copy diskover-web.lic file to folder:
C:\Program Files\diskover-web\src\diskover\
Mac
🔴 Copy diskover.lic file to folder:
/Applications/Diskover.app/Contents/MacOS/diskover/
Support
Support Options
| Support & Ressources | Free Community Edition | Subscriptions* |
|---|---|---|
| Online Documentation | ✅ | ✅ |
| Slack Community Support | ✅ | ✅ |
| Diskover Community Forum | ✅ | ✅ |
| Knowledge Base | ✅ | ✅ |
| Technical Support | ✅ | |
Phone Support
|
✅ | |
| Remote Training | ✅ |
*
Feedback
We'd love to hear from you! Email us at info@diskoverdata.com
Warranty & Liability Information
Please refer to our Diskover End-User License Agreements for the latest warranty and liability disclosures.
Contact Diskover
| Method | Coordinates |
|---|---|
| Website | https://diskoverdata.com |
| General Inquiries | info@diskoverdata.com |
| Sales | sales@diskoverdata.com |
| Demo request | demo@diskoverdata.com |
| Licensing | licenses@diskoverdata.com |
| Support | Open a support ticket with Zendesk 800-560-5853 | Mon-Fri 8am-6pm PST |
| Slack | Join the Diskover Slack Workspace |
| GitHub | Visit us on GitHub |
| AJA Media Edition | 530-271-3190 sales@aja.com support@aja.com |
© Diskover Data, Inc. All rights reserved. All information in this manual is subject to change without notice. No part of the document may be reproduced or transmitted in any form, or by any means, electronic or mechanical, including photocopying or recording, without the express written permission of Diskover Data, Inc.