![]()
Diskover OVA Installation and Configuration Guide
For version 2.3 +
This guide is intended for Service Professionals and System Administrators.
Introduction
Overview
Diskover Data is a web-based platform that provides single-pane viewing of distributed digital assets. It provides point-in-time snapshot indexes of data fragmented across cloud and on-premise storage spread across an entire organization. Users can quickly and easily search across company files. Diskover is a data management application for your digital filing cabinet, providing powerful granular search capabilities, analytics, file-based workflow automation, and ultimately enables companies to scale their business and be more efficient at reducing their operating costs.
For more information, please visit diskoverdata.com
Diskover Use Cases
Diskover addresses unstructured data stored across various storage repositories. Data curation encompasses the manual and automated processes needed for principled and controlled data creation, maintenance, cleanup, and management, together with the capacity to add value to data.
System Administrators
The use case for System Administrators is often centered around data cleanup, data disposition, ensuring data redundancy, and automating data. System Administrators are often tasked with controlling costs associated with unstructured data.
Line of Business Users
The use cases for Line of Business users are often centered around adding value to data, finding relevant data, correlating, analyzing, taking action on data sets, and adding business context to data.
Approved AWS Technology Partner
Diskover Data is an official AWS Technology Partner. Please note that AWS has renamed Amazon Elasticsearch Service to Amazon OpenSearch Service. Most operating and configuration details for OpenSearch Service should also be applicable to Elasticsearch..
![]()
Document Conventions
Code Snippets Copy
Throughout this document, all code snippets can easily be copied to a clipboard using the copy icon on the far right of the code block:
code snippet - use icon on the far right to copy me
Proposed Actions
🔴 All proposed action items are preceded by a red dot.
Important Notes and Warnings
🟨 All important notes and warnings are preceded by a yellow square.
Restricted Diskover Editions
The appropriate label(s) will be displayed for features and/or sections of the guide that apply to specific Diskover editions.


OVA Overview
Understand the Network
Understand the networking architecture of the site you will be deploying into. If the site has DHCP already configured, the virtual machine will acquire an IP address from the offered range. Ensure the offered IP address will route to the clients using the service. The file systems to be scanned must also be reachable from the offered DHCP range.
For clients to access the service, they will need to route to the hostname provided in the license file. The hostname in the license file must match the hostname on the Linux host. It is recommended that DNS be used to resolve the service.
Performance Limitations
🟨 There are performance limitations when running Diskover using an OVA, as it will start to get sluggish at around 200 million files.
OVA Installation
This section contains instructions to quickly get up and running with Diskover using an OVA (Open Virtual Appliance) on VMWare Workstation and VirtualBox. These OVAs can easily be imported into either of these hypervisors and booted up to run Diskover. This guide provides light instructions on how to import the OVA properly and get it booted up.
VirtualBox Import and VM Settings
🔴 Import the OVA by choosing File -> Import Appliance
🔴 Choose Source → Local File System
🔴 File → Browse for the OVA on your local machine and import it here
🔴 Once imported, choose Next
🔴 By default, the OVA sets the CPU=2 and RAM=2GB. You need to adjust these settings according to your host machine. The recommended specs for OVA usage for POC:
- CPU=12
- RAM=64GB
🔴 Once you've adjusted the settings choose Start
VMWare Workstation Import and VM Settings
🔴 Import the OVA by choosing File -> Open
🔴 Give the VM a unique name, ex:diskover-2.3.0
🔴 Once you've given the VM a name, choose Import
🔴 By default, the OVA sets the CPU=2 and RAM=2GB. You need to adjust these settings according to your host machine. The recommended specs for OVA usage for POC:
- CPU=12
- RAM=64GB
🔴 Once you've adjusted the settings choose Power on this virtual machine.
Diskover Configuration
With the OVA now imported into your hypervisor, there are a few configuration steps needed to get the system up and running and ready to scan. These instructions apply to any hypervisor used for the import.
OVA Login
🔴 You will see two user accounts, Vagrant and Diskover, choose to user/login as Diskover.
🔴 Password by default is darkdata.
Open Activities
🔴 Click on Activities in the top left.
🔴 Open the terminal app.
🔴 Additionally, open Google Chrome or Firefox.
Diskover Configuration Wizard
Diskover v2.3 has an easy configuration wizard that we will walk you through.
🔴 In the browser window, go to http://localhost:8000/diskover_admin/config/
Elasticsearch
🔴 In the initial section, you will see hosts-0 and within the box you will see Elasticsearch, replace this with localhost.
🔴 Choose Test in the bottom right. This should show your Elasticsearch cluster health with a status of green at the top of the window.
🔴 Choose Save & Continue.
🔴 Choose Yes.
🔴 Choose Test in the bottom right. This should show your ES cluster health with a status of green at the top of the window.
🔴 Choose Save & Continue.
License
🔴 Choose Skip in the bottom right for now, we will do this at the end.
Time Settings
🔴 Select your proper timezone.
🔴 Choose Save & Continue.
🔴 Check the box for Show Times in Local Timezone.
🔴 Choose Save & Continue.
RabbitMQ
🔴 Choose Test in the bottom right, this should show Connection Successful( at the top of the screen.
License Request and Installation
Whether you are doing a POC or are a customer, the process is the same.
🔴 Generate your hardware ID
🔴 Send your hardware ID along with basic information so we can easily identify you to licenses@diskoverdata.com for all editions and add diskover-licensing@aja.com for the media edition.
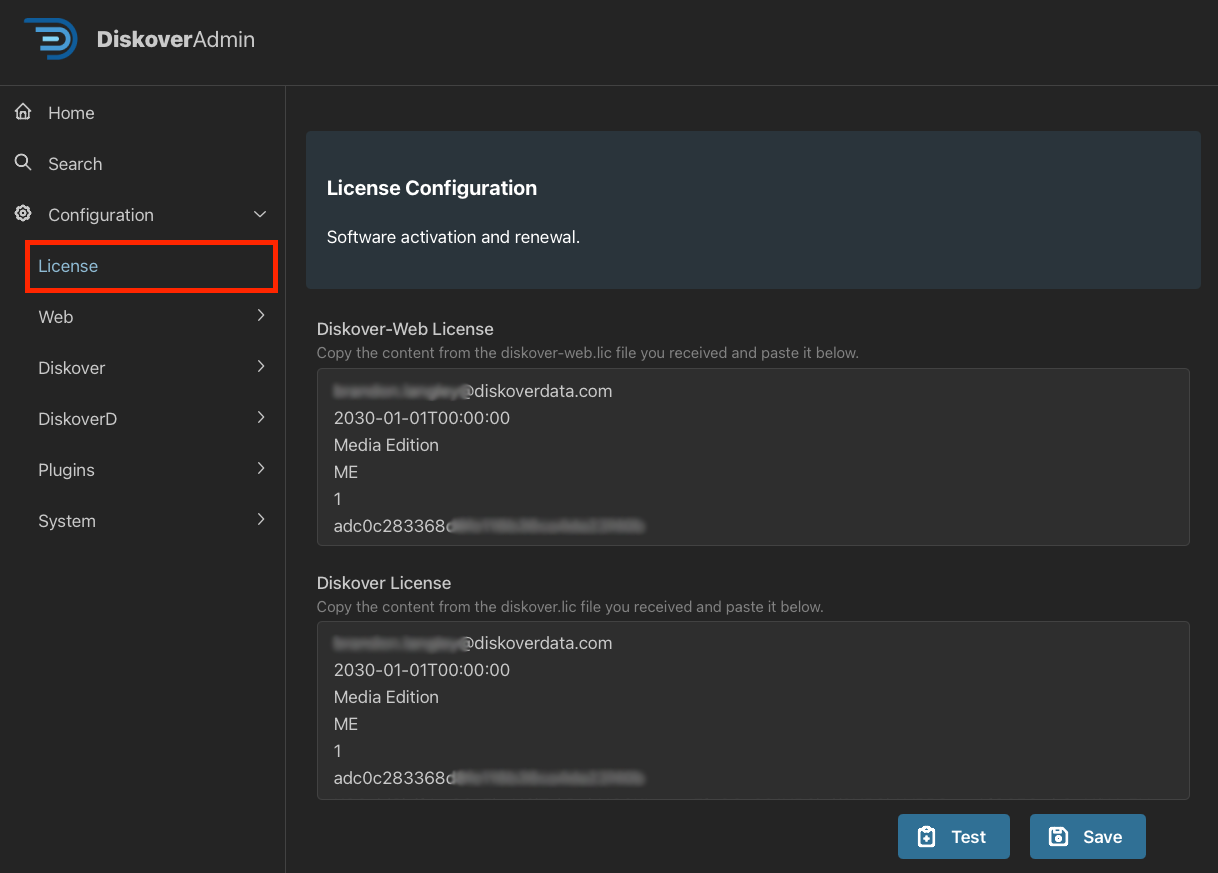
🔴 Once you have your licenses back from the Diskover team, you can input them here http://localhost:8000/diskover_admin/config/License by simply copying the contents from the diskover.lic and diskover-web.lic files into their respective boxes.
Diskover Configuration Enhancements
Now that your Diskover system is mostly configured and online, we want to make a couple of quality-of-life changes. Note that most of these commands are issued via the terminal with the exception of the enable logging.
🔴 Diskover-Web Ownership:
chown -R nginx.nginx /var/www/diskover-*
🔴 Sart DiskoverD service)
systemctl start diskoverd
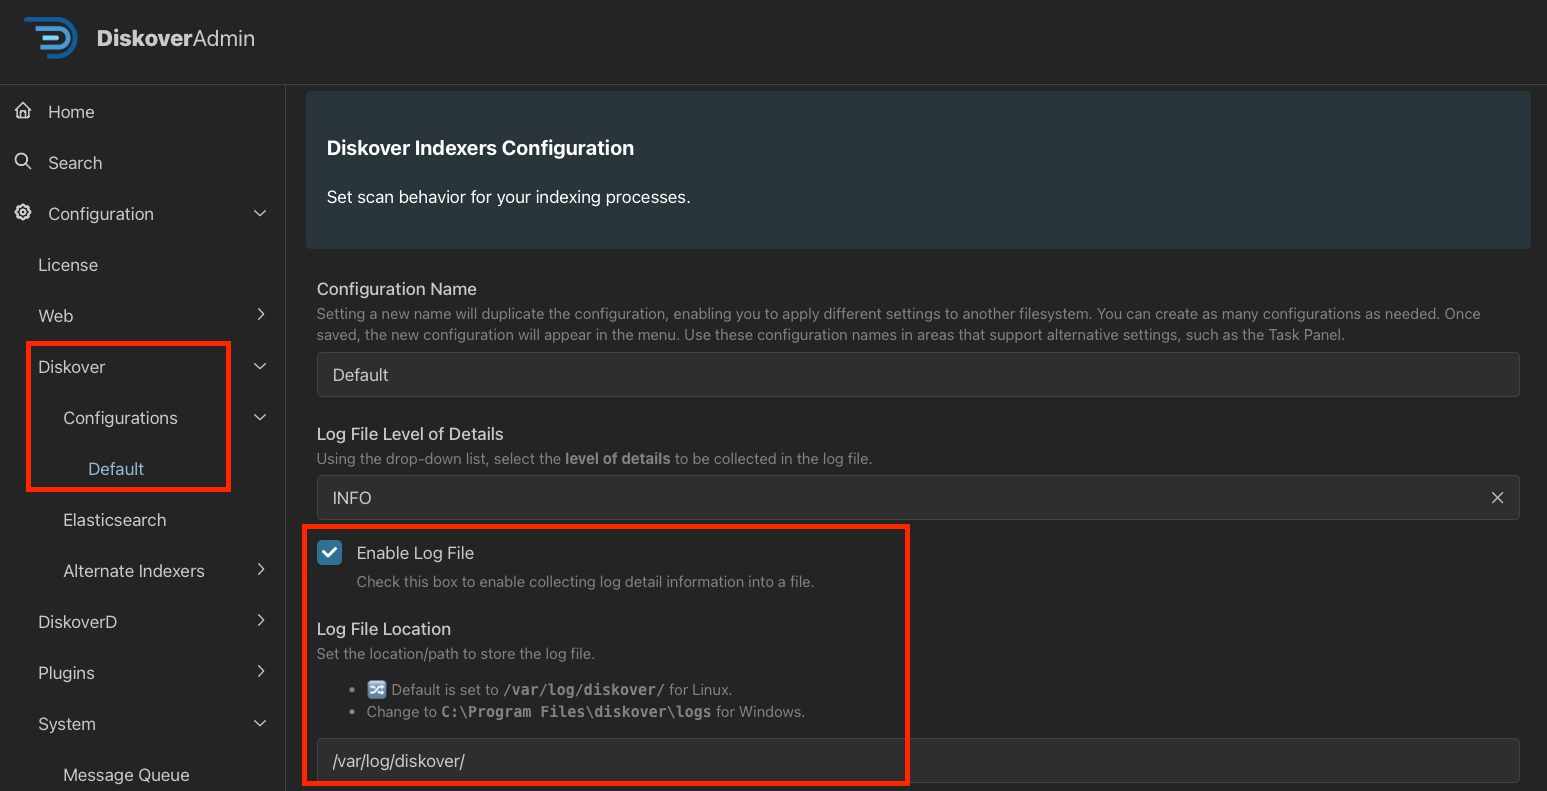
🔴 Enable logging by going to http://localhost:8000/diskover_admin/config/Diskover.Configurations.Default.
🔴 Click Enable Log File checkbox and hit Save in the bottom right.
🔴 Go to http://localhost:8000/diskover_admin/config/DiskoverD.Default
🔴 Click Enable Log File checkbox.
🔴 Under Python Command section put in /bin/python3.11 instead of just python3 and hit Save at the bottom right.
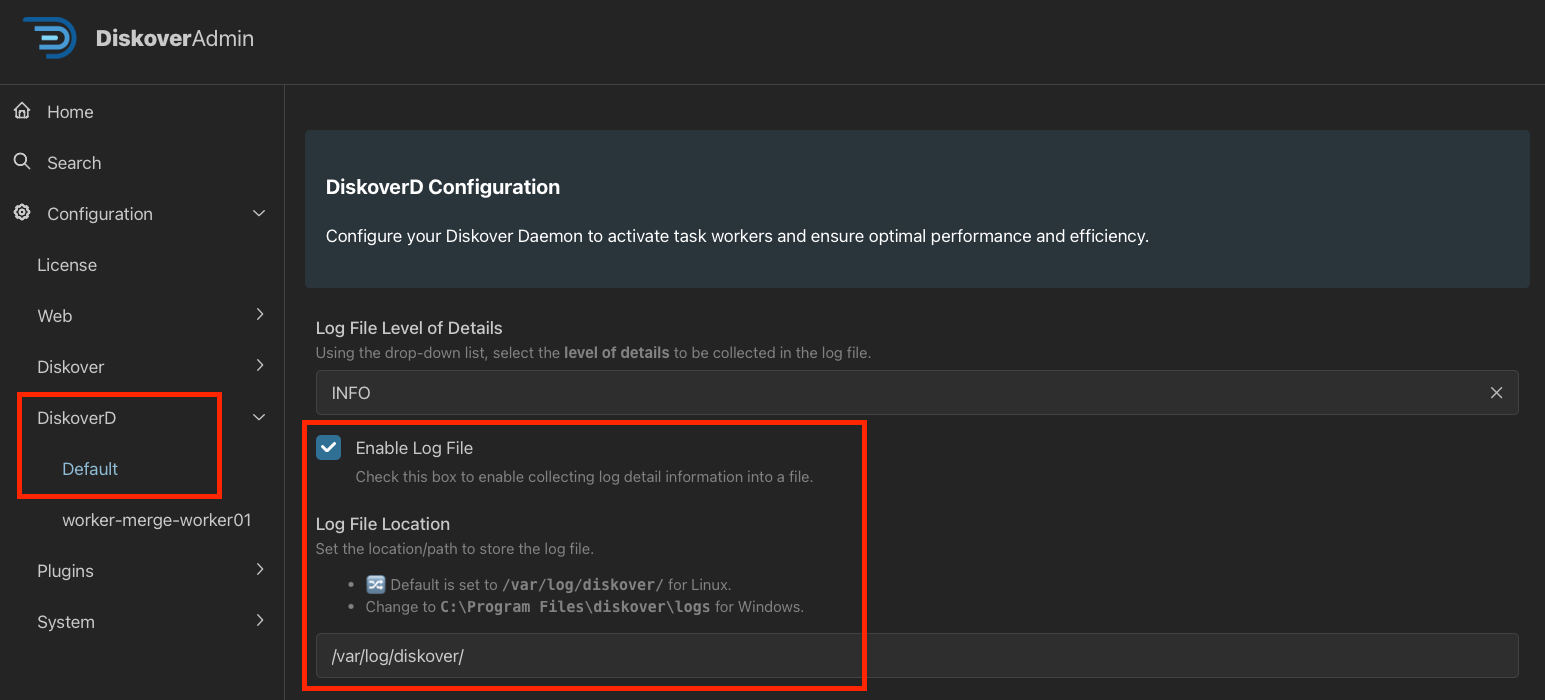
🔴 In the left-hand pane, expand the DiskoverD section, and you should see another Default option here that matches the hostname
of your machine. This might just be worker-localhost_localdomain.
🔴 Click the Enable Log File checkbox.
🔴 Under Python Command section put in /bin/python3.11 instead of just python3 and hit Save at the bottom right.
🔴 Restart services:
systemctl restart diskoverd diskover-admin
Schedule and Run Sample Storage Scan
Scan Schedule
This section will be a real quick test scan of the local OVA filesystem. To properly scan your own storage, you will need to set up and configure SMB/NFS shares to be mounted to the OVA. Once these shares are mounted, you can follow a similar process as outlined below to scan those storage repositories.
🔴 Login to Diskover by going to http://localhost:8000 and login as the admin user. Once you input this password you will be prompted to reset the password and log back in with your own password:
- Username : admin
- Password : darkdata
🔴 From the main user interface, go to the upper right corner ⛭ → Task Panel
🔴 Select Task List at the top left.
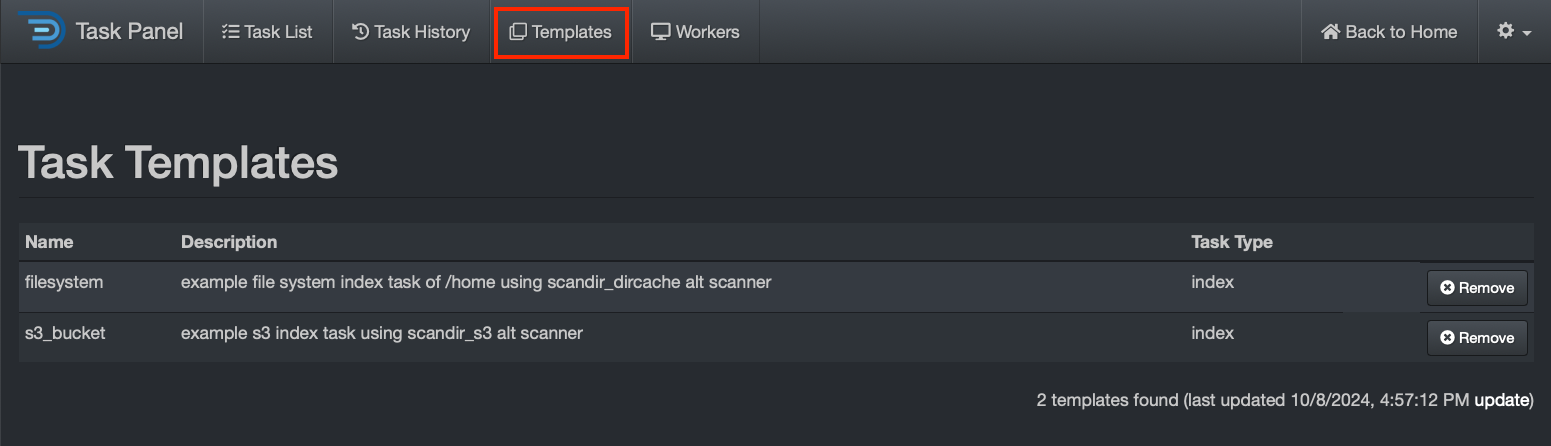
🔴 Select New Index Task.
🔴 Select the filesystem template from the template list at the top.
🔴 Only 5 fields in this default template need to be changed to scan your local storage - click here for more information about all the fields on this page:
| Field | Description |
|---|---|
| Name | Set to some descriptive name, for example Diskover Build Directory |
| Description | Enter a more detailed description of the task, for example Scan of the local /opt/diskover directory |
| Crawl Directory(s) | This will be the path to the OVA that we want to scan, for example /opt/diskover |
| Custom Index Name | We want to differentiate each task(s) index name so that they're never the same, for example diskover-opt-%Y%m%d%H%M |
| Disabled | Uncheck this box |
🔴 Once all properties are set, click Create Task at the bottom of the page.
🔴 Before starting the first scan task, let's tail the log files so we can watch the progress of our scan:
tail -F /var/log/diskover/*
Start First Scan
🔴 Start the scan from the Task List tab, or http://localhost:8000/tasks/index.php, choose your newly created task and select the arrow next to the Info button and choose Run Now, click Ok.
🔴 Open your terminal and watch the scan logs.
Sample Index Review
Now that we have scanned the test directory let’s take a look at the index that was created from this storage location.
🔴 From the main user interface, go to the upper right corner ⛭ → Indices or http://localhost:8000/selectindices.php
🔴 Make sure the Always use latest indices (auto select) box is checked.
🔴 Click on the folder 📁 in the top main menu to navigate back to the main page, and you can now see and review your first test scan, as well as browse and search all of its content.
Software Activation
Licensing Overview
The Diskover Community Edition doesn't require a license key and can be used for an unlimited time.
The Diskover Editions/paid annual subscriptions require a license. Unless otherwise agreed:
- A trial license is usually valid for 30 days and is issued for 1 Elasticsearch node.
- A paid subscription license is valid for 1 year. Clients will be contacted about 90 days before their license expiration with a renewal proposal.
Please reach out to your designated Diskover contact person or contact us directly for more information.
Software Download
You can always download the latest version of the Community Edition here.
We are currently moving to a new platform for software download for the annual subscription editions of Diskover. During this process, please open a support ticket and we will send you a link to the latest version.
Click these links for information on how to create a support account and how to create a support ticket.
License Issuance Criteria
Licenses are created using these variables:
- Your email address
- Your hardware ID number
- Your Diskover Edition
- The number of Elasticsearch nodes.
Hardware ID Generation
Your hardware ID should have been automatically generated when going through the Initial Configuration section. The following command is listed in case you need to manually generate your hardware ID. Please send that unique identifier along with your license request as needed.
🔴 Become the root user:
sudo -i
🔴 To manually create your hardware ID:
cd /opt/diskover
python3 diskover_lic.py -g
After installing Diskover and completing the basic configuration, you will need to generate a hardware ID. Please send that unique identifier along with your license request.
🟨 IMPORTANT!
- Check that you have configured your Elasticsearch host correctly, as it is part of the hardware ID encoding process.
- Note that if your Elasticsearch cluster ID changes, you will need new license keys.
License Key Locations in DiskoverAdmin Panel
- From the main Diskover user interface, click on the ⛭ at the top right corner.
- Select ⛭ System Configuration or navigate to http://localhost:8000/diskover_admin/config/License
- Open the License tab and paste the files into their respective boxes.
Support
Support Options
| Support & Ressources | Free Community Edition | Subscriptions* |
|---|---|---|
| Online Documentation | ✅ | ✅ |
| Slack Community Support | ✅ | ✅ |
| Diskover Community Forum | ✅ | ✅ |
| Knowledge Base | ✅ | ✅ |
| Technical Support | ✅ | |
Phone Support
|
✅ | |
| Remote Training | ✅ |
*
Feedback
We'd love to hear from you! Email us at info@diskoverdata.com
Warranty & Liability Information
Please refer to our Diskover End-User License Agreements for the latest warranty and liability disclosures.
Contact Diskover
| Method | Coordinates |
|---|---|
| Website | https://diskoverdata.com |
| General Inquiries | info@diskoverdata.com |
| Sales | sales@diskoverdata.com |
| Demo request | demo@diskoverdata.com |
| Licensing | licenses@diskoverdata.com |
| Support | Open a support ticket with Zendesk 800-560-5853 | Mon-Fri 8am-6pm PST |
| Slack | Join the Diskover Slack Workspace |
| GitHub | Visit us on GitHub |
| AJA Media Edition | 530-271-3190 sales@aja.com support@aja.com |
© Diskover Data, Inc. All rights reserved. All information in this manual is subject to change without notice. No part of the document may be reproduced or transmitted in any form, or by any means, electronic or mechanical, including photocopying or recording, without the express written permission of Diskover Data, Inc.