![]()
Diskover Setup and Administration Guide
For annual subscriptions v2.4 +
This guide is intended for Service Professionals and System Administrators.

The best way to install Diskover is by using our internal Ansible playbooks. If you're a customer or setting up a POC, please create a support ticket for assistance with your installation or upgrade. If you prefer to blaze your own trail with a more manual approach, please follow the instructions below.
Introduction
Overview
Diskover Data is a web-based platform that provides single-pane viewing of distributed digital assets. It provides point-in-time snapshot indexes of data fragmented across cloud and on-premise storage spread across an entire organization. Users can quickly and easily search across company files. Diskover is a data management application for your digital filing cabinet, providing powerful granular search capabilities, analytics, file-based workflow automation, and ultimately enables companies to scale their business and be more efficient at reducing their operating costs.
For more information, please visit diskoverdata.com
Approved AWS Technology Partner
Diskover Data is an official AWS Technology Partner. Please note that AWS has renamed Amazon Elasticsearch Service to Amazon OpenSearch Service. Most operating and configuration details for OpenSearch Service should also be applicable to Elasticsearch..
![]()
Diskover Use Cases
Diskover addresses unstructured data stored across various storage repositories. Data curation encompasses the manual and automated processes needed for principled and controlled data creation, maintenance, cleanup, and management, together with the capacity to add value to data.
System Administrators
The use case for System Administrators is often centered around data cleanup, data disposition, ensuring data redundancy, and automating data. System Administrators are often tasked with controlling costs associated with unstructured data.
Line of Business Users
The use cases for Line of Business users are often centered around adding value to data, finding relevant data, correlating, analyzing, taking action on data sets, and adding business context to data.
Document Conventions
| TOOL | PURPOSE |
|---|---|
| Copy/Paste Icon for Code Snippets | Throughout this document, all code snippets can easily be copied to a clipboard using the copy icon on the far right of the code block: |
| 🔴 | Proposed action items |
| ✏️ and ⚠️ | Important notes and warnings |
| Features Categorization | IMPORTANT
|
| Core Features |     |
| Industry Add-Ons | These labels will only appear when a feature is exclusive to a specific industry.    |
Architecture Overview
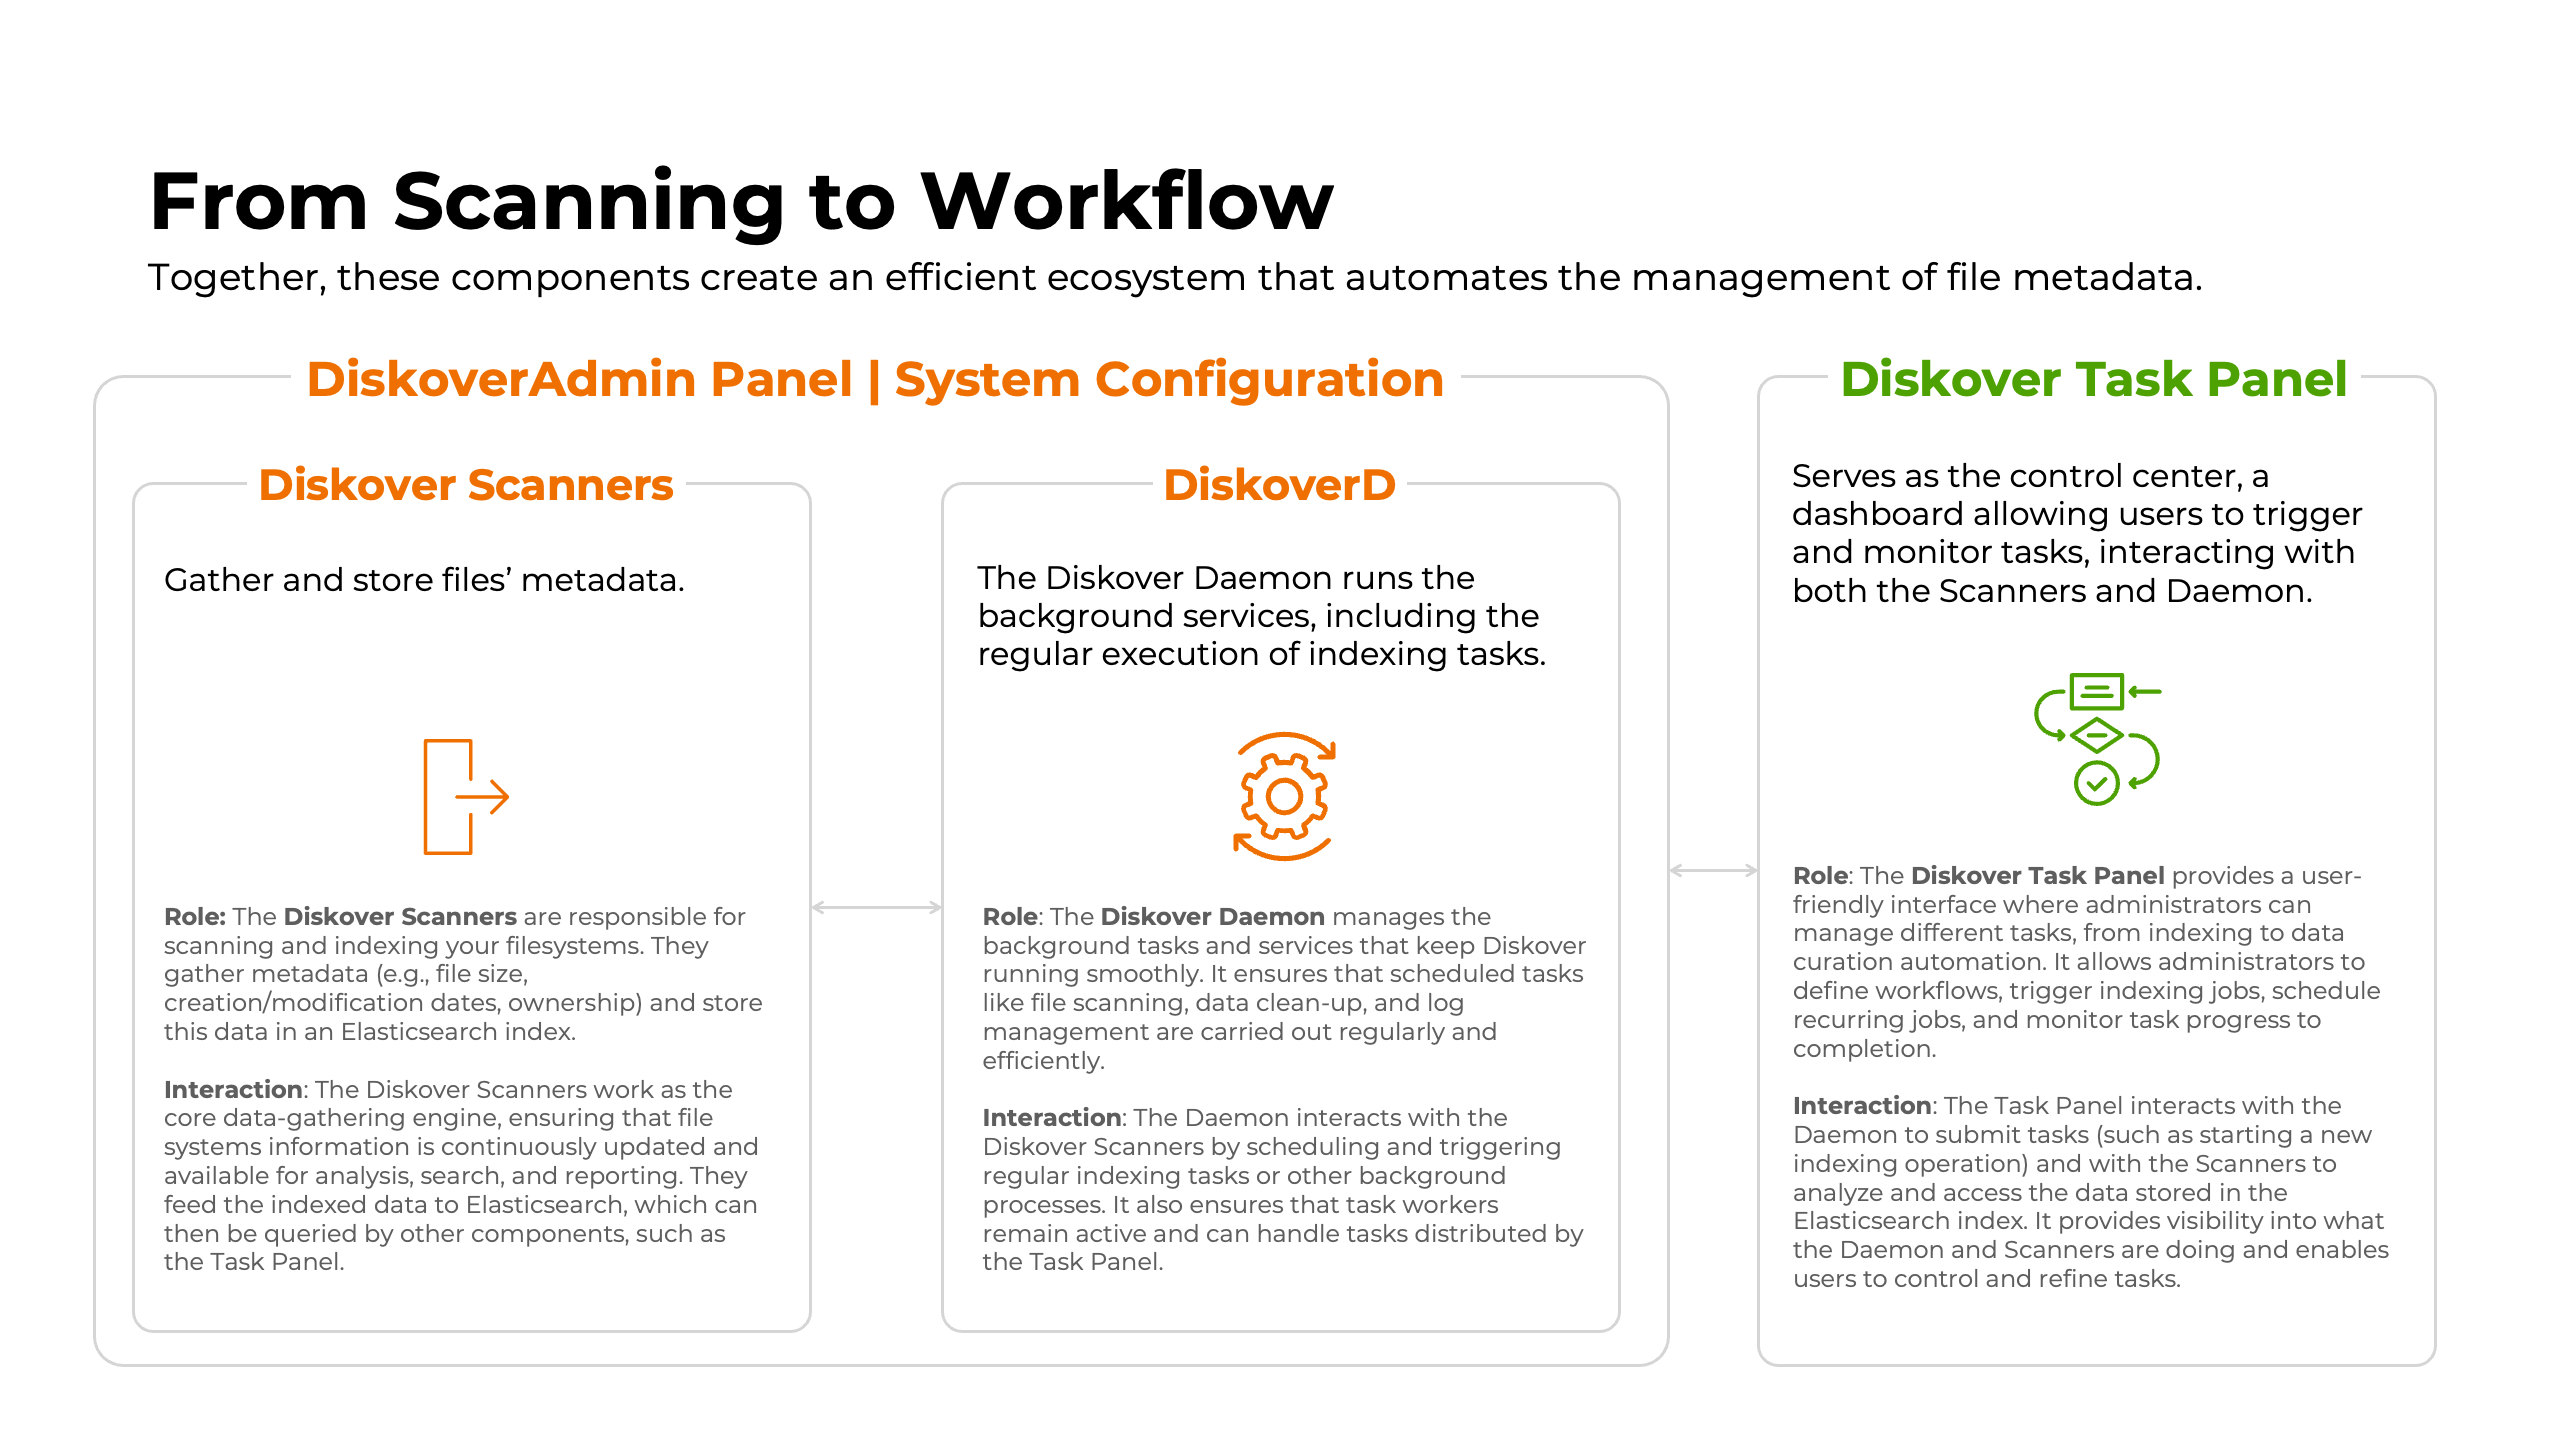
Diskover's Main Components
Deploying Diskover uses 3 major components:
| COMPONENT | ROLE |
|---|---|
| 1️⃣ Elasticsearch |
Elasticsearch is the backbone of Diskover. It indexes and organizes the metadata collected during the scanning process, allowing for fast and efficient querying of large datasets. Elasticsearch is a distributed, RESTful search engine capable of handling vast amounts of data, making it crucial for retrieving information from scanned file systems and directories. |
| 2️⃣ Diskover-Web |
Diskover-Web is the user interface that allows users to interact with the Diskover system. Through this web-based platform, users can search, filter, and visualize the data indexed by Elasticsearch. It provides a streamlined and intuitive experience for managing, analyzing, and curating data. Diskover-Web is where users can explore results, run tasks, and monitor processes. |
| 3️⃣ Diskover Scanners |
The scanners, sometimes called crawlers, are the components responsible for scanning file systems and collecting metadata. These scanners feed that metadata into Elasticsearch for storage and later retrieval. Diskover supports various types of scanners, which are optimized for different file systems, ensuring efficient and comprehensive data collection. Out of the box, Diskover efficiently scans generic filesystems. However, in today’s complex IT architectures, files are often stored across a variety of repositories. To address this, Diskover offers various alternate scanners as well as provides a robust foundation for building alternate scanners, enabling comprehensive scanning of any file storage location. |
| 🔀 Diskover Ingesters |
Diskover’s ingesters are the ultimate bridge between your unstructured data and high-performance, next-generation data platforms. By leveraging the open-standard Parquet format, Diskover converts and streams your data efficiently and consistently. Whether you’re firehosing into Dell data lakehouse, Snowflake, Databricks, or other modern data infrastructures, our ingesters ensure your data flows effortlessly—optimized for speed, scalability, and insight-ready delivery. |
Diskover Platform Overview
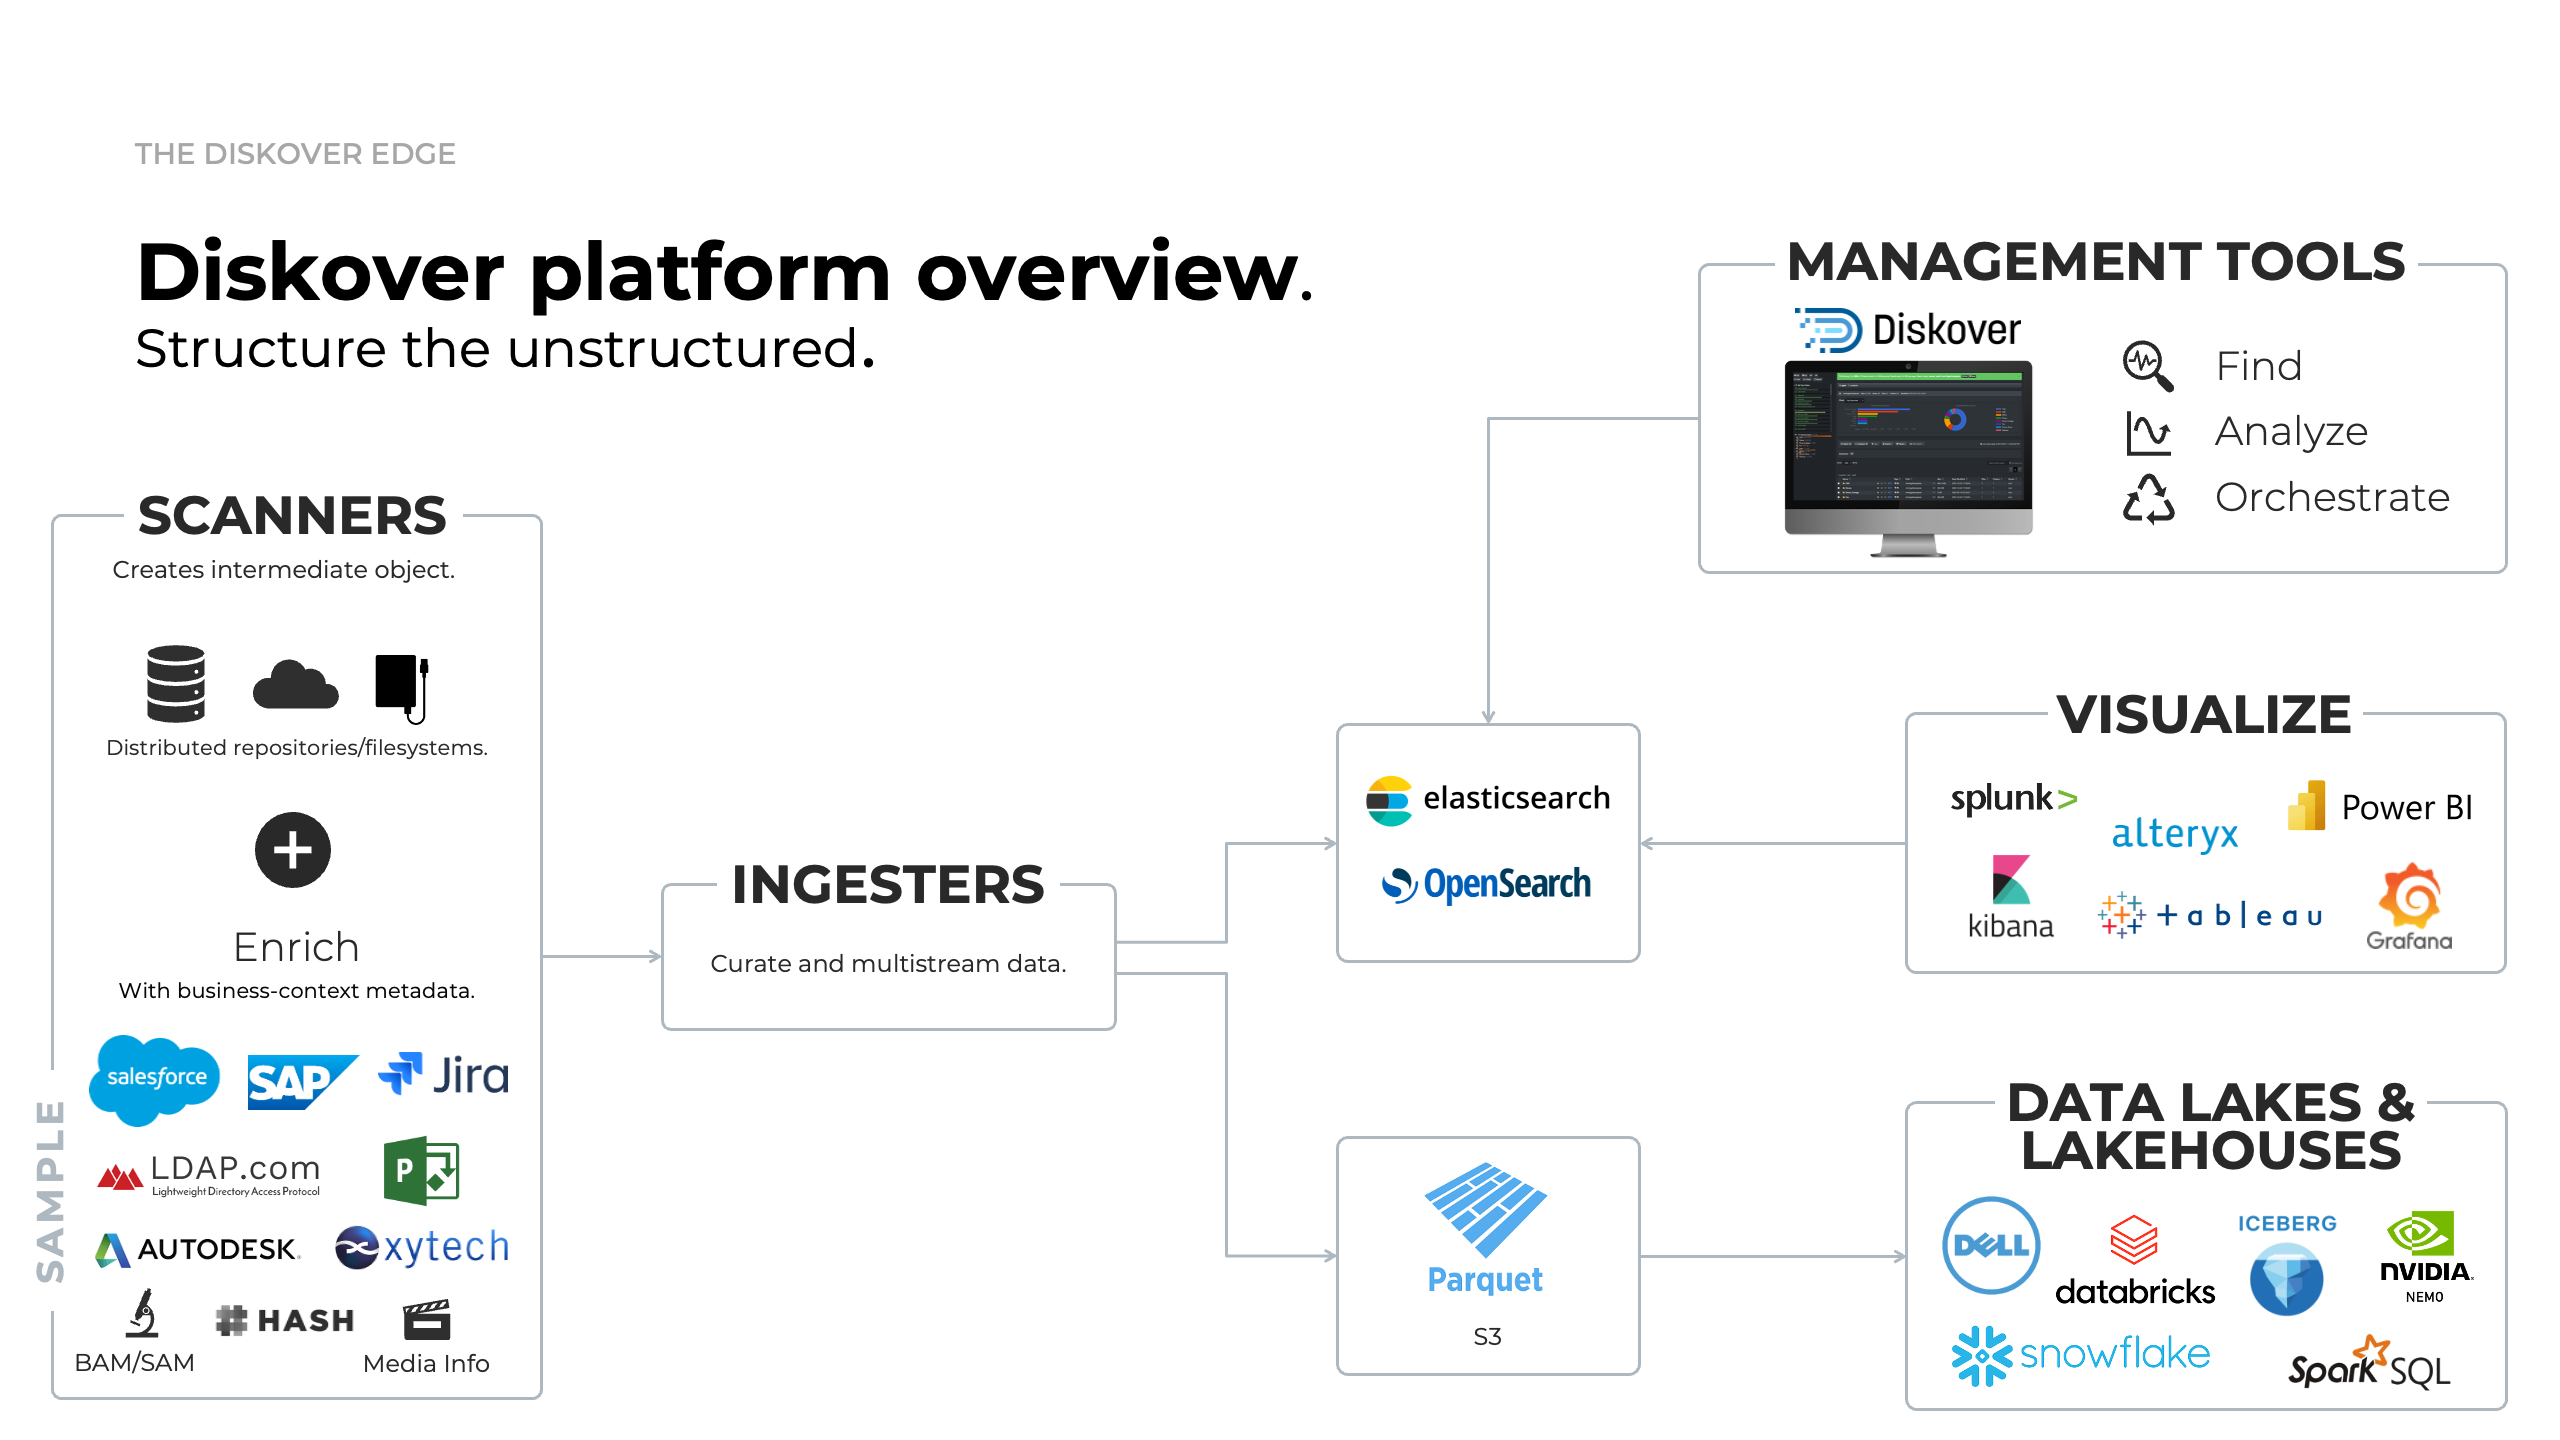
Click here for a full screen view of the Diskover Platform Overview.
Diskover Scale-Out Architecture Overview Diagram
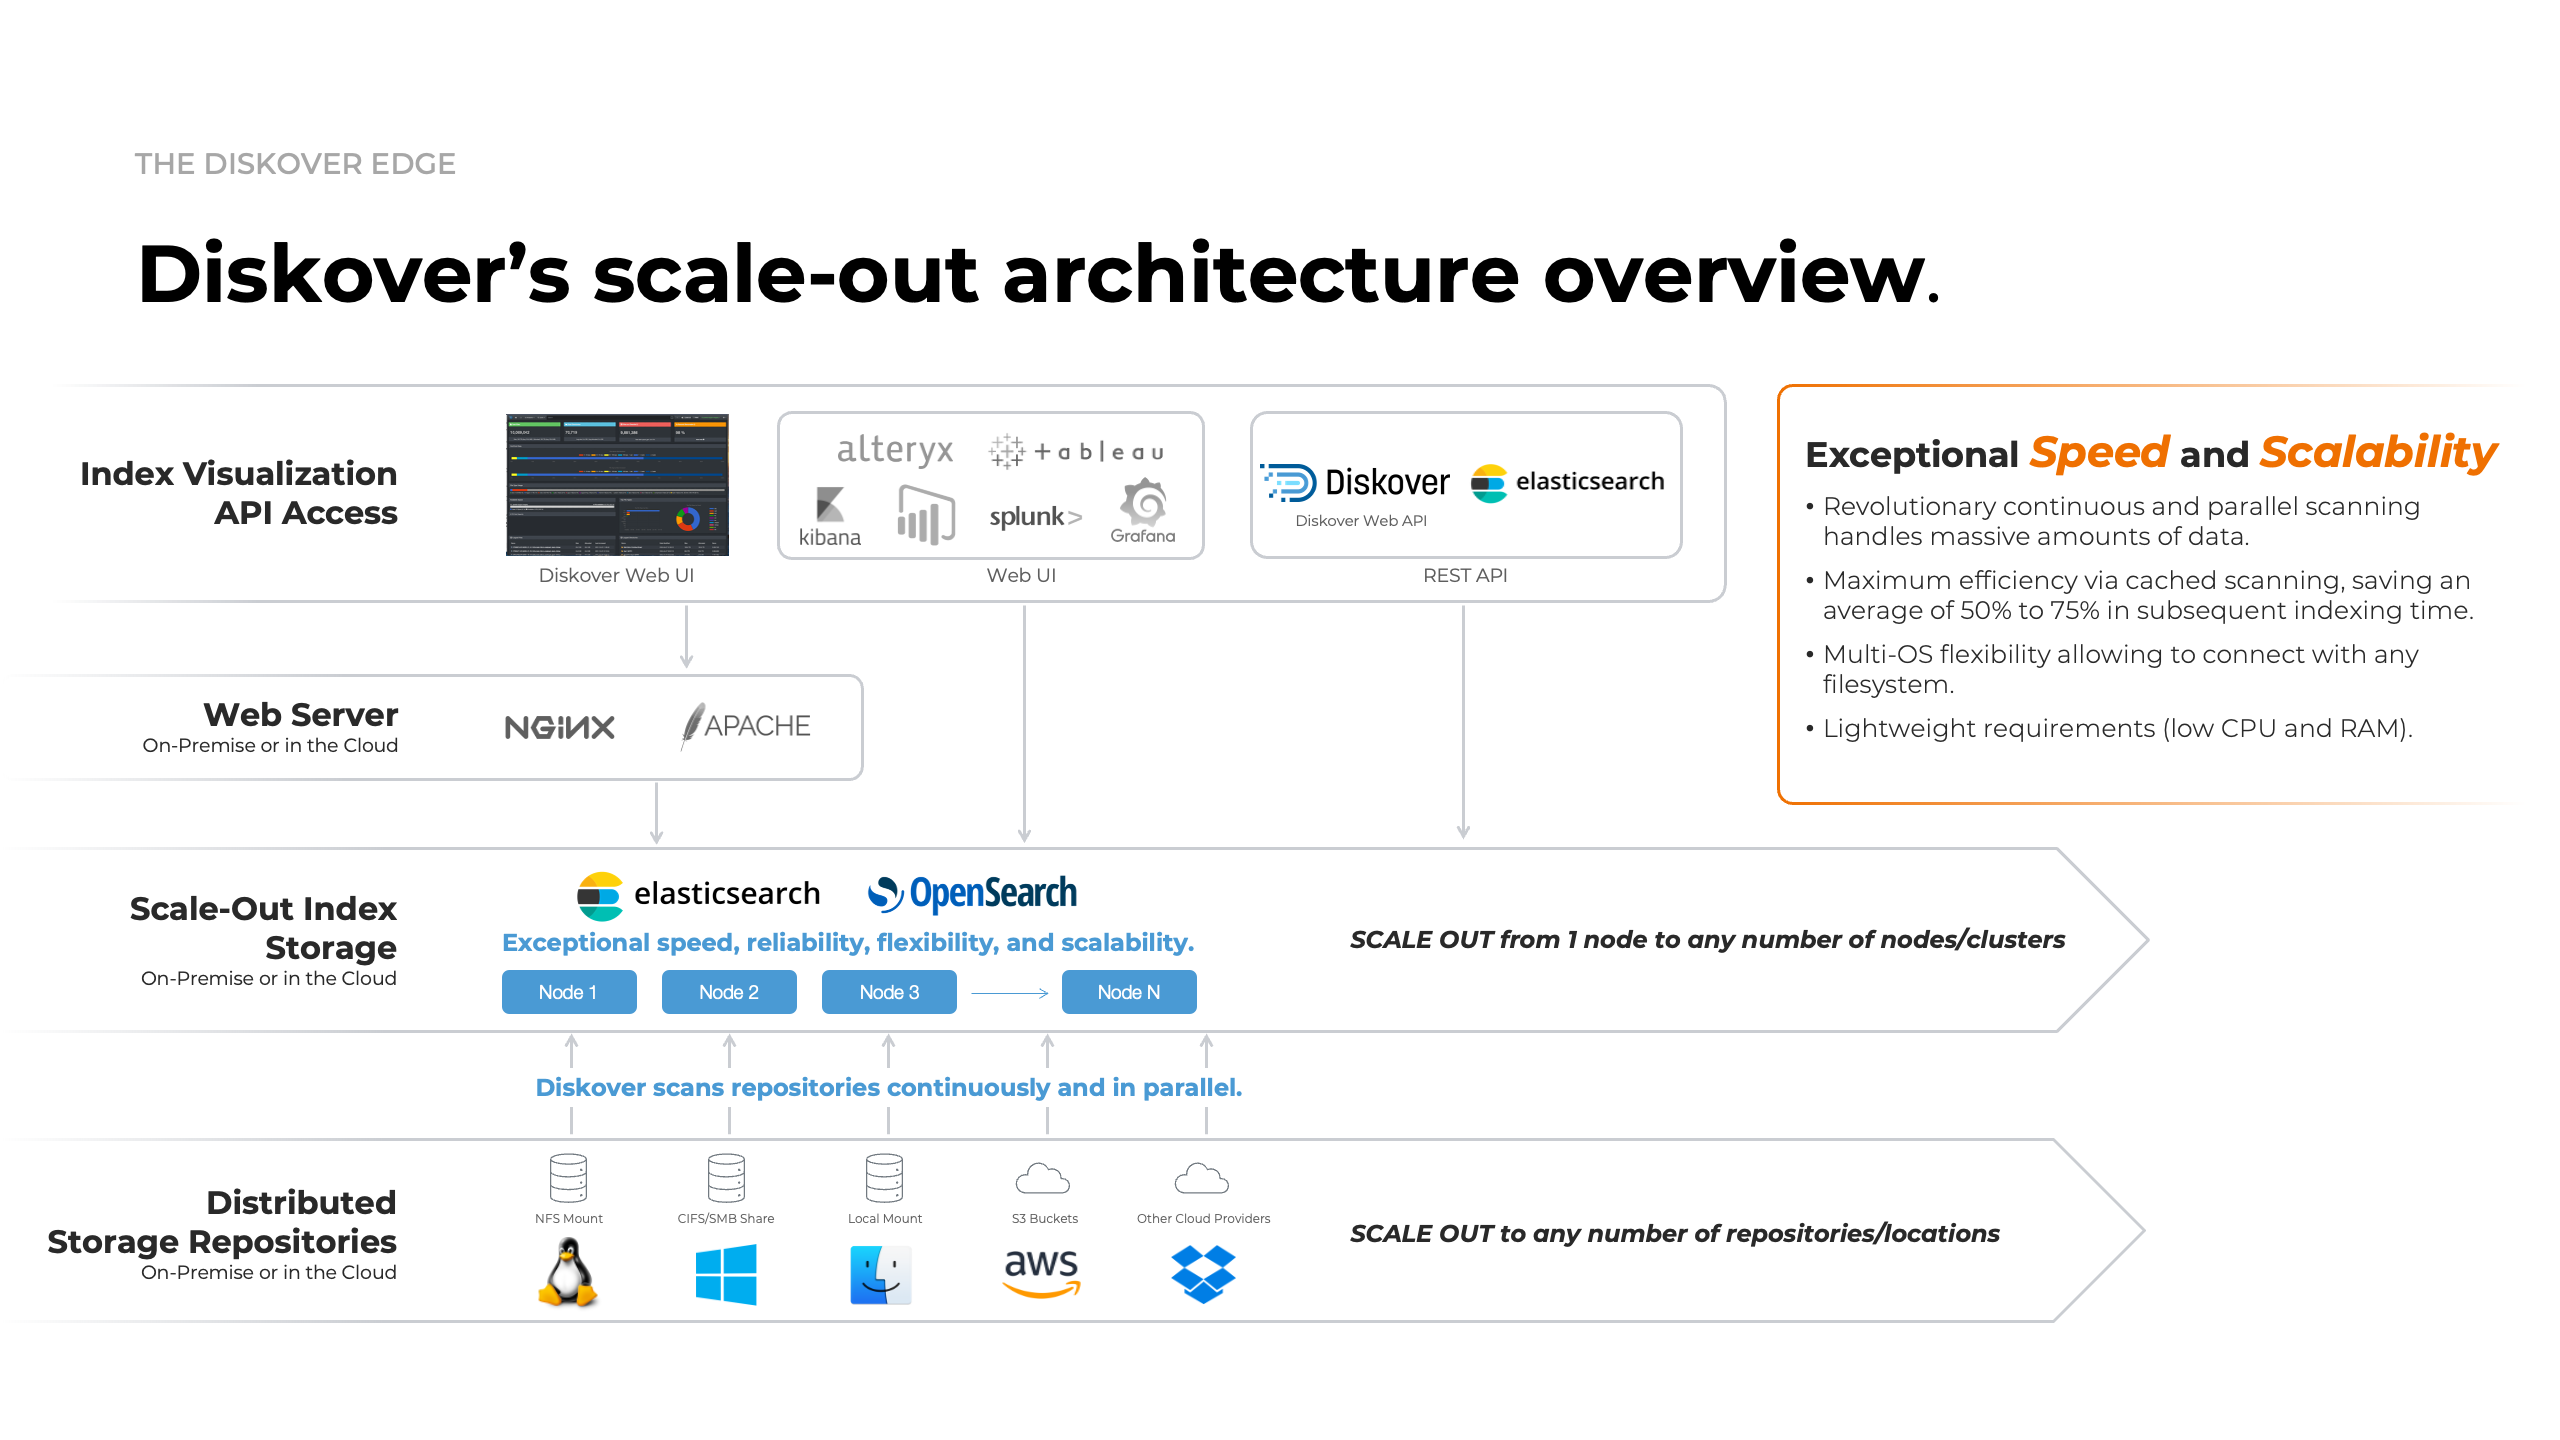
Click here for a full screen view of the Diskover Architecture Overview diagram.
Diskover Config Architecture Overview
It is highly recommended to separate the Elasticsearch node/cluster, web server, and indexing host(s).

Click here for the full screen view of this diagram.
Metadata Catalog
Diskover is designed to scan generic filesystems out of the box efficiently, but it also supports flexible integration with various repositories through customizable alternate scanners. This adaptability allows Diskover to scan diverse storage locations and include enhanced metadata for precise data management and analysis.
With a wide range of metadata harvest plugins, Diskover enriches indexed data with valuable business context attributes, supporting workflows that enable targeted data organization, retrieval, analysis, and enhanced workflow. These plugins can run at indexing or post-indexing intervals, balancing comprehensive metadata capture with high-speed scanning.
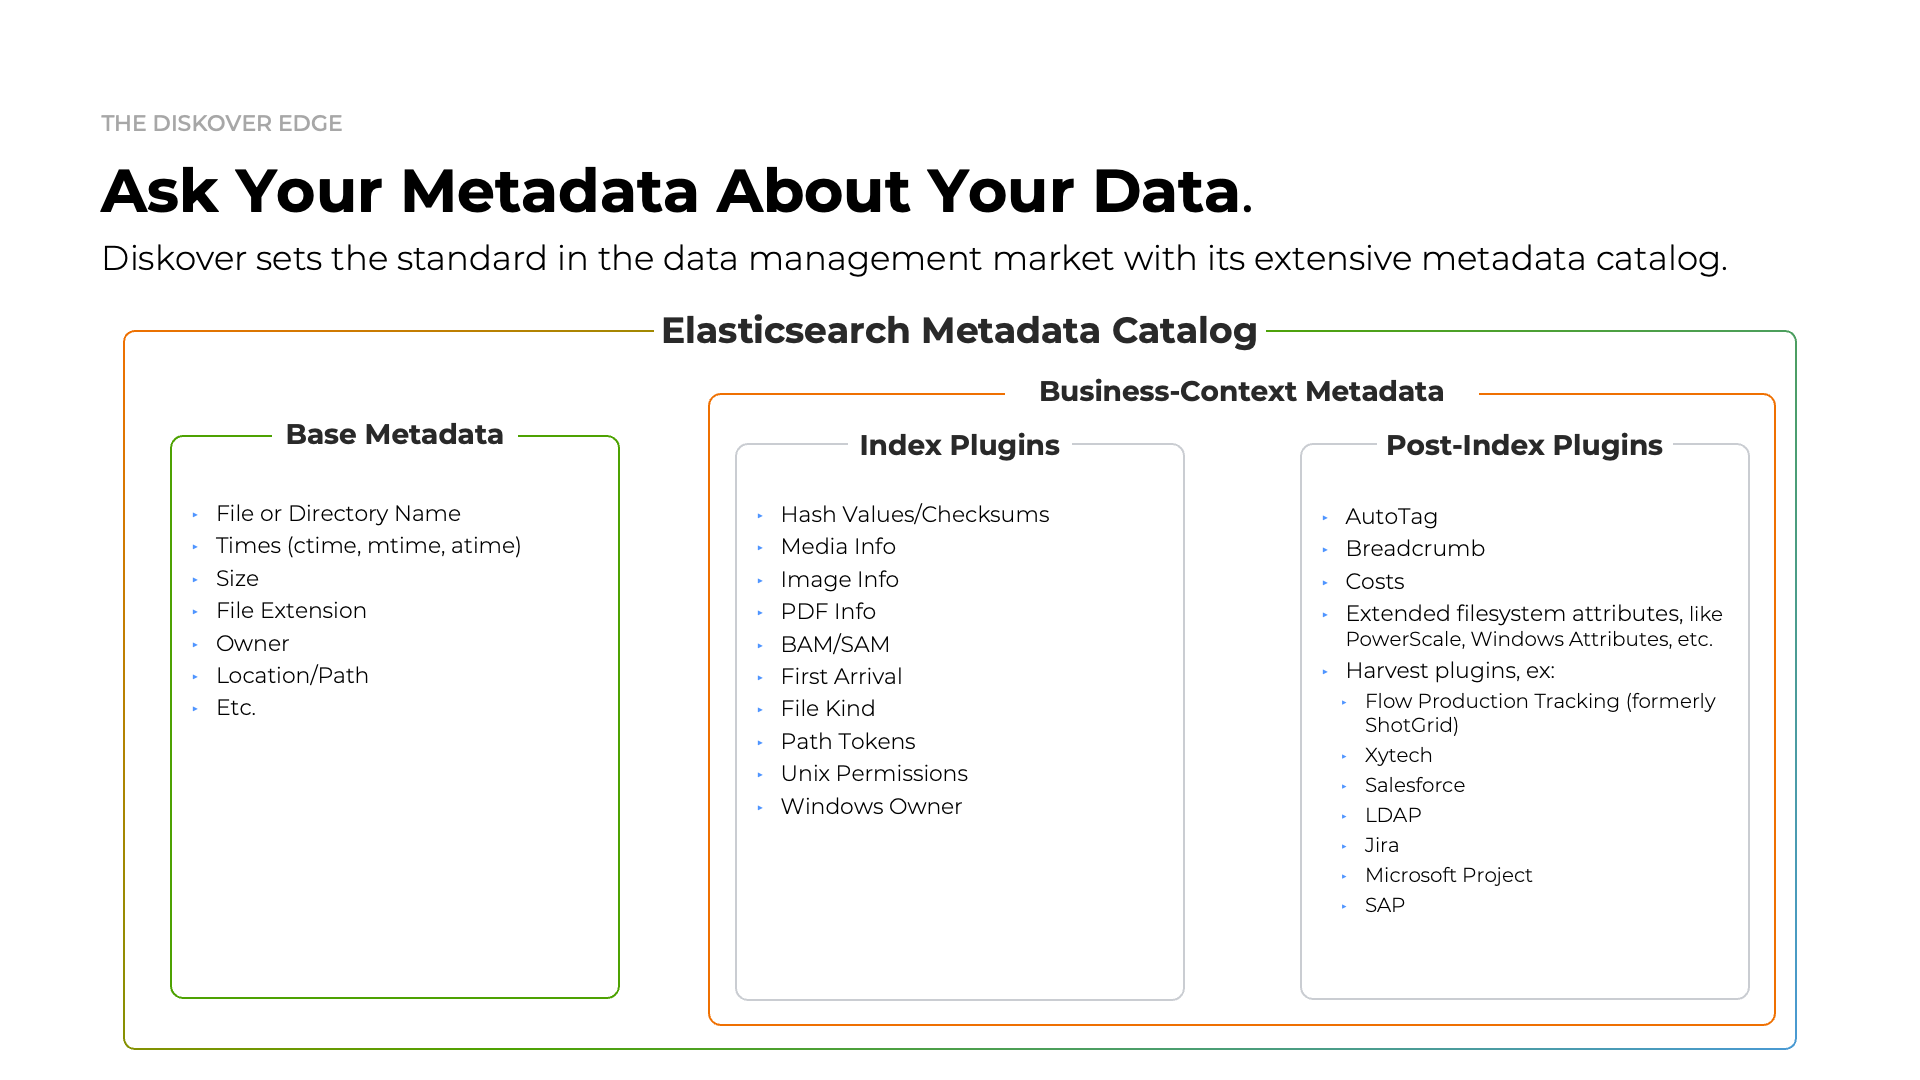
Click here for a full screen view of the Metadata Catalog Summary.
Requirements
Overview
Visit the System Readiness section for further information on preparing your system for Diskover.
| Packages | Usage |
|---|---|
| Python 3.8+ | Required for Diskover scanners/workers and Diskover-Web → go to installation instructions |
| Elasticsearch 8.x | Is the heart of Diskover → go to installation instructions |
| PHP 8.x and PHP-FPM | Required for Diskover-Web → go to installation instructions |
| NGINX or Apache | Required for Diskover-Web → go to installation instructions Note that Apache can be used instead of NGINX but the setup is not supported or covered in this guide. |
Security
- Disabling SELinux and using a software firewall is optional and not required to run Diskover.
- Internet access is required during the installation to download packages with yum.
Recommended Operating Systems
As per the config diagram in the previous chapter, note that Windows and Mac are only supported for scanners.
| Linux* | Windows | Mac |
|---|---|---|
|
|
|
* Diskover can technically run on all flavors of Linux, although only the ones mentioned above are fully supported.
Elasticsearch Requirements
Elasticsearch Version
Diskover is currently tested and deployed with Elasticsearch v8.x. Note that ES7 Python packages are required to connect to an Elasticsearch v8 cluster.
Elasticsearch Architecture Overview and Terminology
Please refer to this diagram to better understand the terminology used by Elasticsearch and throughout the Diskover documentation.
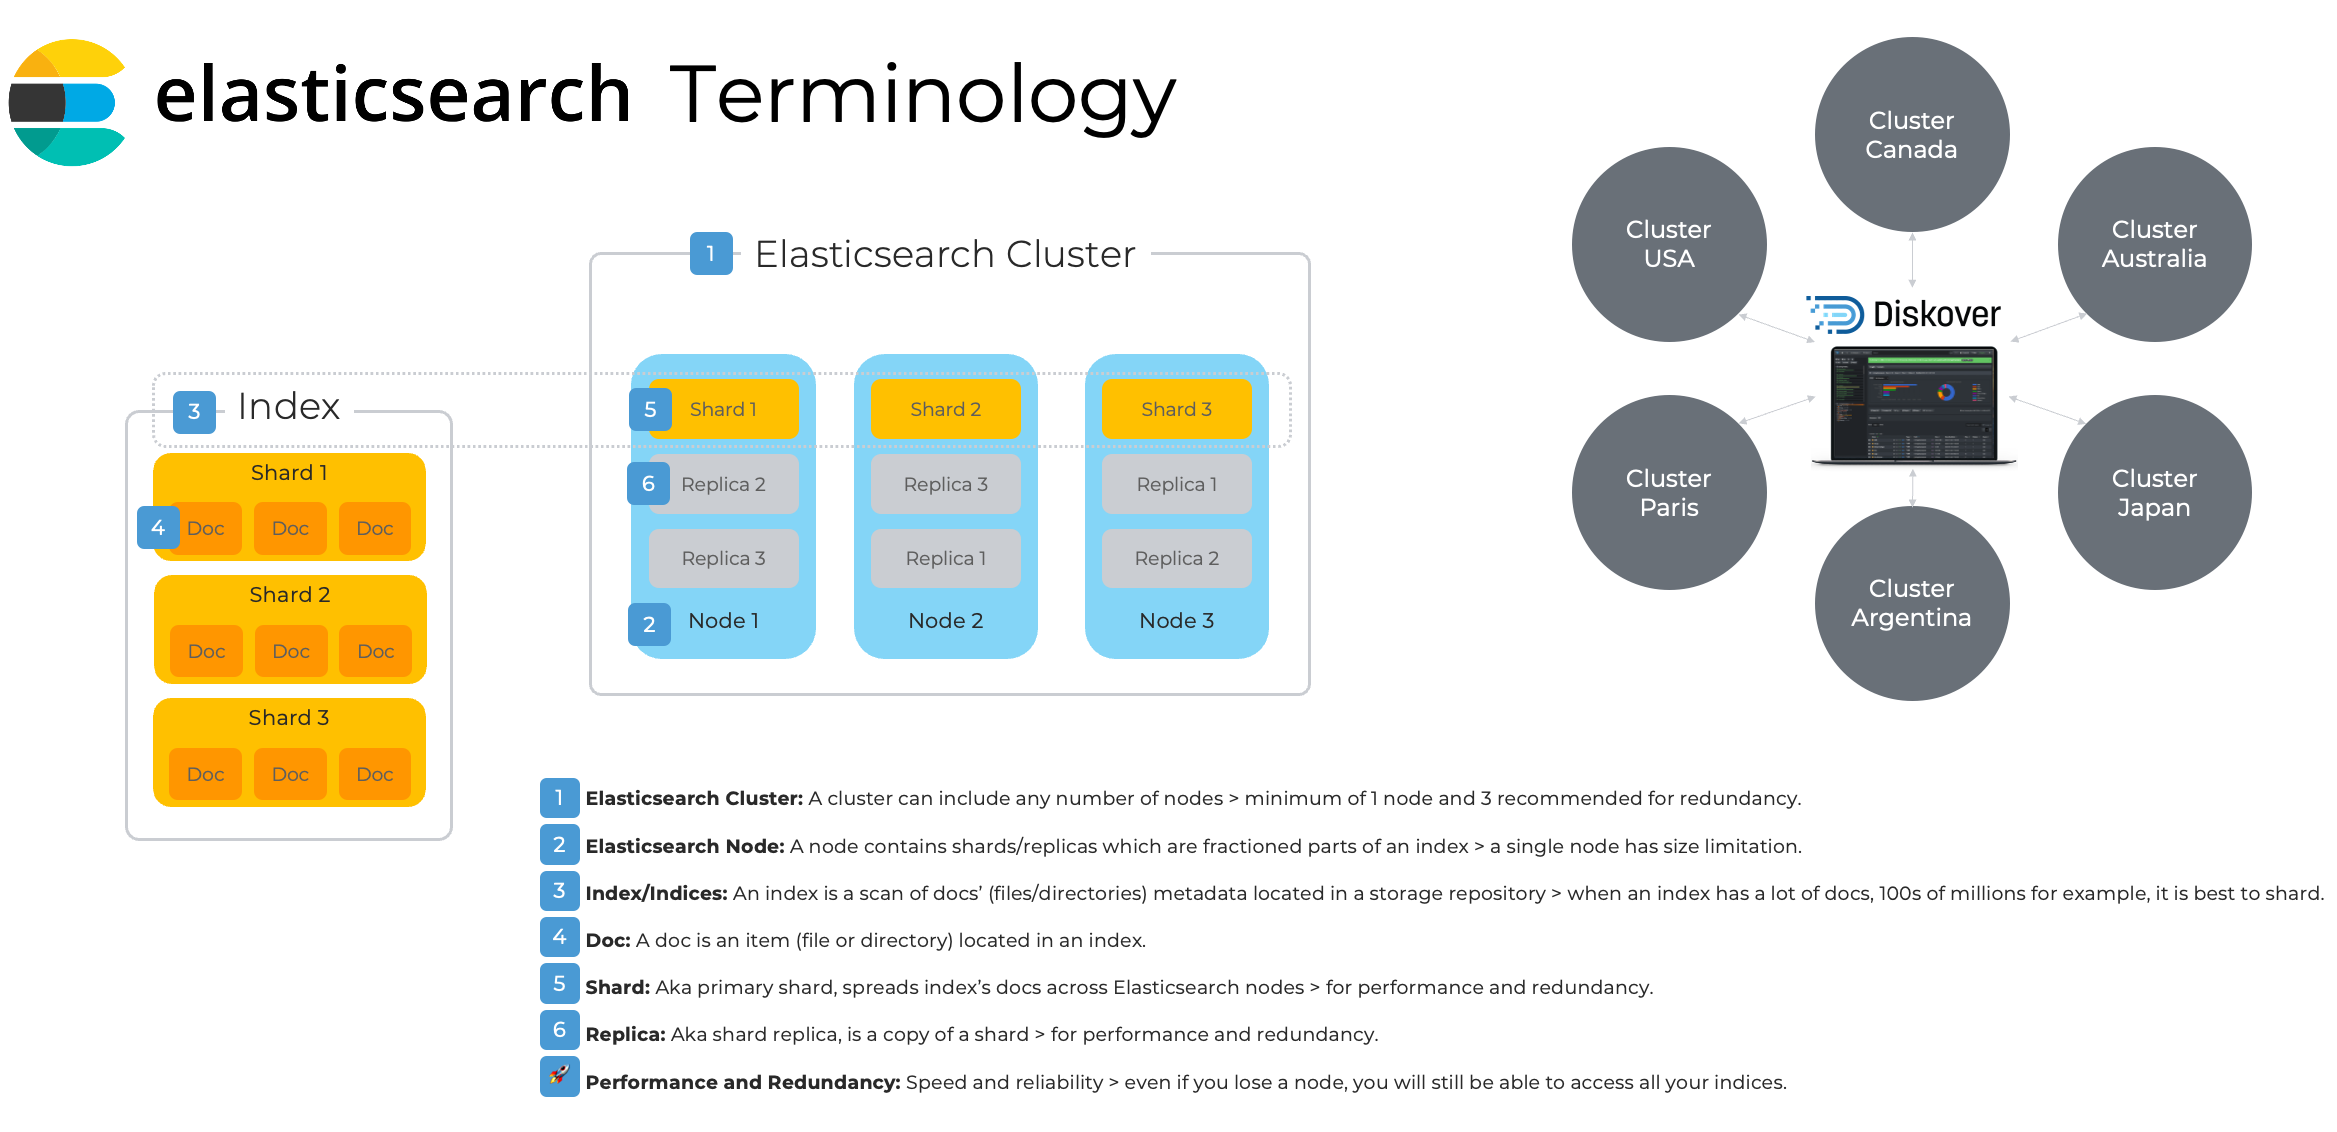 Click here for a full-screen view of the Elasticsearch Architecture diagram.
Elasticsearch Cluster
- The foundation of the Diskover platform consists of a series of Elasticsearch indexes, which are created and stored within the Elasticsearch endpoint.
- An important configuration for Elasticsearch is that you will want to set Java heap mem size - it should be half your Elasticsearch host ram up to 32 GB.
- For more detailed Elasticsearch guidelines, please refer to AWS sizing guidelines.
- For more information on resilience in small clusters.
Requirements for POC and Deployment
| Proof of Concept | Production Deployment | |
|---|---|---|
| Nodes | 1 node | 3 nodes for performance and redundancy are recommended |
| CPU | 8 to 32 cores | 8 to 32 cores |
| RAM | 8 to 16 GB (8 GB reserved to Elasticsearch memory heap) | 64 GB per node (16 GB reserved to Elasticsearch memory heap |
| DISK | 250 to 500 GB of SSD storage per node (root 150 GB, home 25 GB, var 800 GB) | 1 TB of SSD storage per node (root 150 GB, home 25 GB, var 800 GB) |
AWS Sizing Resource Requirements
Please consult the Diskover AWS Customer Deployment Guide for all details.
| AWS Elasticsearch Domain | AWS EC2 Web-Server | AWS Indexers | |
|---|---|---|---|
| Minimum | i3.large | t3.small | t3.large |
| Recommended | i3.xlarge | t3.medium | t3.xlarge |
Indices
Rule of Thumb for Shard Size
- Try to keep shard size between 10 – 50 GB
- Ideal shard size approximately 20 – 40 GB
Once you have a reference for your index size, you can decide to shard if applicable. To check the size of your indices, from the user interface, go to → ⛭ → Indices:
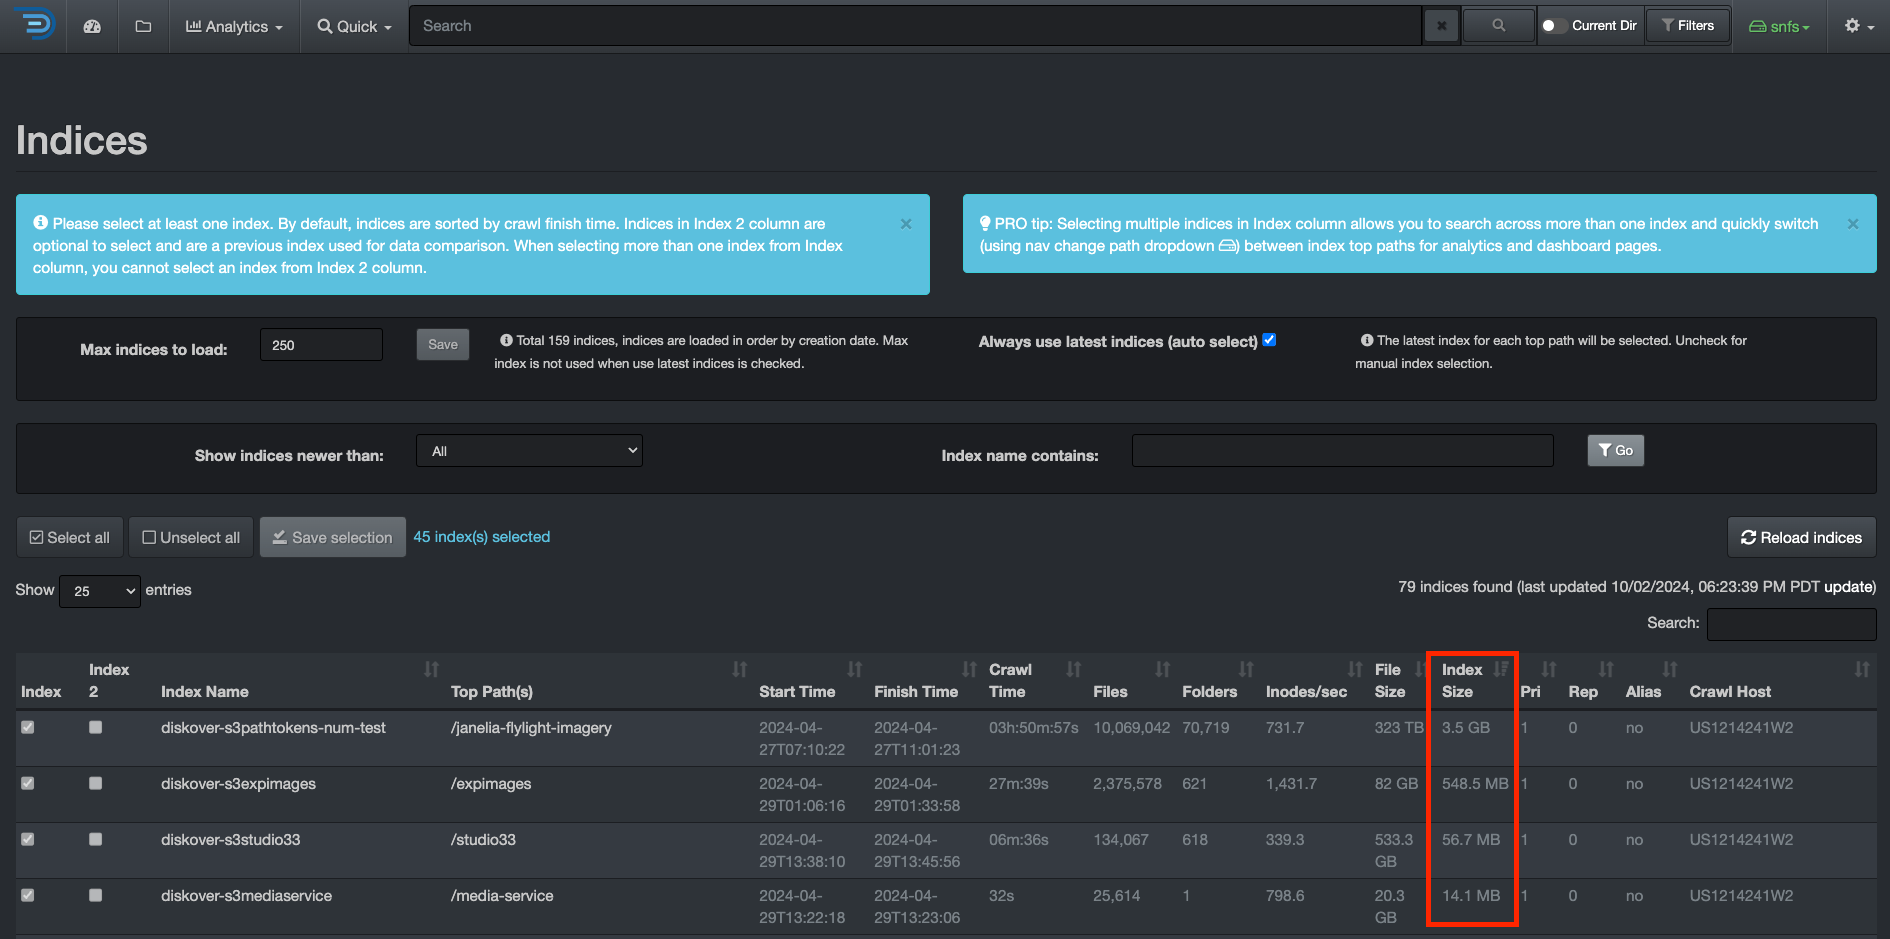 Click here for a full-screen view of this image.
Examples
- An index that is 60 GB in size: you will want to set shards to 3 and replicas* to 1 or 2 and spread across 3 ES nodes.
- An index that is 5 GB in size: you will want to set shards to 1 and replicas* to 1 or 2 and be on 1 ES node or spread across 3 ES nodes (recommended).
⚠️ Replicas help with search performance, redundancy and provide fault tolerance. When you change shard/replica numbers, you have to delete the index and re-scan.
Estimating Elasticsearch Storage Requirements
Individual Index Size
- 1 GB for every 5 million files/folders
- 20 GB for every 100 million files/folders
⚠️ The size of the files is not relevant.
Replicas/Shard Sizes
Replicas increase the size requirements by the number of replicas. For example, a 20 GB index with 2 replicas will require a total storage capacity of 60 GB since a copy of the index (all docs) is on other Elasticsearch nodes. Multiple shards do not increase the index size, as the index's docs are spread across the ES cluster nodes.
⚠️ The number of docs per share is limited to 2 billion, which is a hard Lucene limit.
Rolling Indices
- Each Diskover scan results in the creation of a new Elasticsearch index.
- Multiple indexes can be maintained to keep the history of storage indices.
- Elasticsearch overall storage requirements will depend on history index requirements.
- For rolling indices, you can multiply the amount of data generated for a storage index by the number of indices desired for retention period. For example, if you generate 2 GB for a day for a given storage index, and you want to keep 30 days of indices, 60 GB of storage is required to maintain a total of 30 indices.
Diskover-Web Server Requirements
The Diskover-Web HTML5 user interface requires a Web server platform. It provides visibility, analysis, workflows, and file actions from the indexes that reside on the Elasticsearch endpoint.
Requirements for POC and Deployment
| Proof of Concept | Production Deployment | |
|---|---|---|
| CPU | 8 to 32 cores | 8 to 32 cores |
| RAM | 8 to 16 GB | 8 to 16 GB |
| DISK | 100 GB of SSD storage (root 75 GB, home 25 GB) | 100 GB of SSD storage (root 75 GB, home 25 GB) |
Diskover Scanners Requirements
You can install Diskover scanners on a server or virtual machine. Multiple scanners can be run on a single machine or multiple machines for parallel crawling.
The scanning host uses a separate thread for each directory at level 1 of a top crawl directory. If you have many directories at level 1, you will want to increase the number of CPU cores and adjust max threads in the diskover config. This parameter, as well as many others, can be configured from the user interface, which contains help text to guide you.
Requirements for POC and Deployment
| Proof of Concept | Production Deployment | |
|---|---|---|
| CPU | 8 to 32 cores | 8 to 32 cores |
| RAM | 8 to 16 GB | 8 to 16 GB |
| DISK | 250 to 500 GB SSD | 500 GB (root 450 GB, home 25 GB) |
Skills and Knowledge Requirements
This document is intended for Service Professionals and System Administrators who install the Diskover software components. The installer should have strong familiarity with:
- Operating System on which on-premise Diskover scanner(s) are installed.
- Basic knowledge of:
- EC2 Operating System on which Diskover-Web HTML5 user interface is installed.
- Configuring a Web Server (Apache or NGINX).
⚠️ Attempting to install and configure Diskover without proper experience or training can affect system performance and security configuration.
⏱️ The initial install, configuration, and deployment of the Diskover are expected to take 1 to 3 hours, depending on the size of your environment and the time consumed with network connectivity.
Software Download
Community Edition
There are 2 ways to download the free Community Edition, the easiest being the first option.
Download from GitHub
🔴 From your GitHub account: https://github.com/diskoverdata/diskover-community/releases
🔴 Download the tar.gz/zip
Download from a Terminal
🔴 Install git on Centos:
yum install -y git
🔴 Install git on Ubuntu:
apt install git
🔴 Clone the Diskover Community Edition from the GitHub repository:
mkdir /tmp/diskover
git clone https://github.com/diskoverdata/diskover-community.git /tmp/diskover
cd /tmp/diskover
Annual Subscription Editions
We are currently moving to a new platform for software download. Meanwhile, please open a support ticket and we will send you a link, whether you need the OVA or the full version of Diskover.
Click these links for information on how to create an account and how to create a support ticket.
System Readiness
Overview
This section describes the preliminary steps to installing Diskover. Other software installations will be covered in the subsequent sections.
Linux System Readiness
This section breaks down the recommended hardening of a Linux system prior to the deployment of the Diskover software.
Disable Firewalld & Security Enhanced Linux (SELinux)
Be default, SELinux should be disabled. If you have a corporate firewall in place or VPC security groups that restrict access to Diskover machines, you can safely disable the local Linux firewall.
🔴 Quick command to change the SELinux config:
'sed -i 's/^SELINUX=enforcing/SELINUX=disabled/' /etc/selinux/config'
🔴 Disable firewalld, doing the --now will also stop the service:
systemctl disable firewalld --now
🔴 Disabling SELinux requires a reboot of the system in order to take affect, lets do that now:
reboot now
🔴 Validate SELinux is disabled, that command should return Disabled:
getenforce
DNF Package Upgrade
Before installing custom packages or any of the Diskover software, upgrade all base-level system packages installed with your Linux system. There might be cases where specific package management repositories have to be enabled on your Linux machine prior to running this installation block.
🔴 DNF upgrade:
dnf upgrade -y \
&& \
dnf install epel-release -y \
&& \
dnf install -y \
vim vim-enhanced tar htop nmap yum-utils tmux /usr/bin/sqlite3 mlocate postfix jq gcc \
net-tools bind-utils traceroute pigz screen dstat \
iotop strace tree pv atop lsof git zip unzip wget \
hdparm telnet glances sudo nss-util iftop tldr make
Enable NTP for S3 Scanning
Enabling NTP is optional but recommended if your system is not already synchronized. Without NTP enabled, attempting to scan S3 buckets may result in crawler failures due to a significant mismatch between the request time and the current system time.
🔴 Verify if NTP is set up or not:
timedatectl
In the return, you should see System Clock Synchronized.
- If set to yes, then NTP is synchronized.
- If set to no, then continue with the next step.
🔴 Enable NTP:
timedatectl set-ntp true
🔴 timedatectl leverages chronyd when you run the command above. To verify that the chronyd service came online:
systemctl status chronyd
Windows System Readiness
🚧 Instructions to follow. Meanwhile, please note that Diskover currently only supports Windows for scanners/workers.
Mac System Readiness
🚧 Instructions to follow. Meanwhile, please note that Diskover currently only supports Mac for scanners/workers.
✅ Checklist
The chapters in this guide are in the logical order to follow for installing and configuring Diskover. This checklist is a summary for quick reference.
| STEP | TASK |
|---|---|
| 1 | Elasticsearch Installation |
| 2 | Scanners/Workers Installation |
| 3 | DiskoverD Task Worker Daemon Installation |
| 4 | Celery Installation |
| 5 | RabbitMQ or Amazon MQ Installation |
| 6 | Diskover-Web Installation |
| 7 | DiskoverAdmin Installation |
| 8 | Initial Configuration |
| 9 | Create Alternate Configurations |
| 10 | Create Tasks/Launch your first scan! |
| 11 | Configure Authentication - optional |
| 12 | Configure Access Control - optional |
| 13 | Configure Backup Environment - optional but strongly suggested |
| 14 | Configure Alternate Scanners - optional |
| 15 | Configure Index Plugins - optional |
| 16 | Configure Post-Index Plugins - optional |
| 17 | Configure File Action Plugins - optional |
| 18 | Configure Tags - optional |
| 19 | Configure Analytics - optional |
| 20 | Indices Management |
Click here for a detailed list of configurable features and how to access them.
Elasticsearch Installation
Overview
This section covers the basic installation of Elasticsearch v8, commonly referred to as ES, throughout Diskover's documentation and user interface. This section covers:
- Setting up your first Elasticsearch node and we will leave ES authentication disabled by default for now.
- If you have multiple nodes in your environment, you will need to repeat this process for each node, as each node requires its dedicated system.
Once all the components are installed, you will be able to refine your Elasticsearch environment configuration. We strongly recommend following the deployment order outlined in this guide.
Here are some quick links you might need:
- Set up a cluster
- Set up multiple clusters
- Download the current release of Elasticsearch
- Download past releases of Elasticsearch
Single Node Setup without SSL
Java Open JDK Package Installation
Let's start this process by setting up your first node:
🔴 Install Java v21:
dnf install java-21-openjdk
🔴 Install Elasticsearch v8:
dnf install https://artifacts.elastic.co/downloads/elasticsearch/elasticsearch-8.15.2-x86_64.rpm
Elasticsearch Installation
🔴 Configure yum repository for ES v8:
vi /etc/yum.repos.d/elasticsearch.repo
🔴 Add the following to the file and save:
[elasticsearch]
name=Elasticsearch repository for 8.x packages
baseurl=https://artifacts.elastic.co/packages/8.x/yum
gpgcheck=1
gpgkey=https://artifacts.elastic.co/GPG-KEY-elasticsearch
enabled=0
autorefresh=1
type=rpm-md
🔴 Install the latest ES v8 package:
yum -y install --enablerepo=elasticsearch elasticsearch
⚠️ Elasticsearch v8 should be installed at this point.
Elasticsearch Initial Configuration
Let's perform some basic configurations to ensure our single-node ES cluster is up and running, and ready for integration with Diskover.
🔴 ES setting modifications:
vi /etc/elasticsearch/elasticsearch.yml
⚠️ Ensure the following properties are set and uncommented:
cluster.name: <name of your cluster>        (Should be a distinctive name)
node.name: node-1                           (Can be named anything, but should be distinctive)
path.data: /var/lib/elasticsearch           (or some other custom ES data directory)
path.logs: /var/log/elasticsearch           (or some other custom ES logging directory)
bootstrap.memory_lock: true                 (lock RAM on startup)
network.host: 0.0.0.0                       (binds ES to all available IP addresses)
discovery.seed_hosts: ["ES-IP"]             (If you have other ES IPs part of the cluster, they need to be comma separated like so: ["ES IP 1", "ES IP 2", "ES IP 3"])
cluster.initial_master_nodes: ["node-1"]    (Names need to be what you have named the nodes above)
xpack.security.enabled: false               (disable security)
xpack.security.enrollment.enabled: false    (disable security enrollment on first boot)
xpack.ml.enabled: false                     (disable machine learning functionality - not needed)
🔴 Configure Java JVM and memory lock for ES:
vi /etc/elasticsearch/jvm.options.d/jvm.options
🔴 Ensure the JVM args are uncommented and set to half of your available RAM:
-Xms8g
-Xmx8g
🔴 ES systemd service memory settings:
mkdir /etc/systemd/system/elasticsearch.service.d
vi /etc/systemd/system/elasticsearch.service.d/elasticsearch.conf
🔴 Add the following to the file and save:
[Service]
LimitMEMLOCK=infinity
LimitNPROC=4096
LimitNOFILE=65536
🔴 Start and enable the ES service:
systemctl enable elasticsearch
systemctl start elasticsearch
systemctl status elasticsearch
⚠️ If ES fails to lock the memory upon startup, then add the following to /etc/security/limits.conf:
elasticsearch soft memlock unlimited
elasticsearch hard memlock unlimited
Multiple Nodes Setup without SSL
If you have more than 1 node in your environment, redo all the Single Node Setup without SSL steps for each node/system.
Single Node Setup with SSL
This section will guide you through setting up an Elasticsearch cluster with a single node ensuring that SSL is enabled for secure communication.
🔴 Install Java v21:
dnf install java-21-openjdk
🔴 Install Elasticsearch v8:
dnf install https://artifacts.elastic.co/downloads/elasticsearch/elasticsearch-8.15.2-x86_64.rpm
🔴 When ES v8 finishes installing, you will need to grab the output password for the elastic user. The output will look like the following:
--------------------------- Security autoconfiguration information ------------------------------

Authentication and authorization are enabled.
TLS for the transport and HTTP layers is enabled and configured.

The generated password for the elastic built-in superuser is : y1DGG*eQFdnYPXJiPu6w
....
⚠️ If you need to reset the password, more info can be found here on that subject:
bin/elasticsearch-reset-password -u elastic
⚠️ Ensure the following is set inside the /etc/elasticsearch/elasticsearch.yml. By default, ES v8 should configure these settings automatically, but in case it doesn’t, you may need to set them manually:
🔴 Enable security features:
xpack.security.enabled: true
xpack.ml.enabled: false
xpack.security.enrollment.enabled: true
🔴 Enable encryption for HTTP API client connections, such as Kibana, Logstash, and Agents:
xpack.security.http.ssl:
  enabled: true
  keystore.path: certs/http.p12
🔴 Enable encryption and mutual authentication between cluster nodes:
xpack.security.transport.ssl:
  enabled: true
  verification_mode: certificate
  keystore.path: certs/transport.p12
  truststore.path: certs/transport.p12
🔴 Create a new cluster with only the current node. Additional nodes can still join the cluster later:
cluster.initial_master_nodes: ["diskover-1"]
🔴 Allow HTTP API connections from anywhere. Connections are encrypted and require user authentication:
http.host: 0.0.0.0
🔴 Allow other nodes to join the cluster from anywhere. Connections are encrypted and mutually authenticated:
transport.host: 0.0.0.0
⚠️ Be sure to comment cluster.initial_master_nodes after you have bootstrapped ES for the first time.
🔴 Verify your certs live in /etc/elasticsearch/certs/, you should have the following:
-rw-r----- 1 elasticsearch elasticsearch  1915 Oct 10 18:10 http_ca.crt
-rw-r----- 1 elasticsearch elasticsearch 10061 Oct 10 18:10 http.p12
-rw-r----- 1 elasticsearch elasticsearch  5822 Oct 10 18:10 transport.p12
🔴 Chown the /etc/elasticsearch/ directory recursively if not already done:
chown -R elasticsearch.elasticsearch /etc/elasticsearch/
🔴 Start Elasticsearch
🔴 Curl the cluster:
curl -u elastic:password https://IP or hostname:9200/_cluster/health?pretty --cacert /etc/elasticsearch/certs/http_ca.crt
Multiple Nodes Setup with SSL
This section will guide you through setting up an Elasticsearch cluster with multiple nodes ensuring that SSL is enabled for secure communication.
Prerequisites
🔴 A minimum of 3 systems, one for each ES node.
🔴 All nodes must be able to communicate with each other. The best way to test this is to install ES on the nodes, start the services, and try to telnet to each of the host:
telnet <es-ip> 9200
🔴 If this is successful, you should see the following:
[root@es1 ~]# telnet 192.168.64.19 9200
Trying 192.168.64.19...
Connected to 192.168.64.19.
Escape character is '^]'.
⚠️ If you see Connection Refused, you should check to see if SELinux and Firewalld are respectively disabled and off.
⚠️ The instructions below are for new clusters, go to Onboarding New Nodes Containing Existing Data if you are onboarding new nodes to an existing cluster.
Set up Node 1
🔴 Install Java v21:
sudo dnf install -y java-21-openjdk
🔴 Install Elasticsearch v8:
sudo dnf install -y https://artifacts.elastic.co/downloads/elasticsearch/elasticsearch-8.15.2-x86_64.rpm
🔴 Configure the JVM for Elastic vi /etc/elasticsearch/jvm.options.d/jvm.options:
-Xms8g
-Xmx8g
⚠️ You should never set the memory to more than half of what is configured for your system!
🔴 Make the directory for the custom ES systemd settings:
mkdir /etc/systemd/system/elasticsearch.service.d
🔴 Create the service config file vi /etc/systemd/system/elasticsearch.service.d/elasticsearch.conf:
[Service]
LimitMEMLOCK=infinity
LimitNPROC=4096
LimitNOFILE=65536
🔴 Change the Elastic configs to set the node and cluster name, network configs, etc.:
vi /etc/elasticsearch/elasticsearch.yml:
| Field | Description |
|---|---|
| cluster.name | It should include diskover in the name to make it easily distinguishable for the customer, for example: diskover-es |
| node.name | It can be named anything, but should include a number to identify the node, for example: node-1 |
| path.data | Set this to the desired storage location for your data. If a large amount of data is expected, it's recommended to use an external storage location. The default location is /var/lib/elasticsearch |
| path.logs | This defines the path where Elasticsearch logs will be stored. The default location is /var/log/elasticsearch |
| bootstrap.memory_lock | This should always be set to true. It will prevent Elasticsearch from trying to use the swap memory. |
| network.host | Set this to 0.0.0.0 |
| cluster.initial_master_nodes | IMPORTANT! This property will bootstrap your cluster. Without it, the service will not start up. You need to input the name of the node that you have for node.name, for example: cluster.initial_master_nodes: ["node-1"] |
| xpack.ml.enabled | This should be set to false to disable Machine Learning within ES. If you do not have this set to false, then Elasticsearch will fail upon startup |
🔴 Start the Elasticsearch service:
systemctl start elasticsearch
🔴 Create an enrollment token for the nodes you want to onboard to your cluster:
/usr/share/elasticsearch/bin/elasticsearch-create-enrollment-token -s node.
⚠️ This last step will output a very long token, keep this token in a safe space as we’re going to need it soon. Note that you will need the = that is included in the value.
Set up Node 2 and 3
🔴 Run through the same pre-steps to set up Node 1, but don’t worry about the password that is generated.
🔴 Change the Elastic configs to set the node and cluster name, network configs, etc.:
vi /etc/elasticsearch/elasticsearch.yml:
| Field | Description |
|---|---|
| cluster.name | This name must match the Node 1 cluster name, otherwise, these nodes will not join the correct cluster, for example: diskover-es |
| node.name | Should be incremented from the last node name, for example: Node 1: node-1, Node 2: node-2, Node 3: node-3 |
| path.data | Set this to the desired storage location for your data. If a large amount of data is expected, it's recommended to use an external storage location. The default location is /var/lib/elasticsearch. IMPORTANT! This should match the other nodes' location for parity. |
| path.logs | This defines the path where Elasticsearch logs will be stored. The default location is /var/log/elasticsearch |
| bootstrap.memory_lock | This should always be set to true. It will prevent Elasticsearch from trying to use the swap memory. |
| network.host | Set this to 0.0.0.0 |
| cluster.initial_master_nodes | Don’t worry about this property for now as we’re going to be joining a bootstrapped cluster |
| xpack.ml.enabled | This should be set to false to disable Machine Learning within ES. If you do not have this set to false, then Elasticsearch will fail upon startup |
⚠️ Do not start Elasticsearch yet!
🔴 Let's join Nodes 2 and 3 to the Node 1 cluster:
/usr/share/elasticsearch/bin/elasticsearch-reconfigure-node --enrollment-token "your token here"
🔴 Press Y to continue with the reconfiguration. This will remove the self-signed certs that ES generated when you installed it, remove all the previous settings from the keystore, etc. and place in the certs and password from Node 1, ensuring all nodes are using the same password as Node 1.
🔴 Start the Elasticsearch service:
systemctl start elasticsearch
Single Cluster Setup
Overview
While it’s not mandatory to set up a cluster, if you have 3 or more Elasticsearch nodes, setting up a cluster is highly recommended for ensuring high availability, reliability, load balancing, and fault tolerance. It’s the preferred setup for production environments.
This section will walk you through the steps to configure a cluster, enabling your nodes to work together efficiently and securely distribute data across the system.
Requirements
- Each ES node needs to be installed on its own system.
- All nodes must be able to communicate with each other. To test this, install Elasticsearch on the nodes, start the services, and use telnet to connect to each host.
telnet <es-ip> 9200
- If this is successful, you should see the following:
[root@es1 ~]# telnet 192.168.64.19 9200
Trying 192.168.64.19...
Connected to 192.168.64.19.
Escape character is '^]'.
- If you see Connection Refused, you should validate if SELinux and Firewalld are disabled and off, respectively.
Setup
🔴 Run DNF updates:
sudo dnf update -y
🔴 Install Java 8:
sudo dnf install -y java-21-openjdk
🔴 Install Elasticsearch 7:
sudo dnf install -y https://artifacts.elastic.co/downloads/elasticsearch/elasticsearch-8.15.2-x86_64.rpm
🔴 Configure the JVM for Elastic:
vi /etc/elasticsearch/jvm.options.d/jvm.options:
🔴 Set the memory heap size - memory allocation should never exceed half of your system's total configured memory:
-Xms8g
-Xmx8g
🔴 Set up the Elastic config:
vi /etc/elasticsearch/elasticsearch.yml:
| Field | Description |
|---|---|
| cluster.name | It should include diskover in the name to make it easily distinguishable for the customer, for example: diskover-es |
| node.name | It can be named anything, but should include a number to identify the node, for example: diskover-node-1 |
| path.data | Set this to the desired storage location for your data. If a large amount of data is expected, it's recommended to use an external storage location. The default location is /var/lib/elasticsearch |
| path.logs | This defines the path where Elasticsearch logs will be stored. The default location is /var/log/elasticsearch |
| bootstrap.memory_lock | This should always be set to true. It will prevent Elasticsearch from trying to use the swap memory. |
| network.host | This should be set to the IP address of the host where you're configuring Elasticsearch. |
| discovery.seed_hosts | IMPORTANT! You need to enter the IP addresses of each Elasticsearch node that will be part of the cluster, for example:discovery.seed_hosts: ["192.168.64.18", "192.168.64.19", "192.168.64.20"] |
| cluster.initial_master_nodes | IMPORTANT! You need to enter the name of each node for the node.name setting, for example:cluster.initial_master_nodes: ["diskover-node-1", "diskover-node-2", "diskover-node-3"] |
| xpack.ml.enabled | This should be set to false to disable the Machine Learning within ES. If you do not have this set to false, then Elasticsearch will fail upon startup. |
🔴 Make the directory for the custom ES systemd settings:
mkdir /etc/systemd/system/elasticsearch.service.d
🔴 Create the service config file:
vi /etc/systemd/system/elasticsearch.service.d/elasticsearch.conf:

[Service]
LimitMEMLOCK=infinity
LimitNPROC=4096
LimitNOFILE=65536
Start Elasticsearch Cluster
🔴 Reload the daemon on all ES nodes:
sudo systemctl daemon-reload
🔴 Start up Node 1 first:
sudo systemctl start elasticsearch
⚠️ You can watch the startup logs at /var/log/elasticsearch/
🔴 Once Node 1 is online, start Node 2, then once Node 2 is online, start Node 3.
Multiple Clusters Setup
In a multiple-cluster setup for Elasticsearch, you can run and manage multiple independent clusters, each with its own set of nodes and indices. This setup is typically used when you need to isolate data or workloads across different environments (such as production, testing, and development) or geographically distributed locations. Each cluster operates independently, and you can configure cross-cluster search or replication to share data or search across clusters as needed.
Please open a support ticket for assistance.
Elasticsearch Health Check without SSL
With the ES cluster installed and running, you can now run a simple curl command to check the health of your cluster.
🔴 Check the health of your Elasticsearch cluster.
⚠️ Replace the ${ESHOST} below with your ES node(s) IP address or hostname
Curl command if SSL is enabled on the cluster - the result will differ, of course, based on your own environment:
curl -XGET -u elastic:password https://${ESHOST}:9200/_cluster/health?pretty --cacert /etc/elasticsearch/certs/http_ca.crt
{
  "cluster_name" : "elasticsearch",
  "status" : "yellow",
  "timed_out" : false,
  "number_of_nodes" : 1,
  "number_of_data_nodes" : 1,
  "active_primary_shards" : 78,
  "active_shards" : 78,
  "relocating_shards" : 0,
  "initializing_shards" : 0,
  "unassigned_shards" : 1,
  "delayed_unassigned_shards" : 0,
  "number_of_pending_tasks" : 0,
  "number_of_in_flight_fetch" : 0,
  "task_max_waiting_in_queue_millis" : 0,
  "active_shards_percent_as_number" : 98.73417721518987
}
Curl command if SSL is not enabled on the cluster - the result will differ, of course, based on your own environment:
curl http://${ESHOST}:9200/_cluster/health?pretty
{
  "cluster_name" : "elasticsearch",
  "status" : "green",
  "timed_out" : false,
  "number_of_nodes" : 1,
  "number_of_data_nodes" : 1,
  "active_primary_shards" : 0,
  "active_shards" : 0,
  "relocating_shards" : 0,
  "initializing_shards" : 0,
  "unassigned_shards" : 0,
  "delayed_unassigned_shards" : 0,
  "number_of_pending_tasks" : 0,
  "number_of_in_flight_fetch" : 0,
  "task_max_waiting_in_queue_millis" : 0,
  "active_shards_percent_as_number" : 100.0
}
Elasticsearch Health Check with SSL
🔴 From now 1, curl node 2 or 3:
[root@ip-10-0-3-121 bin]# curl -XGET -u "elastic:redacted" https://10.0.4.84:9200/_cluster/health?pretty --cacert /etc/elasticsearch/certs/http_ca.crt
{
  "cluster_name" : "diskover-soldev",
  "status" : "green",
  "timed_out" : false,
  "number_of_nodes" : 3,
  "number_of_data_nodes" : 3,
  "active_primary_shards" : 32,
  "active_shards" : 34,
  "relocating_shards" : 0,
  "initializing_shards" : 0,
  "unassigned_shards" : 0,
  "unassigned_primary_shards" : 0,
  "delayed_unassigned_shards" : 0,
  "number_of_pending_tasks" : 0,
  "number_of_in_flight_fetch" : 0,
  "task_max_waiting_in_queue_millis" : 0,
  "active_shards_percent_as_number" : 100.0
}
🔴 From now 2, curl node 2 or 3:
[root@ip-10-0-4-84 bin]# curl -XGET -u "elastic:redacted" https://10.0.3.121:9200/_cluster/health?pretty --cacert /etc/elasticsearch/certs/http_ca.crt
{
  "cluster_name" : "diskover-soldev",
  "status" : "green",
  "timed_out" : false,
  "number_of_nodes" : 3,
  "number_of_data_nodes" : 3,
  "active_primary_shards" : 32,
  "active_shards" : 34,
  "relocating_shards" : 0,
  "initializing_shards" : 0,
  "unassigned_shards" : 0,
  "delayed_unassigned_shards" : 0,
  "number_of_pending_tasks" : 0,
  "number_of_in_flight_fetch" : 0,
  "task_max_waiting_in_queue_millis" : 0,
  "active_shards_percent_as_number" : 100.0
}
Downsizing from 3 Nodes to 1 Node
🔴 Stop all 3 nodes.
🔴 On the node you want to preserve:
vi /etc/elasticsearch/elasticsearch.yml
🔴 Then add this:
discovery.type: single-node
🔴 Delete the nodes file and _state directory that contain local metadata from the previous distributed cluster setup:
rm -rf /path/to/dataDir/{nodes,_state}
🔴 Reset the Elasticsearch password, then press y to continue:
/usr/share/elasticsearch/bin/elasticsearch-reset-password -u elastic
🔴 Trt curling the health:
[root@ip-10-0-3-121 bin]# curl -XGET -u "elastic:redacted" https://10.0.3.121:9200/_cluster/health?pretty --cacert /etc/elasticsearch/certs/http_ca.crt
{
  "cluster_name" : "diskover-soldev",
  "status" : "green",
  "timed_out" : false,
  "number_of_nodes" : 1,
  "number_of_data_nodes" : 1,
  "active_primary_shards" : 13,
  "active_shards" : 13,
  "relocating_shards" : 0,
  "initializing_shards" : 0,
  "unassigned_shards" : 0,
  "delayed_unassigned_shards" : 0,
  "number_of_pending_tasks" : 0,
  "number_of_in_flight_fetch" : 0,
  "task_max_waiting_in_queue_millis" : 0,
  "active_shards_percent_as_number" : 100.0
}
Onboarding New Nodes Containing Existing Data
🔴 Node 1:
vi elasticsearch.yml
discovery.seed_hosts: ["Node 1 IP","Node 2 IP","Node 3 IP"]
cluster.initial_master_nodes: ["node-1","node-2","node-3"]
🔴 Restart node 1.
🔴 Add the following to node 2 and 3:
discovery.seed_hosts: ["Node 1 IP","Node 2 IP","Node 3 IP"]
🔴 Restart ES on these nodes one at a time.
🔴 Test curling the cluster health:
[root@ip-10-0-3-121 bin]# curl -XGET -u "elastic:redacted" https://10.0.4.84:9200/_cluster/health?pretty --cacert /etc/elasticsearch/certs/http_ca.crt
{
  "cluster_name" : "diskover-soldev",
  "status" : "green",
  "timed_out" : false,
  "number_of_nodes" : 3,
  "number_of_data_nodes" : 3,
  "active_primary_shards" : 32,
  "active_shards" : 34,
  "relocating_shards" : 0,
  "initializing_shards" : 0,
  "unassigned_shards" : 0,
  "unassigned_primary_shards" : 0,
  "delayed_unassigned_shards" : 0,
  "number_of_pending_tasks" : 0,
  "number_of_in_flight_fetch" : 0,
  "task_max_waiting_in_queue_millis" : 0,
  "active_shards_percent_as_number" : 100.0
}
🔴 From node 2, curl node 1 or 3:
[root@ip-10-0-4-84 bin]# curl -XGET -u "elastic:redacted" https://10.0.3.121:9200/_cluster/health?pretty --cacert /etc/elasticsearch/certs/http_ca.crt
{
  "cluster_name" : "diskover-soldev",
  "status" : "green",
  "timed_out" : false,
  "number_of_nodes" : 3,
  "number_of_data_nodes" : 3,
  "active_primary_shards" : 32,
  "active_shards" : 34,
  "relocating_shards" : 0,
  "initializing_shards" : 0,
  "unassigned_shards" : 0,
  "delayed_unassigned_shards" : 0,
  "number_of_pending_tasks" : 0,
  "number_of_in_flight_fetch" : 0,
  "task_max_waiting_in_queue_millis" : 0,
  "active_shards_percent_as_number" : 100.0
}
Diskover Scanners/Workers Installation
Overview
Diskover has a distributed task system where scanners/workers can be distributed among many resources. For each resource providing a task worker, services need to have a DiskoverD installed. The Task Panel will be covered after the installation and initial configuration of the main components.
Click here for the full screen view of this diagram.
-
This section will walk you through installing node workers for your Diskover environment.
-
During this process, you will need the latest Diskover 2.4x software.
-
Once all components are installed, you will be able to configure your scanning environment. We strongly recommend following the deployment order outlined in this guide.
Multiple Scanners/Workers Environment
If your environment includes multiple scanners, repeat the process in this chapter for each one of your workers. Once you have the zip file, you can SCP it to all machines that are designated to be a Diskover Worker.
🔴 On-prem | Will scp the file to the root user's home directory:
scp <path to diskover.zip> root@ipAddress:~/
🔴 AWS | Will scp the file to the user's home directory. Example using Rocky:
scp -i <path to PEM file> <path to diskover.zip> rocky@bastion-IP:~/
⚠️ Note that the user will differ depending on your OS. It is best to consult your AWS EC2 Console to get the exact user to connect to the bastion. Generally, these are the users for the following OS:
| OS | User |
|---|---|
| Rocky Linux | rocky |
| Centos 7 or 8 | centos |
| RHEL or Amazon Linux | ec2-user |
Linux Scanners/Workers
Python Installation
This section covers installing Python v3.12 and configuring it as the main Python 3 executable. Alternatively, use a PyEnv Python Environments. Additionally, some steps here, such as symlinking to the main Python 3 executable, might not be advisable if this system is used for other Python-based programs.
🔴 Install Python:
yum -y install python3.12 python3.12-devel gcc
unlink /usr/bin/python3
ln -s /usr/bin/python3.12 /usr/bin/python3
which python3
  -- /usr/bin/python3
python3 -V
  -- Python 3.11.11
🔴 Install PIP:
python3 -m ensurepip
python3 -m pip install --upgrade pip
Diskover Scanner Installation
🔴 Extract your zip archive:
unzip diskover-2.4.0.zip
🔴 Copy the Diskover folder:
cd diskover-2.4.0/
cp -a diskover /opt/
🔴 Install Python packages:
cd /opt/diskover
python3 -m pip install -r requirements.txt; python3 -m pip install -r requirements-aws.txt
🔴 Create diskoverd (Diskover Daemons) log directory:
mkdir -p /var/log/diskover
🔴 Create a diskoverd configuration file, allowing us to connect the worker to the Diskover-Web API Server:
mkdir -p /root/.config/diskoverd
cp /opt/diskover/configs_sample/diskoverd/config.yaml /root/.config/diskoverd/
🔴 Set the API URL for Diskover-Web:
vi /root/.config/diskoverd/config.yaml
🔴 Edit the apiurl property. You will need to replace the ${WEBHOST} below with your web nodes IP address or hostname:
apiurl: http://${WEBHOST}:8000/api.php
DiskoverD Task Worker Daemon
Now that your first worker node is installed and configured, let’s daemonize this service with systemd.
🔴 Create systemd service file:
vi /etc/systemd/system/diskoverd.service
🔴 Add the following to the file and don't forget to save:
[Unit]
Description=diskoverd task worker daemon
After=network.target

[Service]
Type=simple
User=root
WorkingDirectory=/opt/diskover/
ExecStart=/usr/bin/python3 /opt/diskover/diskoverd.py -n worker-%H
Restart=always

[Install]
WantedBy=multi-user.target
🔴 Set permissions and enable the service:
chmod 644 /etc/systemd/system/diskoverd.service
systemctl daemon-reload
systemctl enable diskoverd
⚠️ Please proceed to the next sections, as you will be unable to start the diskoverd worker service until your API server and license are installed.
Enable SSL for Task Workers
🔴 Copy the http_ca.crt to the Worker(s) server(s) and place into /etc/pki/ca-trust/source/anchors/http_ca.crt
🔴 Run the following command:
sudo update-ca-trust ; mkdir /opt/diskover/elasticsearch-certs/ ; cp http_ca.crt /opt/diskover/elasticsearch-certs/
🔴 Navigate to DiskoverAdmin → Web → Elasticsearch:
- Input your Elasticsearch IPs, and Elastic user + password.
- For the SSL certificate path, you need to put the full path of where the certificate is held on the Web, including the name of the cert: `/opt/diskover/elasticsearch-certs/http_ca.cr`
- Hitting **Test** on this page will result in a failure as the call for this test is coming from the [Web server](#install_diskover_web), so long as you can start your Worker up, you’re good to go!
Mounting NFS Filesystems
In the example below, we will be mounting a volume called vol1 from the server nas01 into the directory called /nfs/vol1
🔴 Ensure the NFS client tools are installed:
dnf install -y rpcbind nfs-utils nfs4-acls-tools
🔴 Start the required NFS client services:
systemctl start rpcbind nfs-idmap
systemctl enable rpcbind nfs-idmap
🔴 Create the directory where we will mount the filesystem:
mkdir -p /nfs/vol1
🔴 Add an entry in the /etc/fstab configuration file to ensure the volume gets mounted on reboot:
nas01:/vol1 /nfs/vol1 nfs defaults 0 0
🔴 Mount the filesystem and display its capacity:
mount /nfs/vol1
df -h /nfs/vol1
⚠️ For detailed information about configuring NFS clients, consult the RedHat NFS client documentation.
Mounting CIFS Filesystems
In the example below, we will be mounting a volume called vol1 from the server nas01 into the directory called /cifs/vol1
🔴 Ensure the CIFS packages are installed:
dnf install -y samba-client samba-common cifs-utils
🔴 Create the directory where we will mount the filesystem:
mkdir -p /cifs/vol1
🔴 Add an entry in the /etc/fstab configuration file to ensure the volume gets mounted on reboot. In the example below, change the username, password, and domain to match your environment.
systemctl start rpcbind nfs-idmap
systemctl enable rpcbind nfs-idmap
mount /nfs/vol1
df -h /nfs/vol1
\\nas01\vol1 /cifs/vol1 cifs username=winuser,password=winpassword, ˓→domain=windomain,vers=2.0 0 0
🔴 Mount the filesystem and display its capacity:
mount /cifs/vol1
df -h /cifs/vol1
⚠️ For additional information about configuring CIFS clients, visit [CentOS tips for mounting Windows shares](https://wiki.centos.org/TipsAndTricks(2f)WindowsShares.html#:~:text=Mounting%20Windows%20(or%20other%20samba,are%20used%20in%20our%20examples.&text=Word%20of%20warning:%20the%20default%20behaviour%20for%20mount.).
Windows Scanners/Workers
Installation Requirements
Installer Build Directories
This installer requires an internet connection to install Python and the NSSM service. The Windows machine running the installer must have internet access. Currently, there’s no offline install option with this method. To install without internet access, you'd need to reverse-engineer the installer script and manually download and install Python and NSSM packages on the server.
Python on Windows
By default, Windows links the python.exe and python3.exe executables to the Microsoft Store. This means that if you try to run a command like python script.pyit might prompt you to install Python from the Store, even if you've already installed it manually. The installer installs Python manually, so you'll need to disable this setting. To do so, search for Manage App Execution Aliases in the Windows search bar, then find python3 and python, and set both to No or Off.
Build Directories
Installer Build Directories
The installer creates a temporary build directory under the user account that is running the installer, or under the user account authenticated as an admin to execute the installer, depending on the situation. This temporary directory will contain the Diskover build contents.
diskover-2.4.0.zip
requirements.txt
Once the installer finishes and/or when the installer has completed but the Finish button has not been chosen, you can access the contents of this directory if ever necessary. Sample build directory temp path C:\Users\Brandon Langley\AppData\Local\Temp\is-4MFN0.tmp
Diskover Build Directories
During the initial part of the wizard, a few directories are created to host the diskover build and necessary configuration files:
C:\Program Files\Diskover\
%APPDATA%\diskoverd
Sample Path : C:\Users\Brandon Langley\AppData\Roaming\
✏️ Note that this %APPDATA% string can be put in the search bar of the Windows file browser to go to the current users' application data directory. However, as mentioned above, the user running the installers and/or the user authenticating as admin to execute the installer will be the installer using the %APPDATA% path.
The issue here is if one user runs the installer, but then in the NSSM section, we tell another user to run the service. This means that this \diskoverd configuration directory and config file within will be in the wrong user path.
Python Installation
Python Installation
The DiskoverTaskWorker-2.4.0.exe installer will be installing Python3.12.0 on the Windows machine. The installation will do the following things :
- Download the
Python3.12.0.exeinstaller within theC:\Program Files\Diskover\folder - Execute the installer with the following flags:
/quiet→ to not display the Python installer UI while the DiskoverTaskWorker installer is running.InstallAllUsers=0→ to only install thisPython3.12.0version - for the user that is running the installer.PrependPath=1→ to add thePython3.12.0executable to the Windows class path - for the user that is running the installer.
PIP Packages
A standard process using PIP during installer execution now that Python is installed. The requirements.txt file used here is the latest from the master at the time of 2.3.x being released and has been tested against Python3.12.0:
- Ensure PIP
- Upgrade PIP
- Install
requirements.txt
Diskover Configuration
Given that a lot of the Diskover configurations are now in the database, the only actual configuration file is the %APPDATA%\diskoverd\config.yaml mentioned above. This contains the only input field into the DiskoverTaskWorker wizard : Diskover Web URL. This gives the worker the ability to register with the DiskoverAdmin service and fetch all of its other configurations.
NSSM
Install Process
The installer downloads NSSM Version 2.24 from the internet and places it within C:\Program Files\Diskover\. The zip file is extracted in that same directory, and then PowerShell commands are issued to add this directory to the classpath - for the user that is running the installer. This is the path: C:\Program Files\Diskover\nssm-2.24\nssm-2.24\win64\
Building the Diskover Service
Now that NSSM is installed and added to the classpath, the installer runs a few NSSM commands and creates a few files to bind Diskover to NSSM.
🔴 A batch file is created at C:\Program Files\Diskover\diskoverd-win-service.bat
🔴 The contents of this file are the standard startup for DiskoverD:
python "C:\Program Files\diskover\diskoverd.py" -n %COMPUTERNAME%
🔴 The installer executes this command to install the Diskover service in NSSM, nssm.exe installs diskover:
C:\Program Files\Diskover\diskoverd-win-service.bat
🔴 A few commands are executed to create service startup logging:
nssm.exe set diskover AppStdout "C:\Program Files\Diskover\logs\service-start-log"
nssm.exe set diskover AppStderr "C:\Program Files\Diskover\logs\service-start-error-log"
Manual Processes After Installation
NSSM
Once the installer is complete, you'll need to bind the NSSM Diskover service to a user account.
🔴 Get current user account:
whoami
🔴 Edit the diskover service:
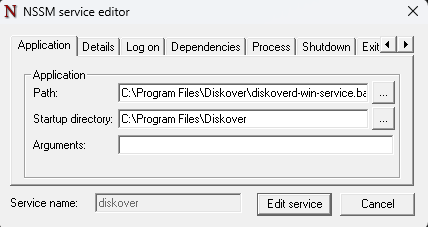
nssm edit diskover
Once you run this command, you will go to the Log On tab and select This Account, then simply put the output of the whoami command and insert the login credentials below. Finally click Edit Service to save the configurations. This means that the user data input will be the one that executes the Diskover Task Worker service on this Windows Machine.
This is a working example of what your service details should look like in NSSM:
Service Startup | Logging
Now that we have that figured out, let’s start the service and tail the log.
🔴 Start diskover:
nssm start diskover
🔴 Service Startup Logs:
Get-Content -Path "C:\Program Files\Diskover\logs\service-start-error.log" -Tail 25 -Wait
🔴 Diskover Logs:
Get-Content -Path "C:\Program Files\Diskover\logs\diskoverd_subproc_$HOSTNAME.log" -Tail 25 -Wait
Troubleshooting | Nice to Know
Manual Scan
Once you have everything going, you can tail the log and run a manual scan:
python "C:\Program Files\Diskover\diskover.py" -i diskover-win-test "C:\Program Files\Diskover"
User Authentication Issues
When configuring NSSM to work with a user, we have seen issues where the Windows machine is bound to an AD domain, and the user attempts to go through the Log On portion of the NSSM setup and use that domain. It seems that the NSSM service (as configured) is not able to properly look up the SID values for the domain-bound users. Thus, there might be errors starting the Diskover Task Worker service.
When this occurs, you can choose to use the Local System Account. Given this occurs, it is possible that the diskoverd\config.yaml was installed in the %APPDATA% folder for the user that is running the installer. This will need to be move to the proper %APPDATA%folder for the Local System Account.
Diskover Admin - DiskoverD Configuration
If you are connecting this back to a single stack OVA that likely has the DiskoverD configuration for the ElasticSearch connection set to localhost you will need to change that to the OVA’s IPV4 address so that the Windows Task Worker can fetch that configuration for ES and be able to connect properly.
Mac Scanners/Workers
🚧 We're hard at work preparing these instructions. Meanwhile, click here to open a support ticket, and we'll gladly assist you with this step of your deployment.
Celery Installation
Overview
This Celery component will need to be installed on each of your scanner/worker nodes.
⚠️ Additional Celery documentation
Celery for Linux
🔴 Install Celery:
python3 -m pip install celery
which celery
  -- /usr/local/bin/celery
🔴 Copy in the default Celery config file:
cp /opt/diskover/diskover_celery/etc/celery.conf /etc/
🔴 Create systemd service file:
cp /opt/diskover/diskover_celery/etc/celery.service /etc/systemd/system/
🔴 Create Celery log/run directories:
mkdir /var/log/celery; chmod 777 /var/log/celery
mkdir /var/run/celery; chmod 777 /var/run
🔴 Set permissions and enable the service:
chmod 644 /etc/systemd/system/celery.service
systemctl daemon-reload
systemctl enable celery
🔴 Run the Celery service manually to see if any errors pop up:
cd /opt/diskover/
celery -A diskover_celery.worker worker
⚠️ When you see something like this, you know your Celery service has come online:
2024-10-04 15:22:55,192 - celery.worker.consumer.connection                  -       INFO -                      - Connected to amqp://diskover:**@rabbitmq-IP:5672//
2024-10-04 15:22:56,450 - celery.apps.worker                                 -       INFO -                      - celery@worker-node-hostname ready.
🔴 Start and enable the celery service:
systemctl start celery
systemctl enable celery
systemctl start celery
🔴 If for some reason the celery service doesn't start, check the celery logs:
cd /var/log/celery/
⚠️ The API server must be installed before starting the Celery service.
Celery for Windows
🚧 We're hard at work preparing these instructions. Meanwhile, click here to open a support ticket, and we'll gladly assist you with this step of your deployment.
Celery for Mac
🚧 We're hard at work preparing these instructions. Meanwhile, click here to open a support ticket, and we'll gladly assist you with this step of your deployment.
RabbitMQ and Amazon MQ Server Installation
Overview
RabbitMQ or Amazon MQ serves as the messaging bus/queue system that communicates with all Celery systems on your Diskover Worker nodes. We recommend installing this service on a dedicated standalone host.
Once all components are installed, you will be able to configure your messaging environment. We strongly recommend following the deployment order outlined in this guide.
⚠️ Additional guidelines for RabbitMQ management:
RabbitMQ for Linux
🔴 Configure yum repositories:
curl -s https://packagecloud.io/install/repositories/rabbitmq/rabbitmq-server/script.rpm.sh | bash
curl -s https://packagecloud.io/install/repositories/rabbitmq/erlang/script.rpm.sh | bash
🔴 Install rabbitmq-server and erlang. Note that installing these packages may require different steps depending on the Linux distribution:
yum -y install rabbitmq-server erlang
🔴 Ensure the service starts and enable it:
systemctl start rabbitmq-server.service
🔴 If the above step failed, make sure the hosts hostame is pingable:
systemctl status rabbitmq-server.service
systemctl enable rabbitmq-server.service
🔴 Configure RabbitMQ for use with Diskover:
rabbitmq-plugins enable rabbitmq_management
rabbitmqctl change_password guest darkdata                  (This will password not be used - it is only to secure the guest account)
rabbitmqctl add_user diskover darkdata                      (Feel free to choose your own username/password)
rabbitmqctl set_user_tags diskover administrator            (If you changed users, set it properly here and replace 'diskover')
rabbitmqctl set_permissions -p / <user> ".*" ".*" ".*"      (If you changed users, set it properly here and replace 'diskover')
🔴 Restart the service:
systemctl restart rabbitmq-server
systemctl status rabbitmq-server
⚠️ This completes the RabbitMQ configuration for Diskover. You should now be able to access the RabbitMQ Management Portal:
http://$rabbitMQHost:15672/#/
RabbitMQ for Windows
🚧 We're hard at work preparing these instructions. Meanwhile, click here to open a support ticket, and we'll gladly assist you with this step of your deployment.
RabbitMQ for Mac
🚧 We're hard at work preparing these instructions. Meanwhile, click here to open a support ticket, and we'll gladly assist you with this step of your deployment.
Amazon MQ
🚧 We're hard at work preparing these instructions. Meanwhile, click here to open a support ticket, and we'll gladly assist you with this step of your deployment.
Diskover-Web Installation
Overview
This section covers all the necessary steps to set up your Diskover-Web user interface, including the new DiskoverAdmin panel available with Diskover v2.4x.
Once all components are installed, you will be able to configure your Diskover-Web environment. We strongly recommend following the deployment order outlined in this guide.
NGINX and PHP Installation
Let's install NGINX and all the necessary PHP packages.
🔴 Install NGINX:
yum -y install nginx
🔴 Enable and start the NGINX service:
systemctl enable nginx
systemctl start nginx
systemctl status nginx
🔴 Enable epel and remi repositories. Change the 8s to 9s if using you're using RHEL/Rocky Linux 9:
yum -y install https://dl.fedoraproject.org/pub/epel/epel-release-latest-8.noarch.rpm
yum -y install https://rpms.remirepo.net/enterprise/remi-release-8.rpm
🔴 Install PHP 8 packages:
yum -y install php84 php84-php-common php84-php-fpm php84-php-opcache \
php84-php-cli php84-php-gd php84-php-mysqlnd php84-php-ldap php84-php-pecl-zip \
php84-php-xml php84-php-mbstring php84-php-json php84-php-sqlite3
🔴 Copy in php.ini:
find / -mount -name php.ini-production
  -- /opt/remi/php84/root/usr/share/dovi /etc/php84-php-common/php.ini-productio
find / -mount -name php.ini
  -- /etc/opt/remi/php84/php.ini
cp /opt/remi/php84/root/usr/share/doc/php84-php-common/php.ini-production /etc/opt/remi/php84/php.ini
⚠️ This command may differ depending on your PHP8 install directory. To find your PHP8 install directory:
php -i | grep 'Configuration File'
🔴 Edit php-fpm configuration:
vi /etc/opt/remi/php84/php-fpm.d/www.conf
⚠️ This command may differ depending on your PHP8 install directory. Please ensure the following properties are set and uncommented:
user = nginx
group = nginx
listen = /var/opt/remi/php84/run/php-fpm/www.sock   (take note of this .sock location, you will need it later)
listen.owner = nginx
listen.group = nginx

;listen.acl_users = apache                          (ensure this is commented out with the ;)
🔴 PHP directories ownership:
chown -R root:nginx /var/opt/remi/php84/lib/php     (this command may differ depending on your PHP8 install directory)
mkdir /var/run/php-fpm
chown -R nginx:nginx /var/run/php-fpm
🔴 Create systemd service file and save:
vi /etc/systemd/system/php-fpm.service
🔴 Add the following to the file and note that this ExecStart command may differ depending on your PHP8 install directory:
[Unit]
Description=PHP FastCGI process manager
After=local-fs.target network.target nginx.service

[Service]
PIDFile=/opt/php/php-fpm.pid
ExecStart=/opt/remi/php84/root/usr/sbin/php-fpm --fpm-config /etc/opt/remi/php84/php-fpm.conf --nodaemonize
Type=simple

[Install]
WantedBy=multi-user.target
🔴 Set permissions, enable, and start the service:
chmod 644 /etc/systemd/system/php-fpm.service
systemctl daemon-reload
systemctl enable php-fpm
systemctl start php-fpm
systemctl status php-fpm
🔴 Build the NGINX configuration file:
vi /etc/nginx/conf.d/diskover-web.conf
🔴 Add the following to the file - replacing the value in fastcgi_pass with the location of your www.sock from the php configuration file a few steps up, and then save:
server {
        listen   8000;
        server_name  diskover-web;
        root   /var/www/diskover-web/public;
        index  index.php index.html index.htm;
        error_log  /var/log/nginx/error.log;
        access_log /var/log/nginx/access.log;
        location / {
            try_files $uri $uri/ /index.php?$args =404;
        }
        location ~ \.php(/|$) {
            fastcgi_split_path_info ^(.+\.php)(/.+)$;
            set $path_info $fastcgi_path_info;
            fastcgi_param PATH_INFO $path_info;
            try_files $fastcgi_script_name =404;
            fastcgi_pass unix:/var/opt/remi/php84/run/php-fpm/www.sock;
            #fastcgi_pass 127.0.0.1:9000;
            fastcgi_index index.php;
            include fastcgi_params;
            fastcgi_param SCRIPT_FILENAME $document_root$fastcgi_script_name;
            include fastcgi_params;
            fastcgi_read_timeout 900;
            fastcgi_buffers 16 16k;
            fastcgi_buffer_size 32k;
        }
}
Diskover-Web Installation
Let's install Diskover-Web now that we have our NGINX and PHP packages installed and configured. You need to ensure that you have the latest Diskover 2.4 zip archive. Once you have the zip file, you can SCP it to the machine that is designated for Diskover-Web.
🔴 On-prem | Will scp the file to the root user's home directory:
scp <path to diskover.zip> root@ipAddress:~/
🔴 AWS | Will scp the file to the user's home directory. Example using Rocky:
scp -i <path to PEM file> <path to diskover.zip> rocky@bastion-IP:~/
⚠️ Note that the user will differ depending on your OS. It is best to consult your AWS EC2 Console to get the exact user to connect to the bastion. Generally, these are the users for the following OS:
| OS | User |
|---|---|
| Rocky Linux | rocky |
| Centos 7 or 8 | centos |
| RHEL or Amazon Linux | ec2-user |
🔴 Extract your zip archive:
unzip diskover-2.4.0.zip
🔴 Copy the diskover-web folder:
cd diskover-2.4.0/
cp -a diskover-web /var/www/
🔴 Copy the default sample reports:
cd /var/www/diskover-web/public
for f in *.txt.sample; do cp $f "${f%.*}"; done
chmod 660 *.txt
🔴 Copy the task panel defaults:
cd /var/www/diskover-web/public/tasks/
for f in *.json.sample; do cp $f "${f%.*}"; done
chmod 660 *.json
🔴 Set permissions for diskover-web:
chown -R nginx:nginx /var/www/diskover-web
🔴 Restart and check services health:
systemctl restart nginx php-fpm; systemctl status nginx php-fpm
⚠️ Occasionally you will see this error Another FPM instance seems to already listen on /var/opt/remi/php84/run/php-fpm/www.sock, if you do:
rm /var/opt/remi/php84/run/php-fpm/www.sock
systemctl restart php-fpm; systemctl status php-fpm
Enable SSL for Diskover-Web
🔴 Copy the http_ca.crt to the Web server and place into:
/etc/pki/ca-trust/source/anchors/http_ca.crt
🔴 Run the following command:
sudo update-ca-trust
🔴 Edit the php.ini file so that we can have PHP use this cert location to communicate with ES vi /etc/opt/remi/php84/php.ini:
openssl.cafile=/etc/pki/tls/certs/ca-bundle.crt
openssl.capath=/etc/pki/tls/certs
🔴 Run the following commands:
mkdir /var/www/diskover-web/src/diskover/elasticsearch-certs/ ; cp /etc/pki/ca-trust/source/anchors/http_ca.crt /var/www/diskover-web/src/diskover/elasticsearch-certs/ ; chown -R nginx.nginx /var/www/diskover-web/src/diskover/elasticsearch-certs/
🔴 Navigate to DiskoverAdmin → Web → Elasticsearch:
- Input your Elasticsearch IPs, and Elastic user + password.
- For the SSL certificate path, you need to put the full path of where the certificate is held on the Web, including the name of the cert: `/var/www/diskover-web/src/diskover/elasticsearch-certs/http_ca.crt`
- Hit **Test** at the bottom to ensure Diskover can communicate with your cluster.
DiskoverAdmin Installation
Overview
Diskover-Web is nothing without its new Administrator! The DiskoverAdmin configuration management user interface will allow you to further configure your Diskover system once it’s up and running.
⚠️ Note that DiskoverAdmin must be installed on the same host as Diskover-Web.
Start Here
During this process, you will need the latest Diskover 2.4x zip archive. Note that this is subject to change to RPMs in the near future. Once you have the zip file, you can SCP it to the machine that is designated for DiskoverAdmin.
🔴 On-prem | Will scp the file to the root user's home directory:
scp <path to diskover.zip> root@ipAddress:~/
🔴 AWS | Will scp the file to the user's home directory. Example using Rocky:
scp -i <path to PEM file> <path to diskover.zip> rocky@bastion-IP:~/
⚠️ Note that the user will differ depending on your OS. It is best to consult your AWS EC2 Console to get the exact user to connect to the bastion. Generally, these are the users for the following OS:
| OS | User |
|---|---|
| Rocky Linux | rocky |
| Centos 7 or 8 | centos |
| RHEL or Amazon Linux | ec2-user |
Python Installation
Python should already be installed as instructed in the Diskover Scanners/Workers Installation section. Alternatively, you could use a PyEnv (Python Environments).
⚠️ Note that some steps here, such as symlinking to the main Python3 executable, might not be advisable if this system is used for other Python-based programs.
DiskoverAdmin Installation
🔴 Extract your zip archive:
unzip diskover-2.4.0.zip
🔴 Copy the diskover-admin folder:
cd diskover-2.4.0/
cp -a diskover-admin /var/www/
🔴 Adjust the file ownership:
chown -R nginx.nginx /var/www/diskover-admin/
🔴 PIP installs:
cd /var/www/diskover-admin/etc/
python3 -m pip install -r requirements.txt
🔴 NGINX configuration - Copy the location block output of this cat command:
cat /var/www/diskover-admin/etc/diskover-web.conf
🔴 Paste the contents here. This needs to be in its own location block:
vi /etc/nginx/conf.d/diskover-web.conf
🔴 Set NGINX proxy params:
cp /var/www/diskover-admin/etc/proxy_params /etc/nginx/
🔴 Restart and check services health:
systemctl restart nginx php-fpm; systemctl status nginx php-fpm
Daemons
Now that DsikoverAdmin is installed and configured, let’s daemonize this service with systemd.
🔴 Copy default service file:
cp /var/www/diskover-admin/etc/diskover-admin.service /etc/systemd/system/
🔴 Start the Diskover-Admin service:
systemctl daemon-reload
systemctl enable diskover-admin
systemctl start diskover-admin
systemctl status diskover-admin
⚠️ A happy status looks like this:
      Starting Uvicorn instance to serve /diskover-admin...
      INFO:     Uvicorn running on unix socket /var/www/diskover-admin/run/diskover-admin.sock (Press CTRL+C to quit)
      INFO:     Started parent process [10559]
      Started Uvicorn instance to serve /diskover-admin.
Initial Configuration
Overview
This section describes the foundational setup to get things running without much complexity. Keep in mind that you can always go back and adjust any of your settings at any time.
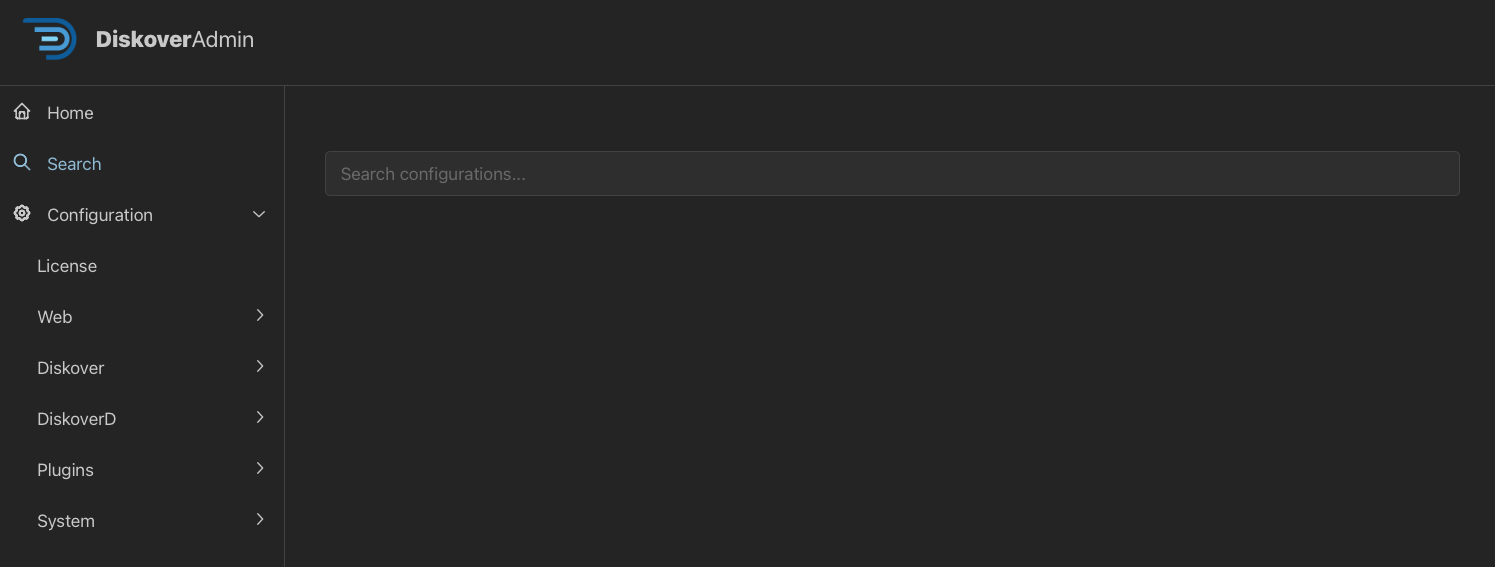
Access DiskoverAdmin
You have reached THE big moment. Paste this link in a browser to access DiskoverAdmin and complete the configuration process for all Diskover's components and plugins.
http://diskover-web:8000/diskover_admin/config/
DiskoverAdmin Wizard
The DiskoverAdmin service allows for the fine-tuning of Diskover's core components and plugins. The setup wizard will guide you through the first part of the initial configuration of the DiskoverAdmin services, which can be further customized later.
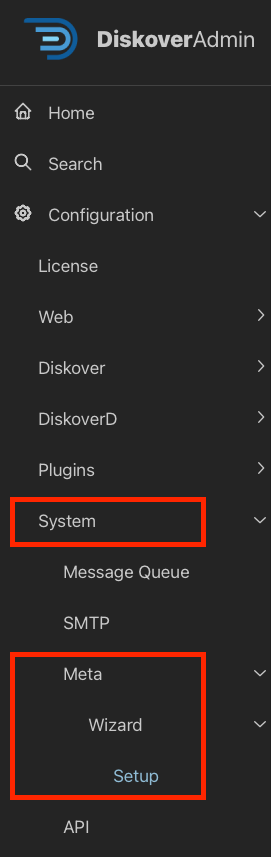
🔴 Access the Wizard by selecting System → Meta → Wizard → Setup:
Elasticsearch Connection Configuration for Diskover-Web
⚠️ Note that Diskover-Web and the scanners can point to two different Elasticsearch hosts, hence the next steps.
🔴 Input the IP/AWS endpoint/Elastic Cloud endpoint where your Elasticsearch is running in the host field. If you have a clustered ES setup, click + Add Item to list your other IPs/endpoints.
🔴 Keep the port at 9200 unless your cluster runs on another port.
🔴 Enable HTTPS if your Elasticsearch uses an encrypted protocol. Otherwise, keep it unchecked for HTTP.
🔴 If you select HTTPS, enter your Elasticsearch username & password.
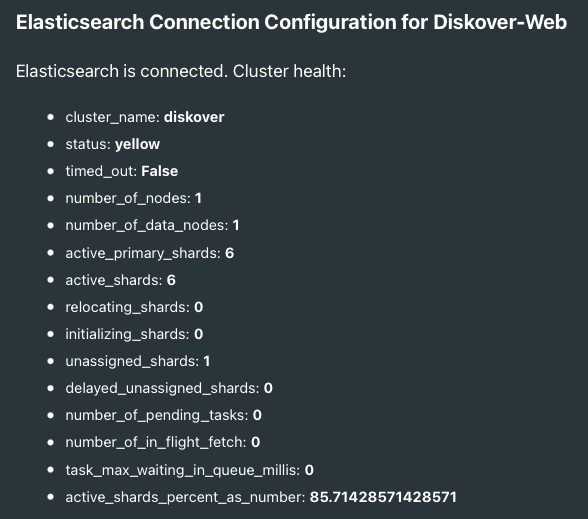
🔴 Click Test to see if Diskover can connect to your Elasticsearch system. The page will refresh and output the health of your cluster at the top of the page (number of shards, nodes, etc.):
🔴 If the test is successful, click Save & Continue, otherwise review the information you entered.
Elasticsearch Connection Configuration for Scanners
🔴 Copy connection settings from Diskover-Web?:
- If your Diskover-Web and scanners point to the same ES host, click Yes.
- If your Diskover-Web and scanners point to different ES hosts, click No, go through each field, and click:
- Test to test your connection.
- Save & Continue once done.
License
This is the point where you need to send your license request and the wizard partially automates this task for you. Note that if you skip this part for now, you can send a license request at any time.
🔴 Click on the Request License button and fill out the required fields:
- Email Address: please use your corporate email.
- Edition: the solution you subscribed to or want to try for your POC.
- Elasticsearch Nodes: the number of nodes included in your subscription plan - POCs are for 1 node only.
- Comments: anything that can help us, like your company name.
✏️ Your license is be attached to your hardware ID, which will be automatically generated and sent to us during this process.
🔴 Click Send Request.
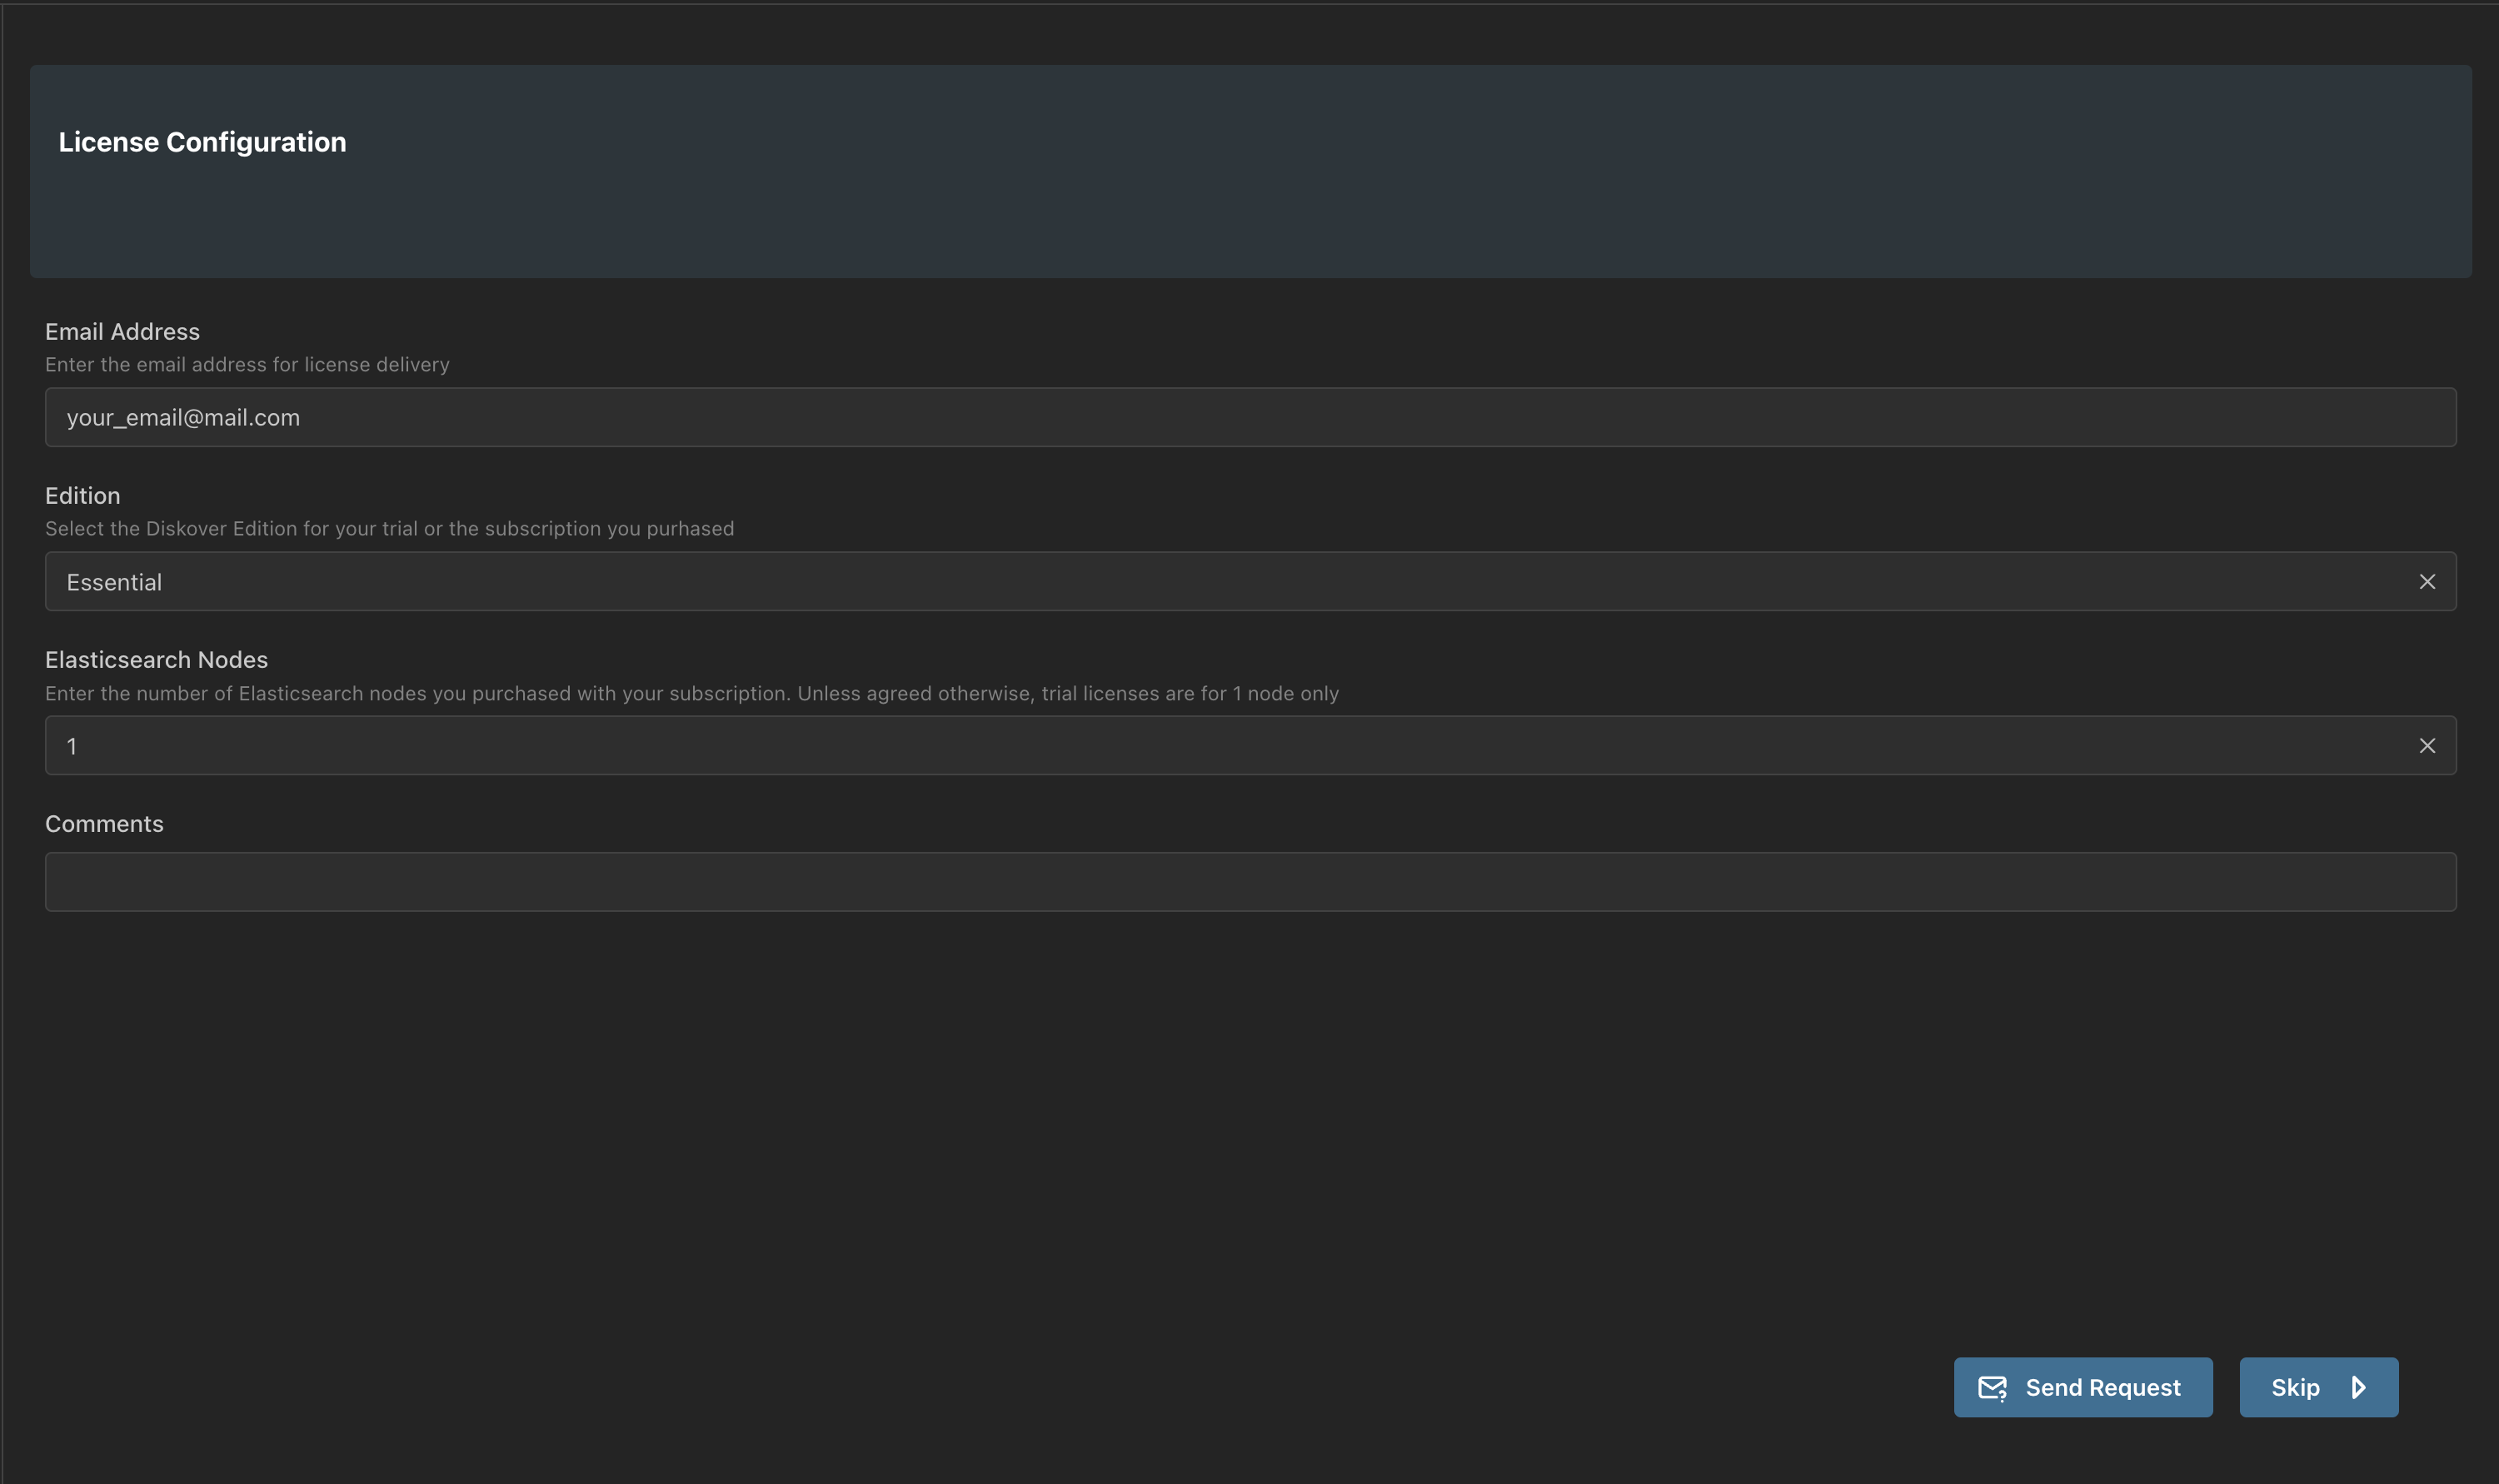
🔴 You should receive your license within 24 hours, usually much less than 24 hours or a little more if you send your request during a weekend. You have 2 choices at this point:
- Pause and wait to receive the license to continue.
- Click Skip and come back once you receive the license.
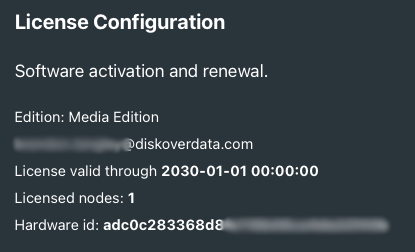
🔴 Once you receive the license, copy/paste the keys as instructed on the License Configuration page.
🔴 Click Test if you want to validate your license, example below, then click Save & Continue.
Time Zone
🔴 Using the dropdown list, select your Time Zone. More customization can be done later regarding time zones, click Save & Continue.
🔴 Click the box to enable your time zone selection, click Save & Continue.
Message Queue Configuration | RabbitMQ or Amazon MQ
This section is only needed if you are planning to use File Action plugins.
🔴 Follow the instructions on this page, click Test to check the connection, and then Save & Continue, or click Skip. You can configure or edit at any time.
⚠️ The basic setup using the wizard is not completed. CONGRATS!
API
🔴 Now navigate to System → API.
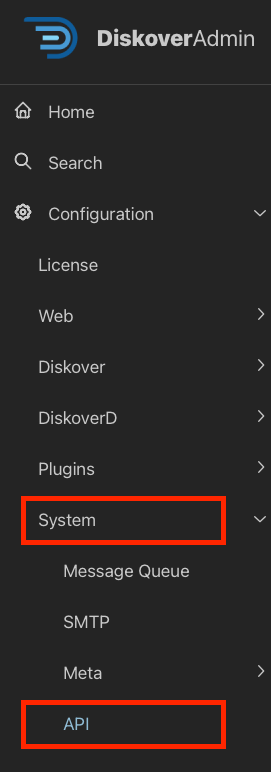
🔴 The API Host needs to be the IP address where Diskover-Web is running.
🔴 Specify an API Port if different than the default of 8000.
Diskover Scanners/Workers
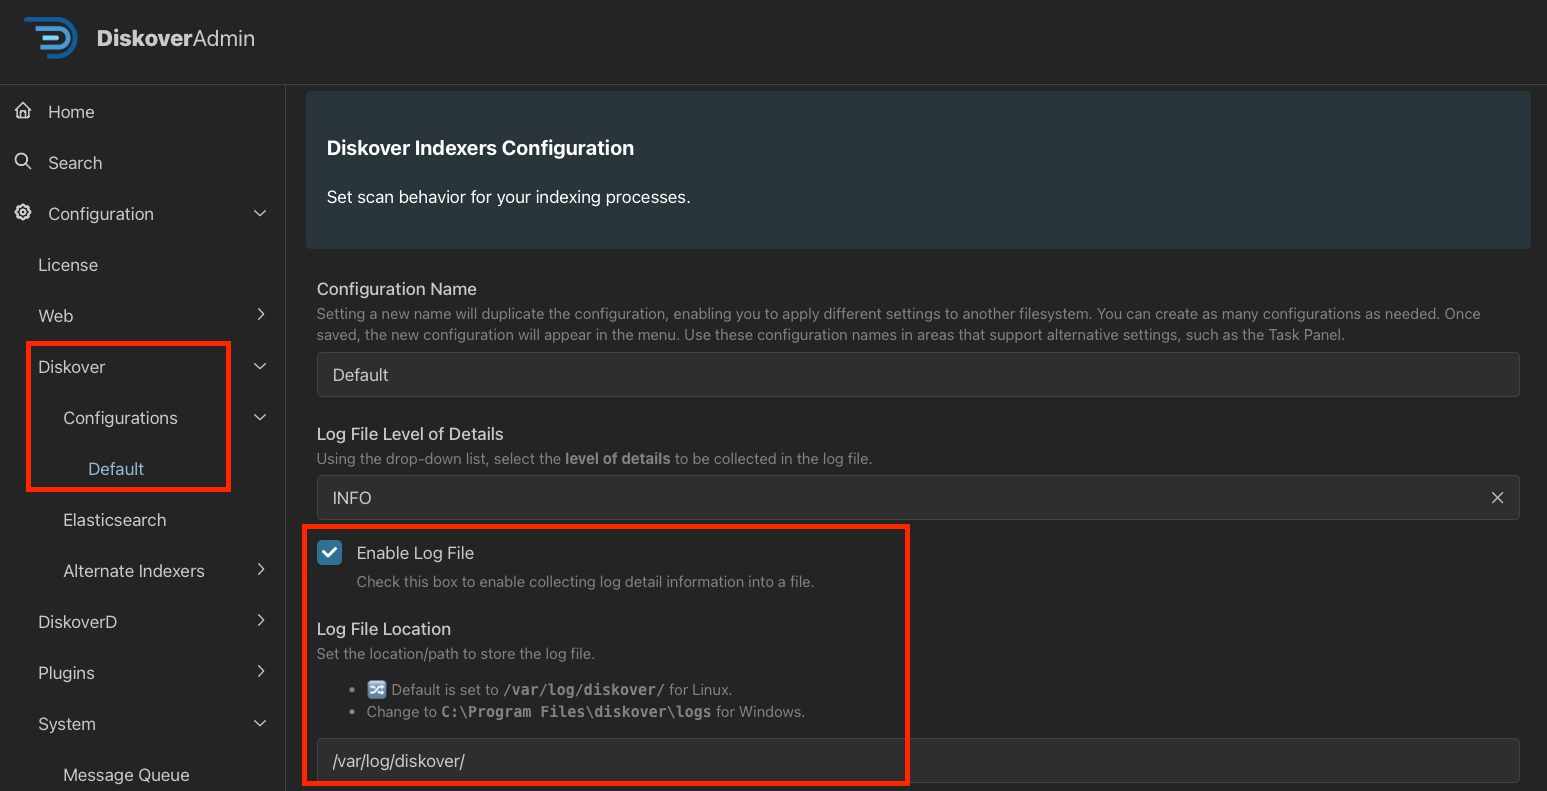
🔴 Navigate to Diskover → Configurations → Default.
🔴 Check Enable Log File and modify the Log File Location as needed:
DiskoverD
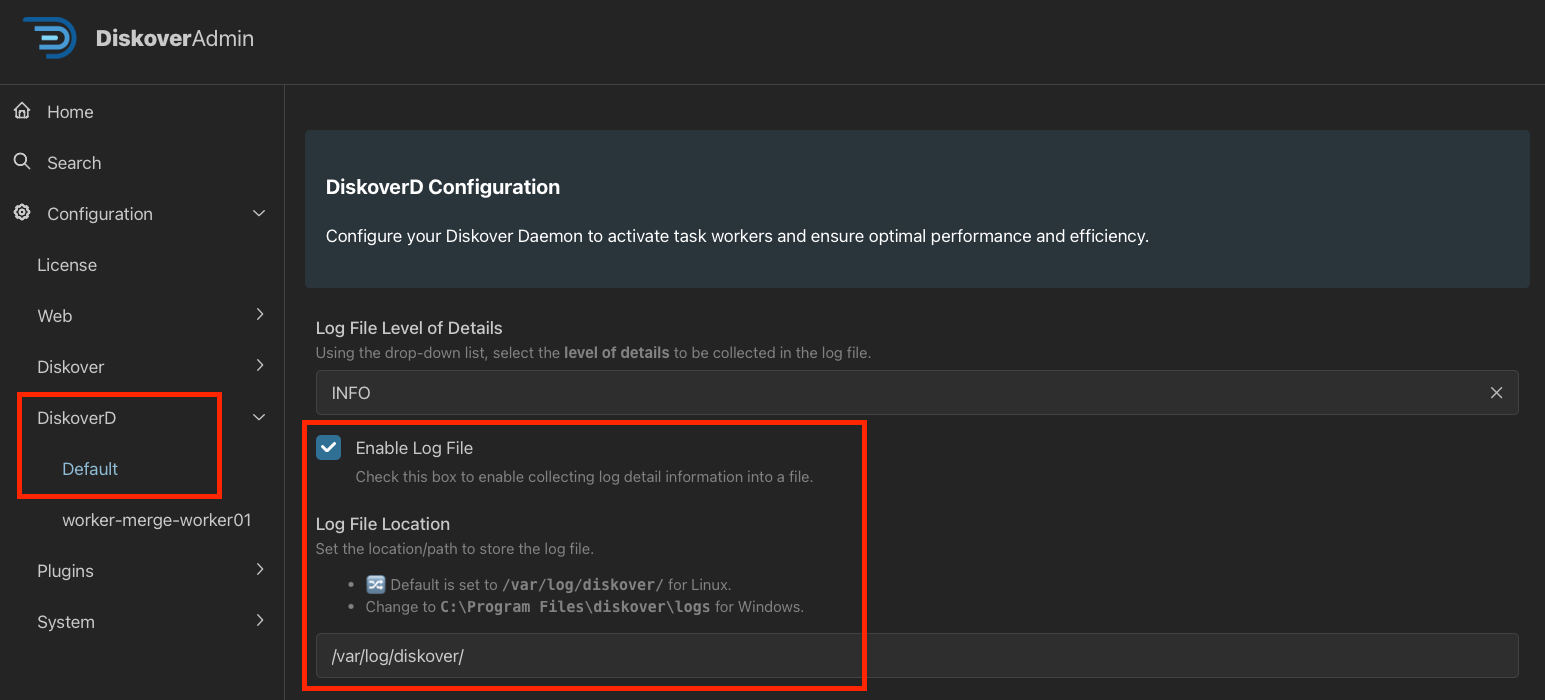
🔴 Navigate to DiskoverD → Default.
🔴 Check Enable Log File and modify the Log File Location as needed:
Schedule Your First Scan
You are now ready to schedule and then run your first scan! Go to the next section, Tasks Management via Task Panel, for the details.
Create an Alternate Scanning Configuration
Overview
This section will walk you through how to set up an alternate scanning configuration that you can use in a task.
Alternate Config Setup
🔴 If you are in the main Diskover user interface, navigate to the DiskoverAdmin panel.
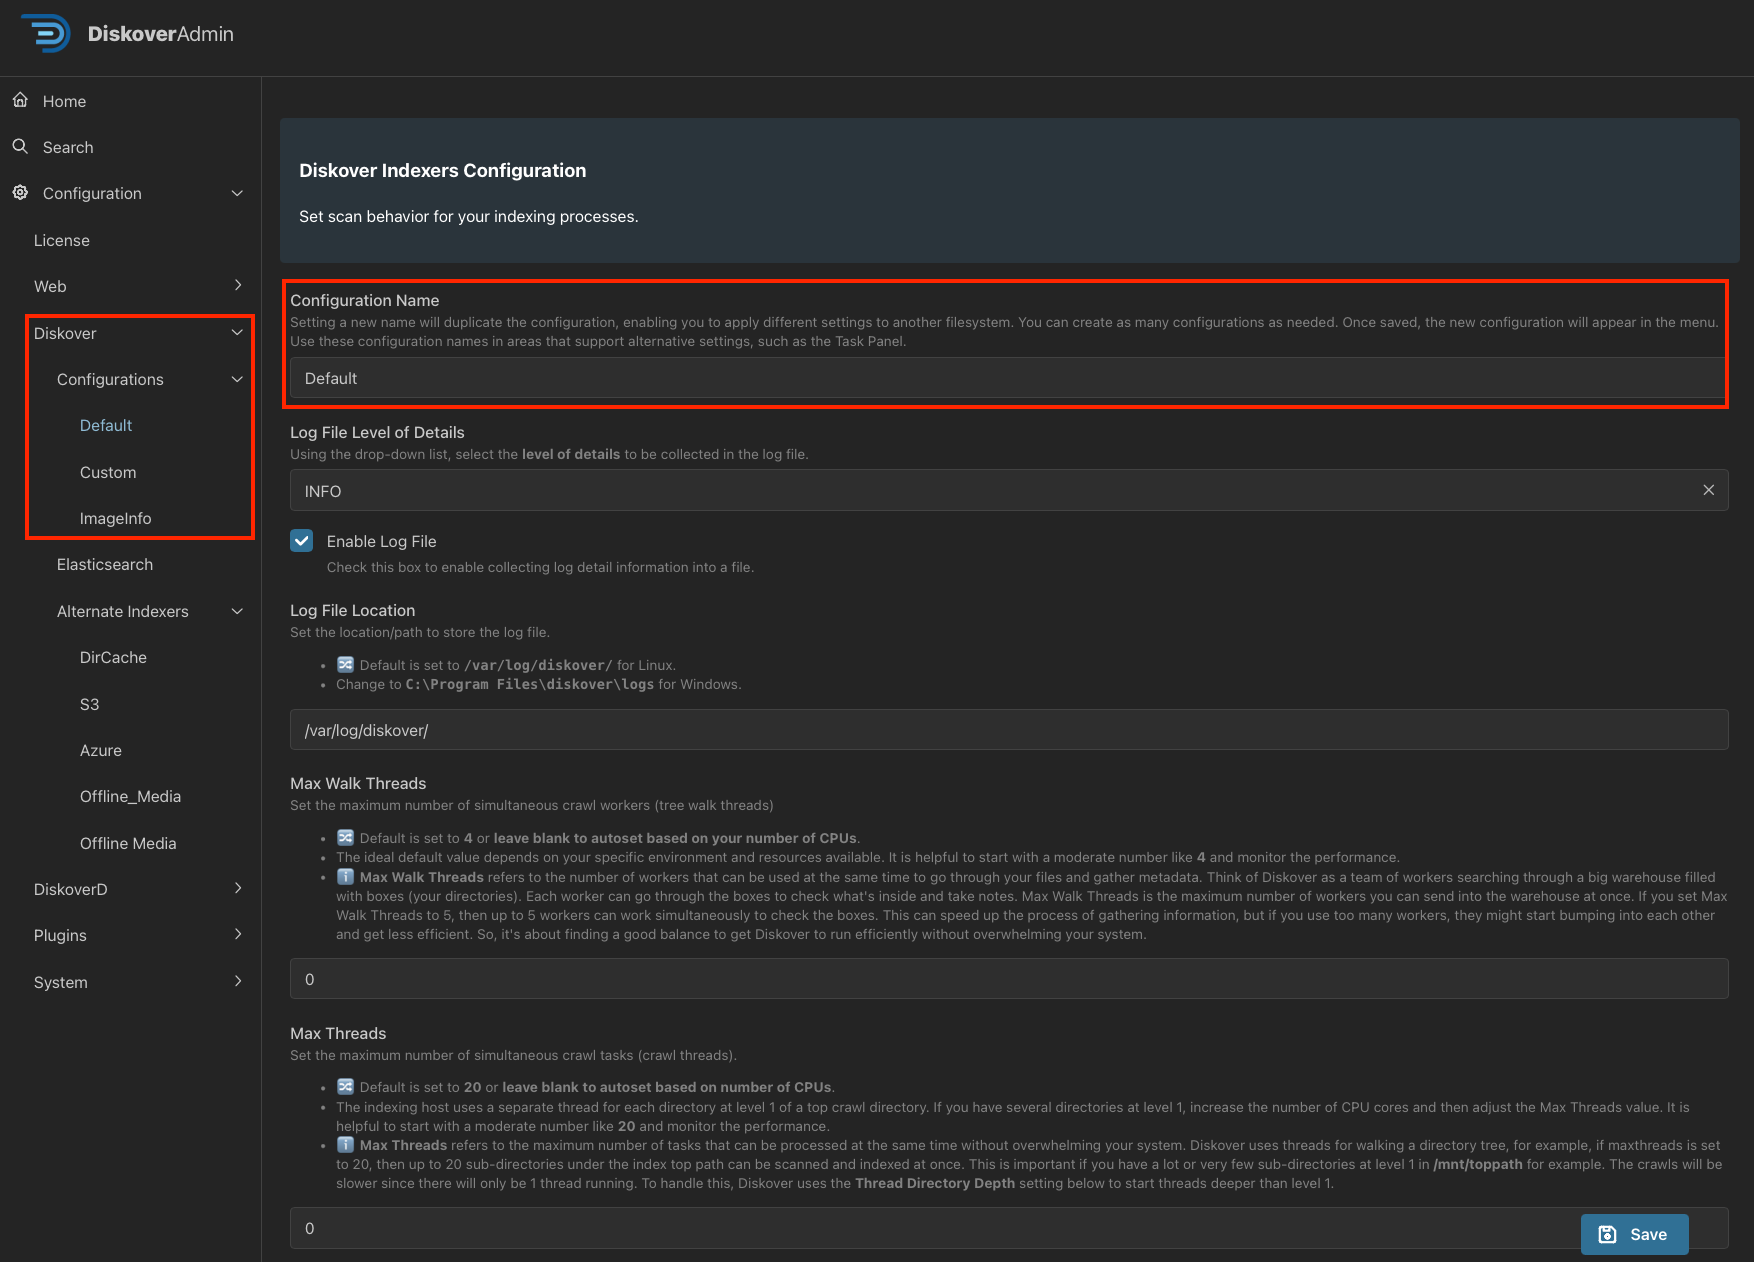
🔴 Go to Configuration → Diskover → Configurations → Default.
- You can change the name from Default to a name of your choosing.
- Hit Save and refresh the page.
- You should now see the new alternate configuration that you’ve created. You can see alternate configs in the example below that were created using Custom and ImageInfo.
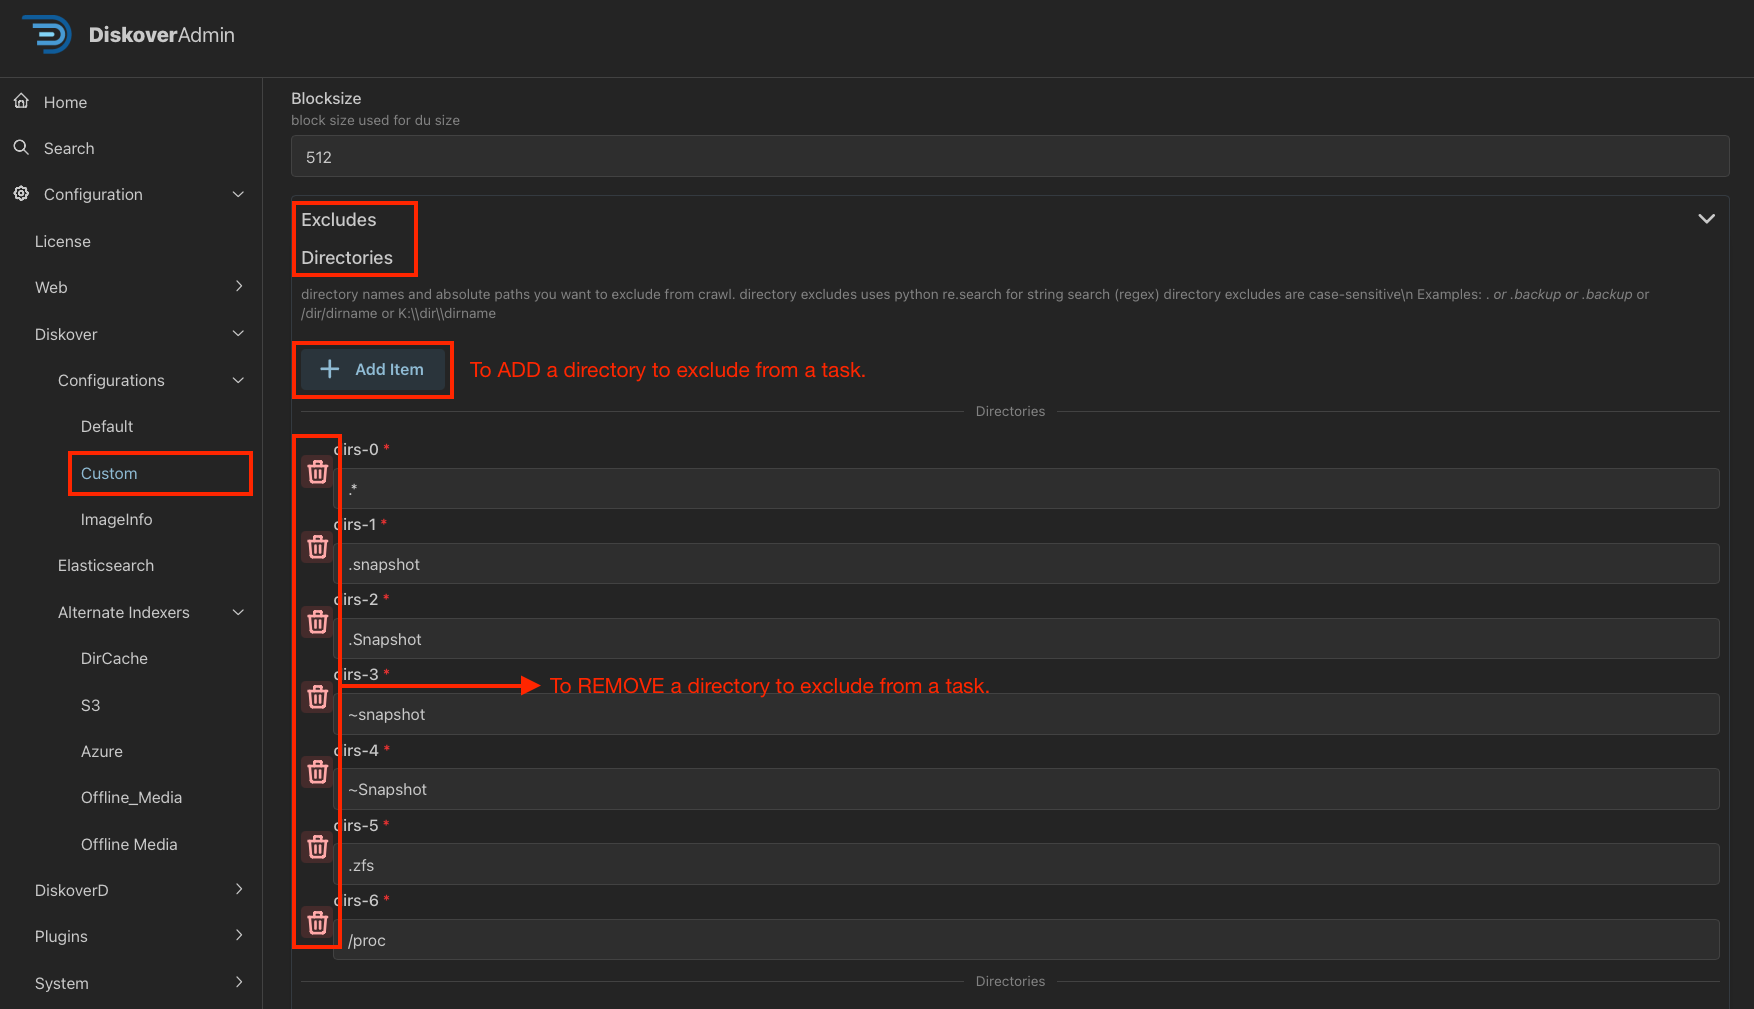
🔴 Click into the alternate configuration - we used the Custom alternate config for this example. Follow the help text on the config page to customize several parameters, such as:
- Include/exclude particular directories upon scanning - see example below
- Rules based on times
- Set up AutoTags
- Set up storage costs
- And more
- Don't forget to Save once done!
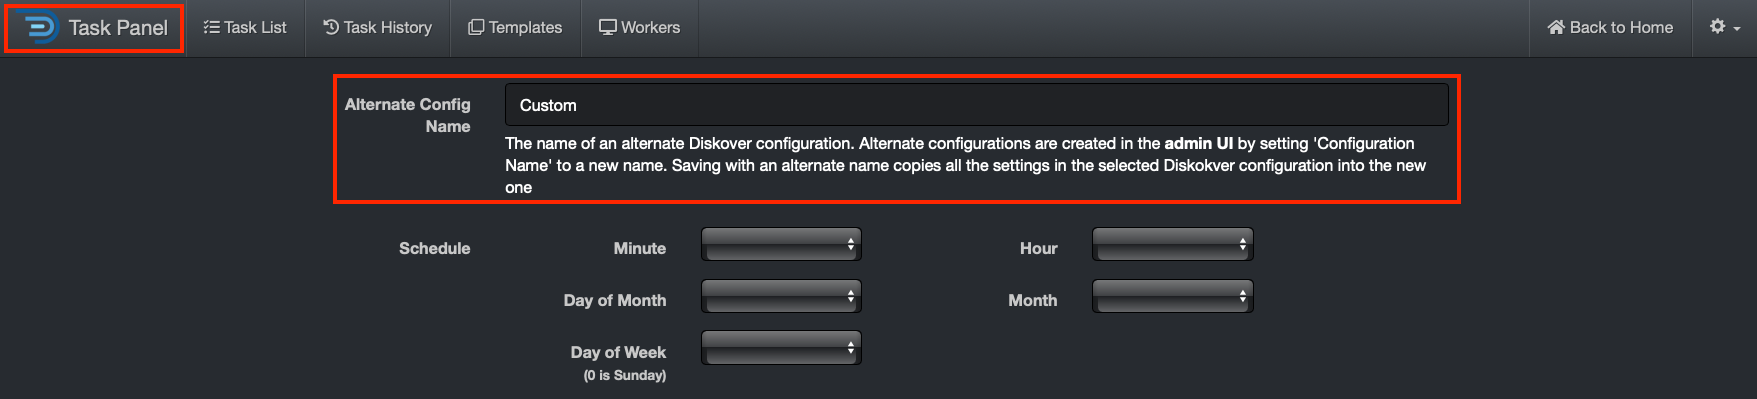
🔴 Now navigate to the Task Panel. When creating or modifying an existing task, scroll down to Alternate Config Name and use the name exactly as you created it on the DiskoverAdmin page - we used the Custom alternate config again for this example.
Alternate Config Testing
🔴 You should now be able to run that task, and we’re using the alternate configuration name Custom in the /var/log/diskover/diskoverd_subproc logs:
2024-11-11 13:55:24,804 - diskoverd_subproc - INFO - [do_work_thread_3] run command: python3 /opt/diskover/diskover.py --task "root" -f -i diskover-root-202411112055 --configurationname Diskover.Configurations.Custom --altscanner scandir_dircache /
Tasks Management via Task Panel
Task Panel Overview
Need Help?
Diskover offers professional services to assist with setting up tasks, dataflows, and workflows - contact us for details.
Use Cases
The Task Panel can be used to schedule scanning tasks or run any custom task, such as data curation via the AutoClean plugin, copying files, running duplicate file findings, checking permissions on directories, etc.
Diskover has a distributed task system where scanners/workers can be distributed among many resources. For each resource providing a task worker, services need to have a DiskoverD installed. This section will describe setting up both scanning and custom tasks within the Diskover-Web Task Panel.
Click here for the full screen view of this diagram.
Accessing the Task Panel
🔴 From the DiskoverAdmin panel: Click on DiskoverAdmin and you'll be redirected to the main Diskover user interface:

🔴 From the Diskover user interface: click the ⛭ in the upper right corner → Task Panel
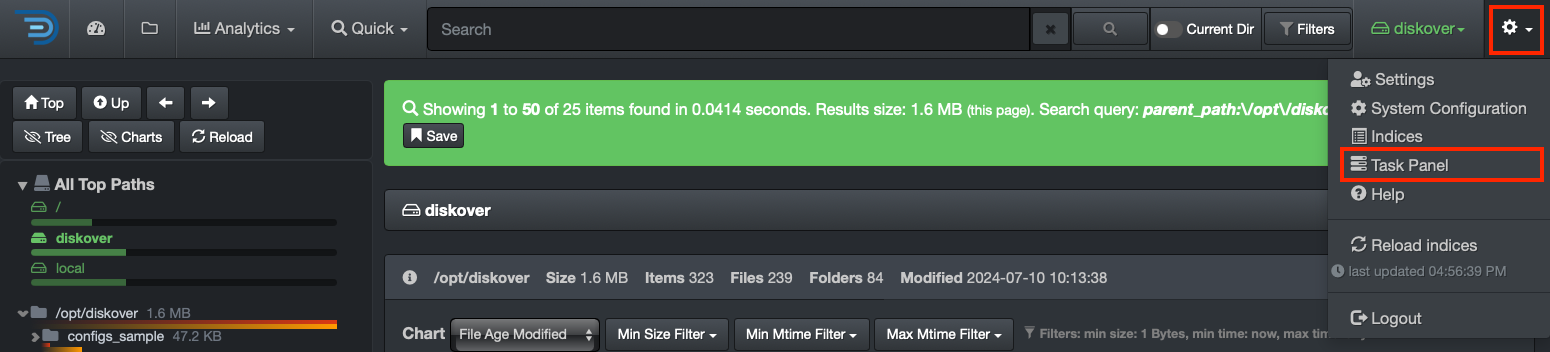
Task Panel Options
These tabs work together to give you full control over task creation, execution, monitoring, and overall management, ensuring smooth and efficient data scanning and task processing in Diskover.
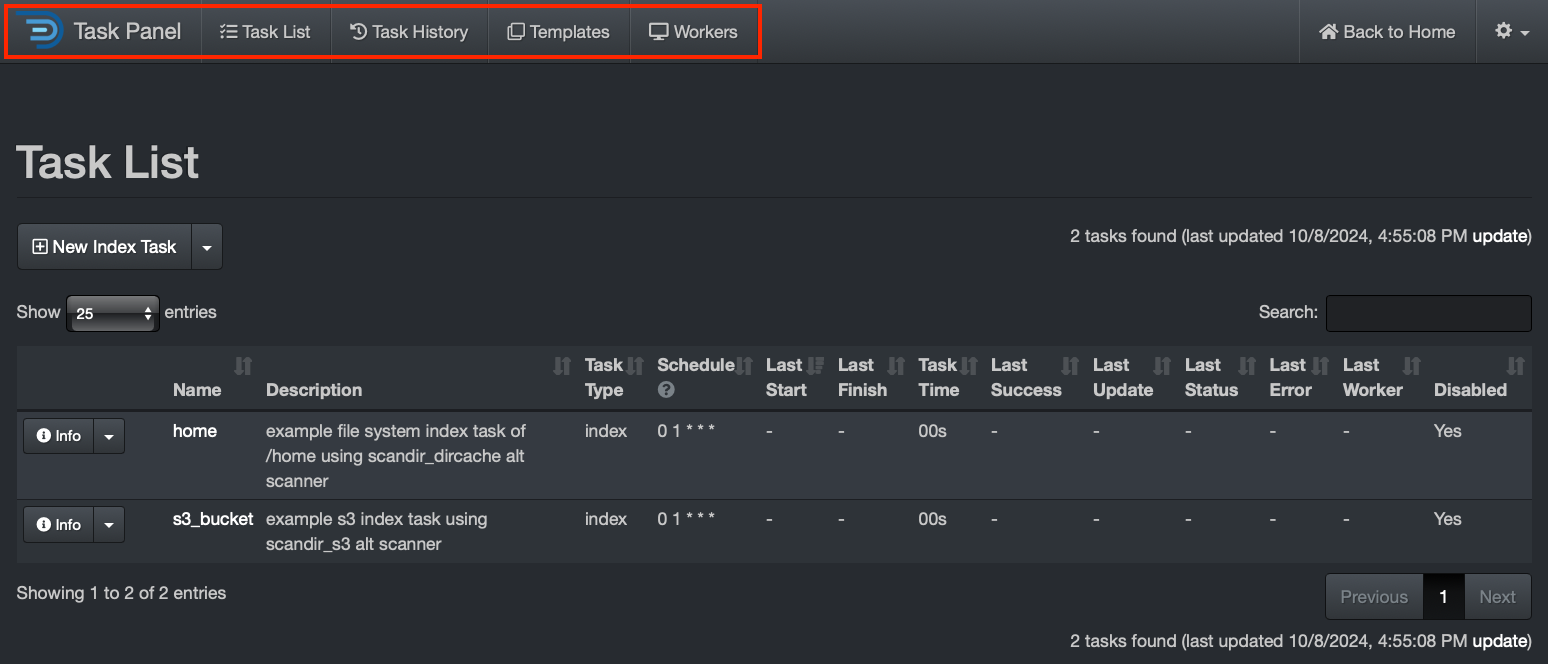
Task List Tab
The Task List shows the current and pending tasks in Diskover. It allows you to see all the tasks that are currently active, queued, or scheduled to run.
- You can create new tasks from this tab.
- You can view task details, such as task type, configuration, and status (e.g., running, paused, queued).
- This tab is where you can manage active tasks, pause them, or cancel them if needed.
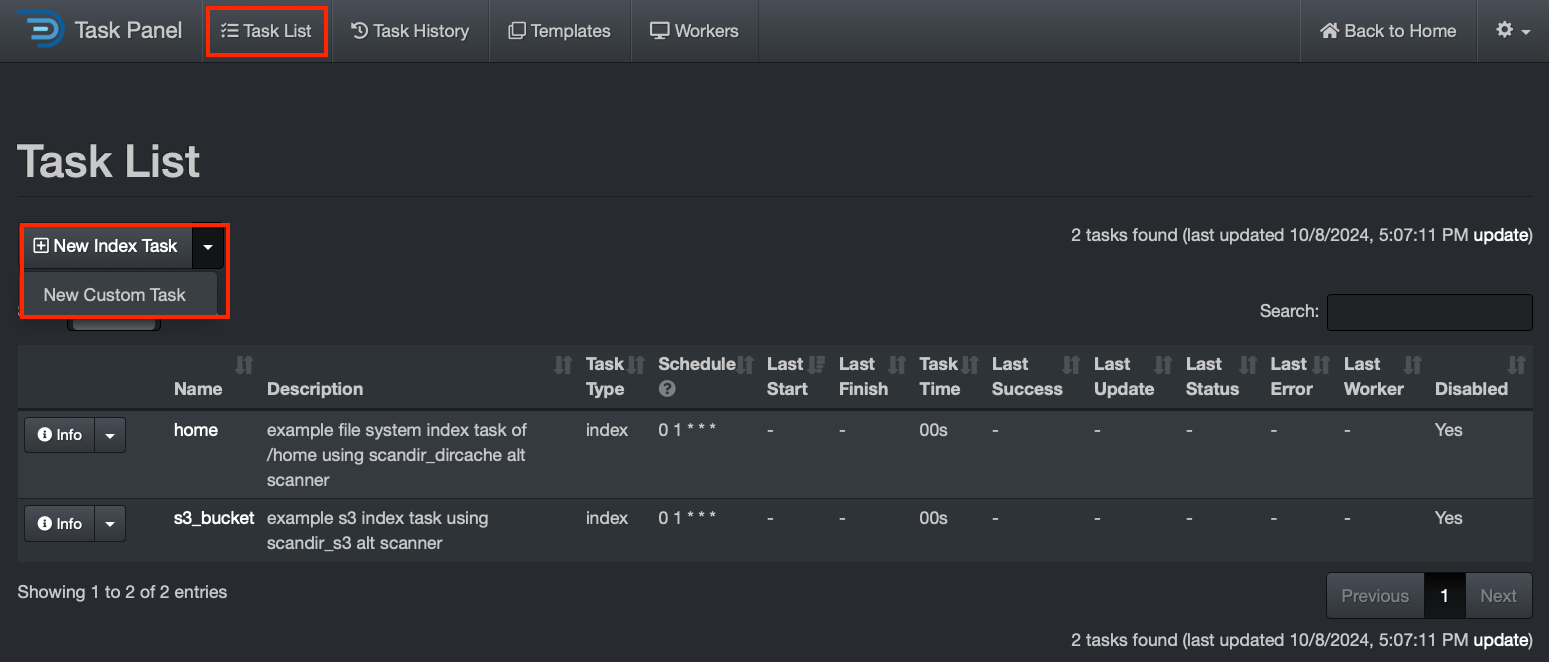
Task History Tab
The Task History keeps a log of completed tasks, allowing you to review past tasks and their outcomes.
- Provides details on tasks that have finished running, including success or failure status, duration, and any logs or error messages related to the task.
- Useful for tracking performance and identifying any issues that occurred during past operations, which is crucial for troubleshooting.
- Find useful information to fine-tune future tasks.
Templates Tab
Default scanning tasks are available in the Templates tab of the Task Panel, for both Posix filesystem and S3 bucket scanning.
Also, when creating a new task, you have the option at the bottom of the page to save the settings as a template. This is particularly useful if you have multiple similar repositories to scan, as it allows you to reuse the same configuration for future tasks.
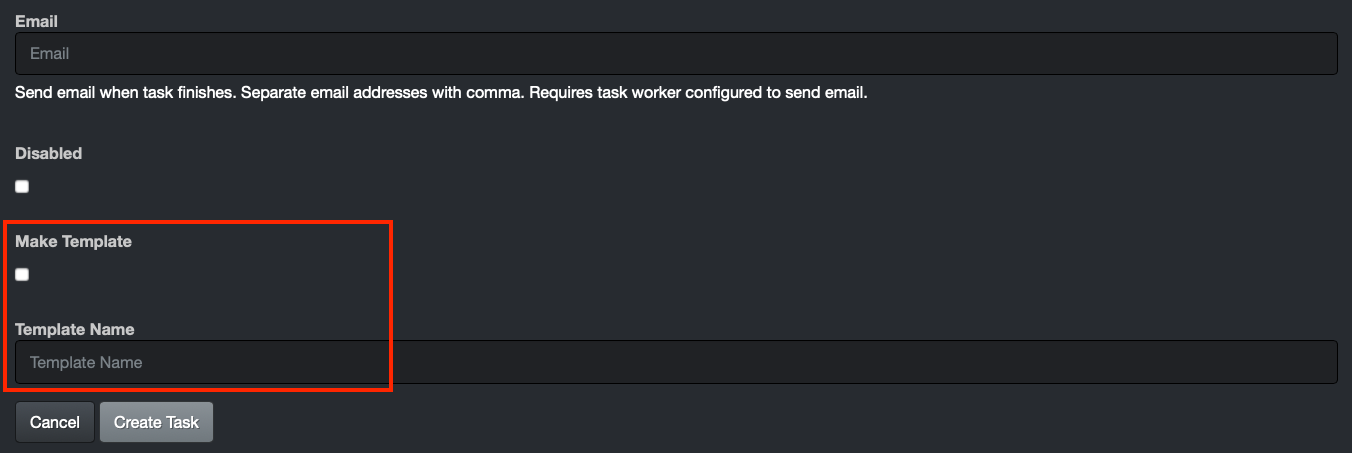
Once that template is created, you can find it under the Templates tab.
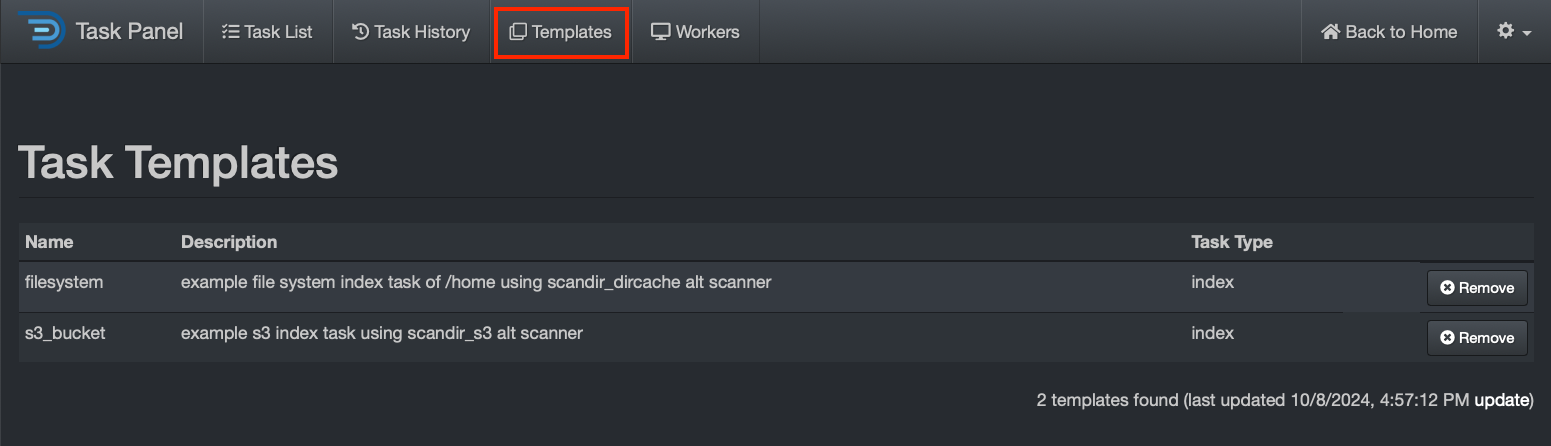
Workers Tab
The Workers tab shows the status and performance of task workers, which are responsible for executing tasks such as file scanning.
- Provides a real-time overview of all active workers, their current workloads, and any tasks they are processing.
- You can monitor the health and activity of workers, ensuring that they are functioning properly.
- You can disable, enable, or remove a worker.
- Useful for optimizing resource allocation by distributing tasks evenly across workers.
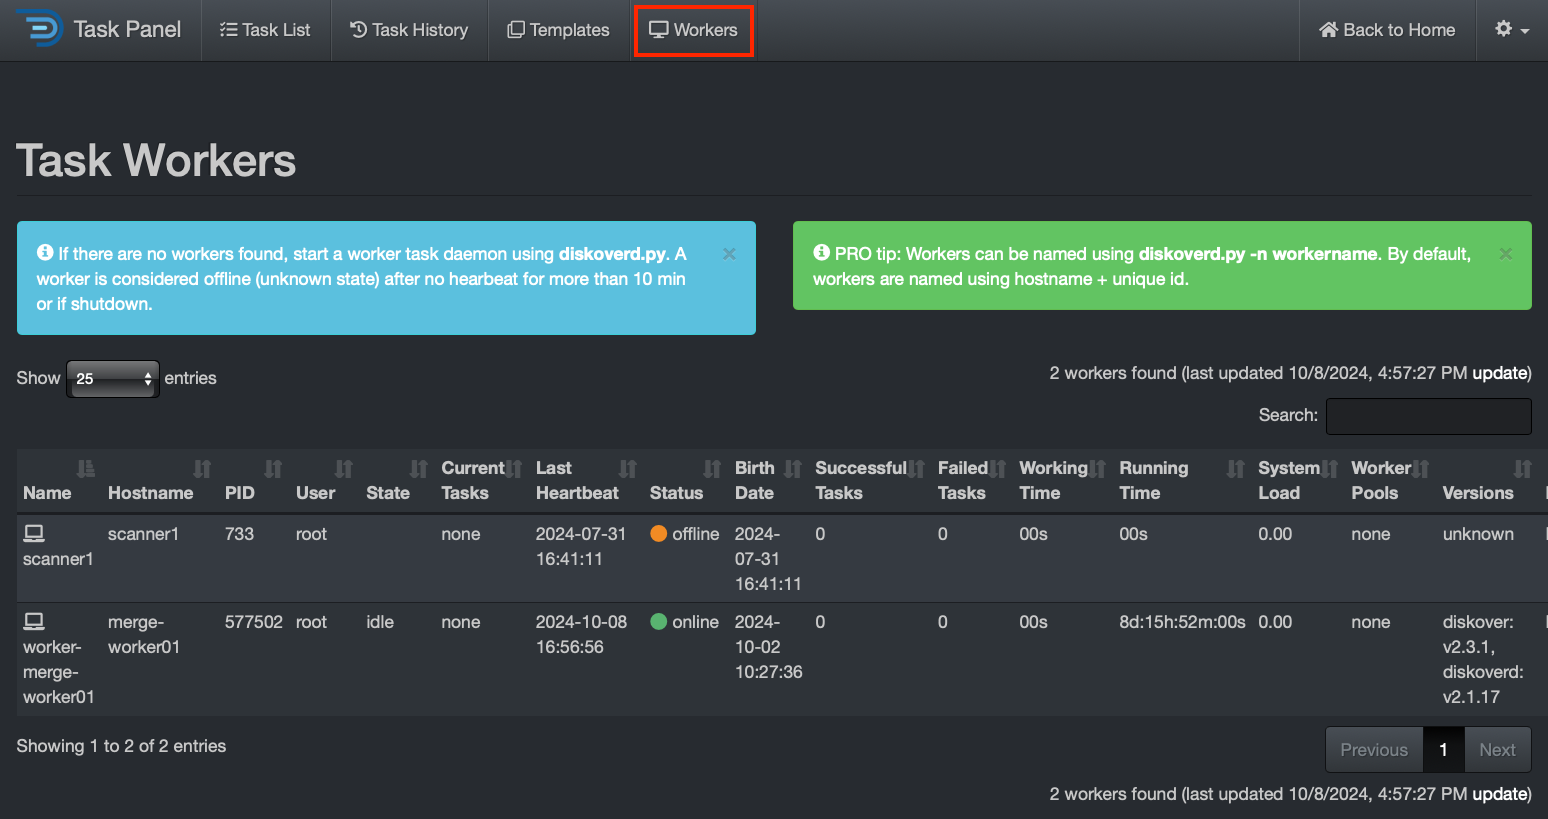
Task Fields Description
| FIELD | DESCRIPTION |
|---|---|
| Template | Select a template whenever possible to pre-populate some of the fields. |
| ID | Diskover will automatically assign an ID number to a task. This field is non-editable. |
| Name | Assing a custom name to your task. Note that this name is not related to any configuration in the DiskoverAdmin panel. |
| Description | You can enter a detailed description for this task. |
| Crawl Directory(s) | Specify top path where to start the crawl, for example: /mnt/snfs2 or /home |
| Alt Scanner | Enter the name of an alternate scanner if applicable for this task, for example: scandir_s3, scandir_azure, scandir_offline_media. You can configure your alternate scanners via the DiskoverAdmin panel.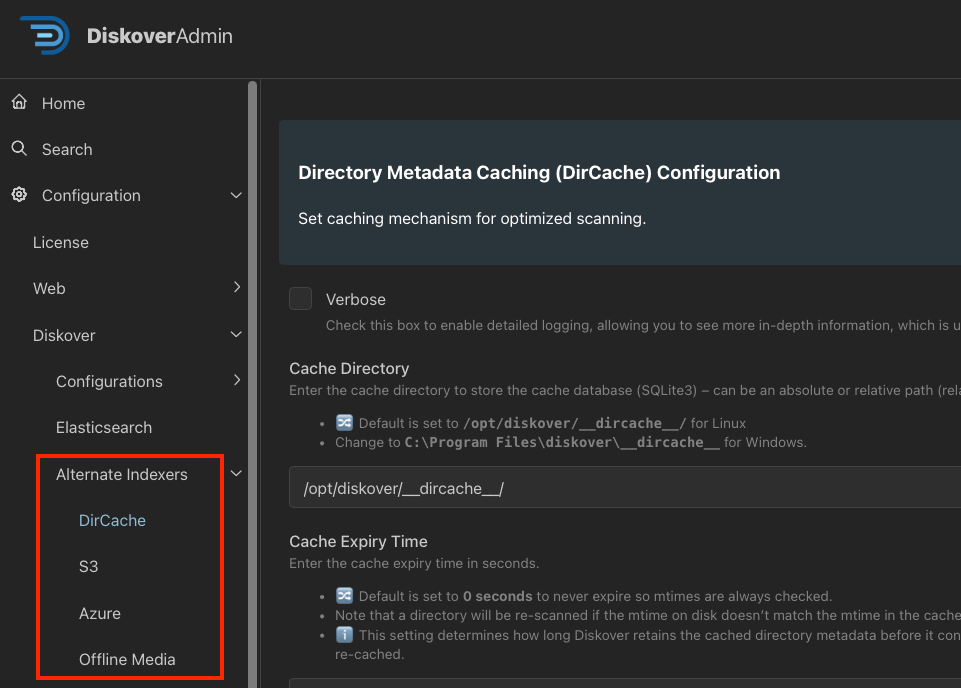 Use DirCache: Check this box to optimize future scanning, make sure to configure DirCache accordingly in the DiskoverAdmin panel. Note that this box is just a shortcut as entering scandir_dircache in the field above will yield the same result. |
| CLI Options/Flags | Allows users to fine-tune tasks directly through additional parameters, providing more control over how the indexing runs. Follow the help instructions in the interface. |
| Auto Index Name | Check this box for Diskover to assign a name to your index using the format diskover-toppath-datetime |
| Custom Index Name | Assign a custom name to your index and read the help text in the interface for guidance. Note that this name has no correlation with the scanner's name in the DiskoverAdmin panel. |
| Overwrite Existing | Checking that box will delete any existing index with the same name and create a new index. |
| Add to Index | To add paths to an existing index. Requires a custom index name for this to work. |
| Use Default Config | This field correlates with the configured scanners in the DiskoverAdmin Panel. Check this box if you only have one scanner for which the name was left at Default. |
| Alternate Config Name | Enter a custom scanner name/config that you created in the DiskoverAdmin panel. |
| Schedule | Using the drop-down lists, schedule the frequency at which you want this task to run OR use the Custom Schedule field. |
| Custom Schedule | Any entry in this field will overide values in the Schedule fields. This field is for expert users who want to use a chron schedule. |
| Environment Vars | Provide a flexible way to configure tasks and their behavior at runtime. They allow users to manage dynamic settings like paths, credentials, and system configurations without needing to modify the other settings. |
| Pre-Crawl Command | It specifies a command/action to run before the crawling task starts, for example, zip files, cleanup, etc. Refer to the help in the interface. |
| Pre-Crawl Command Args | This field is used to specify arguments/parameters that are passed to the pre-crawl command. It provides additional information that the command may need to execute properly. |
| Post-Crawl Command | It specifies a command/action to run after the crawl, for example, unzip, etc. Refer to the help in the interface. |
| Post-Crawl Command Args | This field is used to specify arguments/parameters that are passed to the post-crawl command. It provides additional information that the command may need to execute properly. |
| Retries | Enter the number of times to retry running the task if the task fails to complete successfully. |
| Retry Delay (sec) | Enter the delay, in seconds, in between retries. |
| Timeout (sec) | Enter the amount of time, in seconds, after which to stop a task running long. Note that this field is different than [Time Limit for Long-Running Tasks in DiskoverD in the DiskoverAdmin panel]. |
| Assigned Worker | Select the appropriate DiskoverD config for this task.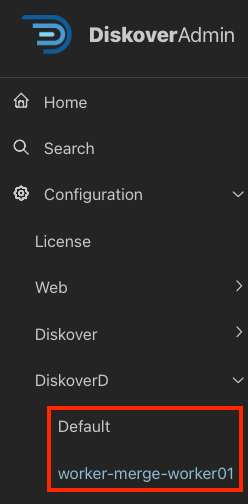 |
| Enter an email address for the notifications. This will override the email that you might have input in DiskoverAdmin → DiskoverD config. | |
| Disabled | Check this box to disable this task without deleting it. |
| Make Template | If you wish to reuse the settings from this task, check this box to create a template that will be saved under the Templates tab. |
| Template Name | Enter the custom template name you want to give to this group of settings. |
Validate Task Worker Presence
🔴 To ensure the presence of at least one online task worker, select Workers tab at the top, and then use the Status column to validate.
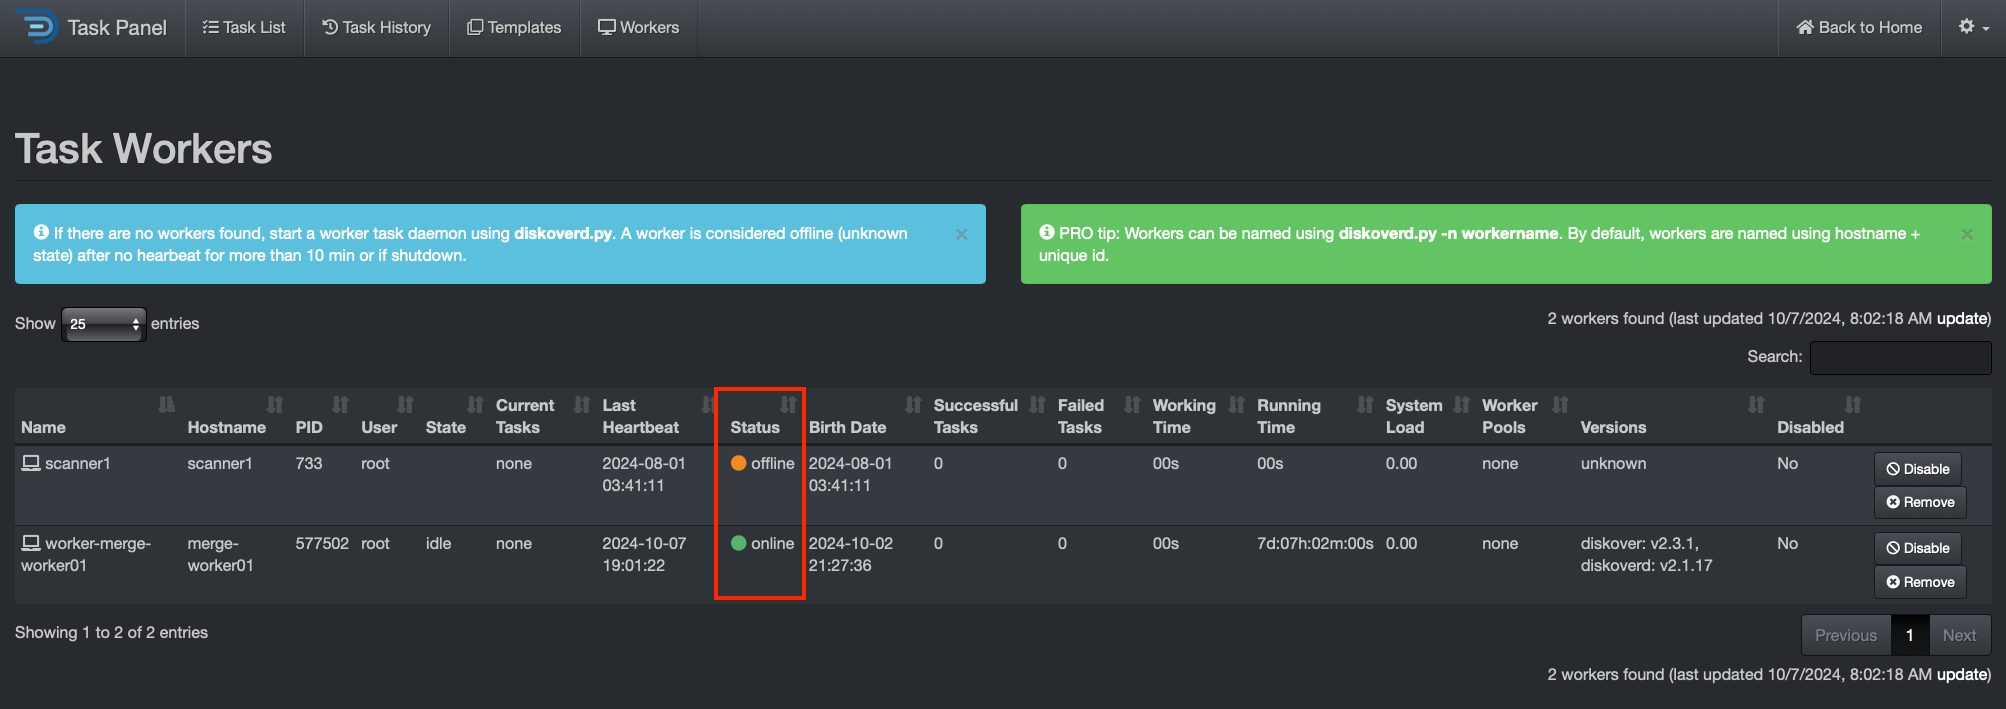
Create an Indexing Task
This is your last step to start your first index! Keep in mind that some configurations may still require customization, even if we haven’t reached those steps yet.
The configuration for indexing tasks varies between Posix File Systems and S3-based object storage.
The following sections will guide you through setting up basic indexing tasks for each.
🔴 From the Task Panel go to → Task List tab → select New Index Task:
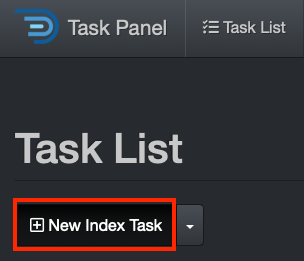
Posix File System Indexing Task
🔴 Name: volumename, for this example, snfs2
🔴 Crawl Directory(s): /mnt/volumedir where volumedir is the volume mount point, for this example, /mnt/snfs2
⚠️ Please note:
- The paths are case-sensitive and must exist on the indexing task worker host.
- For Windows task workers, set the crawl directory to, for example, H:\Somefolder or C:\ using double backslashes to escape, or for UNC paths use \\UNC\share
🔴 Auto Index Name: Make sure the box is unchecked.
🔴 Custom Index Name: For this example, diskover-snfs2-%Y%m%d%H
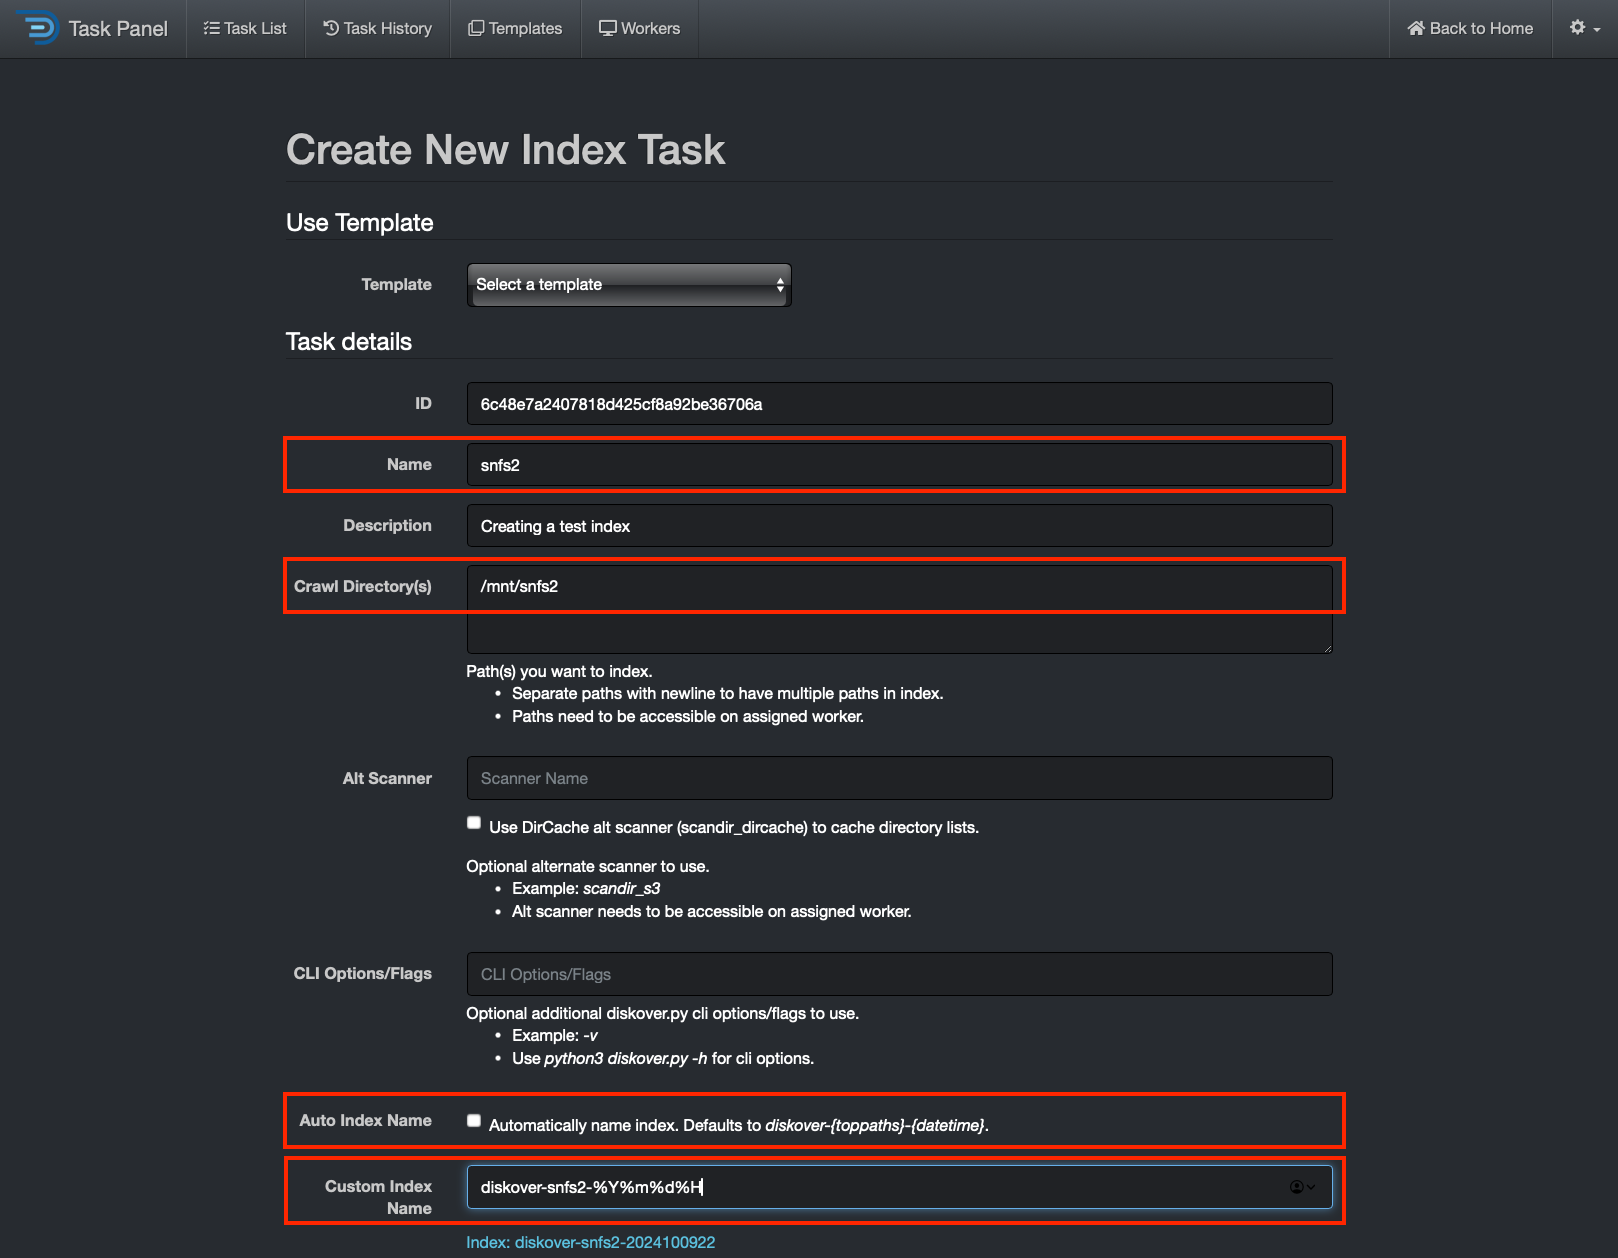
🔴 Schedule: A schedule is required to create the indexing task. The example below → Hour → 1 will run the indexing task every day at 1:00 am.
🔴 Custom Schedule: To use a custom schedule to set the volume to index every hour from 7 am to 11pm, for example, enter the following 0 7-23 * * *. Note that any entries in this field will override values entered in Schedule.
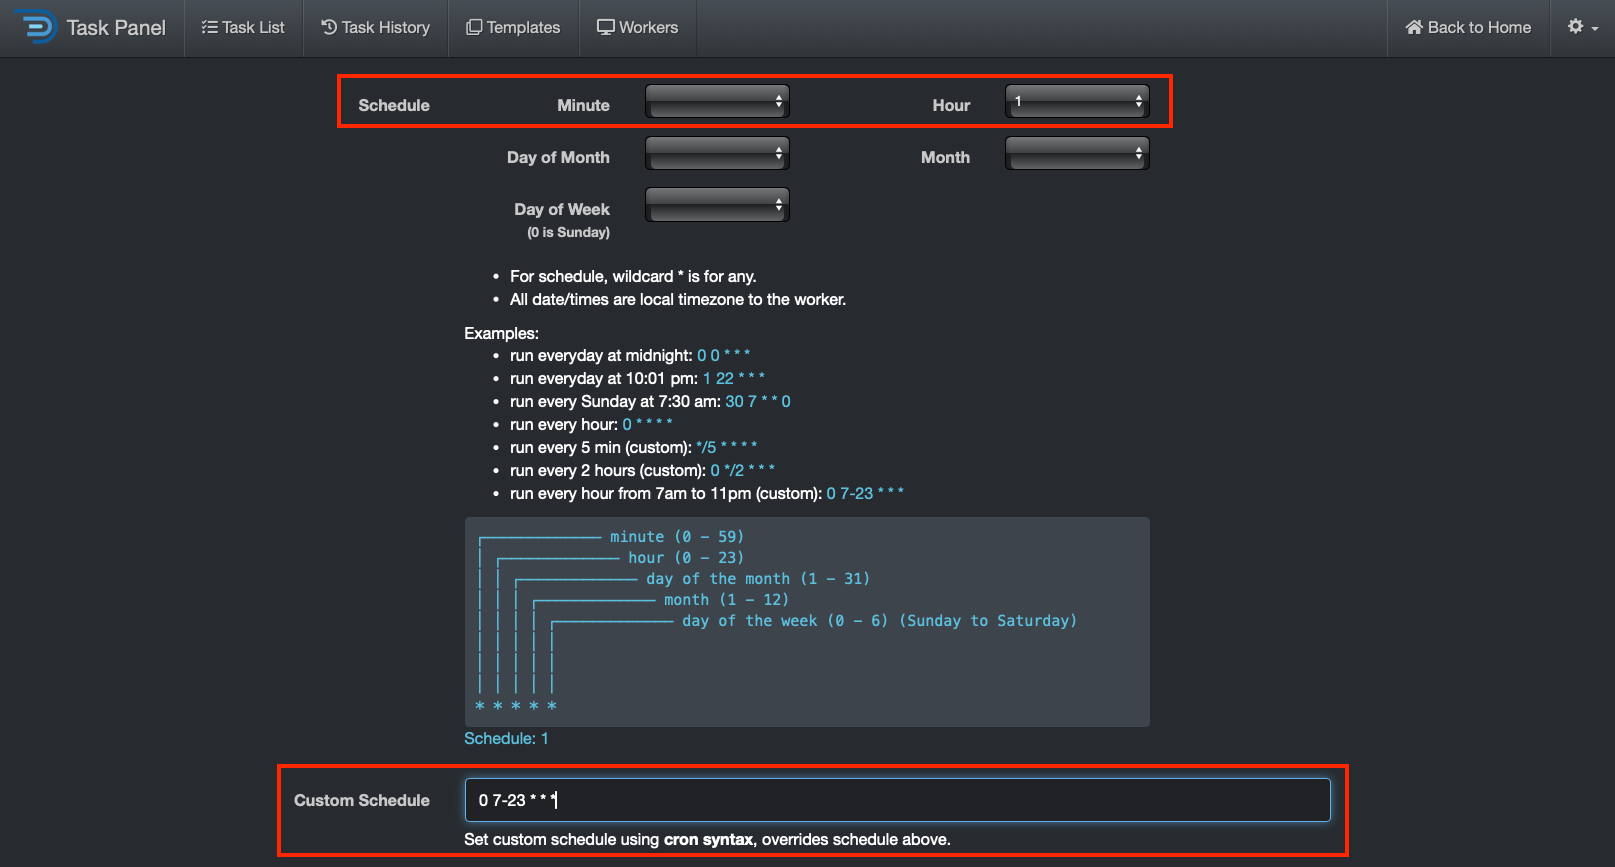
🔴 Then select Create Task at the bottom of the page:
S3 Bucket Indexing Task
Indexing tasks for S3 buckets are slightly different than Posix File systems, the following outlines the configuration differences required when creating a new index task. Configure the following differences for indexing S3 buckets.
🔴 Crawl Directory(s): s3://bucketname where bucketname is the actual name of the S3 bucket desired for indexing, in this example, the bucket name is dps-offload:
🔴 Alt Scanner: Select scandir_s3:
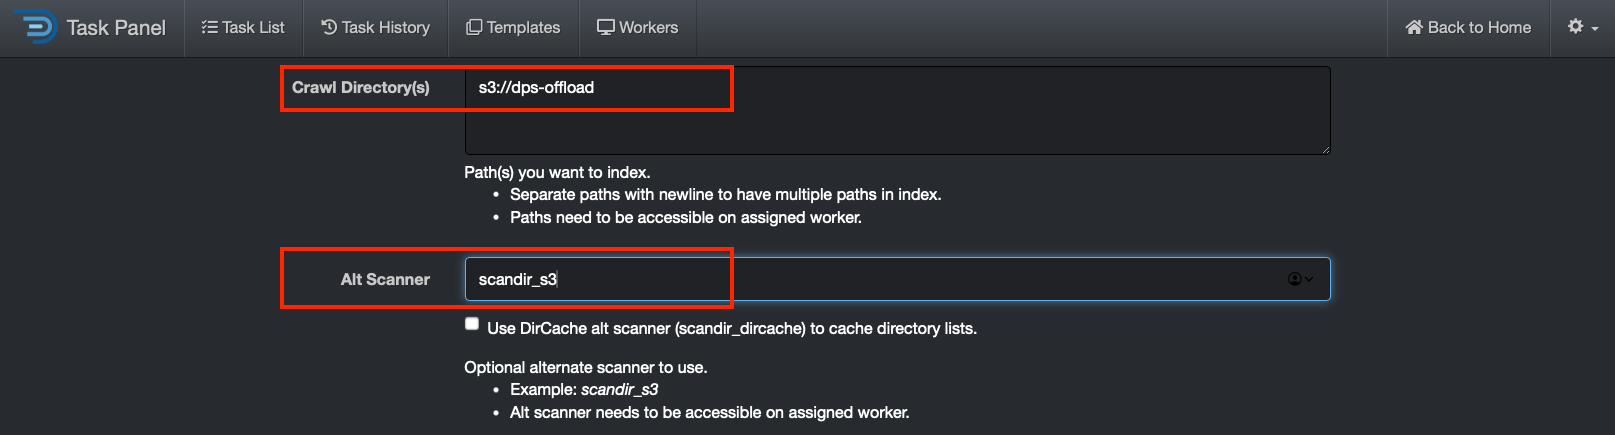
Non-AWS S3 Bucket Indexing Task
Indexing tasks for non-AWS S3 buckets is slightly different than the previous section. The following outlines the configuration differences required for alternate credentials and endpoints.
🔴 Environment Vars: In addition, you need to configure that field for non-AWS S3 buckets:
-
Where profile is the name of desired_profile, as found in /root/.aws/credentials (where desired_profile in this example is wasabi-us)
-
Where alternate_endpoint.com is the URL of the S3 bucket - where alternate_endpoint.com in this example is
https://s3.us-central-1.wasabisys.com)
AWS_PROFILE=profile,S3_ENDPOINT_URL=https://alternate_endpoint.com

Create a Custom Task
🔴 From the Task Panel go to → Task List tab → select New Custom Task:
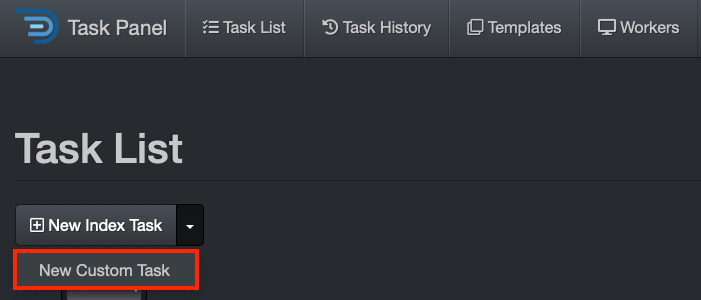
🚧 We're hard at work preparing these instructions. Meanwhile, click here to open a support ticket, and we'll gladly assist you with this step of your deployment.
Existing Tasks Management
Once a task is created, you can further manage it from the Task List view.
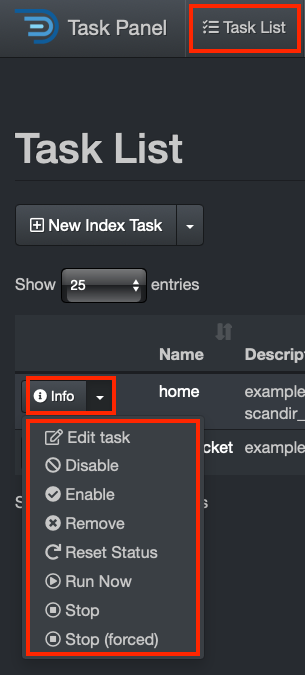
Environment Backup
DO NOT SKIP THIS STEP! It is crucial to keep a proper backup of your environment to quickly get back up and running in case of a system failure.
Backup for Community Edition
This section will outline the process of creating a backup for Diskover Community Edition.
🚧 We're hard at work preparing these instructions. Meanwhile, click here to open a support ticket, and we'll gladly assist you with this step of your deployment.
Backup for Subscriptions
This section will outline the process of creating a backup for the Diskover annual subscriptions.
🚧 We're hard at work preparing these instructions. Meanwhile, click here to open a support ticket, and we'll gladly assist you with this step of your deployment.
🔎 Features Finder and Configuration
This section lists the main configurable Diskover features alphabetically, whether they're located in the DiskoverAdmin panel or require manual configuration, along with where to find them. Some features are listed multiple times under different names to make them easier to locate.
Additionally, if you are using the DiskoverAdmin panel, you can select Search in the menu on the left and type a simple word to find where a feature is located in the DiskoverAdmin menu.
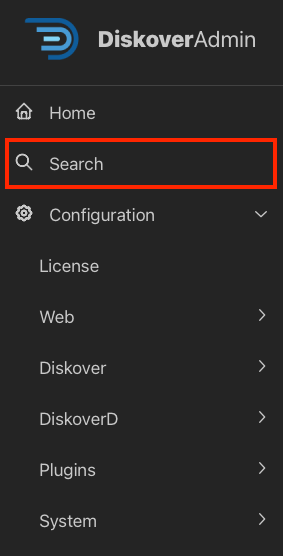
| FEATURE | CONFIGURE IN USER INTERFACE DiskoverAdmin → Configuration |
MANUAL CONFIGURATION |
|---|---|---|
| Alternate Scanners | Diskover → Alternate Scanners | |
| Amazon MQ | System → Message Queue | |
| Analytics Filters | Web → Analytics Filters | |
| API | System → API | |
| Arrival Time Plugin | Plugins → Index → First Index Time | |
| Atempo Miria alt scanner | Atempo Alternate Scanner | |
| Authentication Native Diskover-Web | Web → General | |
| Authentication LDAP | Web → LDAP | |
| Authentication OAuth | Web → OAUTH | |
| AutoClean | Plugins → Post Index → AutoClean | |
| AutoTag at index time | Diskover → Configurations → Default | |
| AutoTag Plugin post-index | Plugins → Post Index → AutoTag | |
| Azure alt scanner | Diskover → Alternate Scanners → Azure | |
| Azure AD Authentication | Web → OAUTH | |
| BAM Info Plugin | Plugins → Post Index → BAM | |
| Breadcrumb Plugin | Plugins → Post Index → Breadcrumb | |
| Checksums at index time | Plugins → Index → Checksums | |
| Checksums post-index | Plugins → Post Index → Checksums | |
| Chesksums S3 post-index | Plugins → Post Index → Checksums S3 | |
| CineViewer Player Plugin | CineViewer Player File Action Plugin by CineSys | |
| Collapsible Top Path | Web → Top Path Display | |
| Cost at time of index | Diskover → Configurations → Default | |
| Cost Plugin post-index | Plugins → Post Index → Costs | |
| Daemon for indexers | DiskoverD → Default | |
| Dell PowerScale alt scanner | Dell PowerScale Alternate Scanner | |
| DirCache alt scanner | Diskover → Alternate Scanners → DirCache | |
| Diskover indexers | Diskover → Configurations → Default | |
| DiskoverD daemons | DiskoverD → Default | |
| Diskover-Web | Web → General | |
| Dropbox alt scanner | Dropbox Alternate Scanner | |
| Dupes Finder Plugin | Plugins → Post Index → Dupes Finder | |
| EDL Check Plugin | Plugins → File Actions → In Development → EDL Check | |
| EDL Download Plugin | Plugins → File Actions → In Development → EDL Download | |
| Elasticsearch for Diskover-Web | Web → Elasticsearch | |
| Elasticsearch for Indexers | Diskover → Elasticsearch | |
| Elasticsearch Field Copier | Plugins → Post Index → ES Field Copier | |
| Elasticsearch Query Report | Plugins → Post Index → ES Query Report | |
| Enable Index Plugins | Diskover → Configurations → Default | |
| Export Plugin | Plugins → File Actions → In Development → Export | |
| Extra Fields | Web → General | |
| File Kind Plugin | Plugins → Index → File Kind | |
| File Types | Web → File Types | |
| Find File Sequences Plugin | Find File Sequences File Action Plugin | |
| First Index Time Plugin | Plugins → Index → First Index Time | |
| Fix Permissions Plugin | Plugins → File Actions → In Development → Fix Permissions | |
| Flow Production Tracking Plugin formerly ShotGrid | Flow Production Tracking Plugin | |
| FTP alt scanner | FTP Alternate Scanner | |
| GLIM Plugin | Telestream GLIM File Action Plugin | |
| Grafana Plugin | Plugins → Index → Grafana | |
| Grafana Cloud Plugin | Plugins → Index → Grafana Cloud | |
| Grant Plugin Plugin | Research Grant File Action Plugin | |
| Hash Differential Checksums Plugin | Hash Differential Checksums File Action Plugin | |
| Illegal Filename Plugin | Plugins → Post Index → Illegal Filename | |
| Image Info Plugin | Plugins → Index → Image Info | |
| IMF Change Report Plugin | Plugins → File Actions → IMF Change Report | |
| IMF Package Validator Plugin | IMF Package Validator File Action Plugin by Oxagile | |
| Index Access Control | Web → Index Access | |
| Index Differential Plugin | Plugins → Post Index → Index Diff | |
| Index Mapping | Web → Index Access | |
| Indexers | Diskover → Configurations → Default | |
| JSON/CSV text alt scanner | JSON/CSV Generic Text Alternate Scanner | |
| LDAP | Web → LDAP | |
| License | License | |
| Live View Plugin | Plugins → File Actions → Live View | |
| Make Links Plugin | Plugins → File Actions → Make Links | |
| Media Info Plugin | Plugins → Index → Media Info | |
| Message Queue | System → Message Queue | |
| Ngenea Data Orchestrator Plugin | Ngenea Data Orchestrator/Mover File Action Plugin by PixitMedia | |
| OAuth | Web → OAUTH | |
| Offline Media alt scanner | Diskover → Alternate Scanners → Offline Media | |
| Okta | Web → OAUTH | |
| OneDrive/SharePoint alt scanner | Microsoft OneDrive and SharePoint Alternate Scanner | |
| Path Tokens Plugin | Plugins → Index → Path Tokens | |
| Path Translation | Web → Path Translations | |
| PDF Info Plugin | Plugins → Index → PDF Info ... coming soon! | |
| PDF Viewer Plugin | Plugins → File Actions → PDF | |
| RabbitMQ | System → Message Queue | |
| Rclone Plugin | Plugins → File Actions → Rclone | |
| S3 AWS and non-AWS alt scanner | Diskover → Alternate Scanners → S3 | |
| ShotGrid now Flow Production Tracking Plugin | Flow Production Tracking Plugin | |
| SMTP | System → SMTP | |
| Spectra Logic RioBroker/BlackPearl alt scanner | Spectra Logic RioBroker/BlackPearl | |
| Spectra Plugin | Plugins → File Actions → In Development → Spectra | |
| Tag Copier at time of index | Plugins → Index → Tag Copier | |
| Tag Copier post-index | Plugins → Post Index → Tag Copier | |
| Tags Customization for manual tags | Web → Custom Tags | |
| Task Notifications | DiskoverD → Default | |
| Time Zone for files and directories | Web → General | |
| Time Zone for indexers | DiskoverD → Default | |
| Time Zone for indices | Web → General | |
| Top Paths | Web → Top Path Display | |
| Unix Permissions Plugin | Plugins → Index → Unix Perms | |
| Vantage Plugin | Plugins → File Actions → Vantage | |
| Vcinity High-Speed Data Transfer Plugin | Vcinity High-Speed Data Transfer File Action Plugin | |
| Windows Attributes Plugin | Plugins → Post Index → Windows Attributes | |
| Windows Owner Plugin | Plugins → Index → Windows Owner | |
| Wizard for initial config | System → Meta → Wizard | |
| Xytech Asset Creation Plugin | Xytech Asset Creation Index Plugin | |
| Xytech Order Status Plugin | Xytech Order Status Index Plugin |
DiskoverAdmin Configuration | Main Components
Overview
Most help information is available directly in the user interface. This section offers additional guidance when applicable to support you during the configuration process of the main components. IMPORTANT!
- Although specified throughout DiskoverAdmin, for best practices, always assume that the fields are case-sensitive.
- For more information about Python re.search whenever mentioned in the help text in DiskoverAdmin.
Diskover-Web
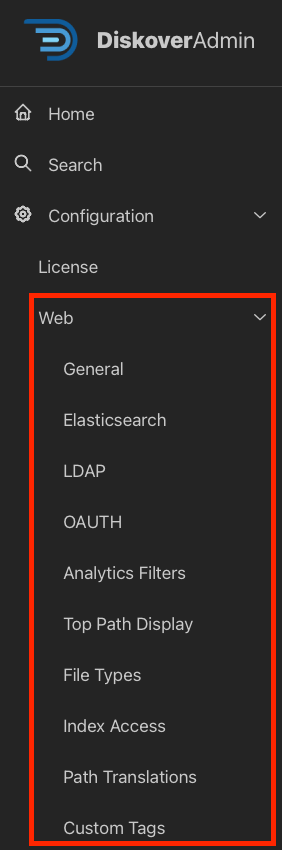
Authentication Options
Diskover currently offers the following options for authentication - all help text can be found directly in the user interface:
| AUTHENTICATION OPTION | WHERE TO CONFIGURE |
|---|---|
| Native Diskover-Web Authentication | DiskoverAdmin → Configuration → Web → General |
| LDAP Authentication | DiskoverAdmin → Configuration → Web → LDAP |
| OAuth2 Authentication (Okta or Azure) | DiskoverAdmin → Configuration → Web → OAUTH |
Restrict Access Control
DiskoverAdmin → Configuration → Web → Index Access
Diskover offers optional settings allowing you to control access and visibility by mapping groups and users to specific indices. All help text can be found directly in the user interface.
Top Paths
DiskoverAdmin → Configuration → Web → Top Path Display
By default, users will see a list of all volumes scanned by Diskover in the left pane of the user interface. You can, however, create Top Paths to organize your volumes (by location, project, etc.). In this example, note that the first collapsible option will always be All Top Paths and will list all your repositories.
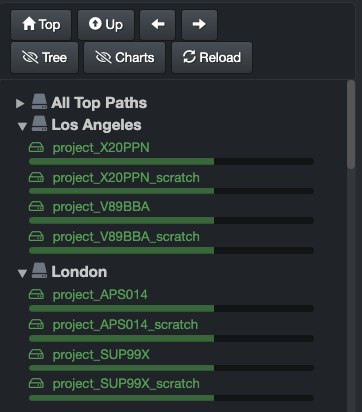
Path Translations
DiskoverAdmin → Configuration → Web → Path Translations
Path Translation | Example 1
Here is an example of path translations. If you set the following path translation sets in DiskoverAdmin:
![]()
![]()
This is what users will see in their ⛭ → Settings and be able to select:
![]()
Path Translation | Example 2
Let's say that this is the choice offered to a user in their ⛭ → Settings:
![]()
And that this is the path structure they see in their results, then if they copy to the 📋 clipboard:
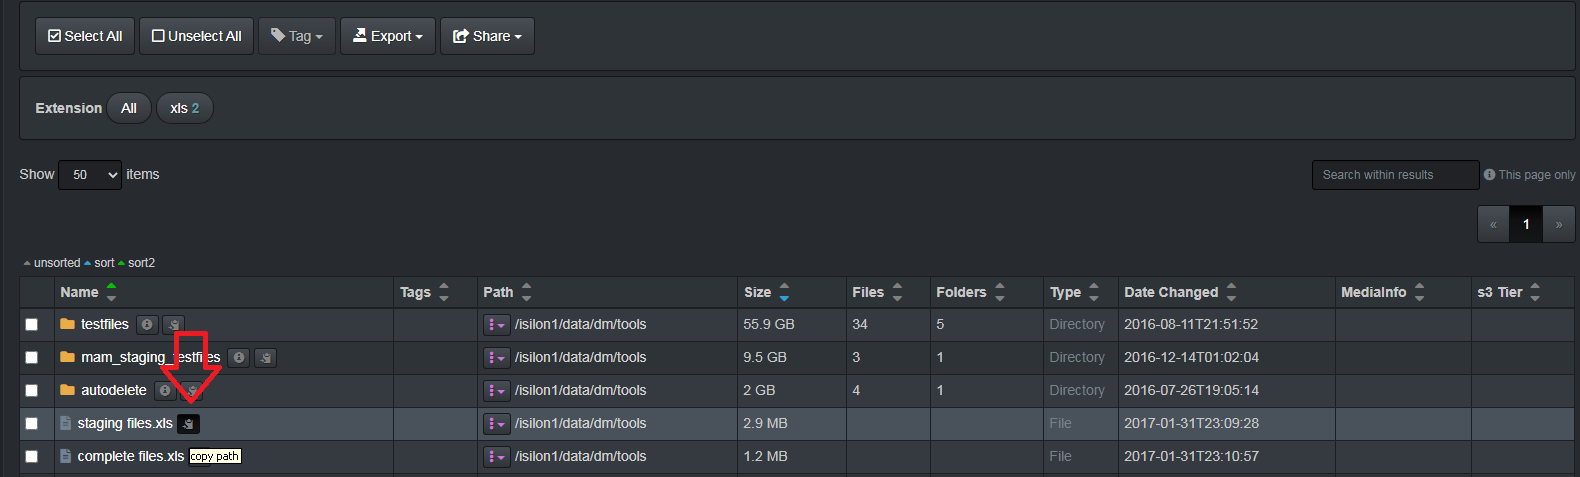
This is the resulting path that would be copied:

Diskover Scanners/Workers & Elasticsearch
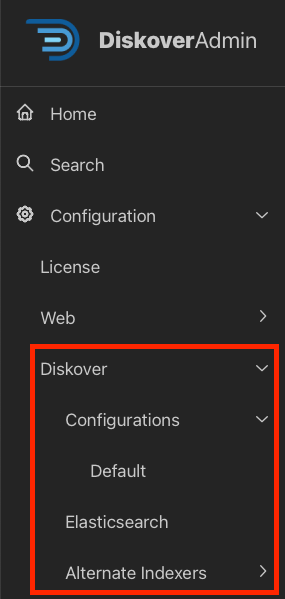
AutoTags
Given the importance of tagging in data management, we dedicated an entire chapter to tags.
Costs
Besides the help text in DiskoverAdmin, you can find more information here regarding cost configuration as well as some use cases.
Diskover Alternate Scanners
Please click this link to follow the instructions to create alternate configurations.
All alternate scanners will eventually be in the DiskoverAdmin panel, meanwhile, please go to the Alternate Scanners Configuration section for the complete list of alternate scanners.
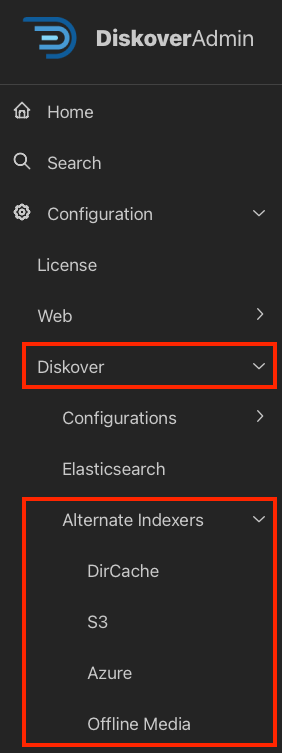
DiskoverD
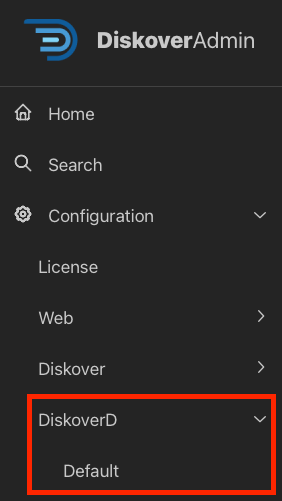
System
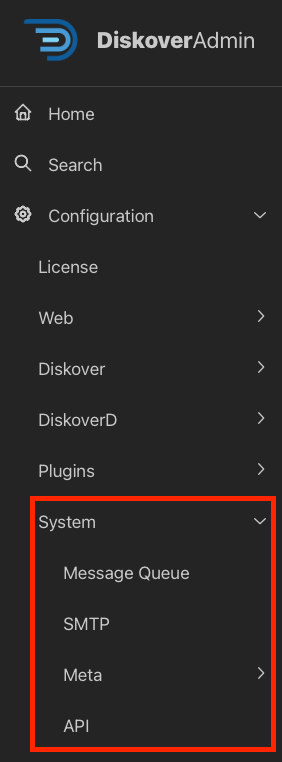
Alternate Scanners Configuration
Overview
Out of the box, Diskover efficiently scans generic filesystems. However, in today’s complex IT architectures, files are often stored across a variety of repositories. To address this, Diskover provides a robust foundation for building alternate scanners, enabling comprehensive scanning of any file storage location.
In addition, Diskover offers a wide range of metadata harvest plugins, enriching indexed data with valuable business context attributes and supporting workflows that enable targeted data organization, retrieval, analysis, and enhanced workflow. These plugins can run at indexing or post-indexing intervals, balancing comprehensive metadata capture with high-speed scanning.
⚠️ IMPORTANT! After configuring an alternate scanner, you must create and schedule a task in the Task Panel to ensure it runs properly.
| Configurable via DiskoverAdmin | Manually Configurable |
|---|---|
|
|
Quick Access List
The plugins in this chapter are listed alphabetically. Here is a quick access list by edition:
| EDITION | PLUGIN |
|---|---|
| Core Editions |
Atempo Miria
| HELP | RESOURCE |
|---|---|
| Install/Config | Via a terminal 🛟 Open a support ticket to request assistance with installing this alternate scanner |
| Learn more | Visit our website and/or contact Diskover |
| Purpose | Organizations often preserve their assets/intellectual properties within tape-based archive systems like the Atempo Miria platform. The Diskover Atempo Scanner is designed to scan all the files within the Atempo Miria archive system and presents them as a volume within the Diskover user interface. Additional attributes are added as properties to the file during the indexing process, such as tape number, media type, etc. Therefore, the files and their rich attributes become searchable and reportable, as well as engaged in automated workflows. |
Azure Blob
| HELP | RESOURCE |
|---|---|
| Enable/Config | Via the DiskoverAdmin panel 🛟 Open a support ticket to request assistance with installing this alternate scanner |
| Learn more | Visit our website and/or contact Diskover |
| Purpose | While you can cost-effectively store and access unstructured data at scale with Microsoft Azure blob storage, searching through multiple accounts or blob containers is not possible from the Azure interface. The Storage Explorer portal doesn't allow users to search all folders at once, plus you need to know the exact file name you are looking for as wild cards are not permitted either. Diskover offers the Azure blob storage scanner allowing you to scan petabytes of data at blazing speed. In turn, you can easily find any file with a single query, whether that file is located in an Azure blob or any other volumes indexed with Diskover. Note that attributes are collected during this process. These extra fields become searchable, reportable for analysis, and actionable, allowing for potential upstream file management, manually or via automated scheduled tasks. |
Dell PowerScale
| HELP | RESOURCE |
|---|---|
| Install/Config | Via a terminal 🛟 Open a support ticket to request assistance with installing this alternate scanner |
| Learn more | Visit our website and/or contact Diskover |
| Purpose | The ability to efficiently collect, store, and analyze data is crucial for making informed decisions and gaining a competitive edge. Dell Technologies recognizes the importance of data management and provides the infrastructure needed to support data-intensive workloads. The lightweight ps_scan architecture harvests the multiple PowerScale attributes harvested during scanning. Users have the option to only index the attributes that are relevant to their business. All these attributes become searchable, reportable, actionable, and can be engaged in automated workflows allowing for very precise data management and curation. |
DirCache Alternate Scanner
| HELP | RESOURCE |
|---|---|
| Enable/Config | Via the DiskoverAdmin panel 🛟 Open a support ticket to request assistance with installing this alternate scanner |
| Learn more | Visit our website and/or contact Diskover |
| Purpose | The DirCache alternate scanner can be used to speed up subsequent crawls when scanning slower network-mounted storage. DirCache uses an SQLite database to store a local cache of directories' mtimes (modified times), directories' file lists, and file stat attributes. On subsequent crawls, when a directory mtime is the same as in the cache, the directory list and all file stat attributes can be retrieved from the cache rather than over the network mount. |
Dropbox
| HELP | RESOURCE |
|---|---|
| Install/Config | Via a terminal 🛟 Open a support ticket to request assistance with installing this alternate scanner |
| Learn more | Visit our website and/or contact Diskover |
| Purpose | The Dropbox Scanner is a powerful utility designed to integrate with Dropbox accounts for comprehensive file metadata retrieval and management. By leveraging Dropbox's API, this scanner connects securely to your Dropbox account, navigates through your files and folders, and collects detailed information such as file sizes, creation and modification dates, and sharing permissions. This tool enhances your ability to monitor and organize your Dropbox content, providing valuable insights into your data usage and structure. Perfect for businesses of any size, the Dropbox Scanner ensures efficient file management, improved data organization, and seamless data accessibility. |
FTP
| HELP | RESOURCE |
|---|---|
| Install/Config | Via a terminal 🛟 Open a support ticket to request assistance with installing this alternate scanner |
| Learn more | Visit our website and/or contact Diskover |
| Purpose | The FTP Site Scanner is a robust tool designed to streamline the process of collecting and analyzing file statistics from FTP sites. It efficiently connects to any FTP server, navigates through the directory structure, and retrieves critical file metadata such as size, creation date, modification date, and permissions. By aggregating this data, the scanner provides comprehensive insights into the filesystem's organization and usage patterns. This tool is ideal for administrators and developers looking to maintain optimal FTP site performance, ensure data integrity, and facilitate audits or compliance checks. |
Generic JSON/CSV Text
| HELP | RESOURCE |
|---|---|
| Install/Config | Via a terminal 🛟 Open a support ticket to request assistance with installing this alternate scanner |
| Learn more | Visit our website and/or contact Diskover |
| Purpose | The JSON/CSV Text Scanner is a powerful tool designed for efficient data processing and metadata collection. This versatile scanner seamlessly handles JSON and CSV files, extracting essential metadata such as file structure, field names, data types, and record counts. Whether you’re managing large datasets or integrating diverse data sources, this scanner simplifies your workflow, providing comprehensive insights and enhancing data transparency. With its robust performance, the JSON/CSV Text Scanner is a go-to solution for streamlined data management and analysis. |
Offline Media
| HELP | RESOURCE |
|---|---|
| Enable/Config | Via the DiskoverAdmin panel 🛟 Open a support ticket to request assistance with installing this alternate scanner |
| Learn more | Visit our website and/or contact Diskover |
| Purpose | The Offline Media Scanner offers a simple solution to scan all your offline data devices. During the scanning process, Diskover automatically creates a new OFFLINE MEDIA volume listing all scanned offline devices as a directory. The index of your offline media stays persistent once the drive is disconnected and put back on the shelf. If your search results point to an offline media, use the reference name or number you attributed to the offline media to locate the device. Then, just reconnect it to retrieve the desired files. There are several Diskover features you can use with those static indices like tags, export, share, and investigate using our multiple analytical tools. Then, if you decide to fully rehydrate that data, more cool things are available like actions via plugins and scheduled workflow automation. |
OneDrive and SharePoint
| HELP | RESOURCE |
|---|---|
| Install/Config | Via a terminal 🛟 Open a support ticket to request assistance with installing this alternate scanner |
| Learn more | Visit our website and/or contact Diskover |
| Purpose | This powerful alternate scanner allows you to seamlessly integrate and manage data from your OneDrive and SharePoint environments, extracting critical metadata and ensuring comprehensive data visibility. With Diskover's flexible and user-friendly scanning options, you can customize your data extraction process to suit your organization's needs. Enhance your data management strategy with Diskover's OneDrive Alternate Scanner, providing unparalleled insights and efficiency for your Microsoft cloud storage solutions. |
S3 | AWS or Non-AWS Endpoints
| HELP | RESOURCE |
|---|---|
| Enable/Config | Via the DiskoverAdmin panel 🛟 Open a support ticket to request assistance with installing this alternate scanner |
| Learn more | Visit our website and/or contact Diskover |
| Purpose | Unlock the full potential of your cloud storage with Diskover's advanced scanning capabilities for S3 buckets and S3-compatible storage with endpoints different than AWS. Seamlessly integrate and manage data across various cloud environments, ensuring comprehensive metadata extraction and efficient data organization. Diskover's robust scanning solution supports diverse storage configurations, providing unparalleled flexibility and control over your data assets. Enhance your cloud storage strategy with Diskover Data's powerful indexing tools, designed to optimize your data visibility and streamline your workflows across multiple platforms. |
Spectra Logic RioBroker/BlackPearl
| HELP | RESOURCE |
|---|---|
| Install/Config | Via a terminal 🛟 Open a support ticket to request assistance with installing this alternate scanner |
| Learn more | Visit our website and/or contact Diskover |
| Purpose | The Spectra RioBroker API Scanner is an advanced solution for seamlessly integrating with BlackPearl systems to retrieve and manage files' metadata. Utilizing the powerful Spectra RioBroker API, this scanner efficiently connects to BlackPearl storage environments, navigating through vast amounts of data to extract detailed file information, including size, timestamps, and lifecycle states. This tool enhances data management capabilities by providing real-time insights and facilitating the organization and retrieval of critical data. Ideal for enterprises that require robust and scalable storage solutions, the Spectra RioBroker API Scanner ensures optimal performance, data integrity, and streamlined workflows. |
Develop Your Own Alternate Scanner
| HELP | RESOURCE |
|---|---|
| Learn more | 🚧 Docs under review |
| Purpose | Empower your data management with Diskover Data's flexible framework, allowing end users to write their own alternate scanners. Tailor your data extraction process to fit unique requirements by developing custom scanners that integrate seamlessly with Diskover Data. Whether you need to handle specialized file formats or implement proprietary metadata collection methods, this capability puts you in control. Leverage Diskover's robust API and comprehensive documentation to create efficient, reliable scanners that enhance your data insights and streamline your workflows. Embrace the power of customization with Diskover's end-user scanner development feature. |
Plugins Configuration
Overview
Whether indexing extra metadata, automating workflows, or customizing actions on data for your own environment, Diskover’s flexible architecture empowers you to extend its functionality and unlock greater value from your digital assets. Diskover currently offers 3 categories of plugins:
- Plugins that run at time of index → Mostly metadata enrichment.
- Plugins that run as a post-index process → Metadata enrichment, data curation, and more.
- File Action plugins → Enable workflow automation by triggering actions on selected files.
⚠️ IMPORTANT! Once the plugin is configured, a task needs to be created and scheduled in the Task Panel.
| Plugins Configurable via DiskoverAdmin | Plugins Manually Configurable |
|---|---|
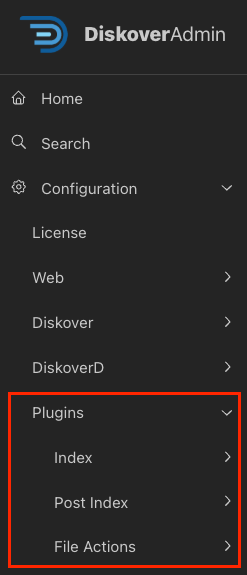 |
|
Quick Access List
The plugins are listed alphabetically.
Plugins
The plugins are listed alphabetically.
AutoClean/Orchestrate
| HELP | RESOURCE |
|---|---|
| Availability | |
| Enable/Config | Via the DiskoverAdmin panel |
| Learn More | Visit our website |
| Purpose | Designed to move, copy, delete, rename, or run custom commands on files and directories based on a set of highly configurable criteria. With the use of tags, the AutoClean plugin can be used to implement a RACI model or approval process for archive and deletion (approved_archive, approved_delete, etc.) tag application. The plugin criteria can then be set to meet the desired set of tags (times, etc.) to invoke action. |
| Need Pro Services? | Diskover offers professional services to assist with setting up data flows and workflows → contact us for details |
AutoTag
| HELP | RESOURCE |
|---|---|
| Availability | |
| Enable/Config | Via the DiskoverAdmin panel |
| Learn More | Visit our website |
| Purpose | Allows for automated tags to be applied/added to the Elasticsearch index as a post-index process. Tags can be applied automatically via a series of rules applied to directories or files. The criteria can be very powerful based on a combination of base and business-context metadata. |
BAM Info
| HELP | RESOURCE |
|---|---|
| Availability | |
| Enable/Config | Via a terminal 🛟 Open a support ticket to request assistance with installing this plugin |
| Learn More | Visit our website | Contact Diskover |
| User Guide | Diskover User Guide Companion for Life Science Solutions |
| Demo | 🍿 Watch Demo Video |
| Purpose | The BAM info plugin is designed to enable additional metadata collection for BAM (Binary Alignment Map) and SAM (Sequence Alignment Map) about a file without granting the Diskover user any read/write file system access. The BAM info plugin enables additional metadata for the SAM and BAM file formats to be harvested at time of index, and are therefore searchable, reportable, actionable, and can be engaged in workflows within Diskover. Learn more about the specification for the SAM file format. Learn more about how the BAM info plugin uses the Python pysam to harvest attributes about the BAM and SAM files. New indices will use the plugin, and any SAM or BAM file will get additional info added to the Elasticsearch index’s bam_info field. The attributes provide the ability to view storage and file system content from a workflow perspective, for example, all the frame rates on any given storage. |
Breadcrumb
| HELP | RESOURCE |
|---|---|
| Availability | |
| Enable/Config | Via the DiskoverAdmin panel |
| Learn More | Contact Diskover |
| Purpose | Designed to extract/add metadata from files’ breadcrumbs to the Elasticsearch index as a post-index process. |
Checksums | Index
| HELP | RESOURCE |
|---|---|
| Availability | |
| Enable/Config | Via the DiskoverAdmin panel |
| To learn more | Contact Diskover |
| Demo | 🍿 Watch a video showing one way hash values can be used |
| Purpose | Adds xxhash, md5, sha1, and sha256 hash values to files in Elasticsearch indices to use for checksums/data integrity. Hash values are like fingerprints; they are unique to each file. They are the results of a cryptographic algorithm, which is a mathematical equation with different complexities and security levels, used to scramble the plaintext and make it unreadable. They are used for data encryption, authentication, and digital signatures. |
Checksums | Post-Index
| HELP | RESOURCE |
|---|---|
| Availability | |
| Enable/Config | Via the DiskoverAdmin panel |
| Learn More | Contact Diskover |
| Purpose | Allows for hash values to be added for files and directories to the Elasticsearch index as a post-index process and can be used for multiple checksums/data integrity tasks. |
Checksums S3
| HELP | RESOURCE |
|---|---|
| Availability | |
| Enable/Config | Via the DiskoverAdmin panel |
| Learn More | Contact Diskover |
| Purpose | Adds md5 and sha1 hash values for files and directories to the Elasticsearch index as a post-index process, using AWS Lambda/Fixity when using the Diskover S3 alternate indexer. |
CineViewer Player by CineSys
| HELP | RESOURCE |
|---|---|
| Availability | |
| Enable/Config | Via a terminal 🛟 Open a support ticket to request assistance with installing this plugin |
| Learn More | Visit our website | Contact Diskover |
| User Guide | Diskover User Guide Companion for Media Solutions |
| Demo | 🍿 Watch Demo Video |
| Purpose | CineViewer is a video playback and management system designed for video and broadcast professionals. It is designed to securely view high-resolution media from a remote browser without giving users access to the source files, as well as play content that may not be supported by standard web browsers, including file formats such as ProRes and MXF. Additionally, Cineviewer allows users to play back image sequences in formats such as DPX and EXR. The player can be launched in one click from the user interface, allowing for seamless validation of media assets, therefore increasing productivity while safeguarding your production network. With its timecode-accurate playback and seeking capabilities, CineViewer enables users to navigate through content with precision. The system also supports up to 16 channels of audio, providing a variety of audio configuration options to accommodate different projects. Furthermore, Cineviewer includes closed captioning functionality, ensuring an accessible experience for all users. The following sections will guide you through the installation and configuration of CineViewer, helping you utilize this tool effectively for your video and broadcast needs. The CineViewer Player is developed by CineSys LLC. For more information, support, or to purchase the CineViewer Player, please contact CineSys.io.  |
Costs
| HELP | RESOURCE |
|---|---|
| Availability | |
| Enable/Config | Via the DiskoverAdmin panel |
| Learn More | Refer to our Analytics | Contact Diskover |
| Purpose | Adds costs per GB for files and directories to the Elasticsearch index as a post-index process. Note that this feature can also be configured to apply at time of index under DiskoverAdmin → Configuration → Diskover → Configurations |
Dupes/Duplicates Finder
| HELP | RESOURCE |
|---|---|
| Availability | |
| Enable/Config | Via the DiskoverAdmin panel |
| Learn More | Contact Diskover |
| Purpose | Designed to add hash values, check and report on duplicate files/directories across single or multiple indices as a post-index process. The plugin supports xxhash, md5, sha1, and sha256 checksums. The plugin is designed for multiple use cases:
The dupes-finder can also be used to add file hashes to all the files in the index, not just the duplicates found. 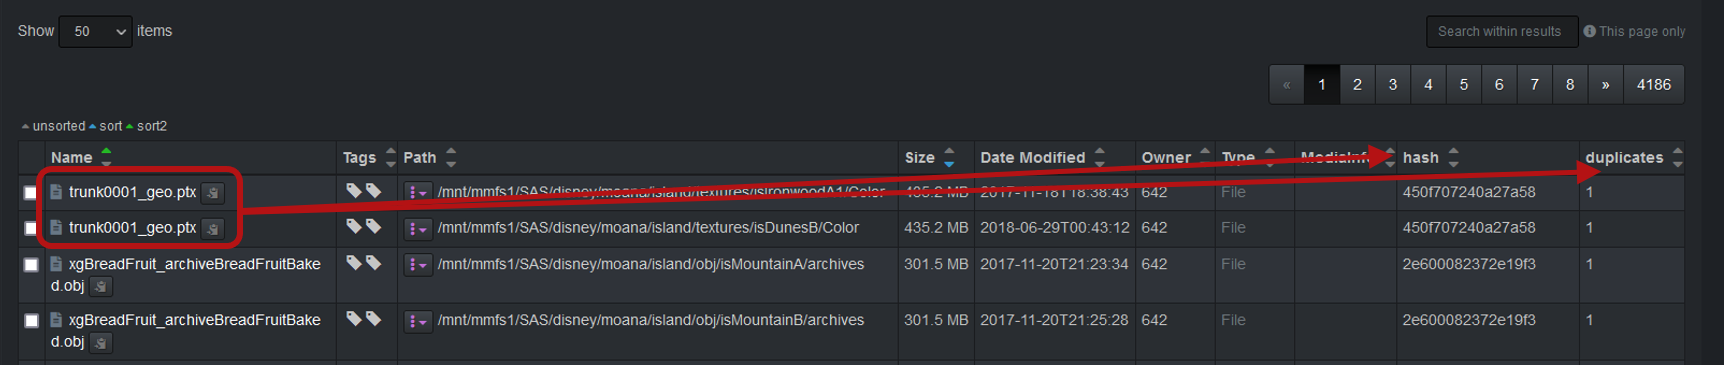 Click here for a full-screen view of this image. Click here for a full-screen view of this image. The duplicates plugin will store hash values that can be stored only for duplicates or for all files. 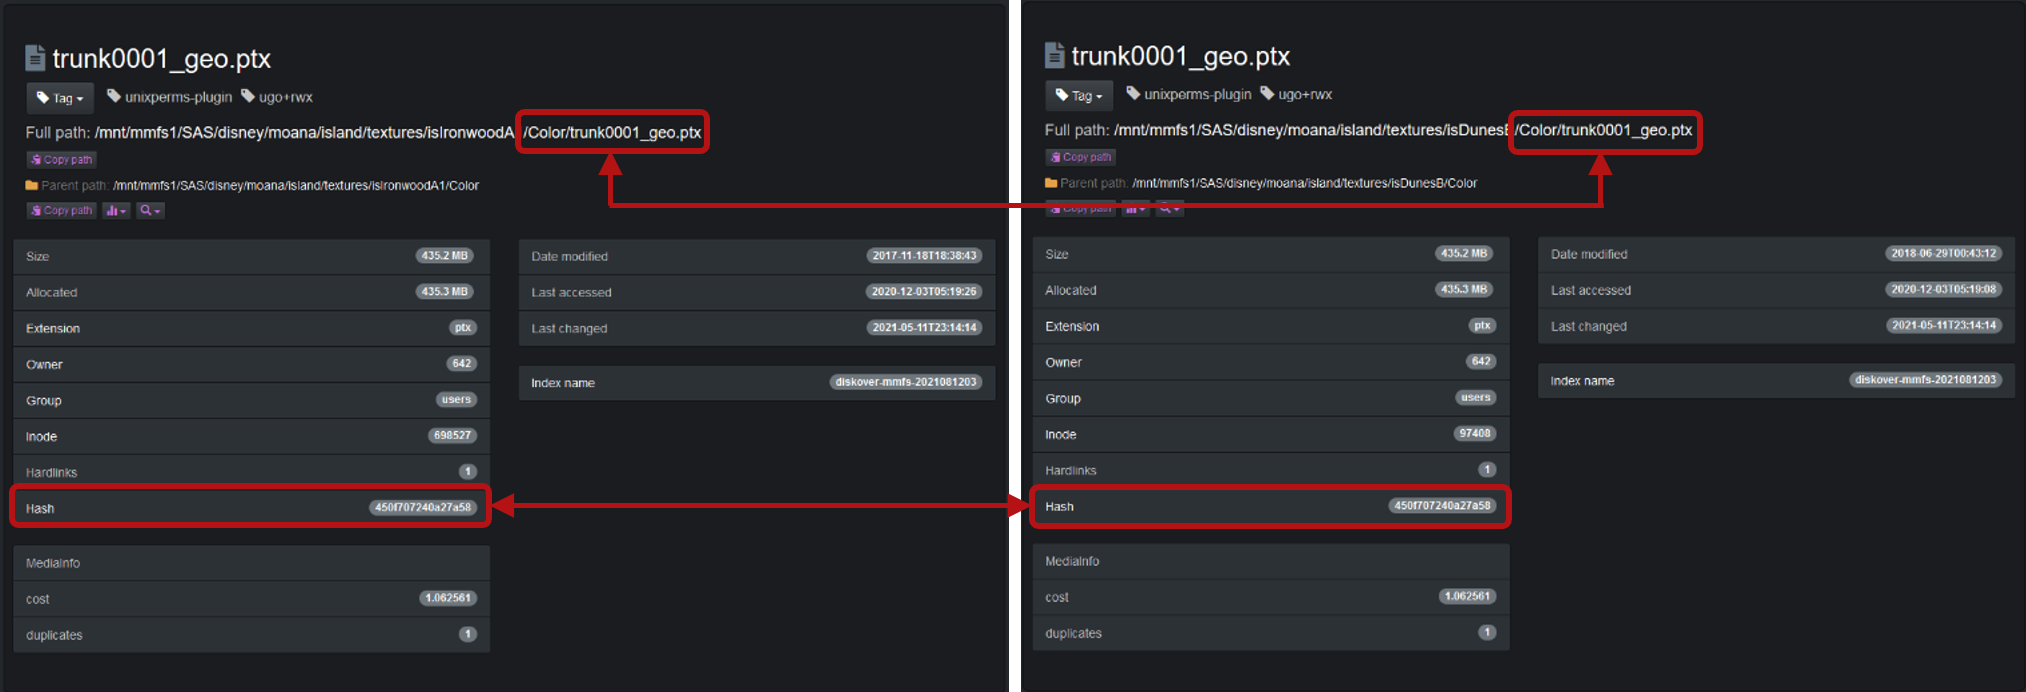 Click here for a full-screen view of this image. Click here for a full-screen view of this image. |
EDL Check
| HELP | RESOURCE |
|---|---|
| Availability | |
| Enable/Config | Via the DiskoverAdmin panel |
| Learn More | Visit our website | Contact Diskover |
| Purpose | Allows authorized users without read/write access to production storage to verify the validity of EDL (Edit Decision List) files. |
EDL Download
| HELP | RESOURCE |
|---|---|
| Availability | |
| Enable/Config | Via the DiskoverAdmin panel |
| Learn More | Visit our website | Contact Diskover |
| Purpose | Allows authorized users without read/write access to production storage to upload or download specific lists of pre-defined file types and sizes, eliminating the need for data management group involvement. |
ES Field Copier
| HELP | RESOURCE |
|---|---|
| Availability | |
| Enable/Config | Via the DiskoverAdmin panel |
| Learn More | Contact Diskover |
| Purpose | Migrates Elasticsearch field data from one index to another as a post-index process. |
ES Query Report
| HELP | RESOURCE |
|---|---|
| Availability | |
| Enable/Config | Via the DiskoverAdmin panel |
| Learn More | Contact Diskover |
| Purpose | The index Elasticsearch (ES) query report plugin is designed to search for Elasticsearch query strings in an existing completed index and create a CSV report with the ability to send the report to one or more email recipients. |
Export
| HELP | RESOURCE |
|---|---|
| Availability | |
| Enable/Config | Via the DiskoverAdmin panel |
| Learn More | Contact Diskover |
| Purpose | Allows authorized users to preview and create a formatted CSV file, enabling integration with other applications that monitor and trigger workflows based on the file's arrival. |
File Kind
| HELP | RESOURCE |
|---|---|
| Availability | |
| Enable/Config | Via the DiskoverAdmin panel |
| Learn More | Contact Diskover |
| Purpose | Allows users to categorize file types by groups and adds extra metadata to the Elasticsearch index during the scanning process, useful for reporting purposes. |
Find File Sequences
| HELP | RESOURCE |
|---|---|
| Availability | |
| Enable/Config | Via a terminal 🛟 Open a support ticket to request assistance with installing this plugin |
| Learn More | Visit our website | Contact Diskover |
| User Guide | Diskover User Guide Companion for Media Solutions |
| Purpose | The File Sequence web plugin File Action is designed to list out any file sequences in a directory or from a single file in a sequence. File sequences are printed out with %08d to show the 0 padding and number of digits in the sequence. Each sequence, whole or broken, is put into a [ ] list.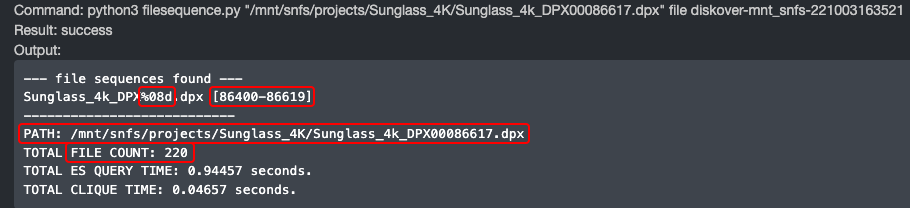 |
First Index/Arrival Time
| HELP | RESOURCE |
|---|---|
| Availability | |
| Enable/Config | Via the DiskoverAdmin panel |
| Learn More | Contact Diskover |
| Purpose | Triggers the creation of an additional attribute when Diskover first detects a new file in a given location and adds the extra metadata to the Elasticsearch index during the scanning process. |
Fix Permissions
| HELP | RESOURCE |
|---|---|
| Availability | |
| Enable/Config | Via the DiskoverAdmin panel |
| Learn More | Contact Diskover |
| Purpose | Enables authorized users to change the Unix permissions of selected files or folders to a configured value. |
Grafana
| HELP | RESOURCE |
|---|---|
| Availability | |
| Enable/Config | Via the DiskoverAdmin panel |
| Learn More | Contact Diskover |
| Purpose | Provides the ability to visualize and trend data metrics over time using Grafana. The plugin rolls up summary data and creates Grafana-specific indices within Elasticsearch. These indices use time series @timestamp metrics to separate logstash- indices, indexes directory size, counts up to N dir depths (default 2). Elasticsearch can then use these summary indexes as a data source for viewing these logstash indices from Grafana. |
Grafana Cloud
| HELP | RESOURCE |
|---|---|
| Availability | |
| Enable/Config | Via the DiskoverAdmin panel |
| Learn More | Contact Diskover |
| Purpose | Provides the ability to visualize and trend data metrics over time using Grafana Cloud. The plugin rolls up summary data and creates Grafana-specific indices within Elasticsearch. These indices use time series @timestamp metrics to separate logstash- indices, indexes directory size, counts up to N dir depths (default 2). Elasticsearch can then use these summary indexes as a data source for viewing these logstash indices from Grafana. |
Grant Research
| HELP | RESOURCE |
|---|---|
| Availability | |
| Enable/Config | Via a terminal 🛟 Open a support ticket to request assistance with installing this plugin |
| Learn More | Visit our website | Contact Diskover |
| User Guide | Diskover User Guide Companion for Life Science Solutions |
| Purpose | The Grant Plugin has a dual purpose 1) assisting research institutes in managing their grants/members/storage costs internally, and 2) fulfilling the requirements for the new NIH DMS Policy. The Grant Plugin collects and parses grants’ metadata (grant number, group ID, etc.) to curated datasets. In turn, staff associated with a specific grant has visibility/searchability of their limited data/grant without access to the source files or other grants. That extra metadata is also available to use for further workflow automation if needed. 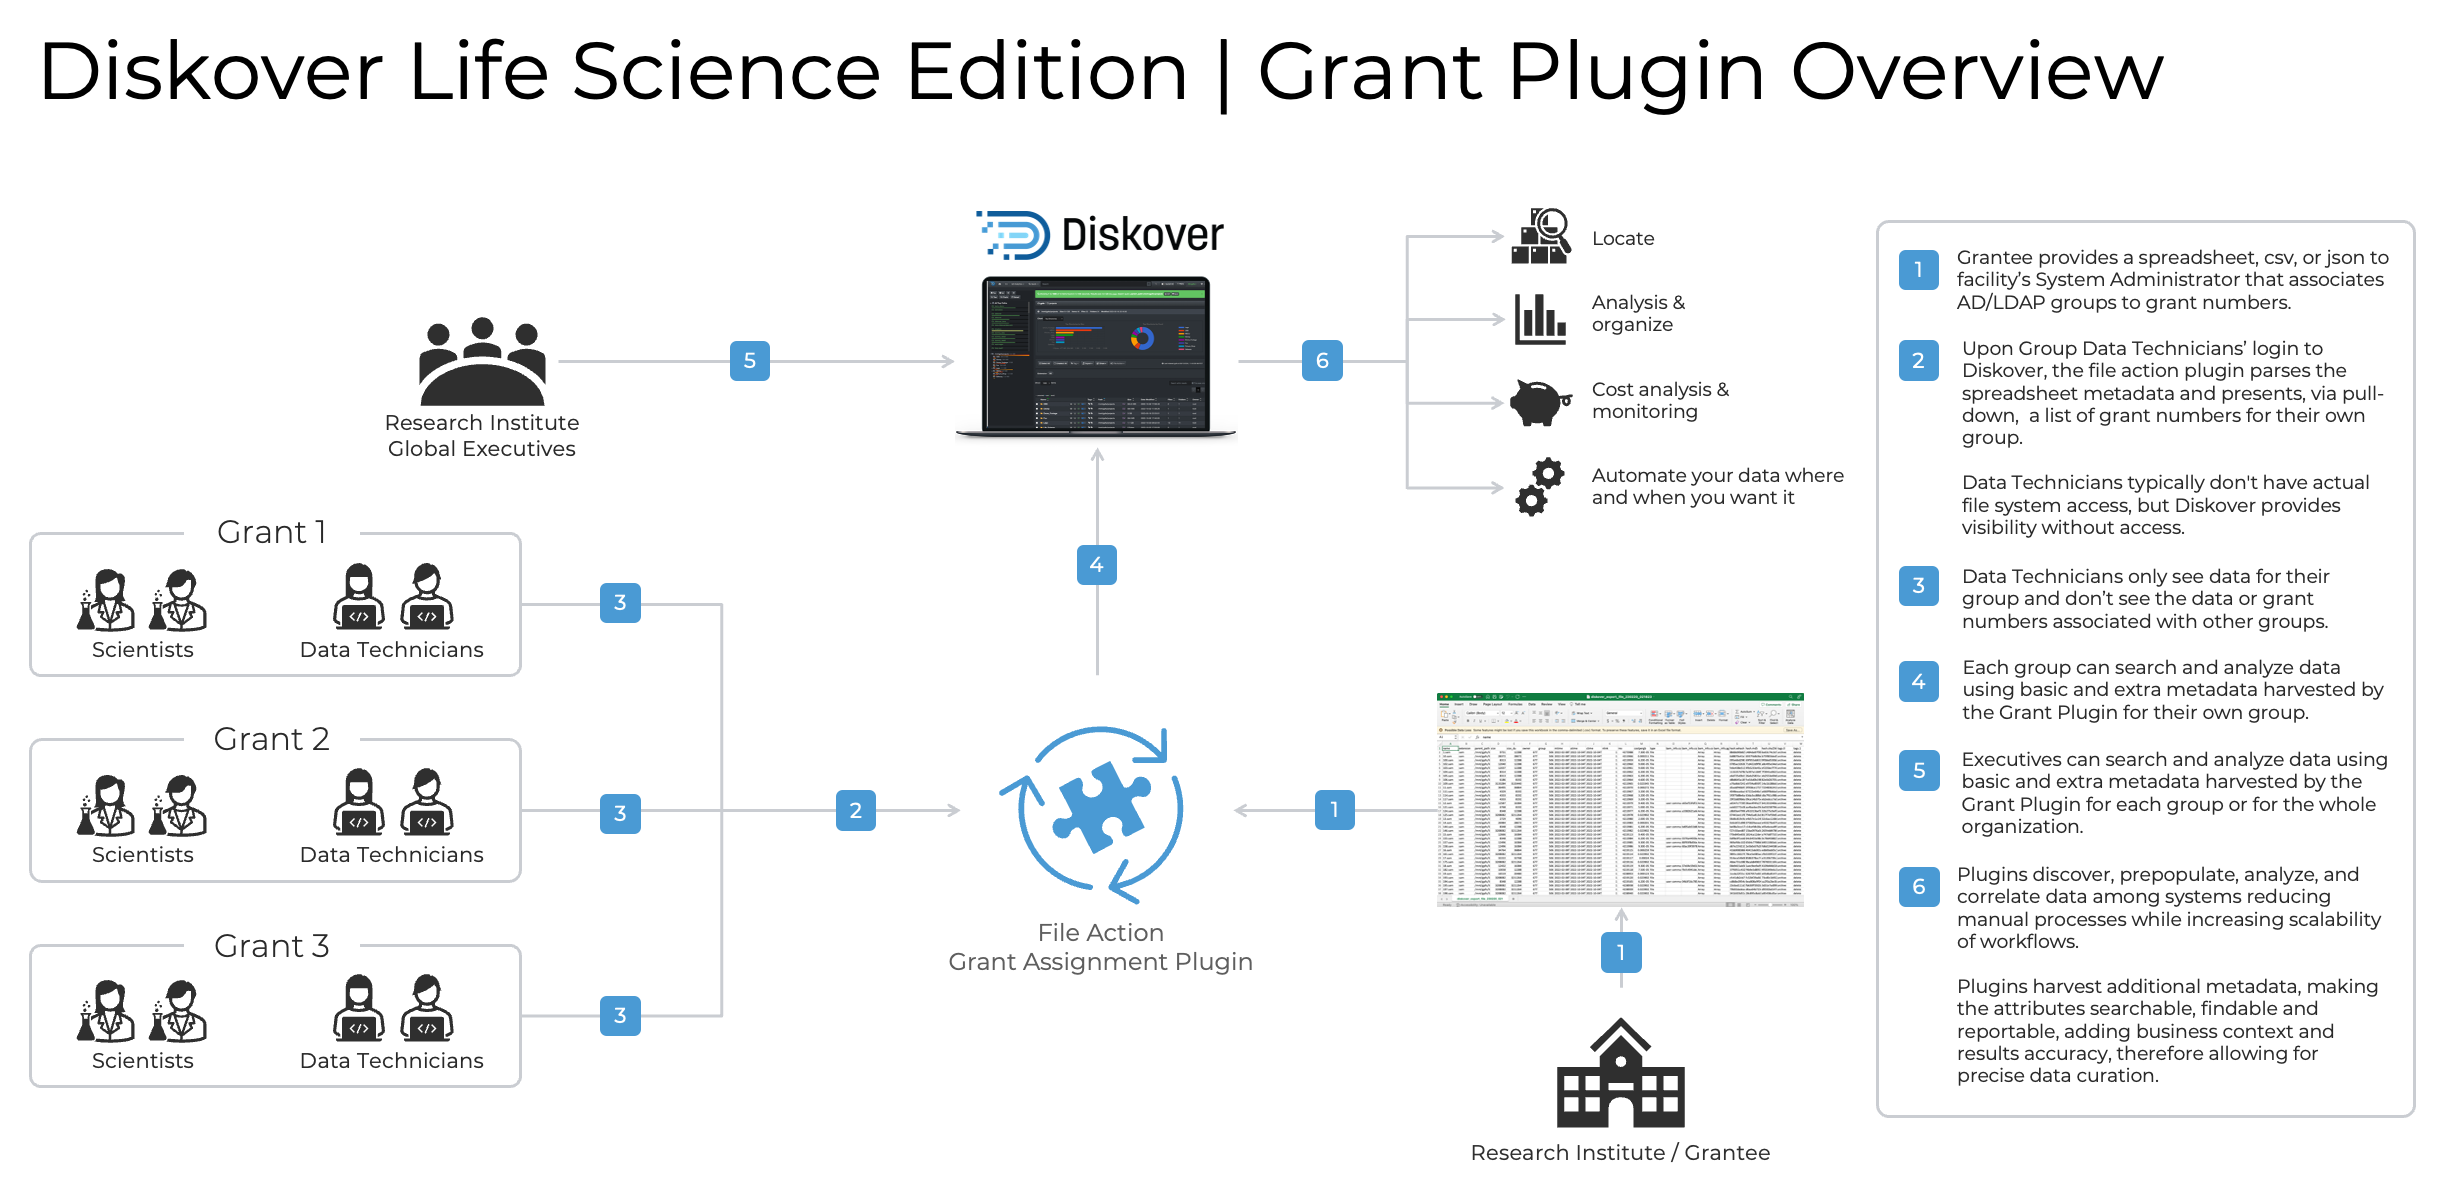 Click here for a full-screen view of this image. |
Hash Differential Checksums
| HELP | RESOURCE |
|---|---|
| Availability | |
| Enable/Config | Via a terminal 🛟 Open a support ticket to request assistance with installing this plugin |
| Learn More | Contact Diskover |
| Demo | 🍿 Watch Demo Video |
| Purpose | Designed for precise data movement monitoring, the plugin checksums xxhash, md5, sha1, and sha256 hash values between the original file and the resulting file once it reaches its transfer destination, catching any possible file corruption in the process. The plugin alerts on areas where the file checksum of the source location does not match the file checksum of the destination location, which would then require a retransfer of these suspect files. A manifest is generated to provide insurance upon completion that all files arrived uncorrupted. |
Illegal Filename
| HELP | RESOURCE |
|---|---|
| Availability | |
| Enable/Config | Via the DiskoverAdmin panel |
| Learn More | Contact Diskover |
| Demo | 🍿 Watch Demo Video |
| Purpose | Analyzes the index of all directories and file names for illegal characters, and long filenames or file paths to proactively find potential files with names that can break applications. Offending filenames are tagged with the corresponding non-conformance, and the list of illegal filenames can then be sent via email reports. The plugin can be configured to remediate these issues with automatic renaming or character replacement. |
Image Info
| HELP | RESOURCE |
|---|---|
| Availability | |
| Enable/Config | Via the DiskoverAdmin panel |
| Learn More | Contact Diskover |
| Purpose | Designed to add Image EXIF info metadata from your image files to the Elasticsearch index during the scanning process. Exchangeable Image File Format is a standardized way of storing useful metadata in digital image files. It holds a wealth of technical information about how the image was created, including the time and date it was taken, the camera and lens that were used, and the shooting settings. |
IMF Change Report
| HELP | RESOURCE |
|---|---|
| Availability | |
| Enable/Config | Via the DiskoverAdmin panel |
| Learn More | Visit our website | Contact Diskover |
| Purpose | Generates a list of IMF image changes in both human-readable format and machine-readable EDL, referencing the updated media. |
Index Diff
| HELP | RESOURCE |
|---|---|
| Availability | |
| Enable/Config | Via the DiskoverAdmin panel |
| Learn More | Contact Diskover |
| Purpose | The index differential plugin is designed to provide a list of file differences between two indices or points in time. The differential list can be used to feed synchronization tools (i.e. rsync) or identify deltas where two repositories should be identical. The plugin outputs a CSV file containing the differences between the two indices. It can also be used to compare checksums/hashes of files between two indices. |
Live View
| HELP | RESOURCE |
|---|---|
| Availability | |
| Enable/Config | Via the DiskoverAdmin panel |
| Learn More | Contact Diskover |
| Purpose | Provides authorized users with a live view of a filesystem between scanning intervals in real-time, without giving access to the source files. |
Make Links
| HELP | RESOURCE |
|---|---|
| Availability | |
| Enable/Config | Via the DiskoverAdmin panel |
| Learn More | Contact Diskover |
| Purpose | Allows authorized users to create symlinks and hard links for selected files and directories. |
Media Info
| HELP | RESOURCE |
|---|---|
| Availability | |
| Enable/Config | Via the DiskoverAdmin panel |
| Learn More | Visit our website | Contact Diskover |
| User Guide | Diskover User Guide Companion for Media Solutions |
| Purpose | Adds business context and searchability via additional media file attributes (resolution, codec, pixel format, etc.). The enriched metadata is key for granular analysis, workflow automation, and overall data curation. The media info harvest plugin is designed to provide media metadata attributes about a file without granting the Diskover user any read/write file system access. New indices will use the plugin and any video file will get additional media info added to the Elasticsearch index’s media_info field. The attributes provide the ability to view storage and file system content from a workflow perspective, for example, all the frame rates on any given storage. |
Ngenea Data Orchestrator by PixitMedia
| HELP | RESOURCE |
|---|---|
| Availability | |
| Enable/Config | Via a terminal 🛟 Open a support ticket to request assistance with installing this plugin |
| Learn More | Download this Solution Brief | Contact Diskover |
| Demo | 🍿 Watch Demo Video |
| Purpose | With the Ngenea Data Orchestrator File Action, authorized users can quickly and securely transport data, directly from the Diskover UI, to and from globally distributed cloud, object storage, traditional NAS files, and tape resources, automatically moving data into the ‘right cost’ resource according to value and usage as your work teams and business needs demand. |
OpenEXR Info
| HELP | RESOURCE |
|---|---|
| Availability | |
| Enable/Config | Via the DiskoverAdmin panel |
| Learn More | Contact Diskover |
| Purpose | Designed to add OpenEXR info metadata from your EXR image files to the Elasticsearch index during the indexing process. |
Path Tokens
| HELP | RESOURCE |
|---|---|
| Availability | |
| Enable/Config | Via the DiskoverAdmin panel |
| Learn More | Contact Diskover |
| Purpose | Designed to break down concatenated directory/file names and add the tokenized metadata to the Elasticsearch index during the scanning process. |
PDF Info
| HELP | RESOURCE |
|---|---|
| Availability | |
| Enable/Config | Via the DiskoverAdmin panel |
| Learn More | Contact Diskover |
| Purpose | Designed to add several metadata fields from your PDF files to the Elasticsearch index during the scanning process. |
PDF Viewer
| HELP | RESOURCE |
|---|---|
| Availability | |
| Enable/Config | Via the DiskoverAdmin panel |
| Learn More | Contact Diskover |
| Purpose | Enables authorized users to view and validate PDF files without accessing the source files. |
PowerScale
| HELP | RESOURCE |
|---|---|
| Availability | |
| Enable/Config | Via the DiskoverAdmin panel |
| Learn More | Visit our website | Contact Diskover |
| Purpose | Adds dozens of Dell PowerScale metadata attributes to the Elasticsearch index as a post-index process. |
Rclone
| HELP | RESOURCE |
|---|---|
| Availability | |
| Enable/Config | Via the DiskoverAdmin panel |
| Learn More | Contact Diskover |
| Purpose | Provides authorized users with the framework for data movement based on pre-configured source and destination profiles. |
ShotGrid/Flow Production Tracking
| HELP | RESOURCE |
|---|---|
| Availability | |
| Enable/Config | Via a terminal 🛟 Open a support ticket to request assistance with installing this plugin |
| Learn More | Visit our website | Contact Diskover |
| User Guide | Diskover User Guide Companion for Media Solutions |
| Purpose | Designed to enhance basic metadata with detailed production status information, aligning data management with production schedules. The Diskover Flow Production Tracking Plugin harvests additional attributes from the Autodesk Flow Production Tracking platform for every shot directory located on storage. These attributes become properties of the shot directories and include status information such as finaled, out-of-picture, multiple project tracking dates, and many more, totaling around one hundred indexable fields. Note that users can opt to only index the fields that are relevant to their business. |
Spectra
| HELP | RESOURCE |
|---|---|
| Availability | |
| Enable/Config | Via the DiskoverAdmin panel |
| Learn More | Contact Diskover |
| Purpose | On-demand menu option that queries the Spectra API to verify additional status, such as whether the desired tape is in the library or on the shelf. |
Spectra MediaEngine
| HELP | RESOURCE |
|---|---|
| Availability | |
| Enable/Config | Via a terminal 🛟 Open a support ticket to request assistance with installing this plugin |
| Learn More | Contact Diskover |
| Purpose | On-demand data mover. |
Tag Copier | Index
| HELP | RESOURCE |
|---|---|
| Availability | |
| Enable/Config | Via the DiskoverAdmin panel |
| Learn More | Visit our website |
| Purppose | Designed to migrate tags from one index to the next. Generally, these tags are applied post index through manual tag application or plugin tag application. Note that there is also a post-index Tag Copier plugin. |
Tag Copier | Post-Index
| HELP | RESOURCE |
|---|---|
| Availability | |
| Enable/Config | Via the DiskoverAdmin panel |
| Learn More | Visit our website |
| Purpose | Migrates tags from one index to the next as a post-index process. Note that there is also an index Tag Copier plugin. |
Telestream GLIM
| HELP | RESOURCE |
|---|---|
| Availability | |
| Enable/Config | Via a terminal 🛟 Open a support ticket to request assistance with installing this plugin |
| Learn More | Visit our website | Contact Diskover |
| User Guide | Diskover User Guide Companion for Media Solutions |
| Demo | 🍿 Watch Demo Video |
| Purpose | This plugin results in a seamless integration with GLIM, allowing end-users to safely view and validate media files while safeguarding your source assets and production network. Diskover allows users to do advanced searches of media assets and then launch GLIM in one click via our File Actions. You need to have a GLIM account and be logged in previously to launch the GLIM preview plugin within Diskover. |
Telestream Vantage
| HELP | RESOURCE |
|---|---|
| Availability | |
| Enable/Config | Via the DiskoverAdmin panel |
| Learn More | Visit our website | Contact Diskover |
| User Guide | Diskover User Guide Companion for Media Solutions |
| Demo | 🍿 Watch Demo Video |
| Purpose | Enables authorized users to submit media workflow job processing to Telestream Vantage directly from the Diskover user interface. |
Unix Perms
| HELP | RESOURCE |
|---|---|
| Availability | |
| Enable/Config | Via the DiskoverAdmin panel |
| Learn More | Contact Diskover |
| Purpose | Adds the Unix permission attributes of each file and directory to the Elasticsearch data catalog during indexing. Two tags are added, unixperms-plugin and ugo+rwx, if a file or directory is found with fully open permissions (777 or 666). |
Vcinity High-Speed Data Transfer
| HELP | RESOURCE |
|---|---|
| Availability | |
| Enable/Config | Via a terminal 🛟 Open a support ticket to request assistance with installing this plugin |
| Learn More | Download this Solution Brief | Contact Diskover |
| Demo | 🍿 Watch Demo Video |
| Purpose | Regardless of distance and latency, the high-speed data transfer Vcinity Plugin provides the framework for reliable and fast data movement based on pre-configured source and destination profiles. The plugin can move NFS, SMB, and S3 to any NFS, SMB, and S3 vendor, no matter the brand, ex: Dell, NetApp, HPE, etc. The Vcinity High-Speed Data Transfer Plugin provides two mechanisms within Diskover to trigger data movement: 1) on-demand user-initiated file action directly from the Diskover interface, and 2) scheduled automated workflow based on file attributes meeting predetermined criteria. |
Windows Attributes
| HELP | RESOURCE |
|---|---|
| Availability | |
| Enable/Config | Via the DiskoverAdmin panel |
| Learn More | Contact Diskover |
| Purpose | The Windows Attributes plugin adds the Windows file owner, primary group and ACE's of each file and directory to the Diskover index after scanning is complete. It replaces all docs showing owner 0 and group 0 with the Windows file/directory owner name and primary group. It updates
|
Windows Owner
| HELP | RESOURCE |
|---|---|
| Availability | |
| Enable/Config | Via the DiskoverAdmin panel |
| Learn More | Contact Diskover |
| Purpose | Adds the Windows file owner and primary group of each file and directory to the Diskover index at time of indexing. It replaces all docs showing username 0 with the Windows file/directory owner name. |
Xytech Asset Creation
| HELP | RESOURCE |
|---|---|
| Availability | |
| Enable/Config | Via a terminal 🛟 Open a support ticket to request assistance with installing this plugin |
| Learn More | Visit our website | Contact Diskover |
| User Guide | Diskover User Guide Companion for Media Solutions |
| Demo | 🍿 Watch Demo Video |
| Purpose | Post facilities often have customers’ assets that have been archived and lack findability, visibility, and searchability, and therefore, the opaque nature of these assets makes them difficult to reuse or repurpose. Companies with years of such archived assets have often stored these on tape media or removable hard drives, which are often stored in a physical vault. Assets were often stored on such “offline” media due to costs; however, with the advent of cloud and object storage, the economics are now making it viable to store such vaulted assets on more “online media”. However, simply putting these assets onto online media does not necessarily make these assets findable in context or within the facility’s order management system. The Xytech asset creation tool is designed to find and index newly restored online assets from LTO tapes, removable hard drives, etc., making them available, findable, and searchable within the Xytech order management system, as well as Diskover. The plugin operates on the assumption that the assets restored to online media are placed into a folder with the following naming convention: CustomerID_CustomerName The path location is added to the asset within Xytech and the asset number is assigned to the file via a tag within the Diskover Index. |
Xytech Order Status
| HELP | RESOURCE |
|---|---|
| Availability | |
| Enable/Config | Via a terminal 🛟 Open a support ticket to request assistance with installing this plugin |
| Learn More | Visit our website | Contact Diskover |
| User Guide | Diskover User Guide Companion for Media Solutions |
| Demo | 🍿 Watch Demo Video |
| Purpose | The Xytech Media Operations Platform order status plugin is designed to automate the correlation of the order management system and the storage system by harvesting key business context from Xytech and applying that context within Diskover. In turn, this business context metadata can be used to automate workflows, curate data, monitor costs, create highly customized reports, and search granularly. Facilities often manually correlate the order management system with the storage repositories. However, manual processes are subject to human errors and difficult to scale as the volume of media orders and data turnover constantly increases. Therefore, the lack of integration for file-based workflows between the order management system and the underlying storage repositories, makes data management decisions difficult as they are solely based on attributes of files or objects on storage. Additional business context is needed from the order management system to increase precision and accuracy of data management decisions. An instance of key information might be the invoice date for a work order. A status change for a work order can be a key indicator for data management, for example, once a Xytech media order has been “invoiced”, then the data associated with that media order can be a candidate for archival. |
Tags
Overview
One of Diskover's powerful features is the ability to add business context to files and directories through tags, which enables the following:
- Increased findability and searchability based on one or more combinations of fields/metadata, for example, name and tag value.
- More informed and accurate data curation decisions.
- Ability to build an approval process (or RACI model) for data curation decisions.
- Reporting aligned with business context, changing reports from disk language (size, age, extension, etc.) to business language (projects, clients, status, etc.)
- Engage tags in workflows via Diskover Task Panel to automate data movement, deletion, archival, etc.
⚠️ IMPORTANT!
- All tags are stored in the tag field in the Elasticsearch index.
- There is no limit on the number of tags per item.
Tagging Methods
Tags can be applied using various methods within Diskover:
⚠️ IMPORTANT! If you want to use tags in your environment, make sure to configure your tags' migration so they get copied from one index to the next.
AutoTag
Tags can be applied automatically through a set of configurable rules applied to directories or files. AutoTags can be configured for each of your scanners in:
DiskoverAdmin → Configuration → Diskover → Configurations.
The rules can be very powerful based on a combination of keys/metadata:
- File names to include
- File names to exclude
- Paths to include
- Paths to exclude
- File times (mtime, atime, ctime)
- File extensions
- Directory names to include
- Directory names to exclude
- Parent path to include
- Parent path to exclude
- Directory times (mtime, atime, ctime)
- Combined with any other fields from the Elasticsearch metadata catalog containing base metadata and possibly extra business-context metadata, depending on your environment.
Once AutoTags are configured and scheduled using the Task Panel, they will get copied from one index to the next.
Note that AutoTags will display as a gray color in Diskover-Web.
Tag Application via Diskover API
Tags can be applied via the Diskover API. Updating file/directory tags is accomplished with the PUT method. A JSON object is required in the body of the PUT method. The call returns the status and number of items updated.
Examples of tag applications can be found in the Diskover-Web user interface under ⛭ → Help, as well as in the Diskover SDK and API Guide.
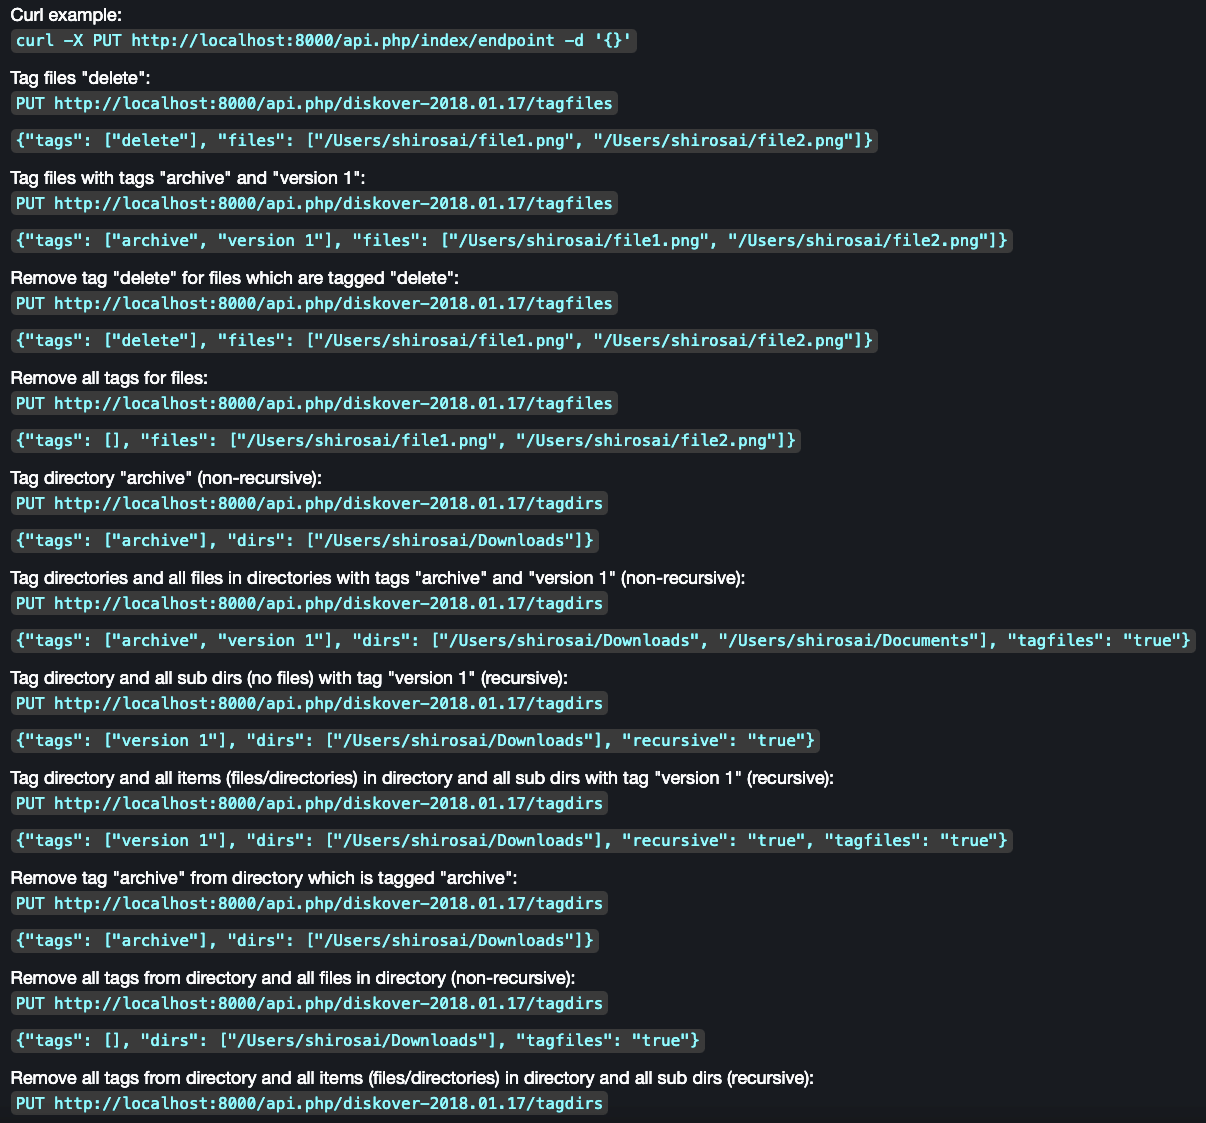
Tag Application via Harvest Plugins
Index and post-index harvest plugins are typically designed to:
- Harvest extra business-context metadata from file headers.
- Correlate the Diskover index to some other business application, for example, an order management or scheduling system.
These plugins typically run 1) during the indexing process or 2) on a scheduled basis. Harvest plugins are designed to correlate various systems or applications, typically using a key identifier within a directory/filename (for example, research grant ID) to harvest additional metadata from another database (for example, Primary Investigator for a specific grant ID). Therefore, tags will be reapplied if a key identifier and connection to an external database exists at the time of re-index/harvest.
Manual Tagging
In general, manual processes are 1) difficult to scale and 2) prone to human errors. Therefore, careful consideration must be applied when determining when to use a manual tag application. Ideally, manual tags should be used sparingly or as part of a workflow approval or RACI model.
Please refer to our Diskover User Guide to learn about:
- Manual tags application.
- Manual tags removal.
⚠️ IMPORTANT! As Diskover exists today, you need to use the Tag Copier Plugins to migrate the tags from one index to the next.
Manual Tags Customization
The tags displayed within the Diskover-Web user interface can be customized, their names and colors, by authorized users in DiskoverAdmin → Configuration → Web → Custom Tags.
You can also get redirected to the Custom Tags configuration page when selecting Edit tags on the search page:
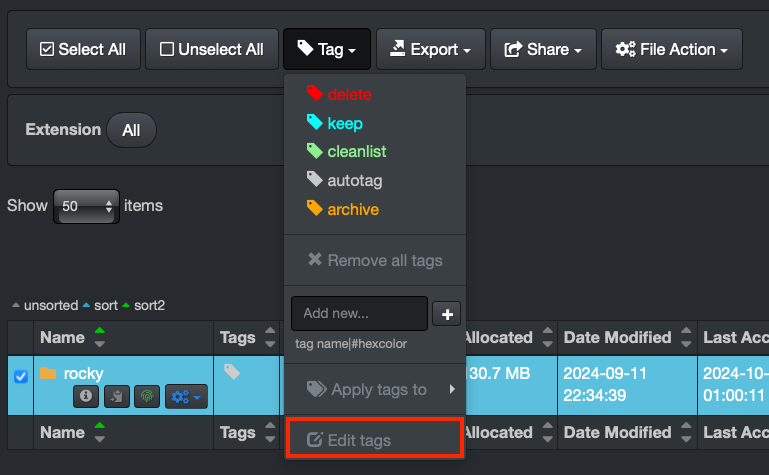
Tag Copier Plugins for Tags Migration
The Diskover scanning process creates a new index or point-in-time snapshot of the volume at time of index. Tags that are applied during the scanning process via AutoTag rules will be automatically re-applied to the next index based on the configuration rules.
However, as the software exists today, the Diskover scanner has no knowledge of tags applied outside of the scanning process. Therefore, tags that have been applied either manually or via AutoTags must be migrated from one index to the next using the Tag Copier Plugins.
Index Tag Copier Plugin
DiskoverAdmin → Configuration → Plugins → Index → Tag Copier
The index tag copier is designed to apply tags during the scanning process. This plugin leverages Diskover’s AutoTag functionality, which automatically assigns tags based on a set of predefined rules. These rules can include file size, type, date, location, or other metadata. As files and directories are being indexed, tags are applied in real-time, ensuring that the data is immediately categorized with business-relevant context.
Post-Index Tag Copier Plugin
DiskoverAdmin → Configuration → Plugins → Post Index → Tag Copier
The post-index Tag Copier plugin is used to apply or migrate tags after the scanning process has been completed. It’s typically used when tags need to be adjusted or added once files and directories are already indexed or when tags from a previous index need to be copied to a new index.
Tags Display in Diskover-Web
Please refer to the Diskover User Guide to learn how to view and work with tags.
Tags Search
Please refer to the Diskover User Guide to learn how to search on tags.
Tags Analytics
Please refer to the Diskover User Guide to learn more about reporting for tags.
Analytics
Overview
Diskover provides powerful reporting capabilities. Reports can be generated to align with business context and can be constructed from any Elasticsearch query. Therefore, any combination of attributes from the metadata catalog (names, tags, project status, etc.) can be used to construct business-facing reports.
Diskover offers professional services to assist with setting up custom reports - please contact us for details.
Below is a summary of the current analytics/reports available. The links will bring you to the Diskover User Guide giving detailed information regarding how to use these analytics. In the following sections, we will take a deep dive into the ⚙️ customizable analytics.
| ANALYTIC | DESCRIPTION |
|---|---|
| Search Page Charts | Snapshot of a path (aging, top files, top directories, etc.) refreshing with every click you make. |
| Dashboard | Snapshot of a repository with multiple clickable links to see the detailed results. |
| File Tree | Instant profiling of directories by size and aging. |
| Treemap | Displays hierarchical data using rectangles to graphically represent the size of the directories. |
| Heatmap | Compares 2 indices from 2 points in time, giving an instant visual of data growth or shrinkage. |
| Tags | Analyze all your tagged datasets by name, size, and number. |
| ⚙️ Smart Searches | Fully customizable reports tailored to meet your specific needs. |
| User Analysis | Gives insights into data consumption and cost per user and group. |
| ⚙️ Cost Analysis | Highly customizable report helping you put a price tag on the value of your digital assets. |
| ⚙️ Reports | Customizable to help you find your top unknowns. |
The reports explained in this chapter can be found in the Analytics drop-down list:
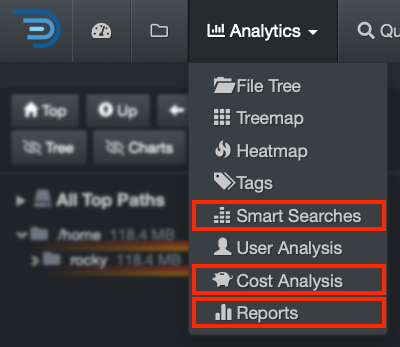
Smart Searches
Overview
Smart Searches provide a mechanism to create repeatable reports or bookmarks based on search queries. Any combination of names, tags, metadata fields, etc., can be used to construct business-facing reports. Any users can access Smart Searches, but only authorized users can customize by adding, editing, or deleting queries.
Smart Searches Examples
Here are a few examples providing business-context insight.
Example with storage tiers:
Example using file kinds:
Example using customers:
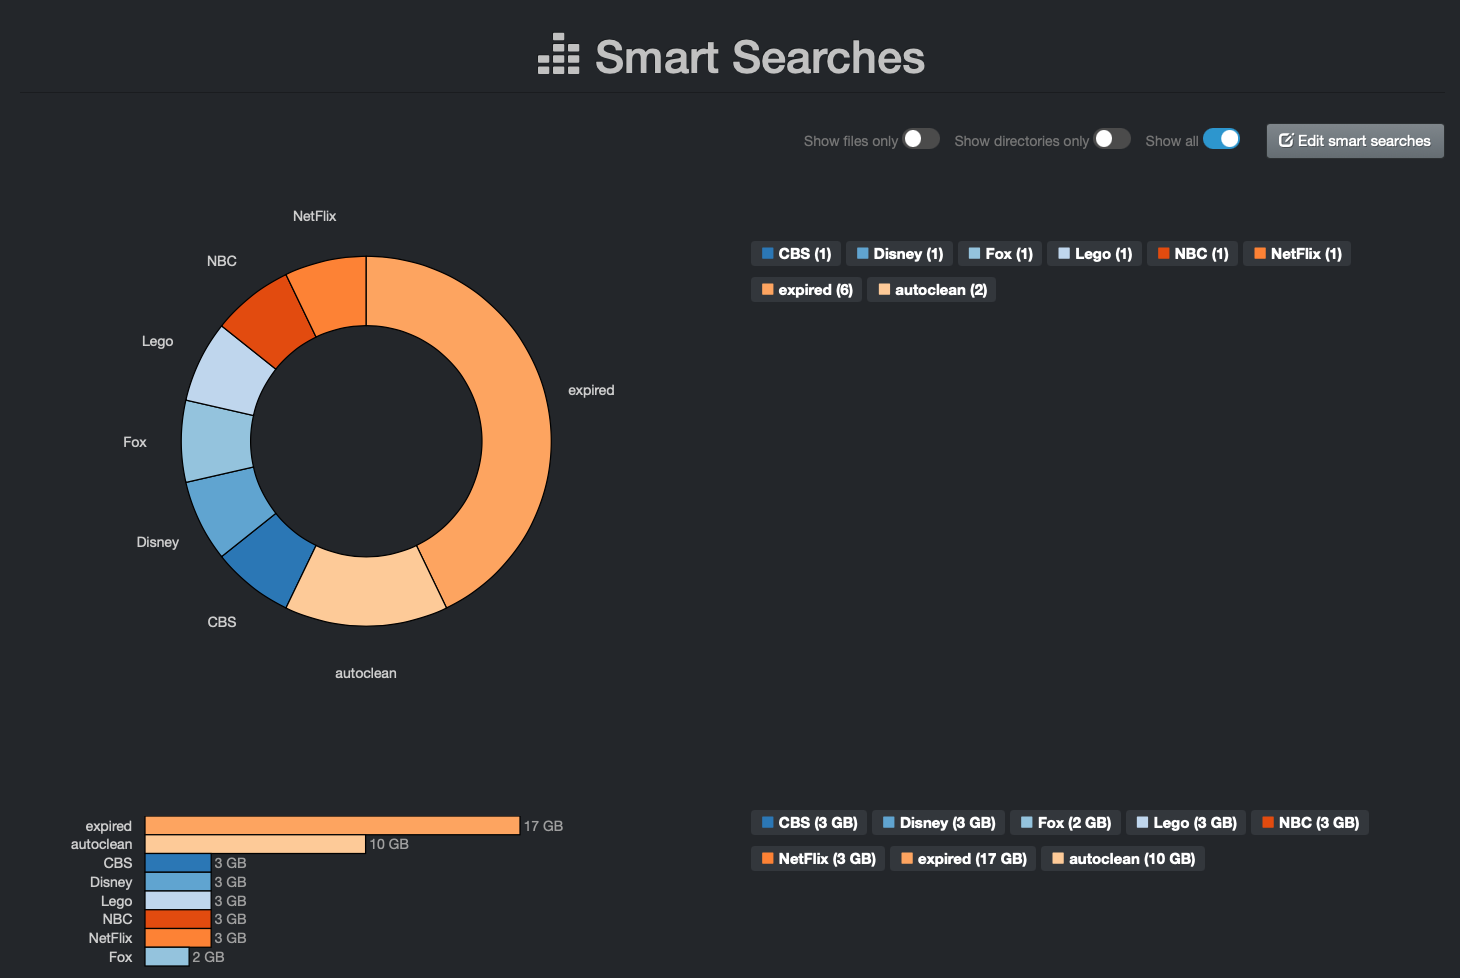
Smart Searches Customization
🔴 To customize, start by clicking the Edit Smart Searches button:

🔴 This page will open in a new tab:
- Read all the instructions at the top for guidance.
- Modify the search queries for your use case(s).
- Click Save Smart Searches to save your queries once done.
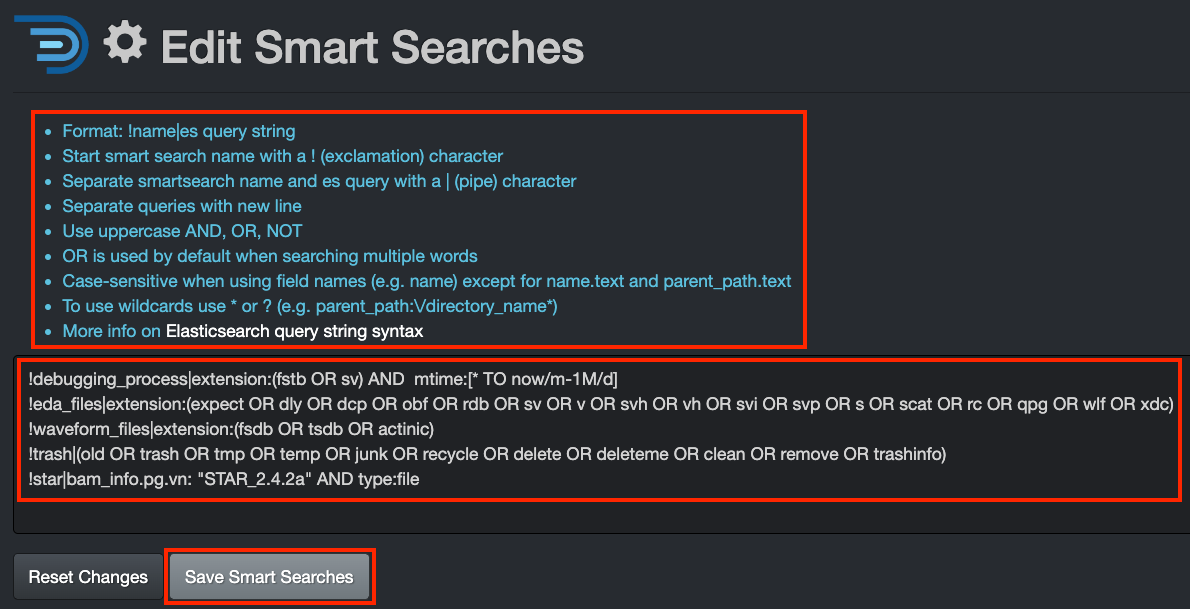
Here is a simple example of queries mostly using customer names + specific paths/repositories + tags:

Reports
Overview
Reports provide a mechanism to create repeatable analytics by searching for your top unknowns, from simple queries like "which file types occupy the most space" to "who is using the most space". Any users can access Reports, but only authorized users can customize by adding, editing, or deleting queries.
Reports Examples
Example using Xytech project lifecycle status:
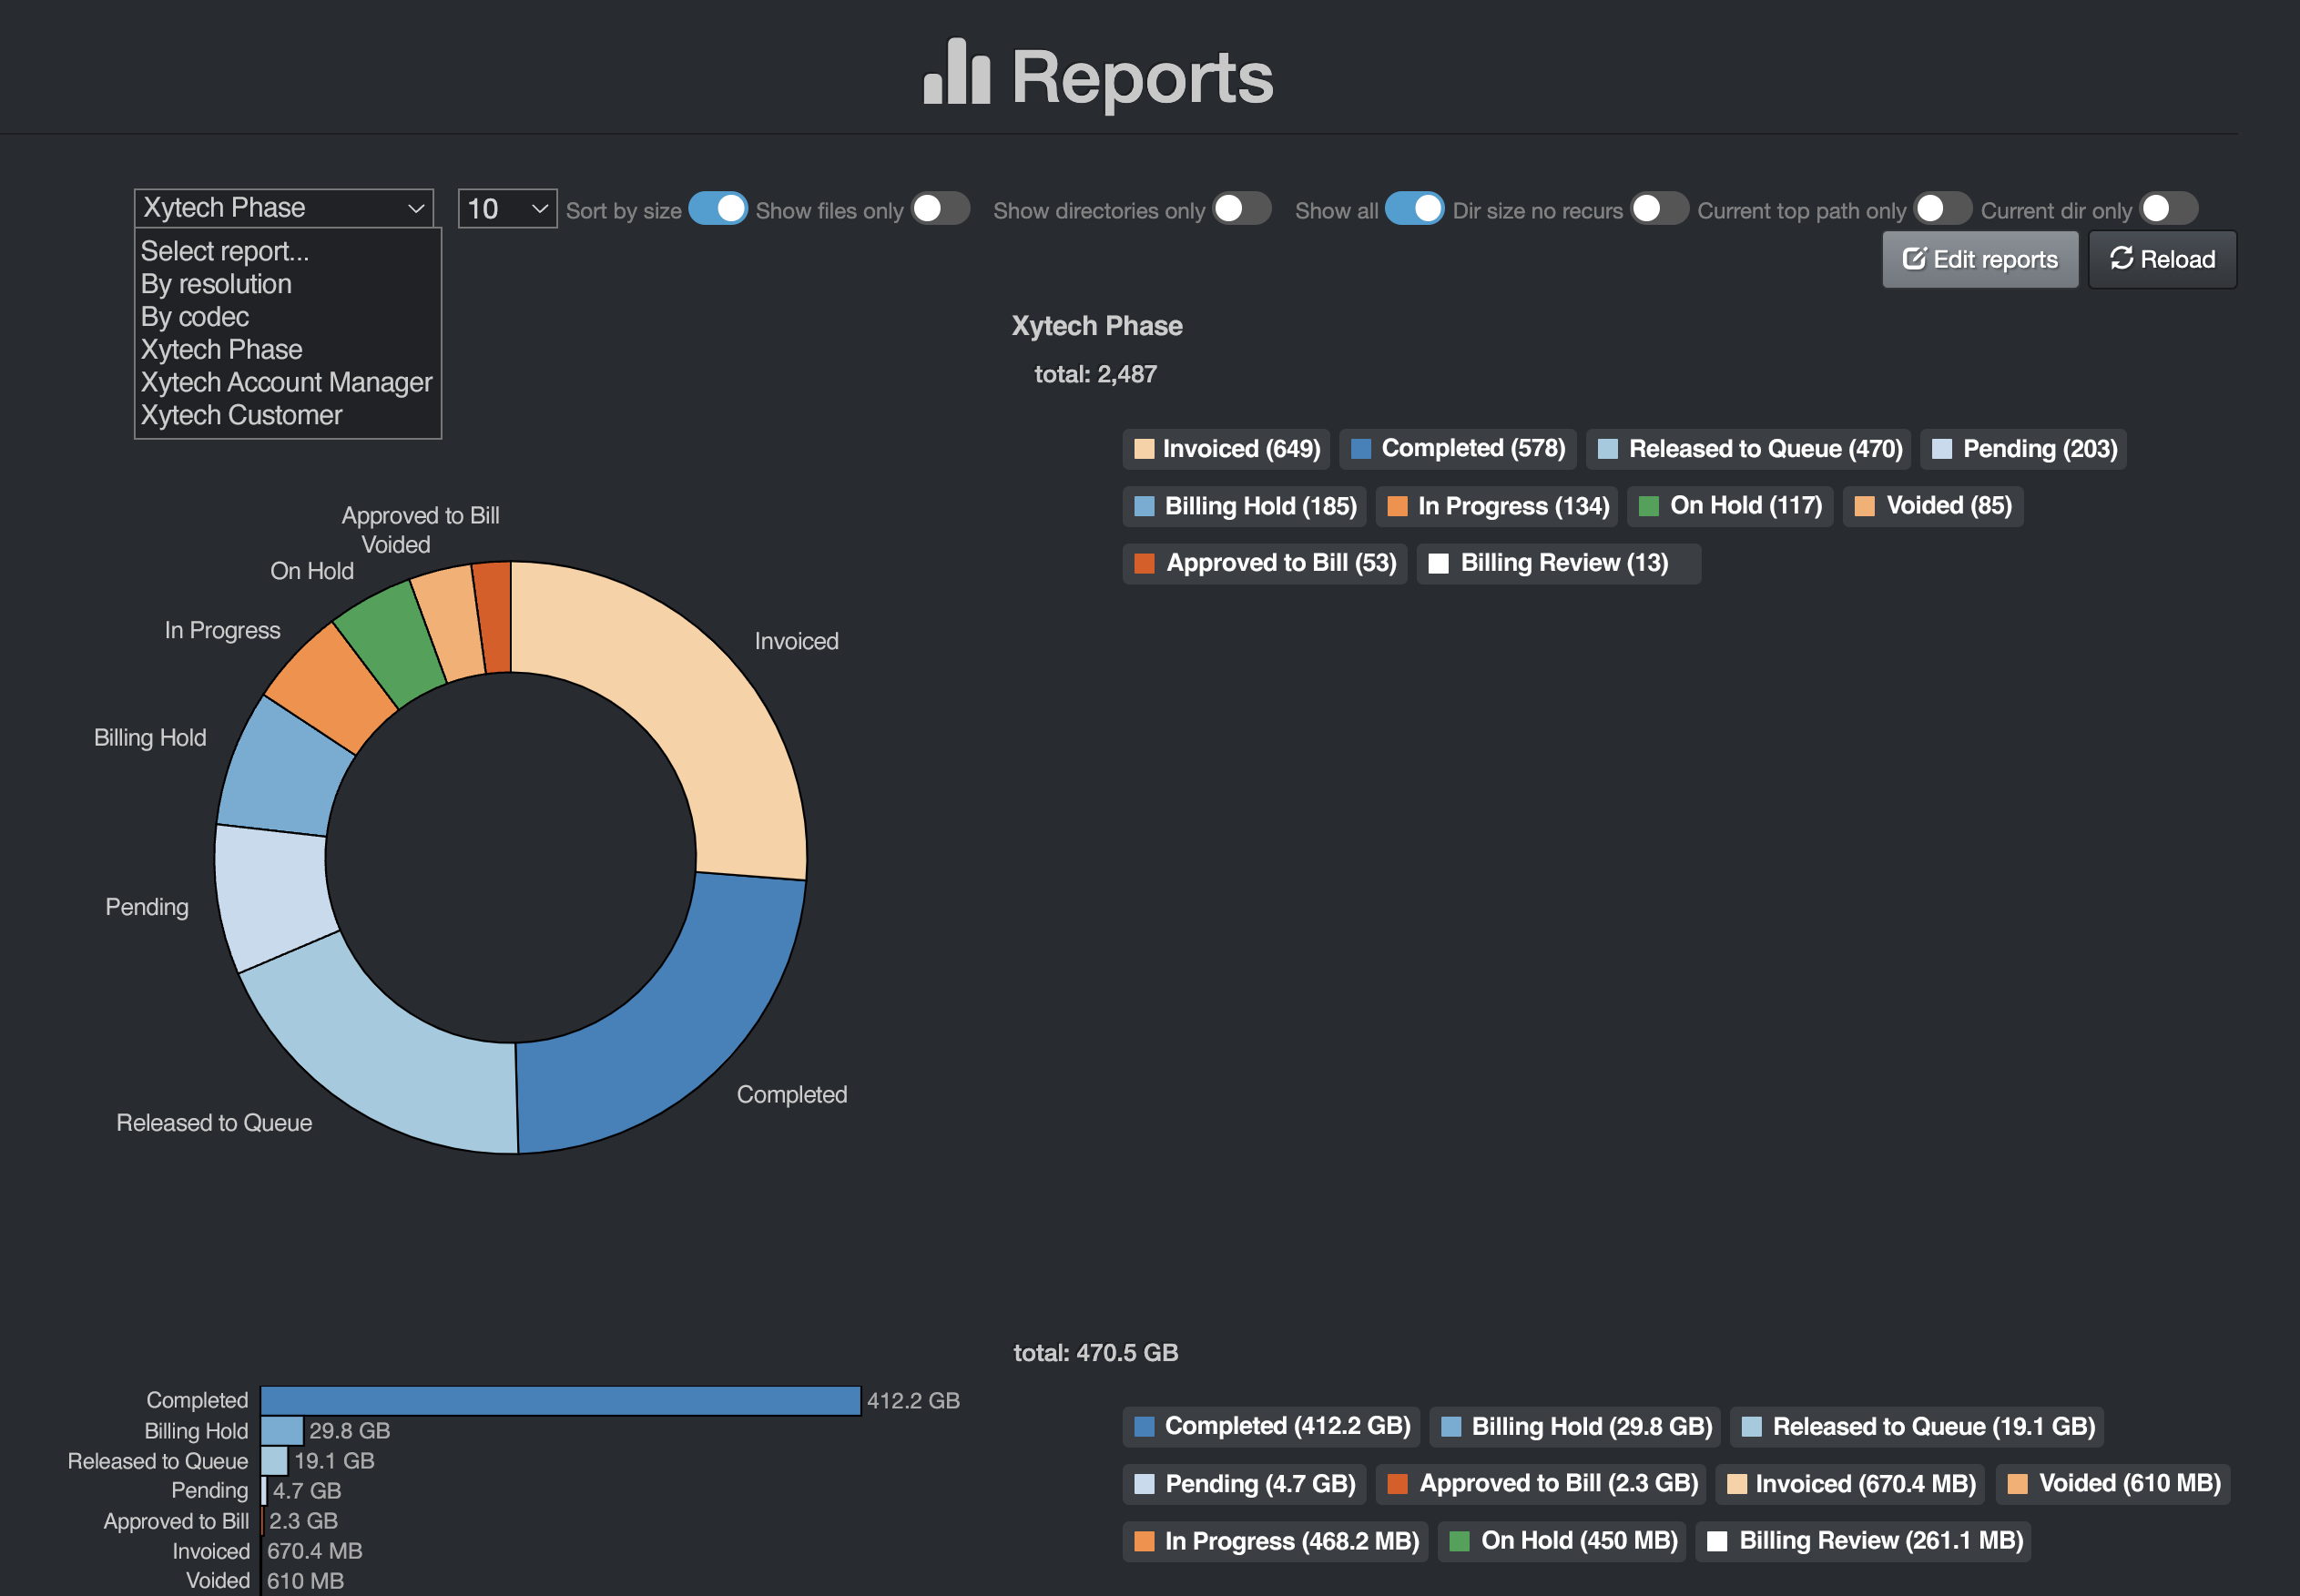
Example using Xytech production managers:
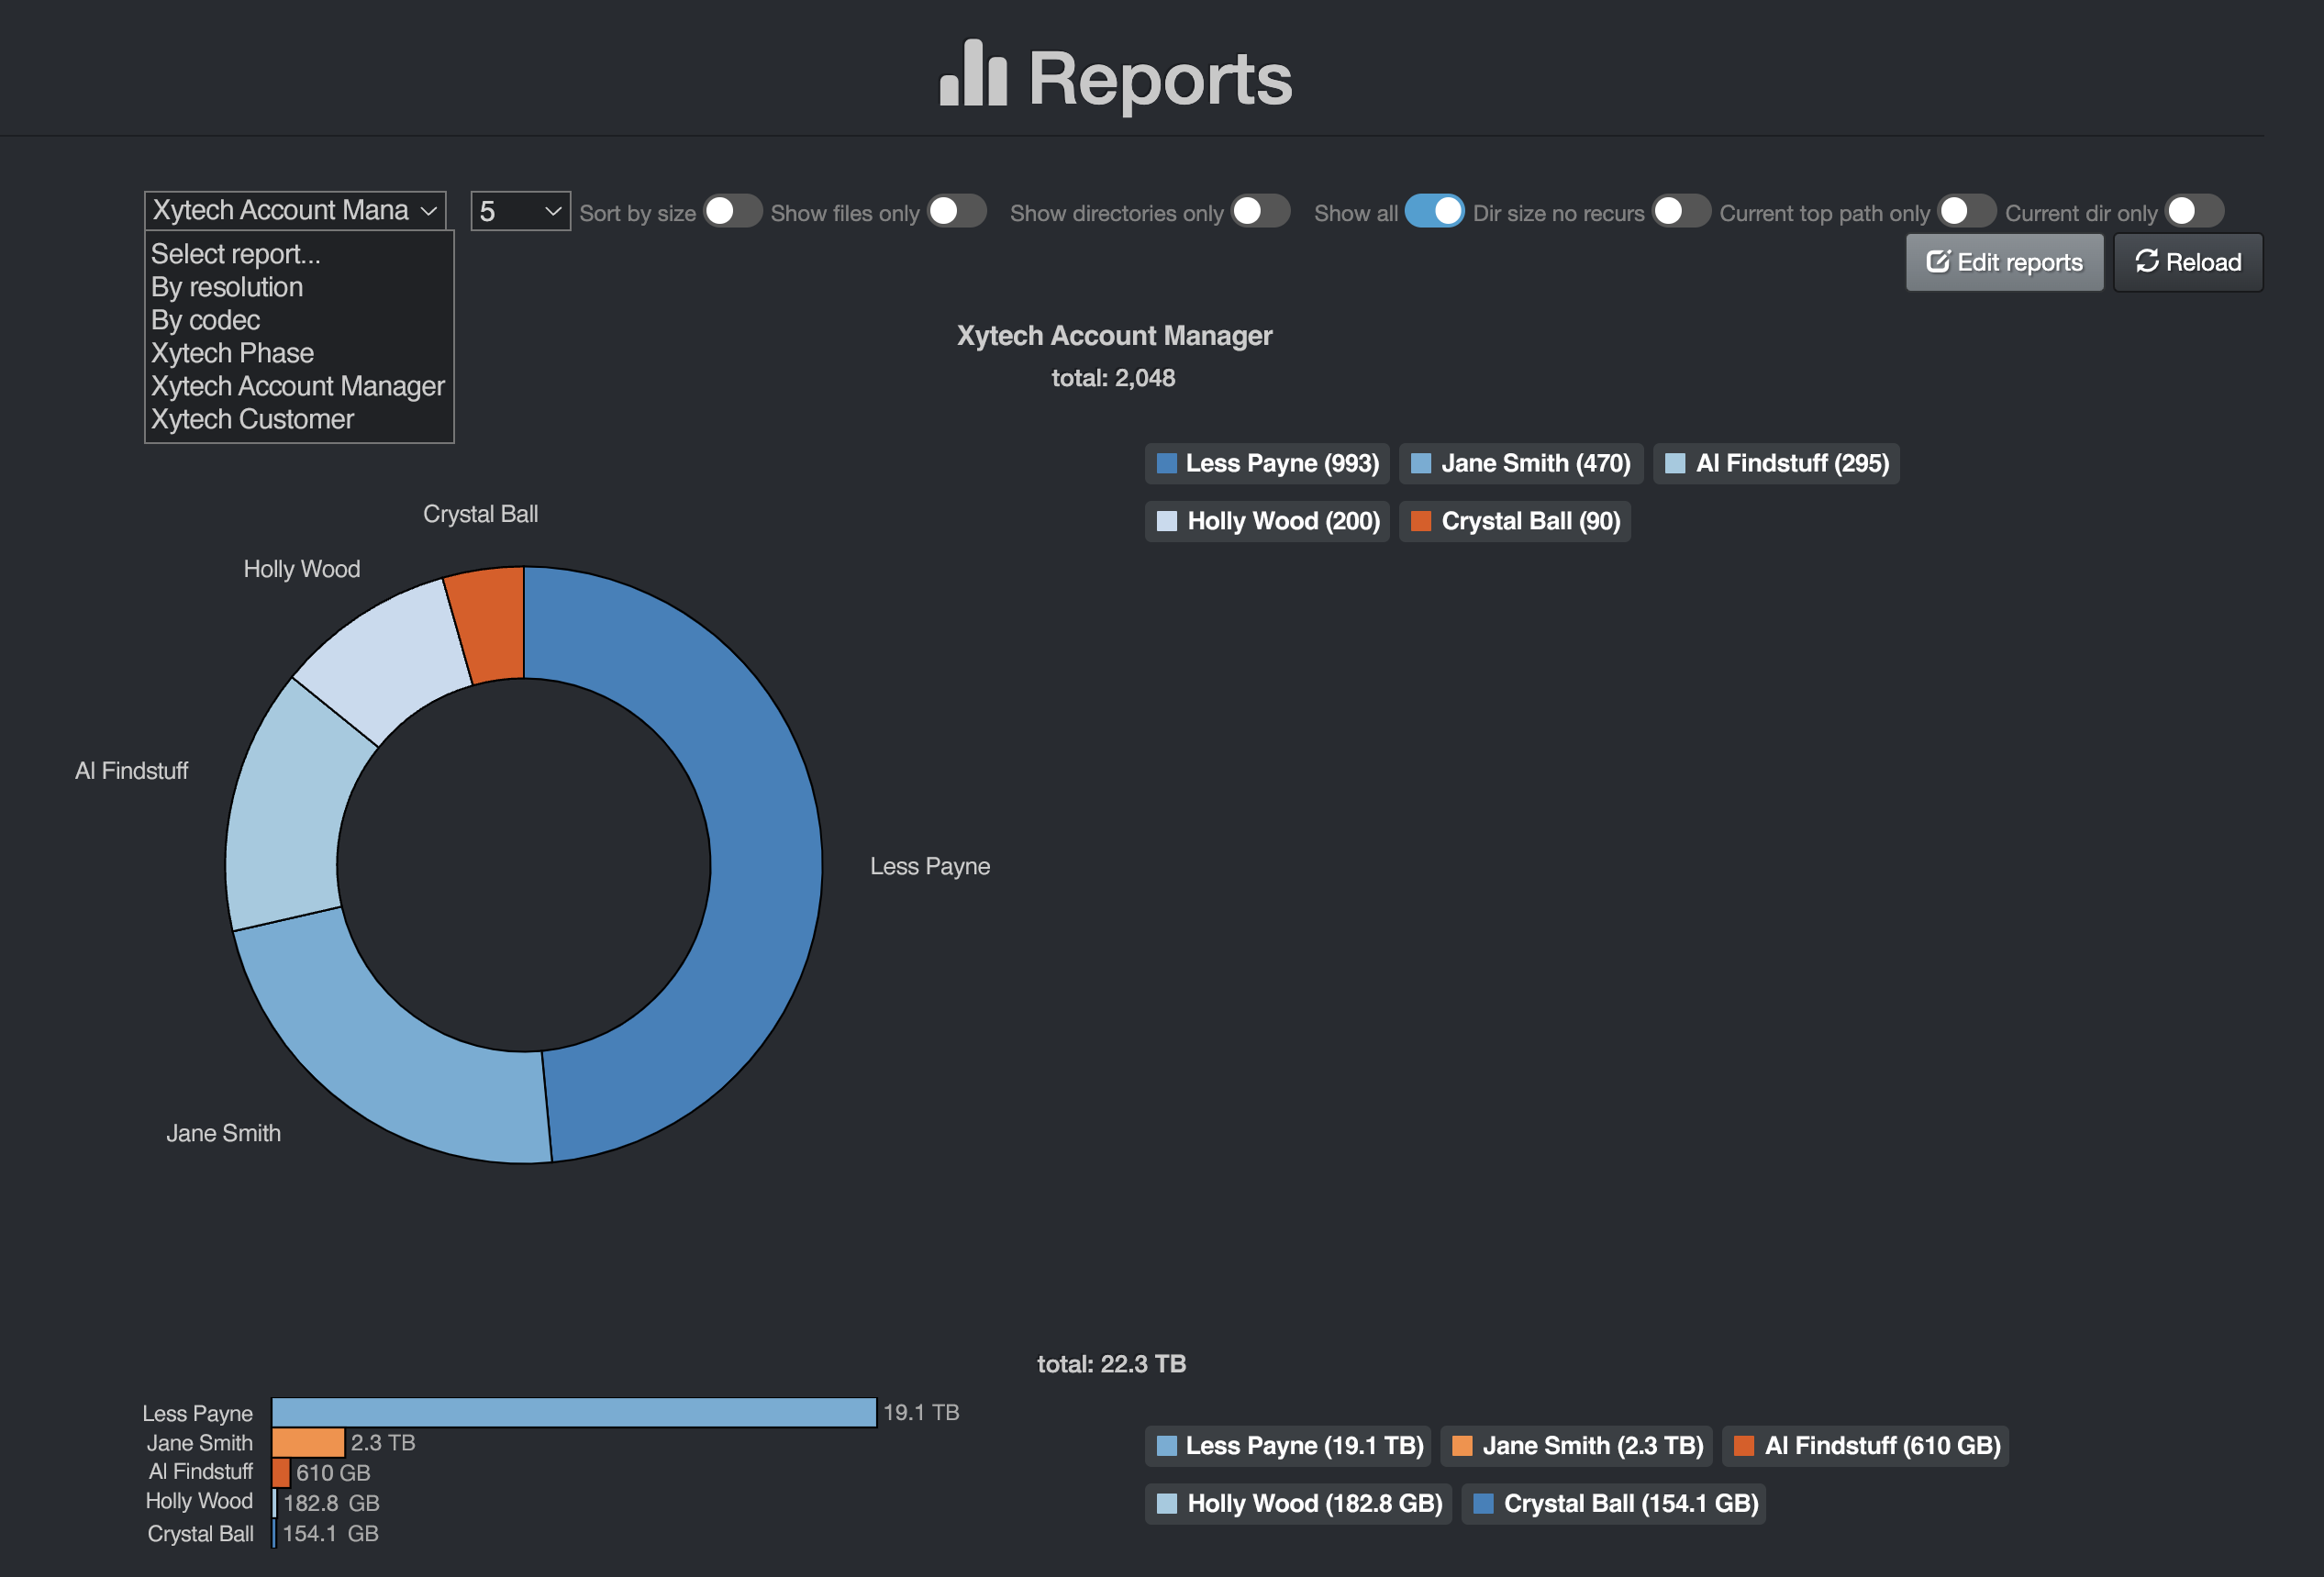
Reports Customization
⚠️ Note that multiple queries can be used for this analytics and selected via the drop-down menu:
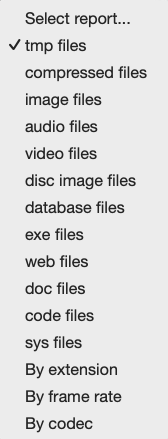
🔴 To customize, start by clicking the Edit Reports button:

🔴 This page will open in a new tab:
- Read all the instructions at the top for guidance. This report is a little more complicated to customize, so take the time to read the instructions and then test your queries.
- Modify the search queries for your use case(s).
- Click Save Reports to save your queries once done.

Cost Analysis
Overview
Cost reporting can be generated to align with business context and can be constructed from any Elasticsearch query. Therefore, any combination of names, tags, metadata fields, etc. can be used to construct business-facing reports.
Storage cost can be set globally or per storage volume, directory, etc. This tool is designed to control operating costs by 1) charging clients accurately for storage of their projects and 2) clean-up/data incentivizing.
Calculation of Cost Estimates
The storage costs can either be estimated globally, by storage volume, or down a directory level. The estimations need to be done outside of Diskover. Besides the cost of the storage itself, other factors can be compounded like electricity, service contract, System Administrator’s salary, subscription fees, etc. The estimations need to be calculated and configured per gigabyte.
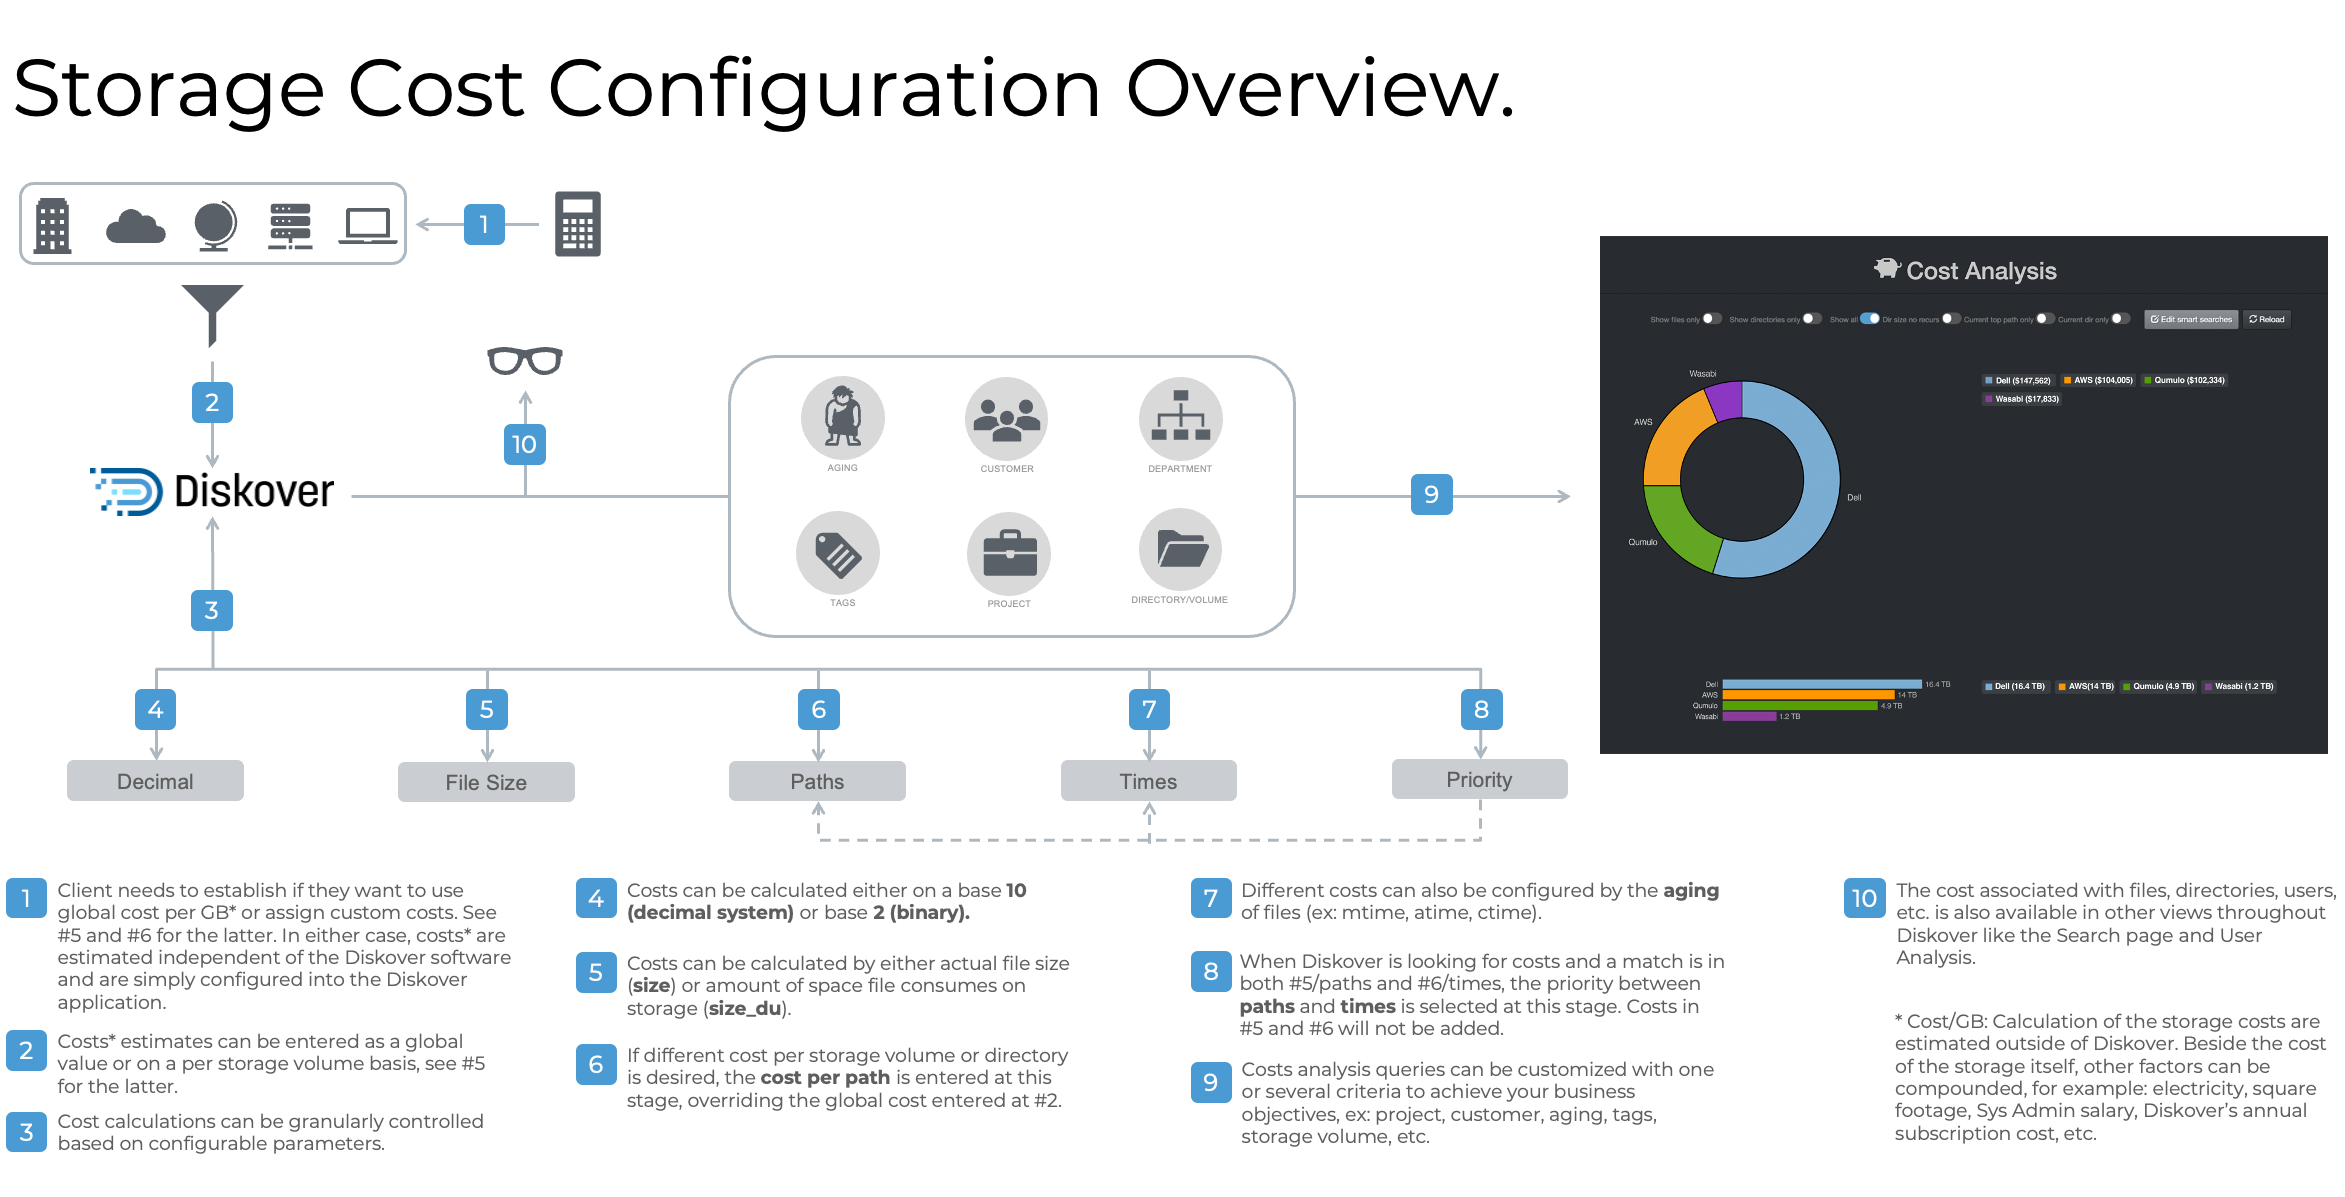 Click here for a full-screen view of this image.
Configuration of Storage Costs
Storage costs can be configured to run at index time or as a post-index process. Follow the help text instructions in DiskoverAdmin:
- To run costs at time of index: Configuration → Diskover → Configurations → Default
- To run costs as a post-index process: Configuration → Plugins → Post Index → Costs
Where to Find Costs in the User Interface
-
Analytics → Cost Analysis, which is the report discussed in this section.
-
Analytics → User Analysis
-
File search page → Cost column in the search results pane - if that column is not visible:
- Go to DiskoverAdmin → Configuration → Web → General → then go to Expose Extra Fields from Index and Post-Index Plugins
- The cost column might need to be exposed by users, from the interface go to ⛭ → Settings → Hide fields in search results
Cost Analysis Examples
Here are a few examples providing business-context insight.
Example by Project:
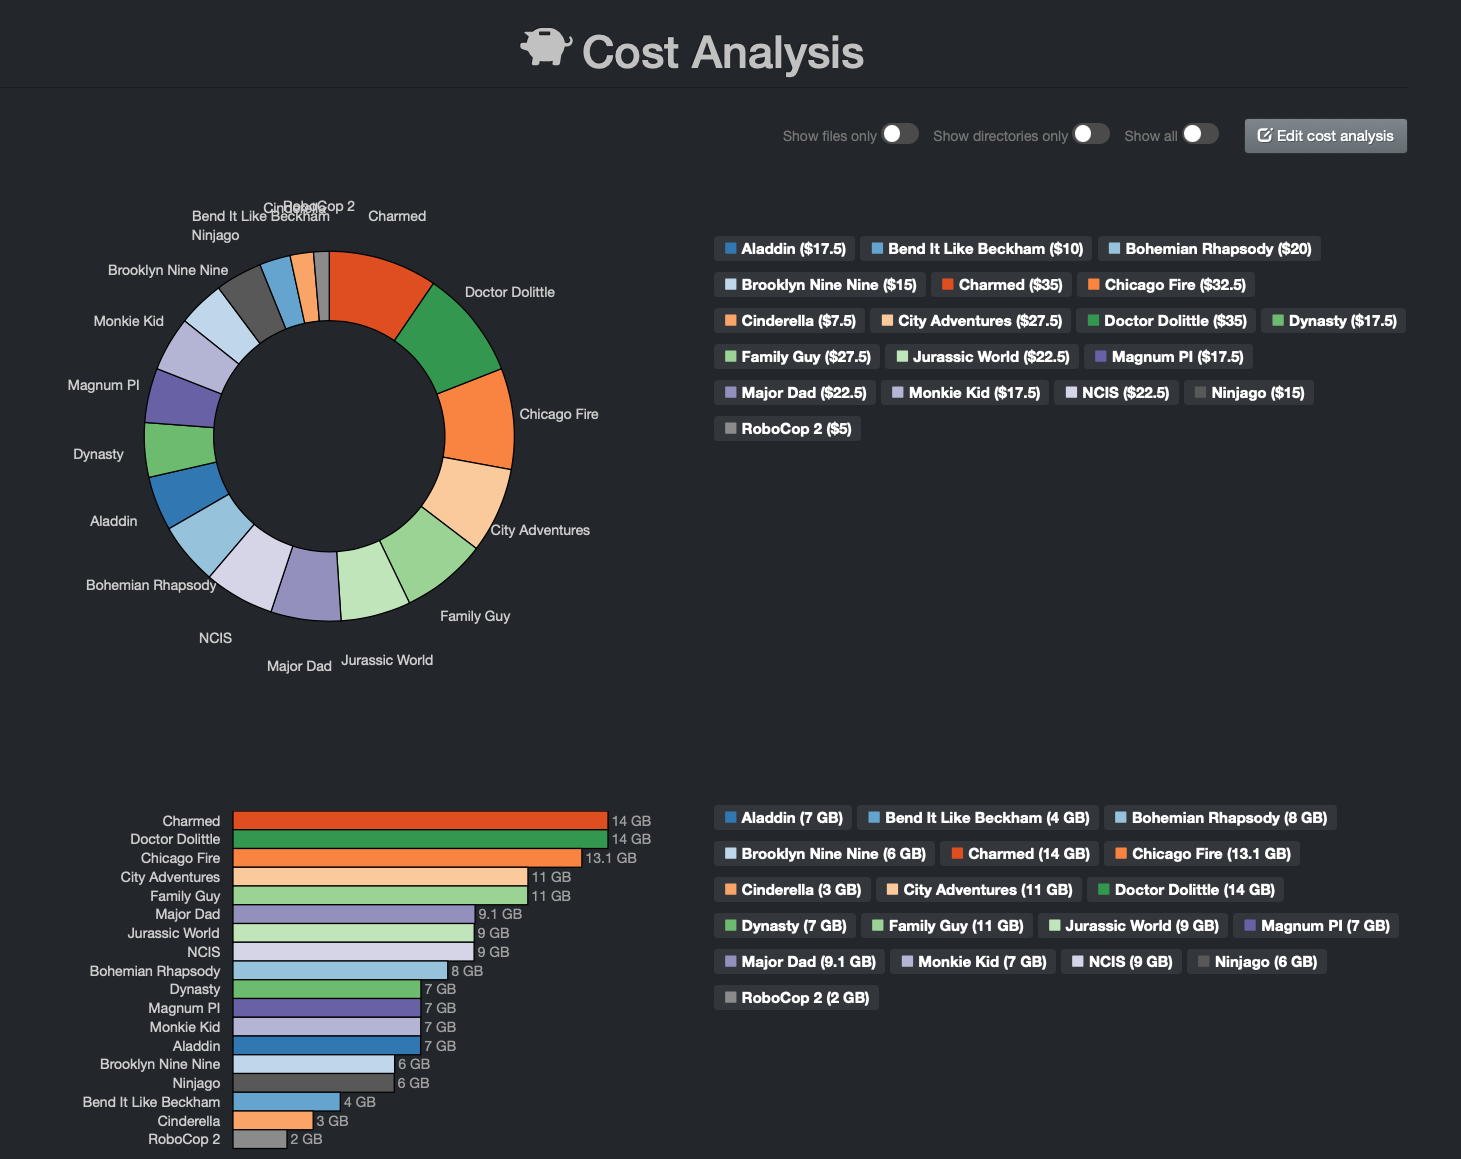
Example by Storage Provider:
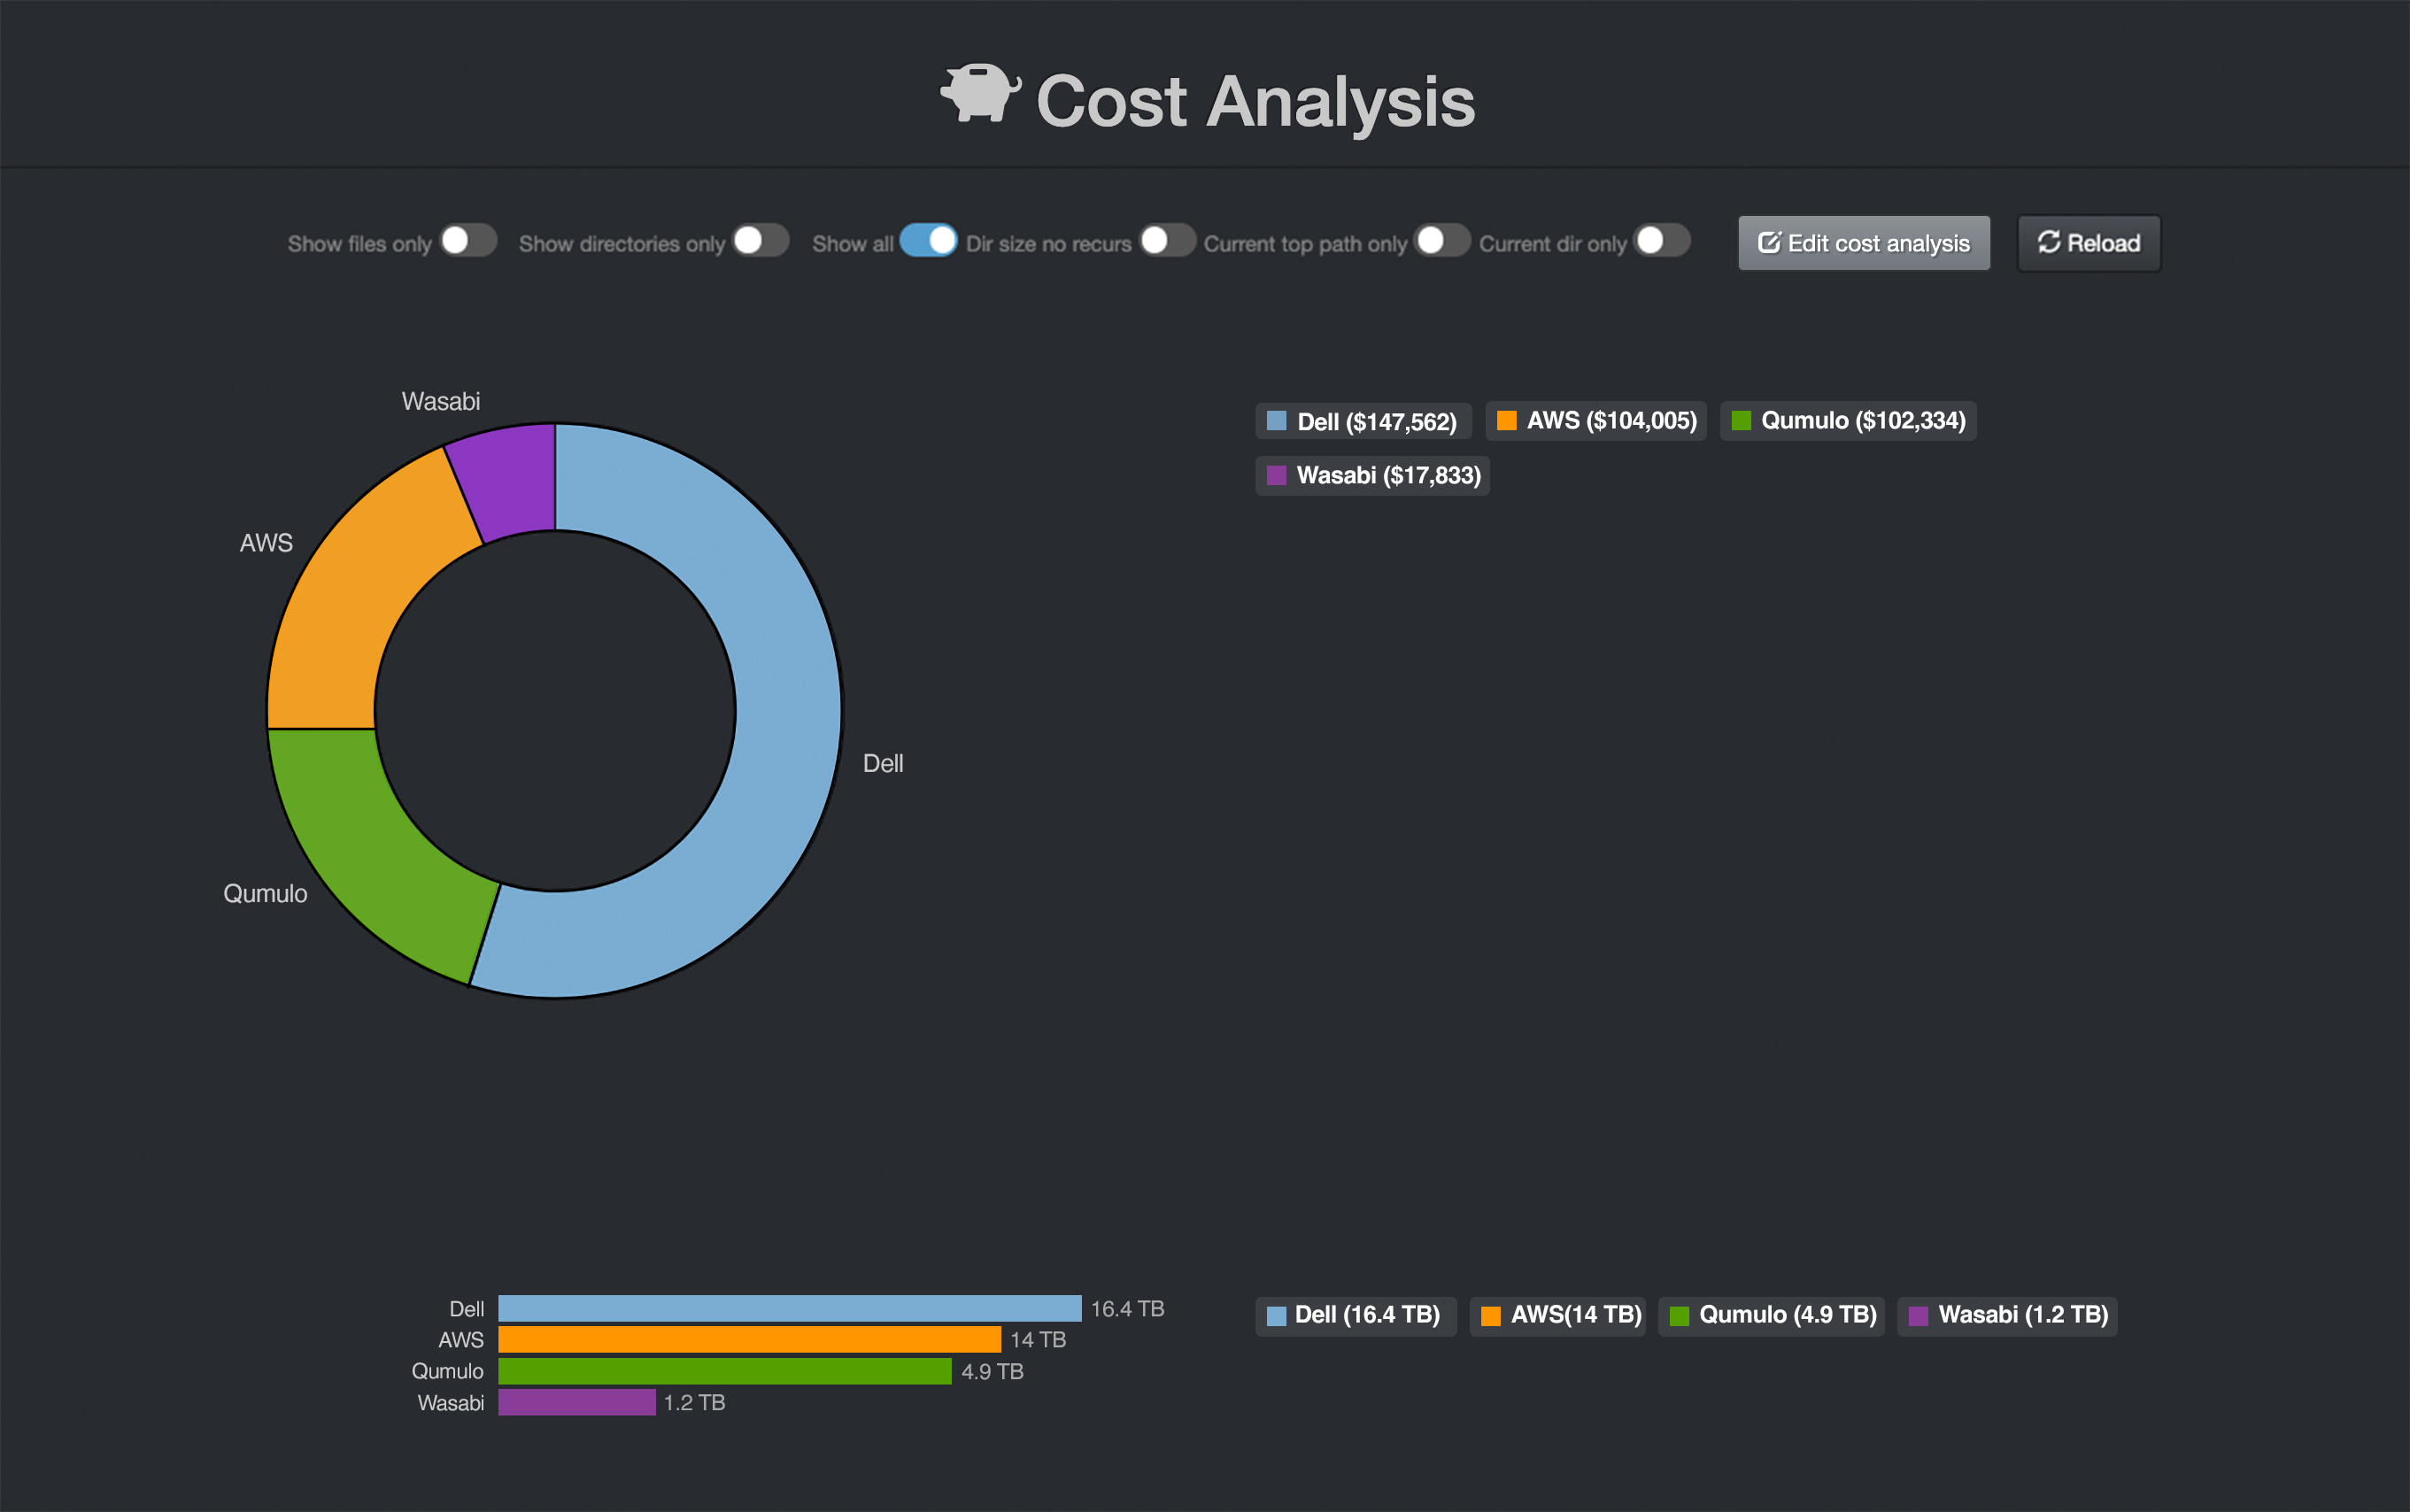
Reports Customization
🔴 To customize, start by clicking the Edit Cost Analysis button:

🔴 The editable queries will open in a new tab:
- Read all the instructions at the top for guidance.
- Modify the search queries for your use case(s).
- Click Save Cost Analysis to save your queries once done.
Indices Management
Indices Management via Diskover-Web
Diskover creates indexes within an Elasticsearch endpoint. Each index is basically a snapshot of a point in time of any given volume (filesystem or S3 Bucket). Note that indexes and indices have the same meaning, and both are used throughout this guide. These indexes require management:
- Indexes can’t be stored infinitely, and ultimately, the Elasticsearch environment will exhaust its available storage space, causing undesired cluster states.
- The index retention policy should reflect the requirements to:
- Search across various points in time within Diskover-Web.
- Perform heatmap differential comparison.
- Perform index differential comparisons via the Index Diff post-index plugin
Access the Indices Page
From the search page in Diskover-Web, select ⛭ → Indices:
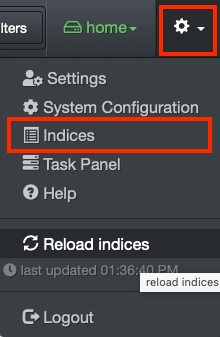
Load and Unload Indices
🔴 The Diskover-Web interface provides manual index management capabilities. By default, Diskover-Web is configured to Always use latest indices when production user logs in to Diskover.
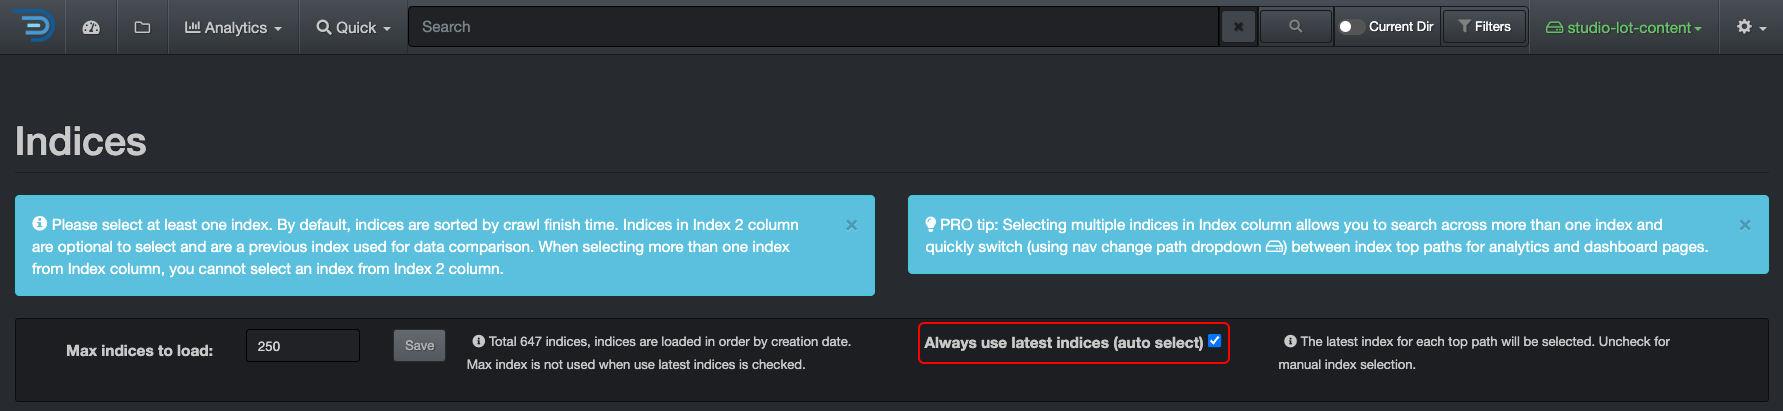
🔴 To manually manage indexes through the Diskover-Web user interface:
- Uncheck the Always Use Latest Indices. Note that index management can’t be performed on an actively loaded index.
- Unselect all indices:
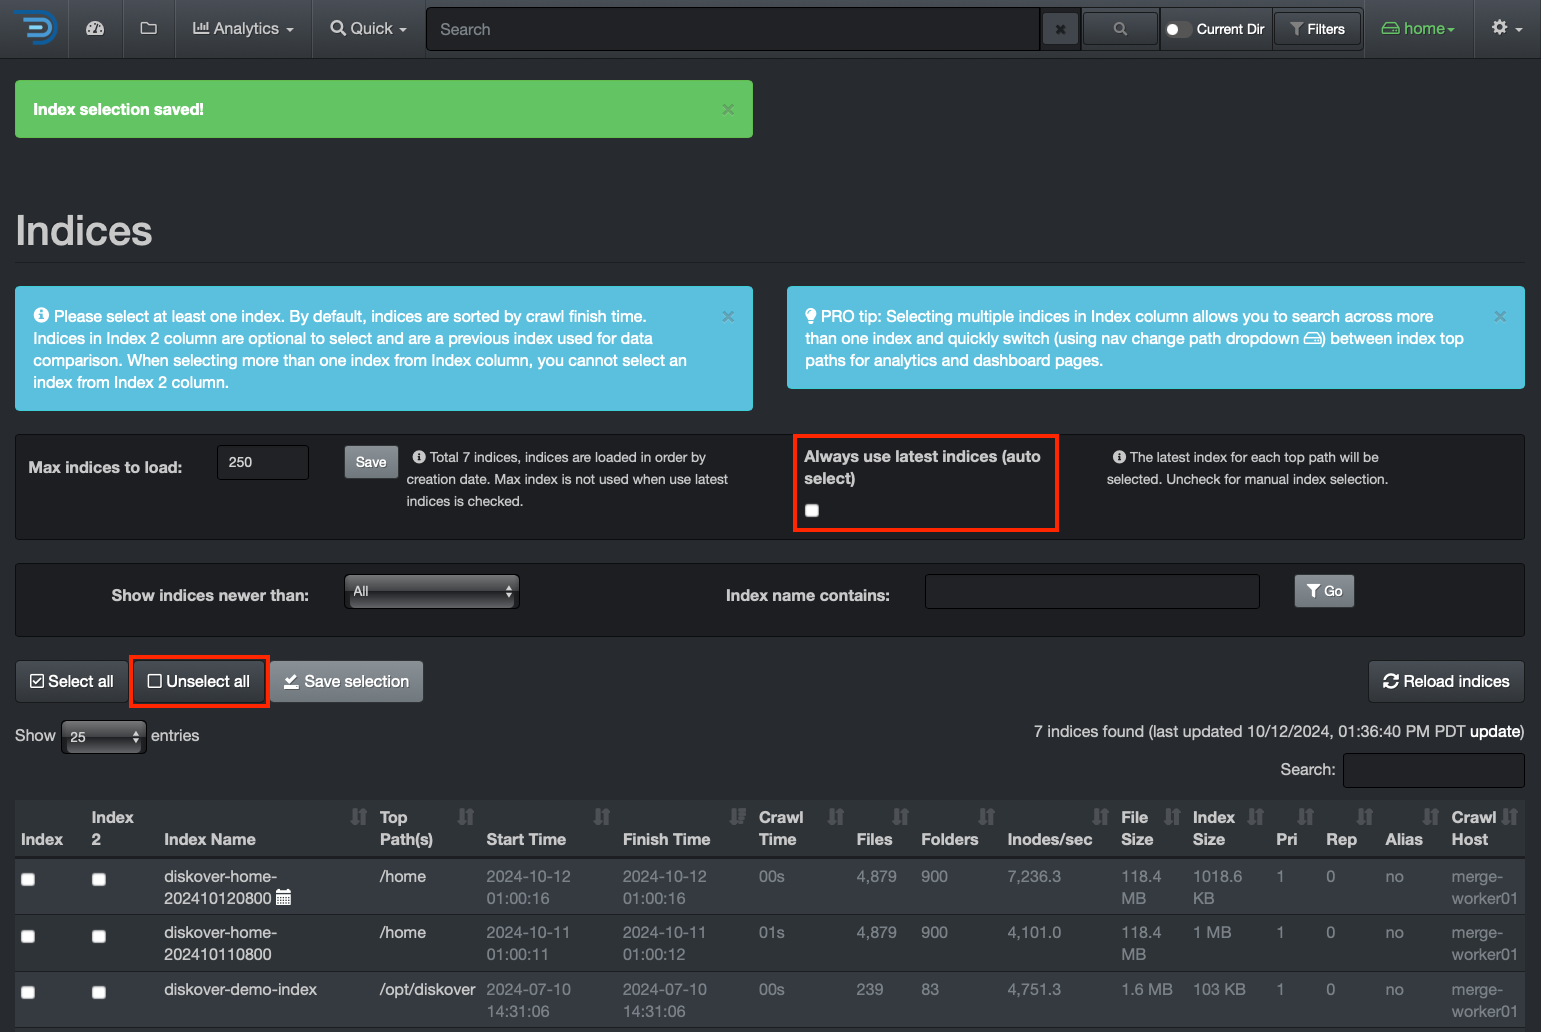
⚠️ To manage an index that is actively loaded, the desired index can be unloaded by selecting any other index and clicking Save selection.
🔴 Select another index from Index column and Save selection to load in the Diskover-Web user interface. The message Index selection saved! will appear upon the index loading successfully:
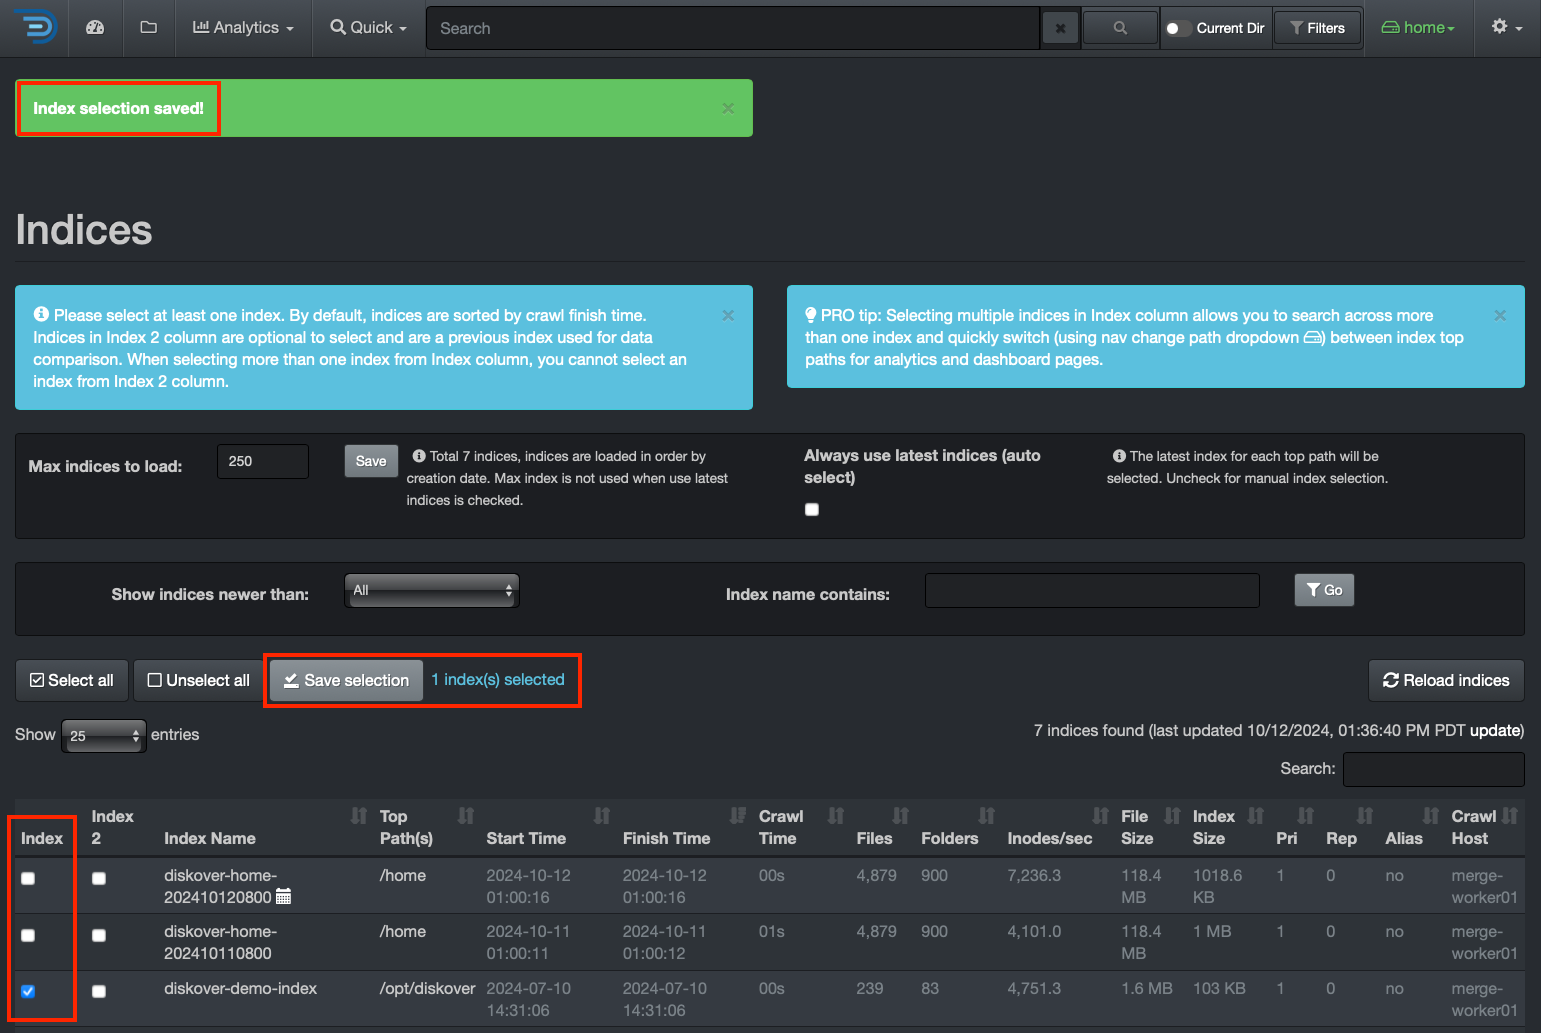
Delete Indices
ElasticSearch indices can accumulate over time, and there is an upper limit to how many shards can be associated with a node. Because of this, it is good to set up the Index Lifecycle Management (ILM) policies to remove unneeded indexes.
⚠️ The Maximum number of shards per node is 1,000 For example, if you get the following error, you will need to remove some indices to clear up some space.
Elasticsearch error creating index RequestError(400, 'validation_exception', 'Validation Failed: 1: this action would add [1] shards, but this cluster currently has [1000]/[1000] maximum normal shards open;') (Exit code: 1)
🔴 To manually delete indices thru the Diskover-Web user interface, follow the steps in the previous section to ensure the index targeted for deletion is not “loaded” within the Diskover-Web user interface.
🔴 Select index(es) targeted for deletion and click Delete. You will get a message asking Are you sure you want to remove the selected indices?, click OK:
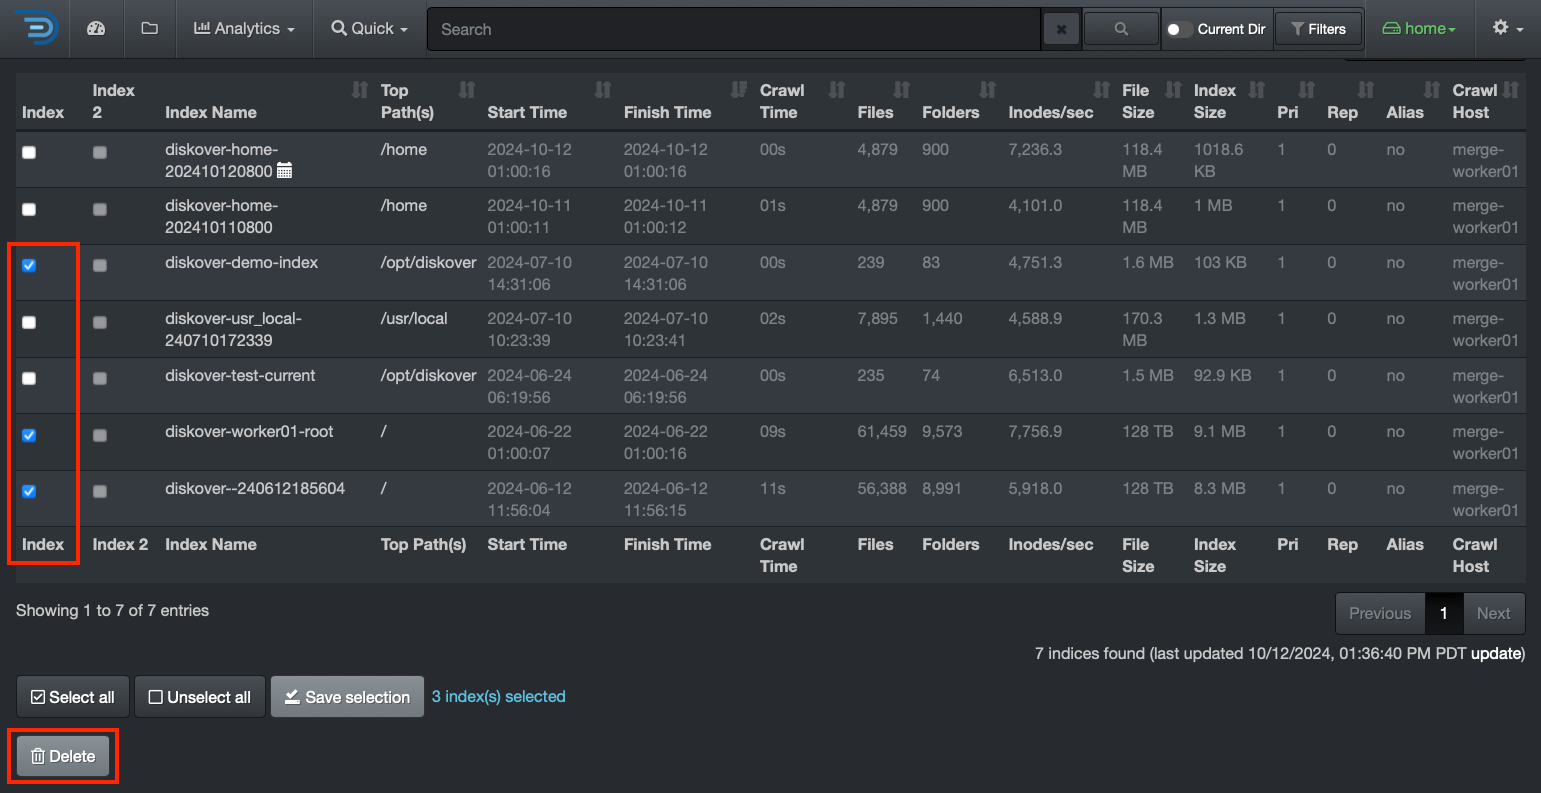
The following confirmation of successful index deletion will be displayed:

🔴 Select the Reload Indices button to ensure that the recently deleted index(es) is not displayed in the list of available indices:
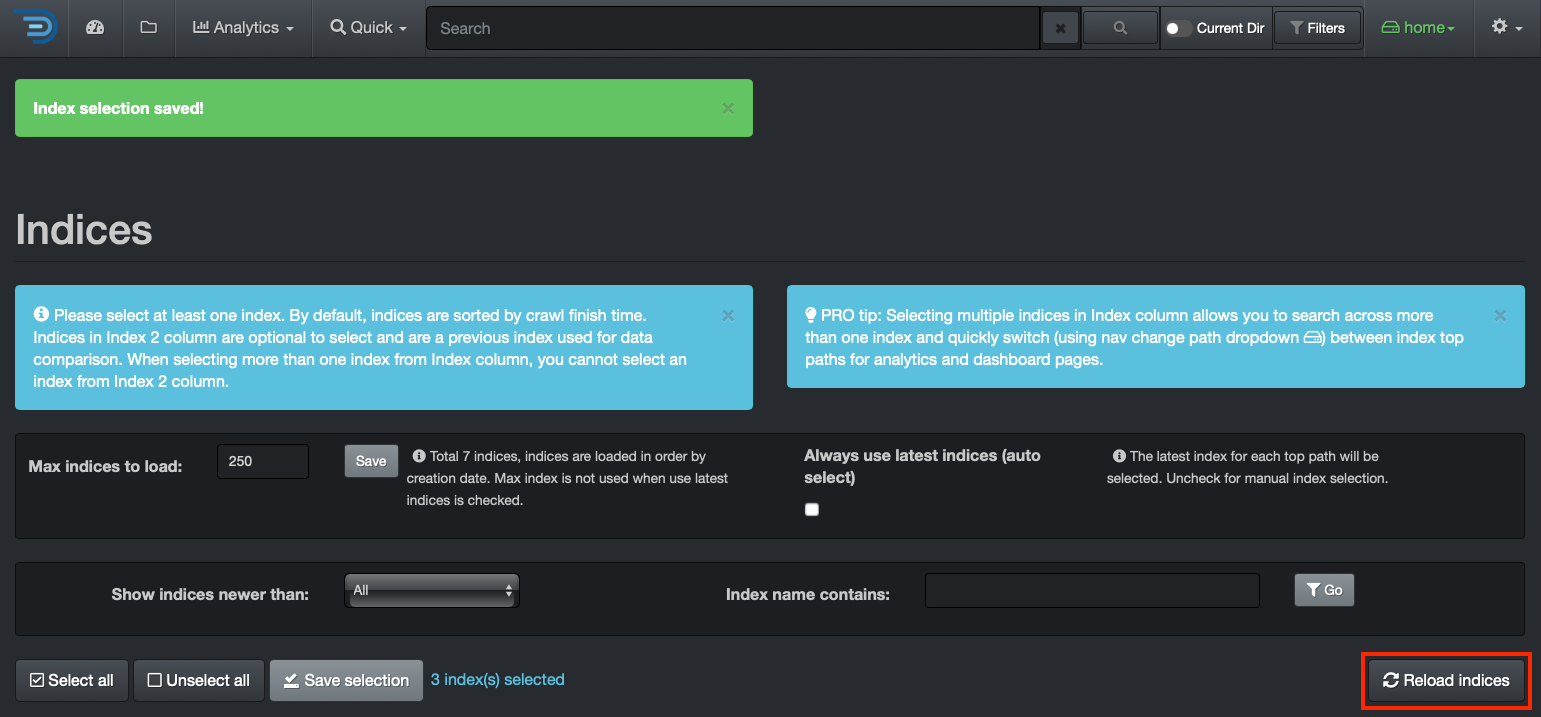
⚠️ Attempting to delete an index that is actively loaded in the Diskover-Web will result in the error message below. The index must first be unloaded as described in this section.

Elasticsearch Index Lifecycle Management via Terminal
Overview
Indices can be managed by policy and manually with Elasticsearch using curl from the command line.
⚠️ Note that it may be easier and less prone to shell issues to put the JSON text (text after -d in the single quotes) into a file first and then use that file for -d using:
curl -X PUT -H "Content-Type: application/json" -d @FILENAME DESTINATION
You can create and apply Index Lifecycle Management (ILM) policies to automatically manage your Diskover indices according to your performance, resiliency, and retention requirements.
More information on index lifecycle management can be found on elastic.co.
The following provides an example for managing Diskover indices on your Elasticsearch cluster by creating a policy that deletes indices after 30 days for new Diskover indices:
🔴 Your Elasticsearch server is accessible at http://elasticsearch:9200
🔴 In this example:
- Indices will be purged after 30 days 30d
- Your policy name will be created as cleanup_policy_diskover
curl -X PUT "http://elasticsearch:9200/_ilm/policy/cleanup_policy_diskover?pretty" \
     -H 'Content-Type: application/json' \
     -d '{
      "policy": {
        "phases": {
          "hot": {
            "actions": {}
          },
          "delete": {
            "min_age": "30d",
            "actions": { "delete": {} }
          }
        }
      }
    }'
🔴 You can apply this policy to all existing Diskover indices based on index name pattern:
curl -X PUT "http://elasticsearch:9200/diskover-*/_settings?pretty" \
     -H 'Content-Type: application/json' \
     -d '{ "lifecycle.name": "cleanup_policy_diskover" }'
🔴 You can create a template to apply this policy to new Diskover indices based on the index name pattern:
    curl -X PUT "http://elasticsearch:9200/_template/logging_policy_template?pretty" \
     -H 'Content-Type: application/json' \
     -d '{
      "index_patterns": ["diskover-*"],
      "settings": { "index.lifecycle.name": "cleanup_policy_diskover" }
    }'
Other Index Management via Command Line
Indexes can be manually listed and deleted in Elasticsearch via:
🔴 List indices, see Elasticsearch cat index api for more info:
curl -X GET http://elasticsearch_endpoint:9200/_cat/indices
🔴 Delete indices, see Elasticsearch delete index api for more info:
curl -X DELETE http://elasticsearch_endpoint:9200/diskover-indexname
🔴 Delete indices on AWS OpenSearch:
curl -u username:password -X DELETE https://endpoint.es.amazonaws.com:443/diskover-indexname
Elasticsearch Index Lifecycle Management via Kibana
If you are interested in using Kibana for your ILM, please open a support ticket, and we will send you a quick policy setup guide.
Index State Management in Amazon OpenSearch Service
✏️ Helpful links:
🔴 In this example:
- Your AWS Elasticsearch Service endpoint url is
<aws es endpoint> - You want your indices to be purged after seven days 7d
- Your policy name will be created as cleanup_policy_diskover
curl -u username:password -X PUT "https://<aws es endpoint>:443/_opendistro/_ism/policies/cleanup_policy_diskover" \
     -H 'Content-Type: application/json' \
     -d '{
      "policy": {
        "description": "Cleanup policy for diskover indices on AWS ES.",
        "schema_version": 1,
        "default_state": "current",
        "states": [{
          "name": "current",
          "actions": [],
          "transitions": [{
            "state_name": "delete",
            "conditions": {
              "min_index_age": "7d"
            }
          }]
          },
          {
            "name": "delete",
            "actions": [{
              "delete": {}
            }],
            "transitions": []
          }
        ],
        "ism_template": {
          "index_patterns": ["diskover-*"],
          "priority": 100
        }
      }
        }'
🔴 Apply this policy to all existing diskover indices:
curl -u username:password -X POST "https://<aws es endpoint>:443/_opendistro/_ism/add/diskover-*" \
     -H 'Content-Type: application/json' \
     -d '{ "policy_id": "cleanup_policy_diskover" }'
Everything Else Chapter
PyEnv
This section will guide you through the global installation of PyEnv. PyEnv lets you easily switch between multiple versions of Python. It’s simple, unobtrusive, and follows the UNIX tradition of single-purpose tools that do one thing well.
⚠️ IMPORTANT!
- PyEnv installs a Python environment on a per-user basis. Thus you must ensure to install the PyEnv as the user that is running the Diskover service.
- PyEnv GitHub repository
🔴 Install git:
yum install git
🔴 Install PyEnv:
curl https://pyenv.run | bash
🔴 Add to .bashrc or .bash_profile:
export PYENV_ROOT="$HOME/.pyenv"
[[ -d $PYENV_ROOT/bin ]] && export PATH="$PYENV_ROOT/bin:$PATH"
eval "$(pyenv init -)"
🔴 yum package installs:
yum install gcc make patch zlib-devel bzip2 bzip2-devel readline-devel sqlite sqlite-devel openssl-devel tk-devel libffi-devel xz-devel
🔴 Install Python version 3.12.4 using PyEnv:
pyenv install 3.12.4
🔴 Display the PyEnv version currently in use:
pyenv
🔴 Update Pyenv to the latest version:
pyenv update
🔴 Show the currently active Python version managed by PyEnv:
pyenv version
🔴 List all Python versions installed via PyEnv:
pyenv versions
🔴 The next commands are optional. Choose based on a temporary or permanent Python3 version for your environment.
- Temporary - Set Python 3.12.4 as the current shells Python3 version:
pyenv shell 3.12.4
- Permanent - Set Python 3.12.4 as the global (default) Python3 version:
pyenv global 3.12.4
Third-Party Analytics
You can optionally use third-party analytical tools, such as Kibana, Tableau, Grafana, PowerBI, and others, to read the Elasticsearch metadata library besides Diskover-Web. Diskover does not technically support these optional tools, and only the installation of Kibana is described in this section.
Kibana v8
- Note that only Kibana v8 can be used with Elasticsearch v8.
- Additional information on installating Kibava v8 via RPM repository.
- For securing Elasticsearch and Kibana, follow this user guide to set up security, as by default, Elasticsearch has no security enabled:
🔴 Get Kibana:
name=Kibana repository for 8.x packages
baseurl=https://artifacts.elastic.co/packages/8.x/yum
gpgcheck=1
gpgkey=https://artifacts.elastic.co/GPG-KEY-elasticsearch
enabled=1
autorefresh=1
type=rpm-md
🔴 Create the above kibana.repo file in:
/etc/yum.repos.d/
🔴 Install Kibana:
dnf install kibana
vi /etc/kibana/kibana.yml
        server.host: "<host ip>"
        elasticsearch.hosts: ["http://<es host ip>:9200"]
🔴 Start and enable the Kibana service:
systemctl enable kibana.service
systemctl start kibana.service
systemctl status kibana.service
🔴 It will take a moment for Kibana to fully start. You can run this tail command to know when it is available for you:
tail -f /var/log/kibana/kibana.log | grep 'Kibana is now available'
Software Activation
Licensing Overview
The Diskover Community Edition doesn't require a license key and can be used for an unlimited time.
The Diskover annual subscription Editions require a license. Unless otherwise agreed:
- A trial license is usually valid for 30 days and is issued for 1 Elasticsearch node.
- A paid subscription license is valid for 1 year. Clients will be contacted about 90 days before their license expiration with a renewal proposal.
Please reach out to your designated Diskover contact person or contact us directly for more information.
License Issuance Criteria
Licenses are created using these variables:
- Your email address
- Your hardware ID number
- Your Diskover Edition
- The number of Elasticsearch nodes.
Hardware ID Generation
Your hardware ID should have been automatically generated when going through the Initial Configuration section. The following command is listed in case you need to manually generate your hardware ID. Please send that unique identifier along with your license request as needed.
🔴 Become the root user:
sudo -i
🔴 To manually create your hardware ID:
cd /opt/diskover
python3 diskover_lic.py -g
After installing Diskover and completing the basic configuration, you will need to generate a hardware ID. Please send that unique identifier along with your license request.
⚠️ IMPORTANT!
- Check that you have configured your Elasticsearch host correctly, as it is part of the hardware ID encoding process.
- Note that if your Elasticsearch cluster ID changes, you will need new license keys.
License Key Locations in DiskoverAdmin Panel
- From the main Diskover user interface, click on the ⛭ at the top right corner.
- Select ⛭ System Configuration or navigate to http://localhost:8000/diskover_admin/config/License
- Open the License tab and paste the files into their respective boxes.
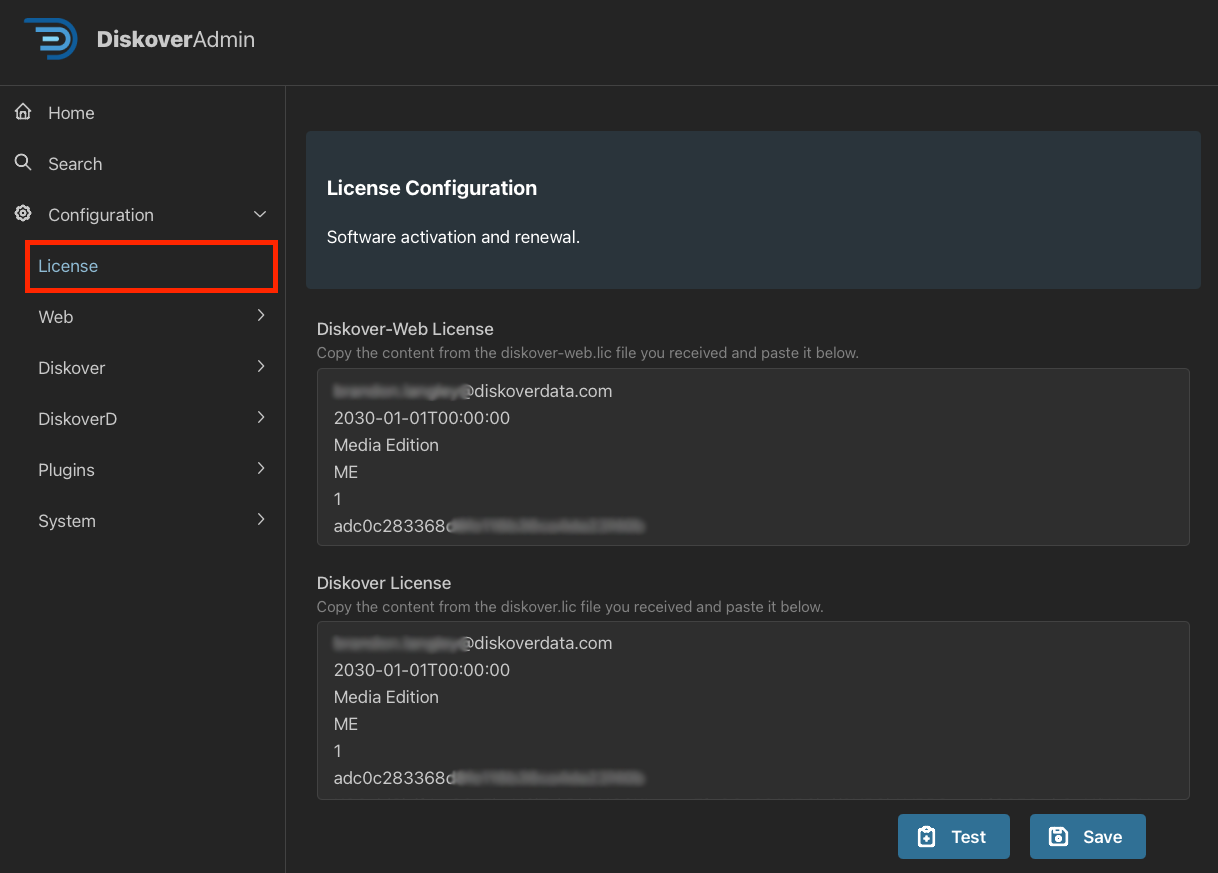
Upgrade to Diskover v2.4
Upgrade from Community Edition to a Subscription
If you are currently using Diskover Community Edition and purchased a subscription Edition, please click here to open a support ticket, and we'll gladly assist you with this step of your deployment.
Upgrade from v2.2x/v2.3 to v2.4
Click here to open a support ticket and our team will set you up with all that you need to upgrade.
Health Check
The following section outlines health checks for the various Diskover's components.
🚧 We're hard at work updating these instructions. Meanwhile, click here to open a support ticket, and we'll gladly assist you with checking the health of your environment.
Elasticsearch Domain
Click the following links to view more instructions on how to verify the health of your Elasticsearch services without SSL and with SSL.
Status of Elasticsearch Service for Linux
🔴 Check status of Elasticsearch service:
systemctl status elasticsearch.service

Status of Elasticsearch Cluster for Linux
🔴 Check status of Elasticsearch Cluster Health:
curl http://ip_address:9200/_cluster/health?pretty
curl -u username:p4ssword http://ip_address:9200/_cluster/health?pretty
curl -u username:password https://aws_endpoint:443/_cluster/health?pretty
List Master Node -
curl http://ip_address:9200/_cat/master?v
Status of Elasticsearch Service for Windows
🔴 To check the status of the Elasticsearch service under Windows, open Services by typing services in the search bar.
🔴 Ensure the Elasticsearch service is running:
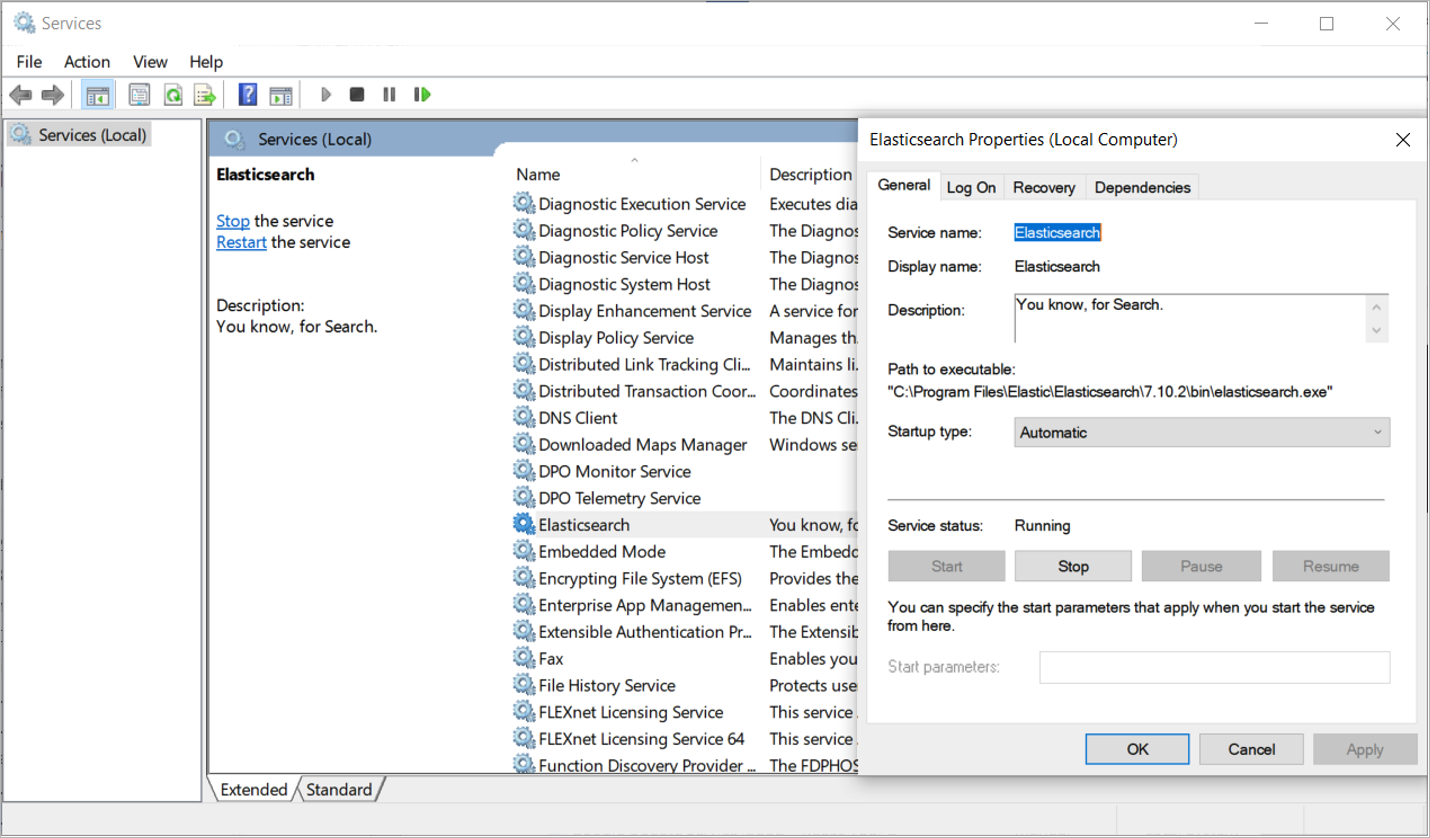
Diskover-Web
To validate health of the Diskover-Web, basically ensures the Web serving applications are functioning properly.
Diskover-Web for Linux
🔴 Check status of NGINX service:
systemctl status nginx

🔴 Check status of PHP-FPM service:
systemctl status php-fpm

Diskover-Web for Windows
🔴 Check status of NGINX service.
🔴 Open Windows Powershell:
get-process | Select-String "nginx"
🔴 Check status of PHP-FPM service.
🔴 Open Windows Powershell:
get-process | Select-String "php"
Celery
🚧 We're hard at work preparing these instructions. Meanwhile, click here to open a support ticket, and we'll gladly assist you with your Celery healh check.
RabbitMQ
🔴 Run diagnostic status:
rabbitmq-diagnostics status
Routine Maintenance
The routine maintenance of Diskover consists of ensuring your environment is up to date with current software versions as they become available. Please check the requirements section for the latest approved versions.
Update Diskover and Diskover-Web
- To update Diskover and Diskover-Web to the latest version, refer to the Software Updates section of this guide
- To make sure you always run the latest version of Diskover, please subscribe to our newsletter to stay informed of new releases.
Update Elasticsearch
Routine maintenance of the AWS Elasticsearch environment consists of two components: 1) managing your indices, and 2) upgrading your Elasticsearch versions as they become available, tested, and approved by Diskover.
- Refer to the Indices Management section for all detail.
- Refer to the Software Updates section of this guide.
Emergency Maintenance
The following section describes how to troubleshoot and perform emergency maintenance for Diskover components.
🚧 We're hard at work updating these instructions. Meanwhile, click here to open a support ticket, and we'll gladly assist you with troubleshooting your critical issue.
Diskover-Web
A few ways to identify and solve Diskover-Web issues.
Unable to Access Diskover-Web from Browser:
🔴 Ensure the Web server is running:
systemctl status nginx
systemctl status php-fpm
🔴 Check the NGINX Web server error logs:
tail -f /var/log/nginx/error.log
🔴 Trace access from Web session by reviewing NGINX access logs. Open a Web browser and attempt to access Diskover-Web; the access attempt should be evident in the access log:
tail -f /var/log/nginx/access.log
Elasticsearch Domain
To identify and solve common Elasticsearch issues, refer to:
Helpful Commands
Here are some helpful Elasticsearch commands to get started.
⚠️ Your Elasticsearch server is accessible at http://elasticsearch:9200
🔴 Check your cluster health:
curl [http://elasticsearch:9200/_cat/health?v](http://elasticsearch:9200/_cat/health?v)

🔴 List indices:
curl -X GET http://elasticsearch:9200/_cat/indices
🔴 Delete indices:
curl -X DELETE http://elasticsearch:9200/diskover-indexname
🔴 Username/Password - To query the Elasticsearch cluster with login credentials:
curl -u login:password https://elasticsearch:9200/_cat/indices
Uninstall Diskover
The following outlines how to uninstall the Diskover's components.
🚧 We're hard at work updating these instructions. Meanwhile, click here to open a support ticket, and we'll gladly assist you with uninstalling all the Diskover components.
Uninstall Elasticsearch
🔴 Determine the Elasticsearch version installed:
rpm -qa | grep elastic

🔴 In the above example, remove elasticsearch-7.10.1-1.x86_64. 🚧 Note that instructions for Elaticsearch v8 are being prepared:
rpm -e elasticsearch-7.10.1-1.x86_64

Uninstall PHP-FPM
🔴 Determine PHP-FPM version installed:
rpm -qa | grep php-fpm
🔴 In the previous example, remove php-fpm-7.3.26-1.el7.remi.x86_64. 🚧 Note that instructions for PHP v8 are being prepared:
rpm -e php-fpm-7.3.26-1.el7.remi.x86_64

Uninstall NGINX
🔴 Determine NGINX version installed:
rpm -qa | grep nginx
🔴 In the above example, remove all NGINX with the --nodeps argument to uninstall each package in the above list:
rpm -e --nodeps rpm -qa | grep nginx
Uninstall Diskover-Web
🔴 To uninstall the Diskover-Web components, simply remove the install location:
rm -rf /var/www/diskover-web
Uninstall Task Worker Daemon
Uninstall Task Daemon for Linux
🔴 To uninstall the Task Daemon on Diskover scanners perform the following:
systemctl stop diskoverd.service
rm /etc/systemd/system/diskoverd.service
Uninstall Task Daemon for Windows
🚧 We're hard at work preparing these instructions. Thanks for your patience!
Uninstall Task Daemon for Mac
🚧 We're hard at work preparing these instructions. Thanks for your patience!
Uninstall Diskover Scanners/Task Workers
Uninstall Scanners for Linux
🔴 To uninstall the Diskover indexer components simply remove the install location:
rm -rf /opt/diskover
🔴 Remove the configuration file locations:
rm -rf /root/.config/diskover*
Uninstall Scanners for Windows
🚧 We're hard at work preparing these instructions. Meanwhile, click here to open a support ticket, and we'll gladly assist you with uninstalling all the Diskover components.
Uninstall Scanners for Mac
🚧 We're hard at work preparing these instructions. Meanwhile, click here to open a support ticket, and we'll gladly assist you with uninstalling all the Diskover components.
Text
Content
Support
Support Options
| Support & Ressources | Free Community Edition | Annual Subscription* |
|---|---|---|
| Online Documentation | ✅ | ✅ |
| Slack Community Support | ✅ | ✅ |
| Diskover Community Forum | ✅ | ✅ |
| Knowledge Base | ✅ | ✅ |
| Technical Support | ✅ | |
Phone Support
|
✅ | |
| Remote Training | ✅ |
*
Feedback
We'd love to hear from you! Email us at info@diskoverdata.com
Warranty & Liability Information
Please refer to our Diskover End-User License Agreements for the latest warranty and liability disclosures.
Contact Diskover
| Method | Coordinates |
|---|---|
| Website | https://diskoverdata.com |
| General Inquiries | info@diskoverdata.com |
| Sales | sales@diskoverdata.com |
| Demo request | demo@diskoverdata.com |
| Licensing | licenses@diskoverdata.com |
| Support | Open a support ticket with Zendesk 800-560-5853 | Mon-Fri 8am-6pm PST |
| Slack | Join the Diskover Slack Workspace |
| GitHub | Visit us on GitHub |
© Diskover Data, Inc. All rights reserved. All information in this manual is subject to change without notice. No part of the document may be reproduced or transmitted in any form, or by any means, electronic or mechanical, including photocopying or recording, without the express written permission of Diskover Data, Inc.