![]()
Diskover User Guide
This guide is intended for the daily operations of Diskover's core features.
Introduction
Overview
Diskover is a powerful platform that helps individuals and businesses manage and understand their data more efficiently. It organizes large amounts of information in one global view, making it easy to find, analyze, and use. With Diskover, you can automate processes, improve workflows, reduce costs, and vastly improve overall efficiencies.
Although Diskover is intuitive and easy to operate by any user, its installation and configuration must be accomplished by a System Administrator or someone with equivalent expertise.
For more information about Diskover, please visit diskoverdata.com
Document Conventions
| TOOL | PURPOSE |
|---|---|
| text in blue font | Click any text/link in blue font to navigate directly to that section. |
| 🔆 | Indicates a tip |
| ✏️ | Indicates a note |
| ⚠️ | Indicates a warning |
| 🍿 | Indicates that a video is available on the subject |
| Features Categorization | IMPORTANT
|
| Core Features |     |
| Industry Add-Ons | These labels will only appear when a feature is exclusive to a specific industry.    |
Software Overview
🍿 Watch Baiscs & Beyond | Software Overview
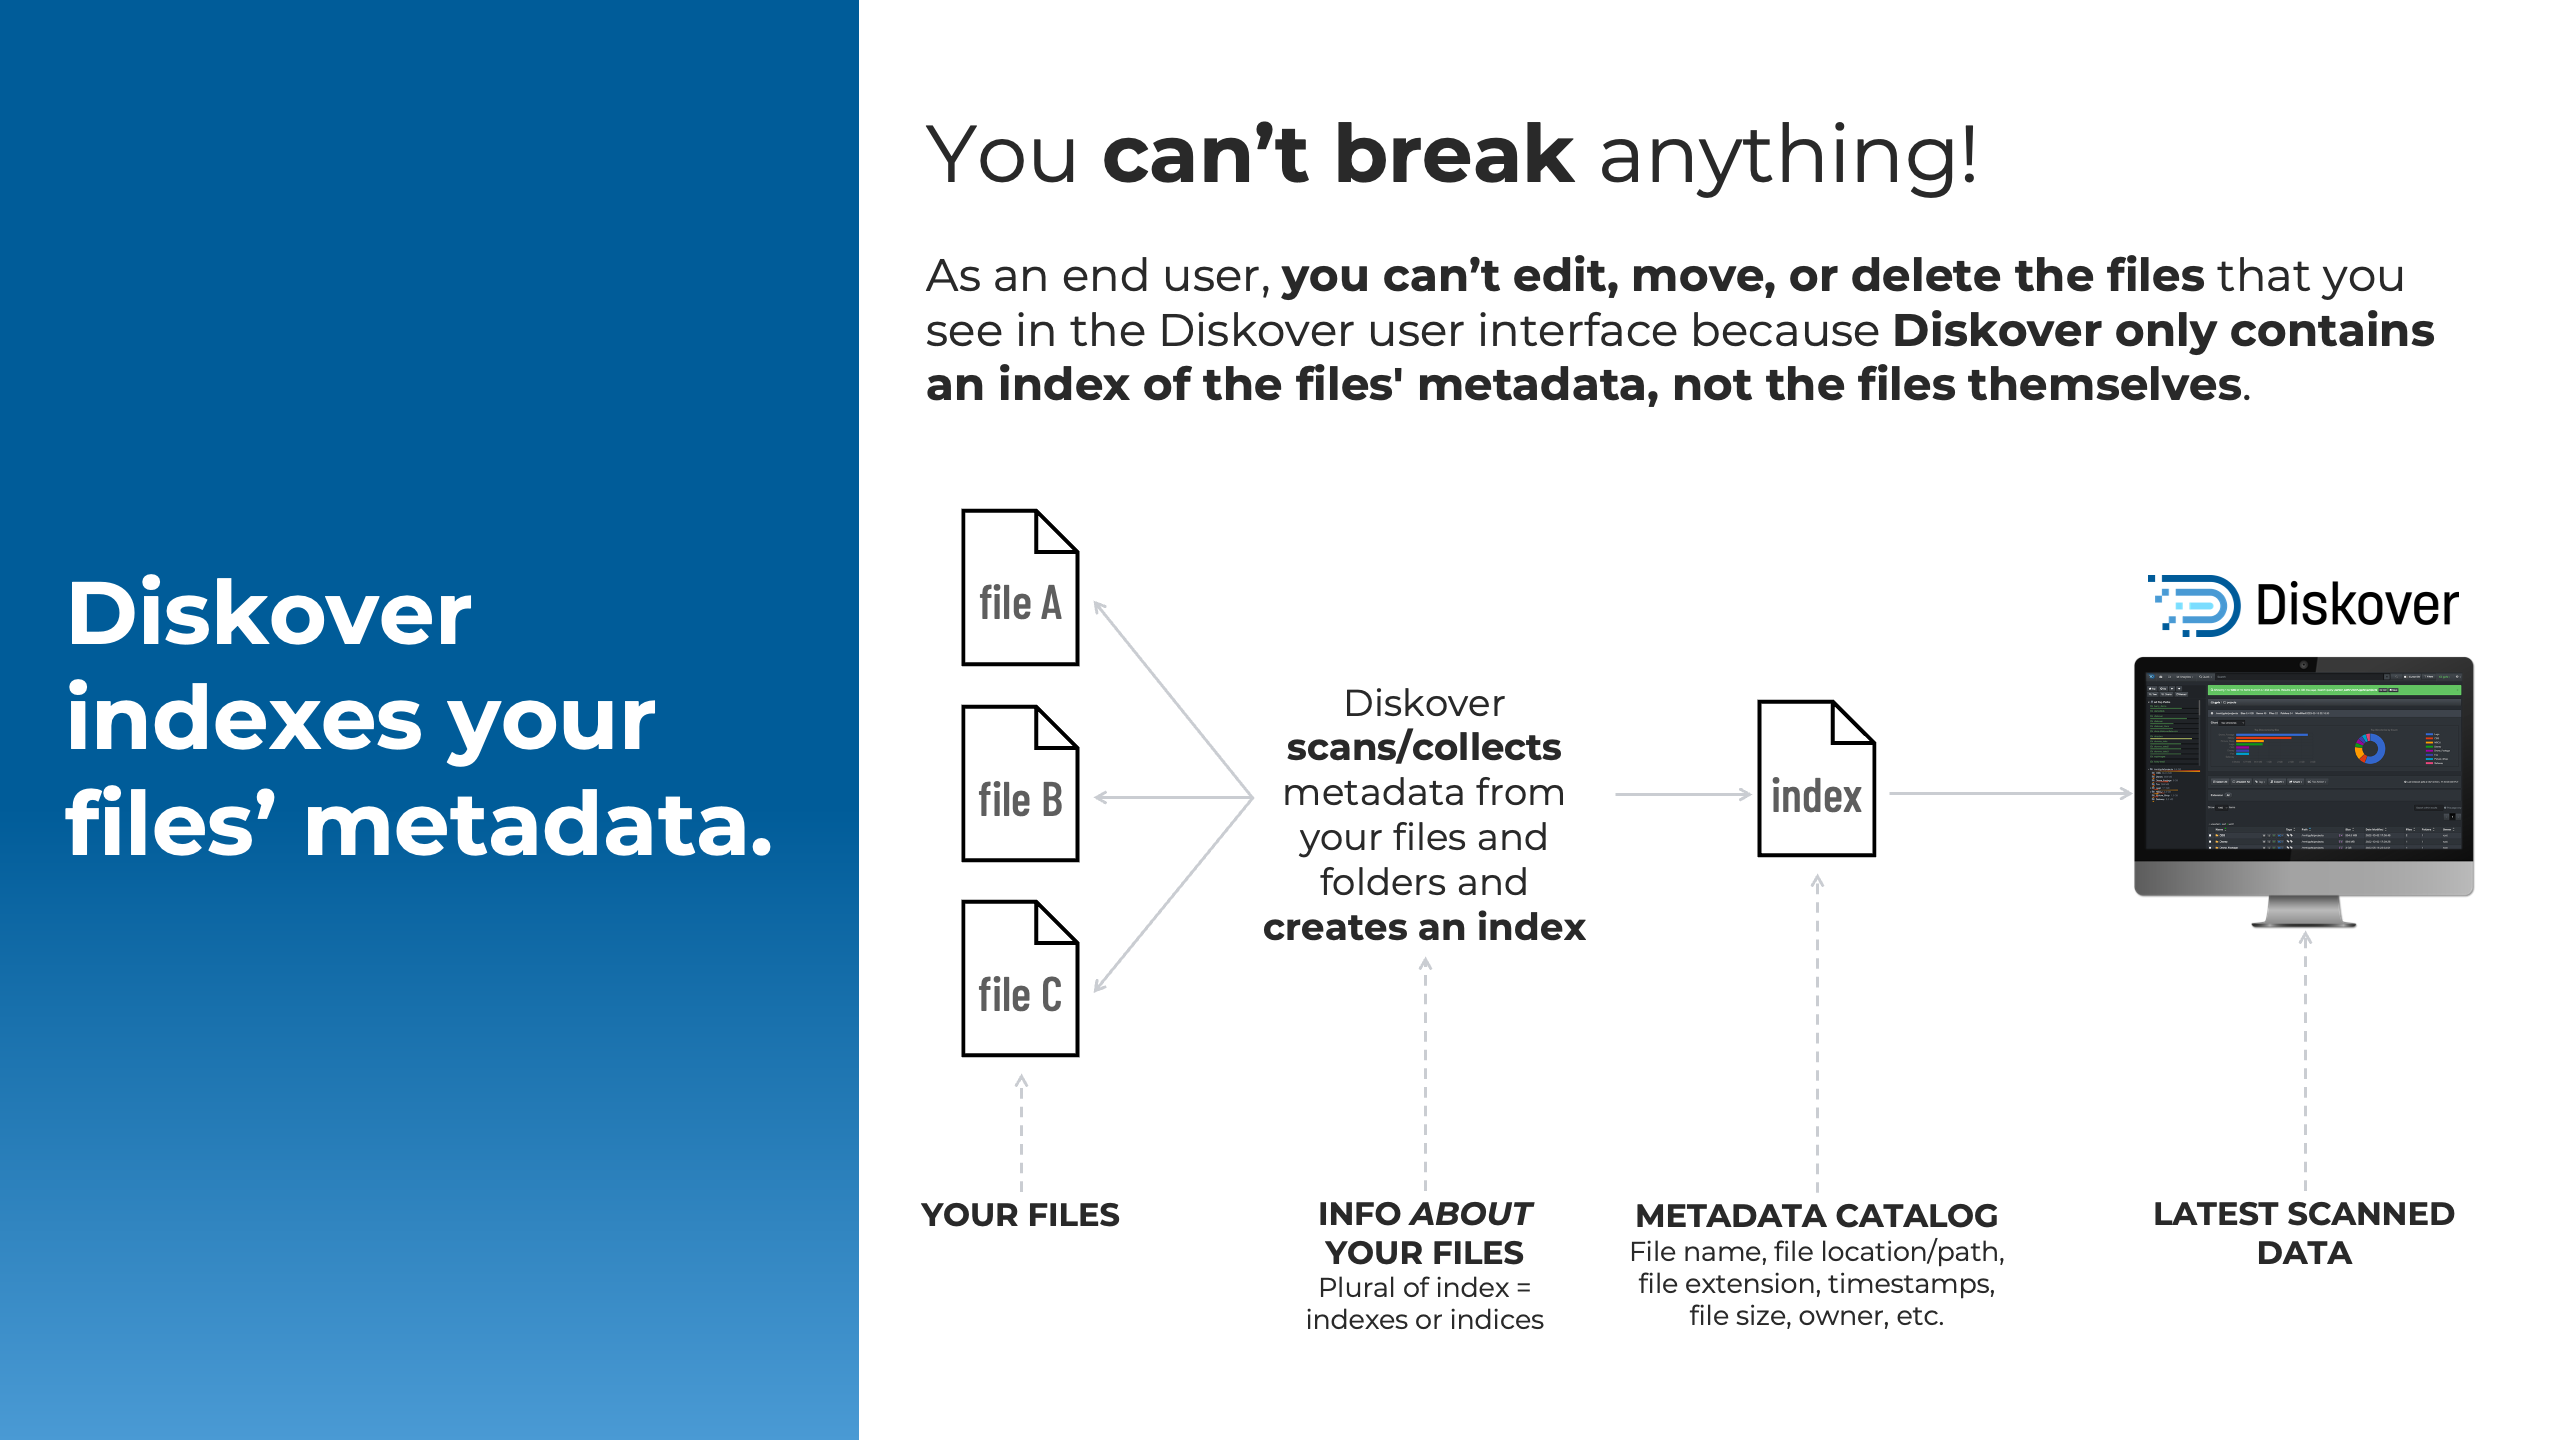
You Can't Break Anything
As an end-user, you can’t break anything. You can't personally edit, move, or delete the files that you see in the user interface because Diskover only contains an index of the metadata of the files, not the files themselves. So don’t be shy to click around.
Features Overview
Diskover offers several features and plugins depending on your environment and needs.
| FEATURE | DESCRIPTION |
|---|---|
| Search | Global searches using built-in tools, manual queries, or a combination of both. |
| Analytics | Several pre-established and customizable reports allow for informed decision-making. |
| Enrich | Diskover’s powerful harvest plugins collect extra attributes, adding rich business context to your metadata catalog. |
| Actions | Limitless possibilities through File Action plugins serving various purposes. |
| Orchestrate | Automated workflows, usually set by your data manager or sys admin, allowing for your data lifecycle management. |
Access to Features
While some plugins may offer users limited control over data (e.g., data movement), Diskover primarily functions as a search and read-only tool, with a strong focus on maintaining data integrity and protection. As an end-user working with Diskover, you may encounter the icon below. This indicates that you’ll need to reach out to someone with an admin-level account to address your request.

| FEATURE | USER | ADMIN | SYS ADMIN |
|---|---|---|---|
| Software install and config | ✔ | ||
| Search | ✔ | ✔ | ✔ |
| Analytics | ✔ | ✔ | ✔ |
| Analytics editing | ✔ | ✔ | |
| Export and share results | ✔ | ✔ | ✔ |
| Manual tagging | ✔ | ✔ | ✔ |
| Manual tags editing | ✔ | ✔ | |
| Automated tagging | ✔ | ||
| File Action plugins | as authorized | ✔ | ✔ |
| Automated workflows | ✔ |
Terminology
While the terms in this section may have different meanings in other contexts, they are defined here specifically for the Diskover end-user environment.
Data Curation
Data curation is the practice of managing data collected from various sources as a valuable asset to unlock its potential and organization. Managing data effectively requires having a data strategy and reliable methods to access, integrate, cleanse, govern, store, and prepare data for analytics. The value of the data is maintained over time and remains available for reuse and preservation.
Volume
A storage repository indexed by Diskover, for example, Windows Share/drive, Linux mount/NFS Export, cloud storage/S3 bucket, Dell PowerScale, a laptop, a USB drive, etc.
Examples of other names for volume that might be used in your organization are storage volume, storage mount, mount point, top-level path, top-level storage directory, etc.
Learn → how to select a volume.
Index/Indexes/Indices
An index is an inventory of all the metadata, aka attributes, about a file on a volume; it allows the metadata to be searched quickly via the index instead of the operating system's "find command". Note that both indexes and indices have the same meaning and are the plural of index, although indices are usually preferred in a technical context.
- You can have multiple inventories/indices of a storage volume from different points in time times.
- Indices contain base metadata like directory name, file name, file size, file extension, creation date, modify date, owner, etc.
- Diskover can also populate the indices with additional metadata, adding business context.
Learn → how to use indices.
Directory/Folder
There are very subtle differences between a directory and a folder, but in the context of this guide, they are interchangeable and have the same meaning: a container to store/organize other directories/folders and files.
Learn → how to select a directory.
Path
A path is the full location or name of a directory or file, for example:
/mnt/lucidlink/projects/Pistachio/WonderfulPistachios_GangnamStyle.mov
Recursive and Non-Recursive
Non-Recursive: Will search or apply an action exclusively to the selected path without going into any subfolders or files.
Recursive: Will search or apply an action to the selected path, as well as all the sub-directories and files inside that path.
Hard Links
A hard link is like a shortcut that acts just like the original file. It connects a name to a file on your computer, so even if the file is renamed, the hard link will still point to the same content. Unlike a regular shortcut, which might break if the file is moved or renamed, a hard link keeps working no matter what.
Think of hard links like copies of a file, but without using extra disk space. Unlike symbolic or soft links, which are just pointers to the original file, hard links are directly tied to the file itself, so they keep working even if the file is renamed.
| Feature | Soft Links | Hard Links |
|---|---|---|
| Can span file systems | Yes | No |
| Can link between directories | Yes | No |
| Inode number | Different from the original file | Same as the original file |
| File permissions | Different from the original file | Same as the original file |
| Permissions update | No, permissions are not updated | Yes, permissions are updated if the source file's permissions change |
| Contents | Points to the path, not the contents | Contains the actual contents of the original file |
| File system boundaries | Can cross file system boundaries | Cannot cross file system boundaries |
| Disk space usage | Does not consume additional space | No additional space until all links are deleted |
| Link type | A pointer to the original file | A reference to the actual data of the file |
| Required for files | Yes | Yes, must have at least one hard link |
| Can link directories | Yes | No |
✏️ Hard links are used a lot in the media and entertainment industry so that digital assets can be referenced in different shot folders without using additional space.
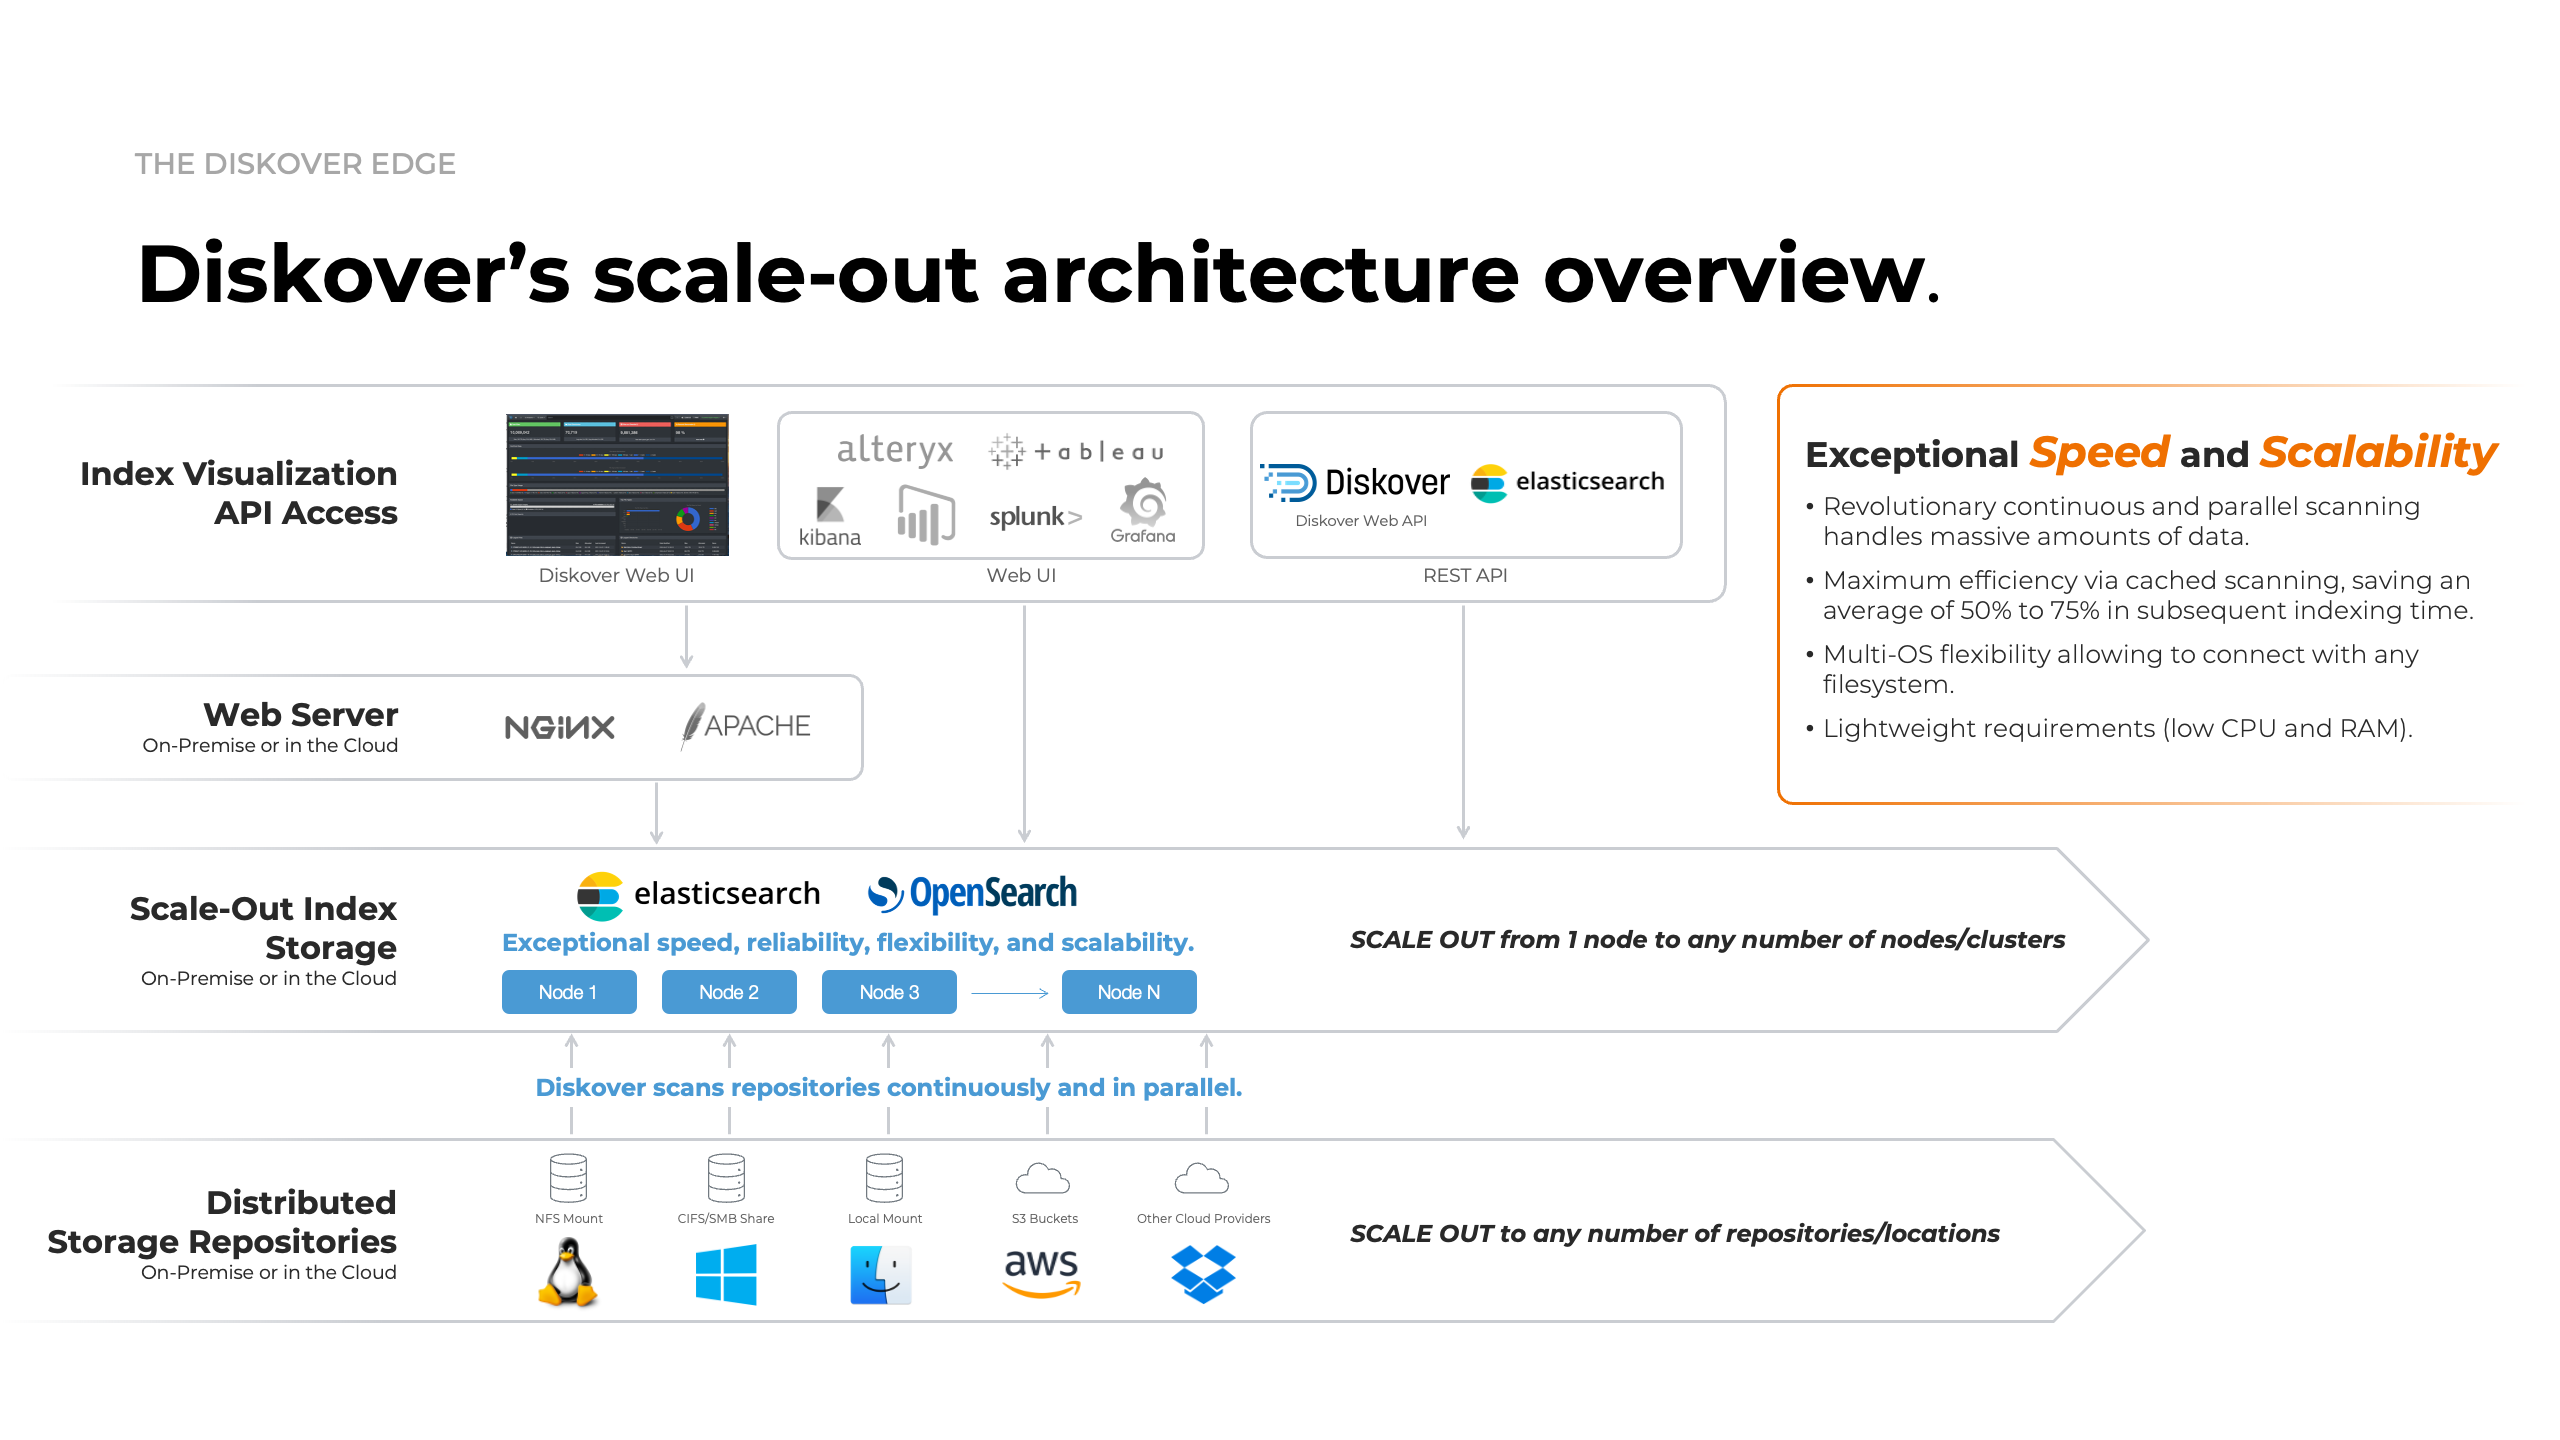
Elasticsearch
Diskover’s unique architecture is designed to handle the most demanding data environments with ease. Built for scalability, flexibility, and unmatched speed, it seamlessly integrates with your existing systems to deliver real-time insights and powerful data management capabilities.
User Interface Overview
🍿 Watch Basics & Beyond | Interface Overview
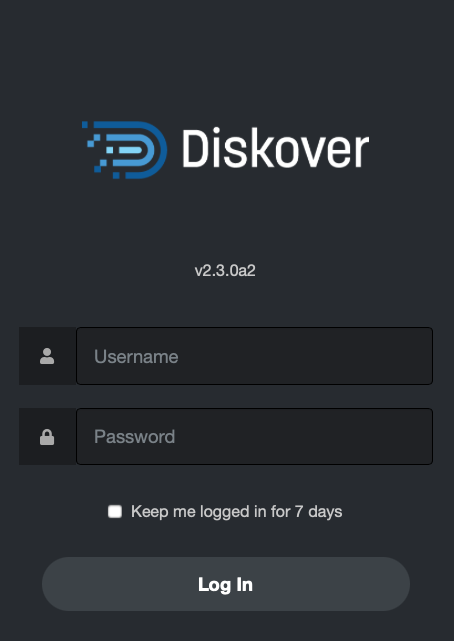
Login
| STEP | DESCRIPTION |
|---|---|
| 1 | Open a Web browser of your choice and type the URL address that was given to you to access Diskover. |
| 2 | Enter your Username and Password, which were also given to you, probably by your System Administrator. |
| 3 | Click Login. |
✏️ Diskover should look and act the same on any web browser. The only thing to keep in mind is if you apply some modifications in your settings using Google Chrome, for example, they will not transfer if you switch to Safari because the settings are tied to your browser's cookies.
User Interface Overview
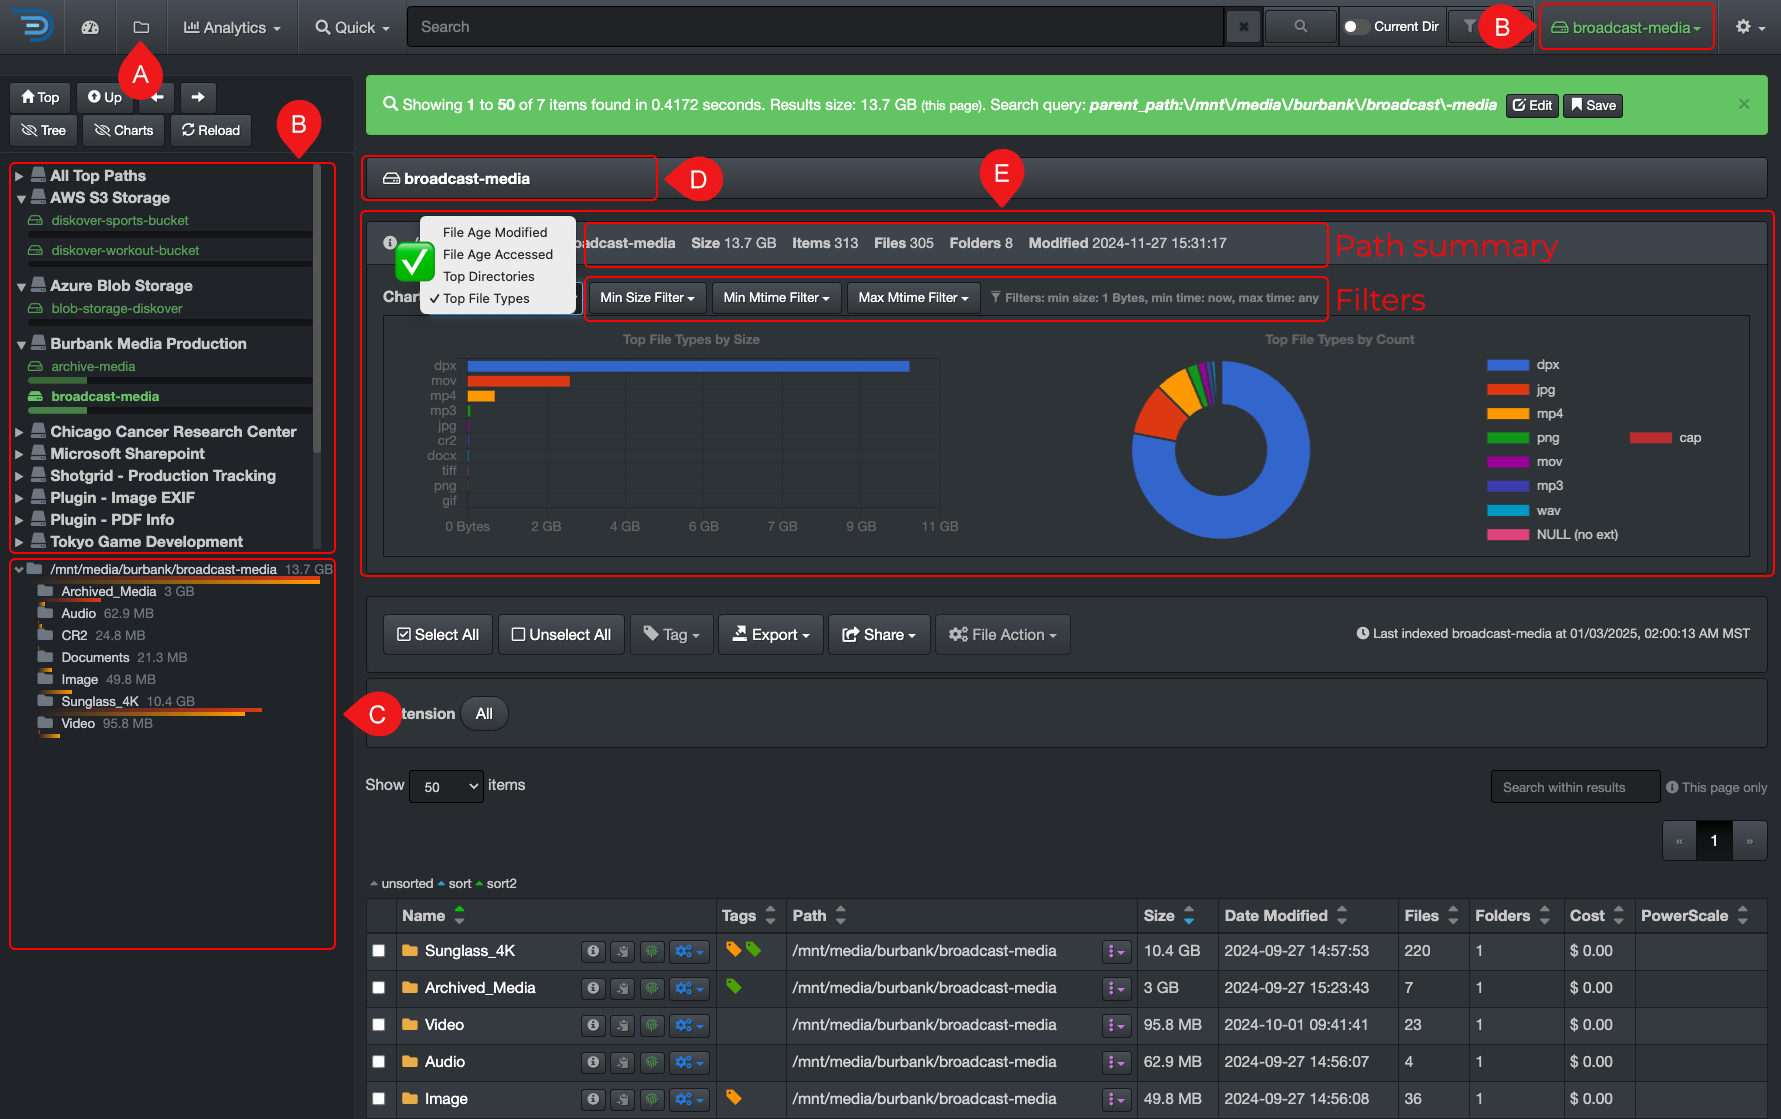
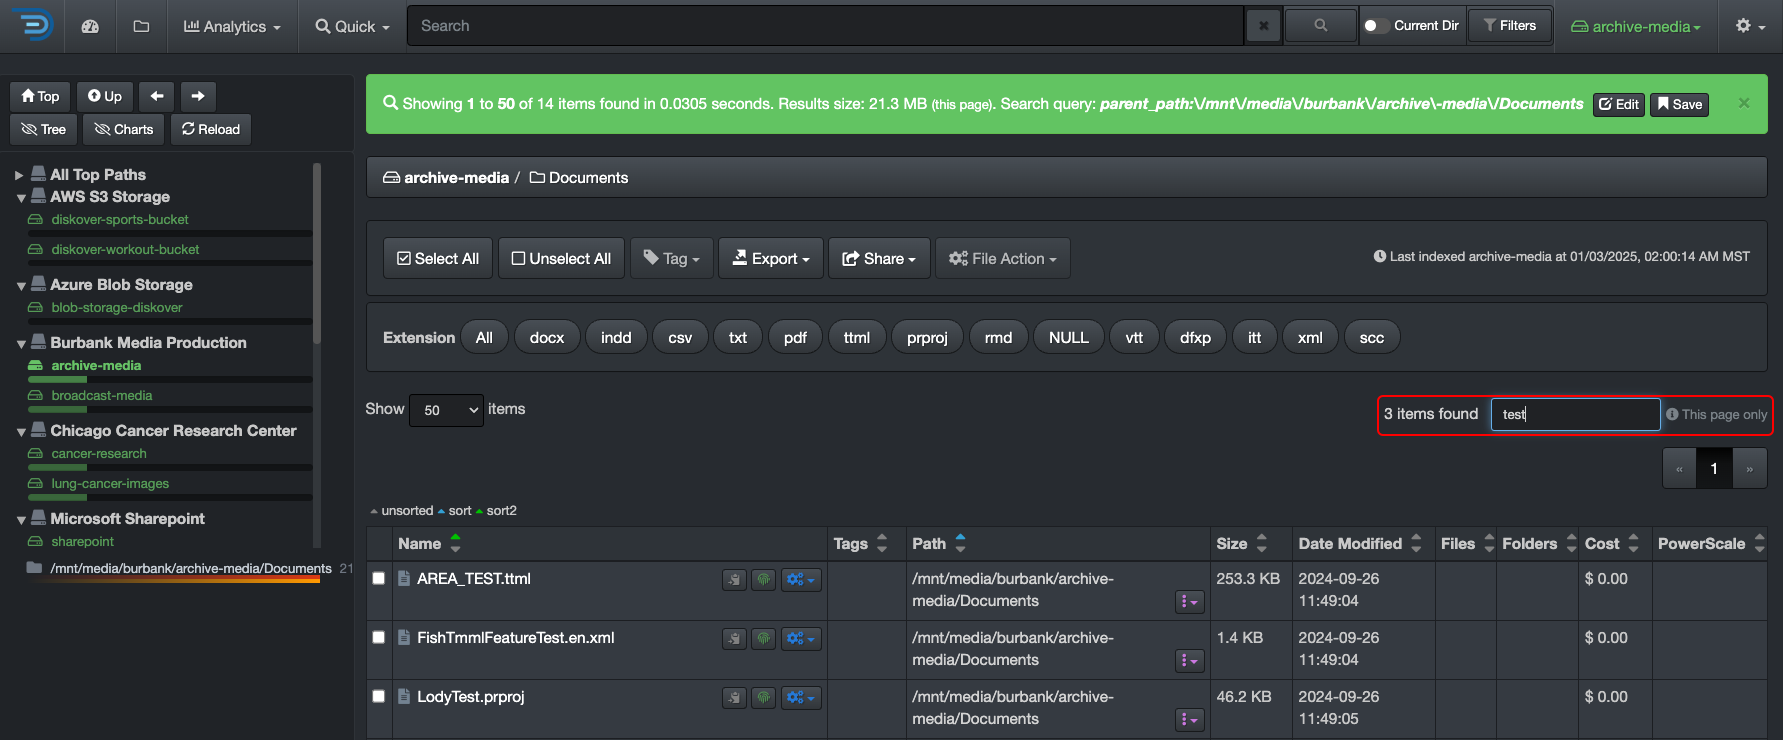
By default, upon login, you will land on the file search page shown below or the dashboard page, depending on how your System Administrator configured your instance. The search page is the most used tool, and this section offers an overview. The subsequent chapters will further explain all other icons, drop-down lists, and features.
🔆 Hovering almost anything(buttons, charts, volumes, etc.) in Diskover will give you additional information.

| REFERENCE | DESCRIPTION |
|---|---|
| A | Software logo - it has no function. |
| B | |
| C | Use the 📁 icon to navigate back to this page called the search page. |
| D | Integrated search tools:
|
| E | Search bar:
|
| F | Current Dir: toggle ON to limit your searches to a selected path, note that it will remain active until you manually toggle OFF. |
| G | Volume selection:
|
| H | ⚙ drop-down list:
|
| I | Optional navigation buttons:
|
| J | Green bar:
|
| K | Path bar: shows the path you're drilling down - you cannot type in it, but you can click on any directory to navigate directly to it. |
| L | Search Page Charts: offer useful statistics about a selected path - click here to learn more about these charts. |
| M | Directories:
|
| N | Select All or Unselect All: the results in the results pane, either they are from drilling down or a search. |
| O | Extension bar: will show all the file extensions detected in your results, either from drilling down or a search - you can click any extension to list only these files in the results pane. |
| P | Tags: to manually tag one or several items - click here to learn more about tagging. |
| Q | Export: to export in JSON or CSV format, or simply copy paths, of all or selected items - click here to learn more about exporting. |
| R | Share: to share the results URL or query with a co-worker using Diskover - click here to learn more about sharing. |
| S | File Action: allow authorized users to take different actions on files - click here to learn more about file actions. |
| T | Items per page:
|
| U | Sort: legend for sorting the data in the results pane - click here to learn more about sorting. |
| V | Results pane: to see the results when you drill down or from a search:
|
Settings
Settings Overview
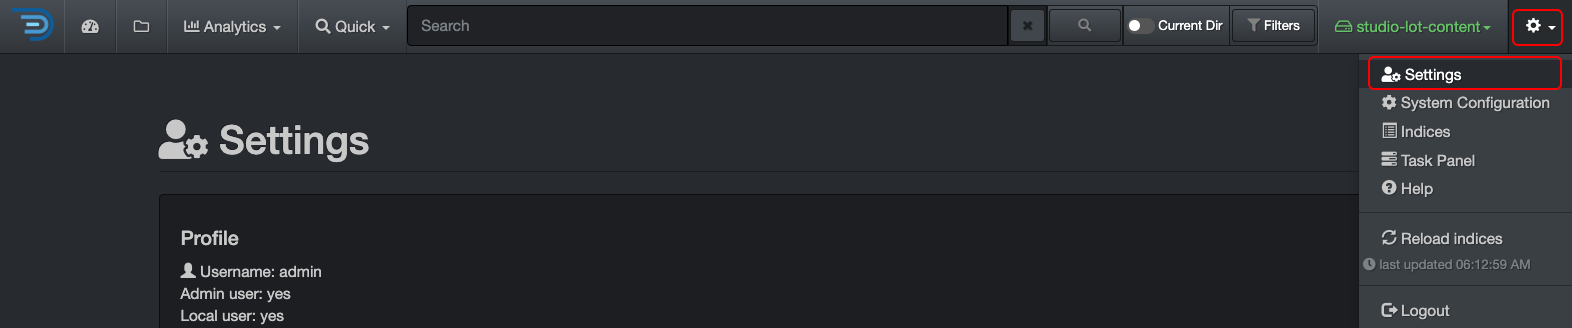
You can access the settings via the ⚙️ icon at the top right corner of the interface.
⚠️ IMPORTANT!
- Settings are personal to your browser, even if you share an account. Your customizations are stored as cookies. Clearing the cookies will reset your settings to Diskover’s defaults.
- If you switch browsers, such as from Chrome to Firefox, you’ll need to reselect your settings, as they are stored as cookies specific to each browser.
- Your cookies may also be cleared after a software update, requiring you to reselect your settings.
- To learn more about how your cookies and cache affect the Diskover user interface.
- GOOD NEWS! There are very few settings to select, so reselecting when needed is an easy task.
Profile

- Shows your Username
- Determines your role/access:
- Admin user = admin
- Local user = non-technical user
- Task panel user = sys admin/technical user
- Click Change Password as needed, and you will be prompted to enter your current password and type a new one.
Time Display

- You can choose to change the time to your local time zone instead of UTC (Coordinated Universal Time).
- We recommend selecting Show times in local timezone to avoid confusion, especially with indexing times.
- This change will also affect the storage time of your indices, file creation dates, modifications, etc.
- Your selection will be saved automatically.
File Size Display

- By default, Diskover shows the file size using the binary system. Click Use decimal system base-10... if you prefer the decimal system. Your selection will be saved automatically.
- By default, Diskover’s file size decimal is set to 1. Change it to your preference and click Set to save.
- Select Use size_du (allocated size) instead... if you want to use the real allocated disk size instead of the actual file size. Your selection will be saved automatically.
Search File Tree

- By default, the file tree analytic is sorted alphanumerically.
- Click the box to sort the file tree analytic by size instead.
- Your selection will be saved automatically.
Filter Charts

- By default, filters do not affect the charts on the file search page or the dashboard.
- Check the Use filters on charts box to apply the filters to the charts and the dashboard.
- Your selection(s) will be saved automatically.
Use Predictive Search

- Check this box if you want your searches to always expand with the * wild card without needing to type the * in the search bar.
- ⚠️ Important: Using this setting may return many additional or unwanted results.
- Your selection(s) will be saved automatically.
- The wild cards are explained further in the manual queries chapter.
Default Search Sort

- By default, the columns on the file search page are sorted by path name and then by file or directory name.
- Check this box to display unsorted search results instead.
- Your selection(s) will be saved automatically.
- Learn how to assign primary and secondary sort in the results pane.
Hide/Unhide Fields in Search Results

- ⬜️ Unchecked boxes mean the columns are visible in your results pane.
- ✅ Checked boxes mean the columns are hidden in your results pane.
- Your selection(s) will be saved automatically.
- The base metadata fields are the same for everyone, but you may have extra options depending on your organization’s indexing of extra metadata.
- Click the Reset button to restore the default column widths if you’ve modified them.
Path Translations for Copying Paths

- Depending on 1) how your System Administrator configured Diskover, 2) your operating system, and 3) who you need to share paths with, you may need to select the proper option to copy paths correctly for your instance.
- For example, in a Windows environment, you may have the option to change a forward slash
/to two backslashes\\, translating a path from/isilon1/data/dm/tools/staging_files.xlsto\\isilon1\data\dm\tools\staging_files.xls. - If you select any path translations, click Set to save.
- Please contact your System Administrator for more details.
Clear Diskover Cache

- A cache stores website content locally in the browser to improve performance by reducing load times.
- There are occasional instances where clearing the cache is necessary, but it should be a last resort:
- Sometimes, the cache can cause issues by storing outdated content, which may prevent the browser-based software from working properly.
- If you receive a pop-up message in the Diskover interface asking you to clear the cache.
Clear Diskover Cookies

- Cookies are used by the browser to store user preferences, such as the personal settings described in this chapter, and are stored both on the server and in the browser.
- Clearing the cookies will remove any customized settings you’ve selected, as discussed in this chapter.
- There are a few instances where you may need to clear the cookies:
- After a software update or upgrade to remove cookies from the previous version, which may affect the behavior of the new version.
- If you receive a pop-up message in the Diskover interface asking you to clear the cookies.
About Diskover
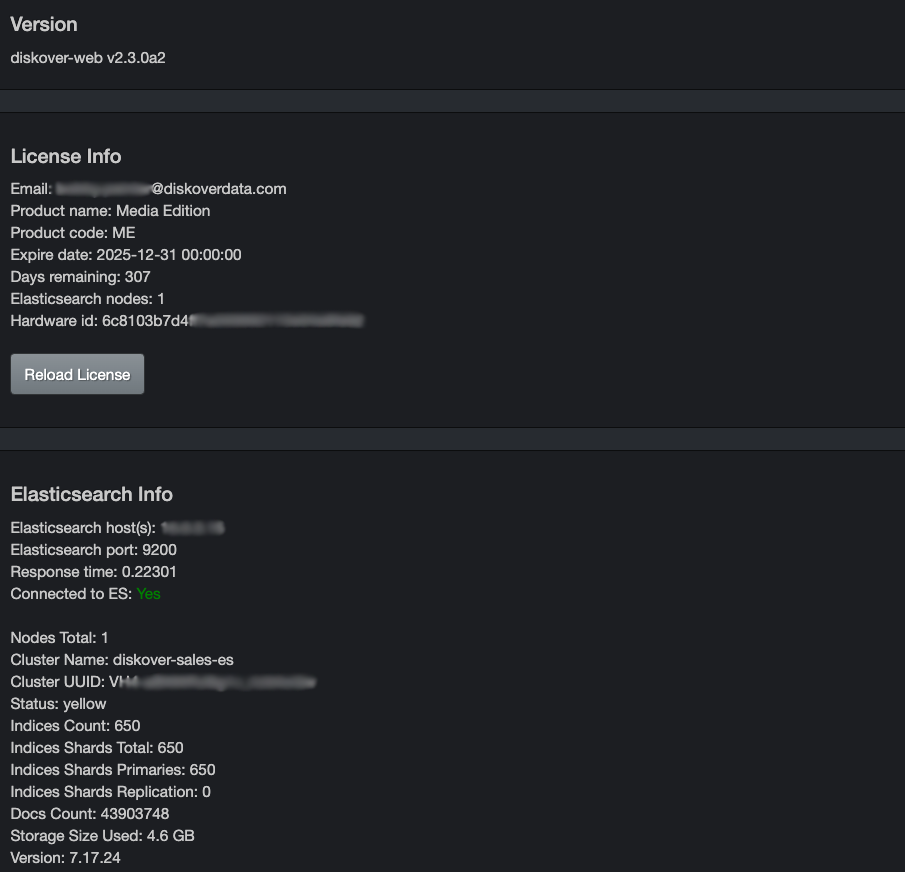
- These sections are for informational purposes only and provide details about your Diskover instance.
Send Anonymous Usage Data

- Upon your first login and after a software update, you will be prompted to agree or decline, allowing Diskover to automatically receive anonymous data to help improve the software based on behavioral results.
- No personal information is collected.
- Uncheck the box if you wish to opt out of sending anonymous data.
- Your selection will be saved automatically.
Basic Usage
This chapter provides guidance on how to effectively use the search page and manage the results from drilling down or following a query.
Search Page
✏️ Click here for a complete overview of the user interface
| REFERENCE | DESCRIPTION |
|---|---|
| A | Use the 📁 icon to navigate back to this page when you visit other pages. |
| B | Volumes:
|
| C | Directories:
|
| D | Path bar: extremely useful, it shows the path you're drilling down - you cannot type in it, but you can click on any directory to navigate directly to it. |
| E | Charts: statistics about the path your're drilling down or up - ⚠️ the charts won't update while searching:
|
Results Pane
This section explains the few items that were not covered in the user interface overview .
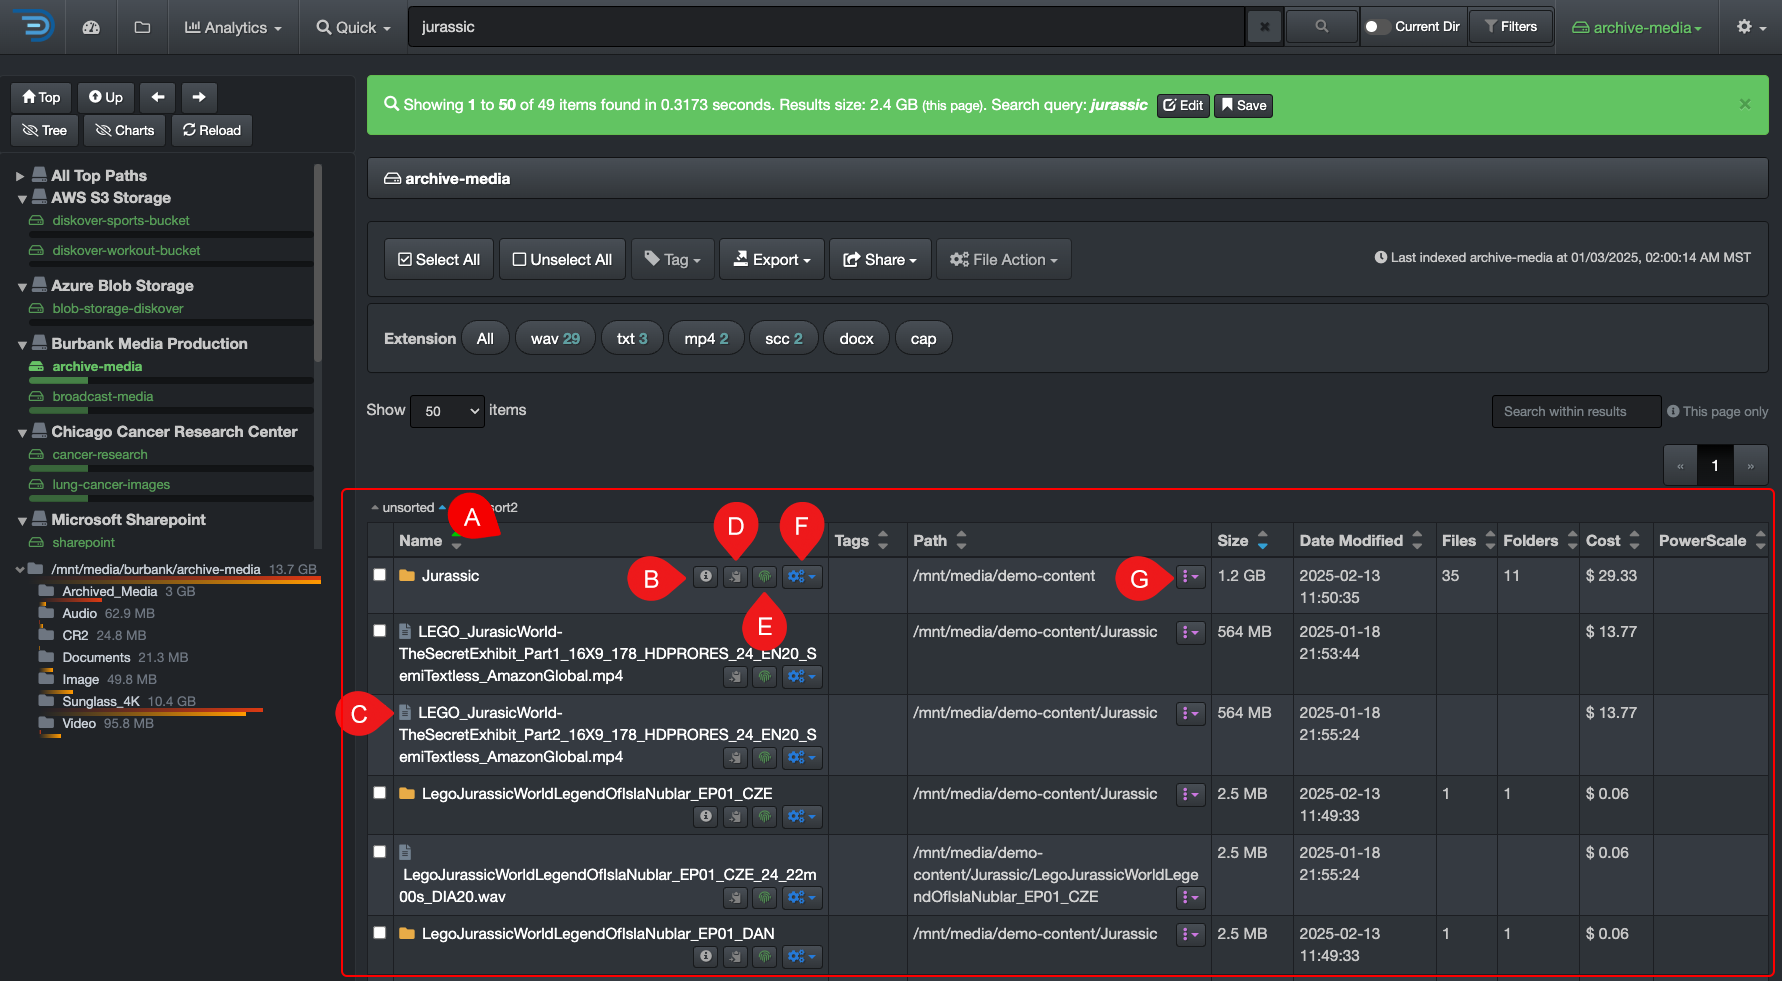
| REFERENCE | DESCRIPTION |
|---|---|
| A | You can hide or unhide columns via your settings. |
| B | |
| C | |
| D | |
| E | |
| F | |
| G |
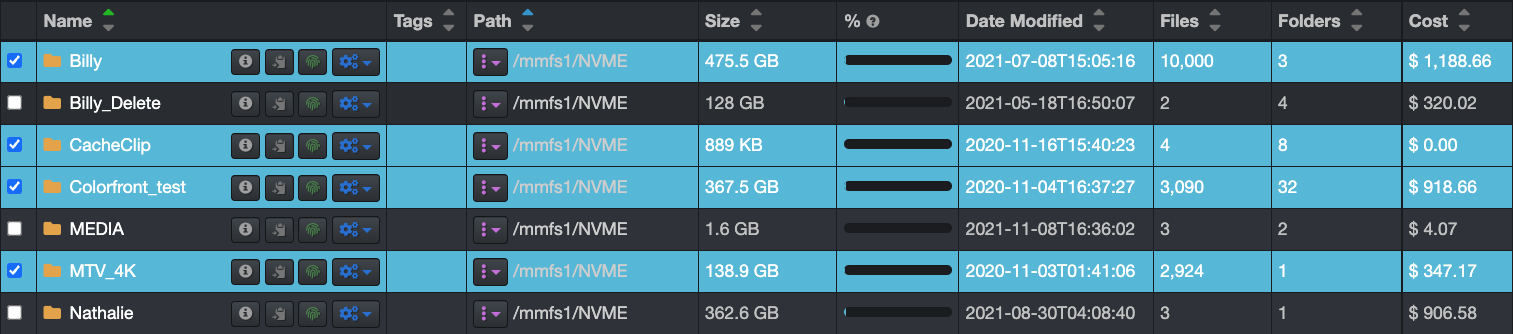
Sort Data in the Results Pane
You can sort data within Diskover's results pane, but if you need to do extensive sorting, we recommend exporting your data as a CSV first. Once exported, you can open the file in Excel to take advantage of its advanced sorting and filtering options.

| REFERENCE | DESCRIPTION |
|---|---|
| A | Legend: you can sort any column in ascending or descending order using the arrows in the headers. Diskover also supports primary and secondary sorting:
|
| B | Reassign primary sort: to change the primary sort to a different column, simply click the arrow in the header of the column you want to sort by. |
| C | Reassign secondary sort: to reassign the secondary sort, first click the current green arrow to remove it. Then, click the arrow in the column you want to set as the new secondary sort. |
Search Bar Overlay
When you click in the search bar, a dark grey overlay will appear beneath it.
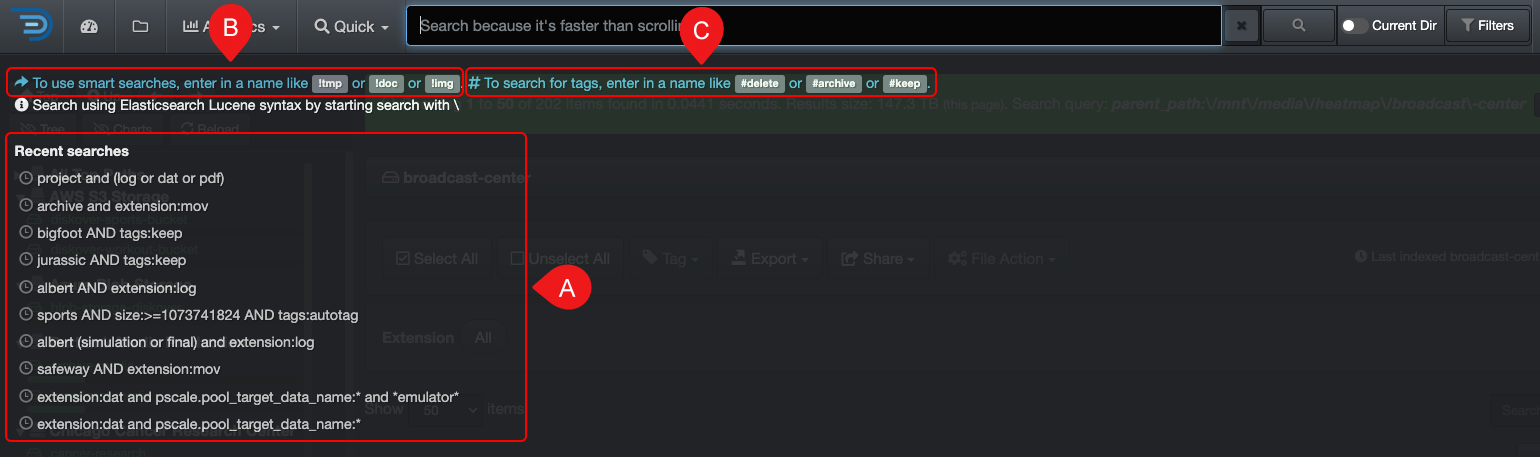
| REFERENCE | DESCRIPTION |
|---|---|
| A | Recent searches: you will find the past 10 queries that you've launched and you can click on any of these links to relaunch the same query. |
| B | Type ! to launch smart searches: typing ! in the search bar will display the list of smart searches you have configured, if any. Clicking on a link will open the results for that report in the search page - it will not launch the analytic: |
| C | Type # to launch tags report: typing # in the search bar will display the list of tags you have configured, if any. Clicking on a link will open the results for that report in the search page - it will not launch the analytic: |
| CLOSE | To close the overlay:
|
No Items Found
If no items are found during a search, a blue info bar will appear. You can use the links in the bar to navigate from there.

| REFERENCE | DESCRIPTION |
|---|---|
| A | Anything: this link will open a fresh search page where you can start a new search. |
| B | Help: this link will bring you directly to the help page for search query examples and support. |
| C | Reset sort order: this will reset the sort order for results. |
| D | Go back: this will take you back to the previous page, allowing you to modify your query - it works the same way as clicking the back button in your browser. |
Detailed Attributes/Metadata
The process is slightly different if you want to refer to the attributes of a directory or a file. In both cases, though, a new tab will open with the detailed metadata configured and harvested for your instance.
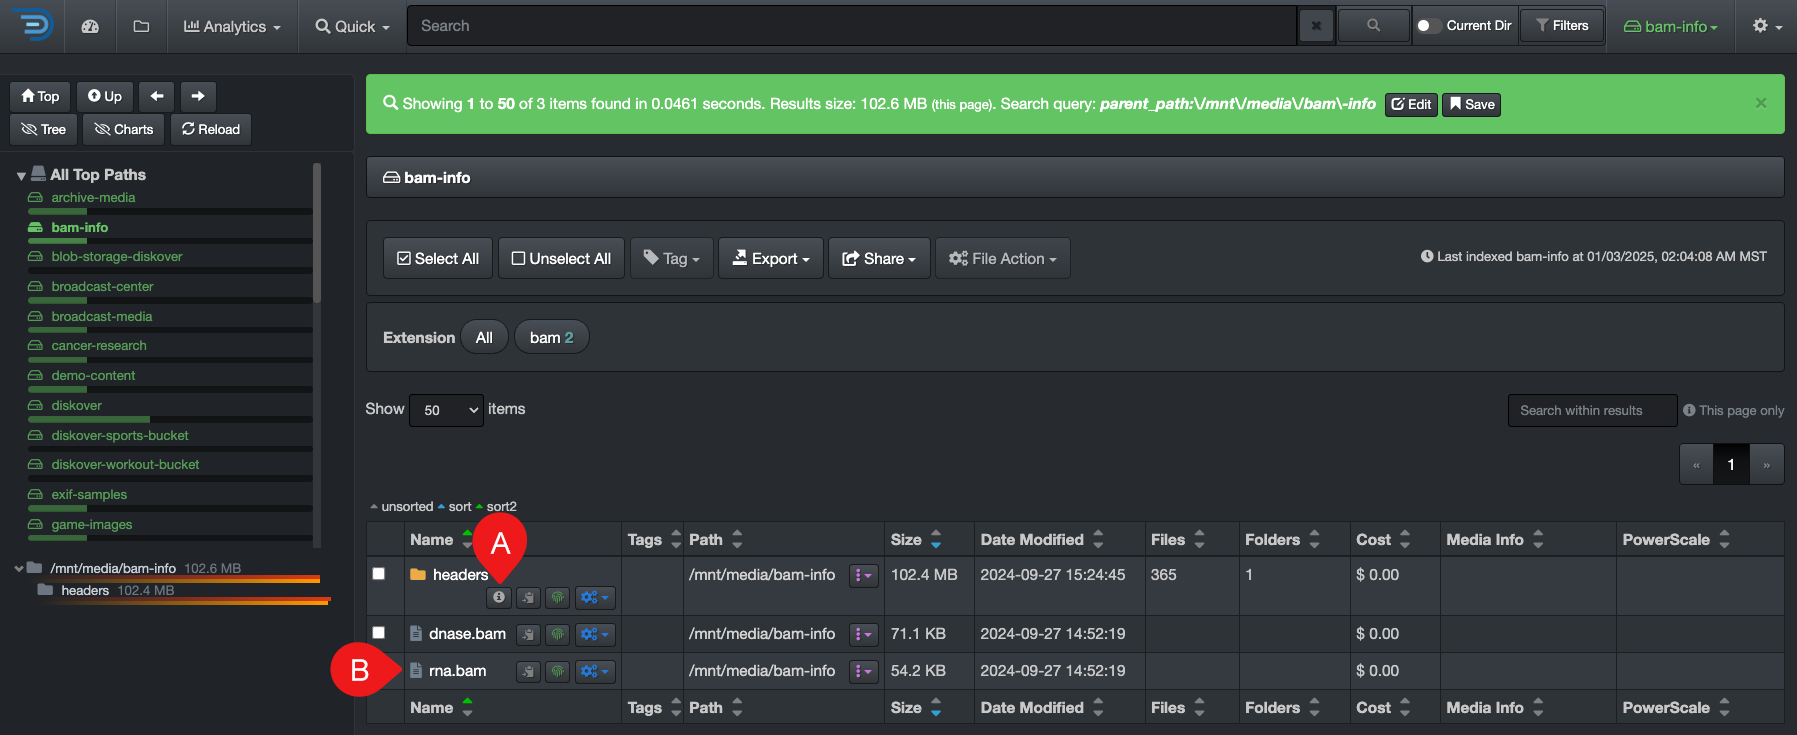
| REFERENCE | DESCRIPTION |
|---|---|
| A | Open detailed metadata for a Directory: click this icon |
| B | Open detailed metadata for a file: click directly on a file name. |
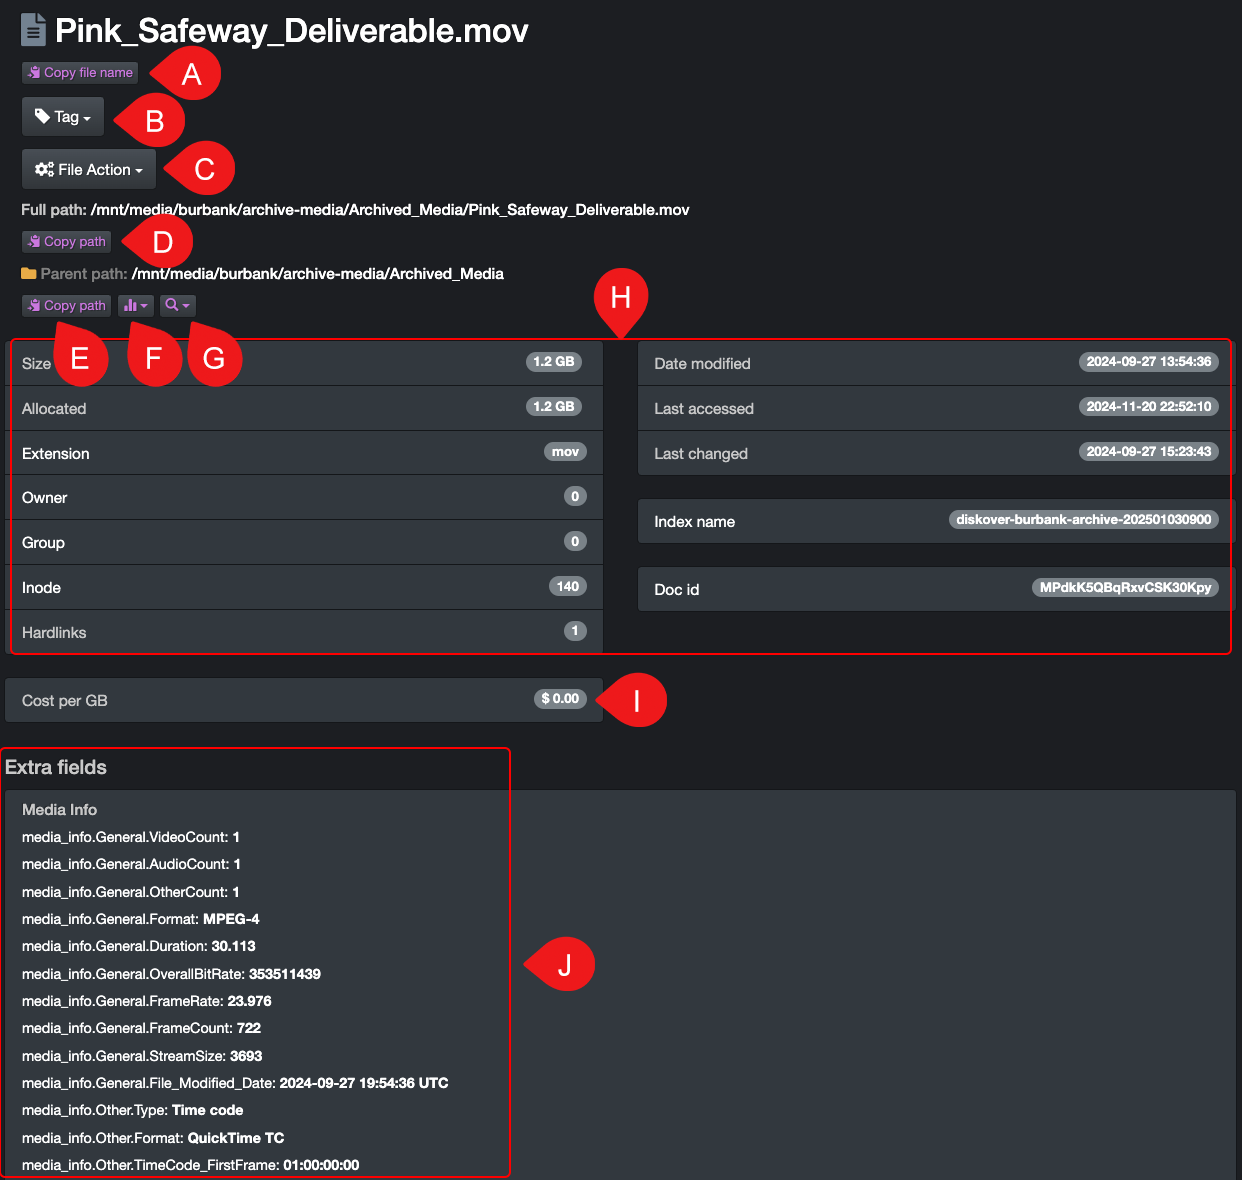
| REFERENCE | DESCRIPTION |
|---|---|
| A | To copy the file name only to your clipboard. |
| B | To apply a tag to the current file or directory, and if applicable, this area would also display the current tag(s) applied to this file or directory. |
| C | To launch a file action for the current file or directory. |
| D | To copy the current path, including the file name, to your clipboard. |
| E | To copy the current path, without the file name, to your clipboard. |
| F | To load the parent path in any of the proposed analytics. |
| G | To search the parent path recursively or non-recursively. |
| H | Detailed base metadata harvested during indexing. ✏️ Each of these fields can be individually searched using field names for basic metadata. |
| I | Displays the file or directory cost when the feature is enabled. |
| J | If applicable for your instance, this section displays any extra metadata indexed using Diskover's metadata harvest plugins. ✏️ Each of these fields can be individually searched using field names for extra metadata. |
Limit Searches to a Specific Path
Diskover searches all your indexed volumes and their directories at all times, but you can limit your searches to a specific path by using the Current Dir toggle button if needed.

| REFERENCE | DESCRIPTION |
|---|---|
| A | Drill down into the specific path you want to use to refine your search results. |
| B | Activate the Current Dir toggle button → gray is inactive and colored is active. ⚠️ This selection will remain active until you go back and manually deactivate the toggle button. |
Limit Searches to a Specific Index
There are different options depending on what you are trying to find.
- Search latest indexed data/volume: You can limit your searches by simply using Current Dir.
- Search older indexed data/volume: You can select a specific index/volume by following the instructions in the indices section.
Selection of Line Items
Selecting line items is helpful for multiple reasons, like exporting results, using file actions, etc.
Select or Deselect All
On the search page, you can select all line items on a page by clicking Select all or deselect all line items by clicking Unselect All buttons.

Select a Block of Lines
You can select a block of lines by clicking the first line item + hold SHIFT key + click the last line item.

Select Random Line Items
You can select random line items by simply clicking in the box in front of the item, or by holding the CTRL key for Windows or CMD key for Mac and clicking each desired line item.
Export
Whether your results come from drilling down the file tree or from a search, you can export them and copy paths to your clipboard. Let's explore the options.
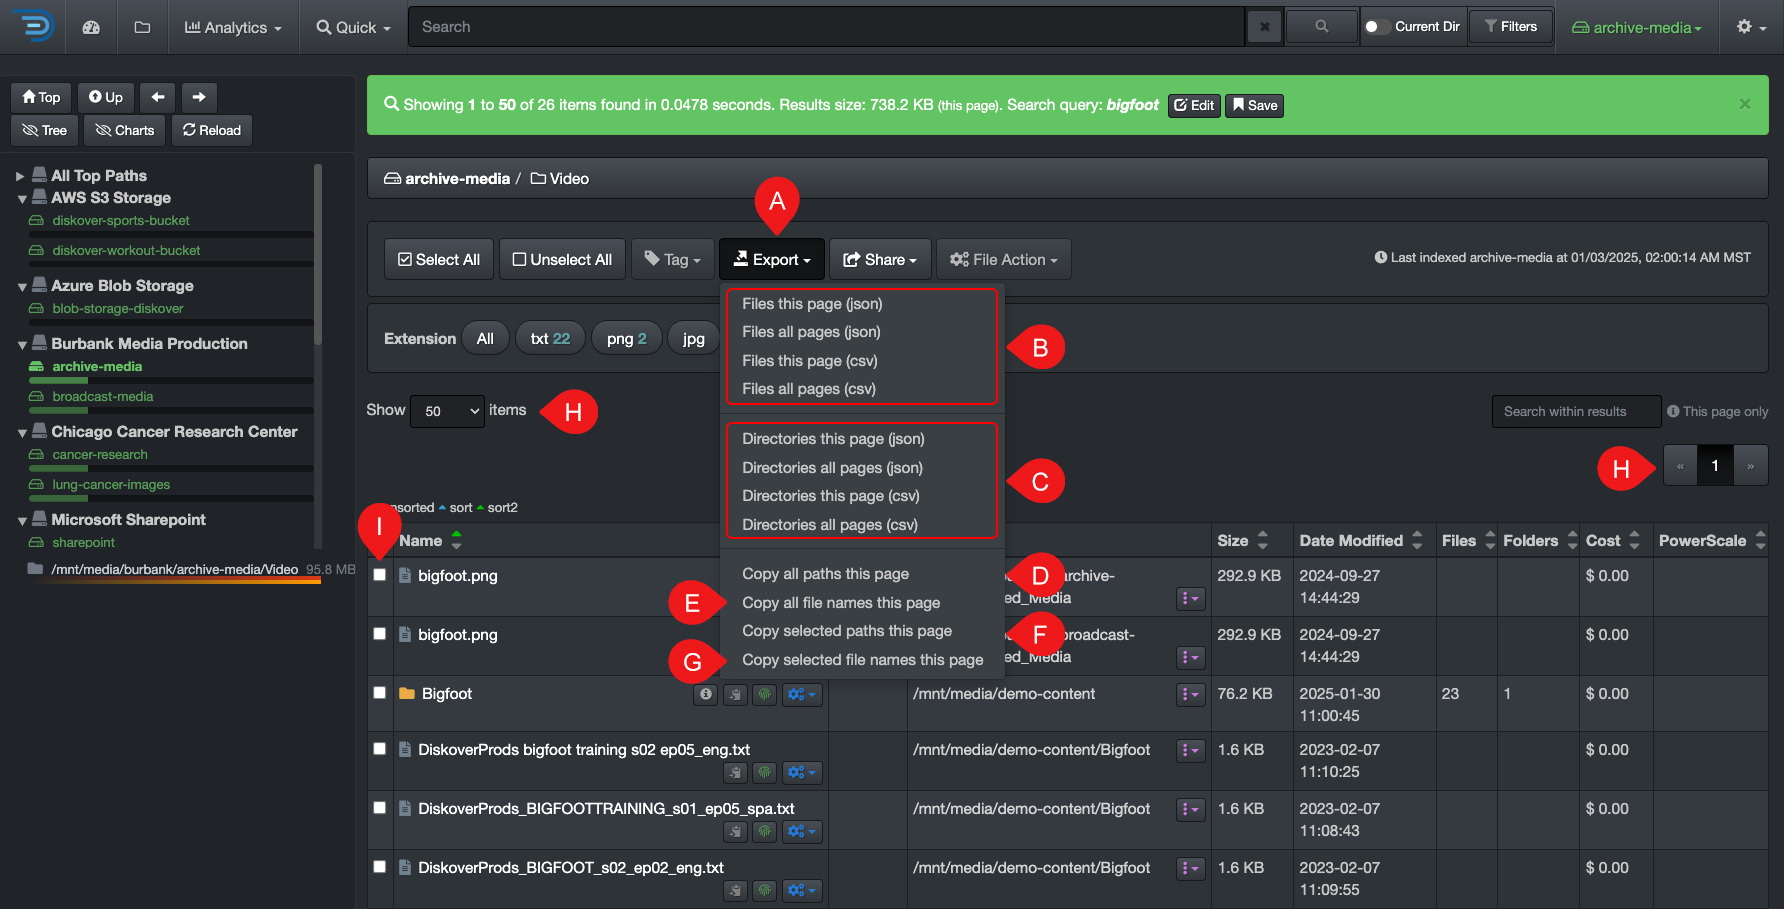
| REFERENCE | DESCRIPTION |
|---|---|
| A | Export drop-down list. ⚠️ We recommend limiting your exports to 100,000 line items - if you try to export more than 100,000 items:
|
| B | Export Files: use these options only if you have files in your results, otherwise, the report will be empty:
|
| C | Export Directories: use these options only if you have directories in your results, otherwise, the report will be empty:
|
| D | Copy all paths this page: copy to your clipboard all paths listed on 🅗 the current page, either they are files or directories, and will disregard if you have selected items. |
| E | Copy all file names this page: copy all file names to your clipboard only, not the path, listed on 🅗 the current page and will disregard if you selected items. |
| F | Copy selected paths this page: copy all paths of the 🅘 selected files and/or directories to your clipboard. |
| G | Copy selected file names this page: copy all paths of the 🅘 selected files to your clipboard. |
| H | Items per page and number of pages: may affect some of the export options as explained above - click here to learn more about items per page options. |
| I | Selection: may affect some of the export options as explained above - click here to learn more about selecting items. |
Data Manipulation in Excel
🍿 Watch Quick Tips | Recursive Search, Export, and Excel Manipulation
Export Directories and/or Files to Excel
Refer to the export section of this guide to learn how to export to a CSV format.
Multiple Path/Directory Levels Manipulation in Excel
When exporting data in CSV format, all metadata associated with a file or directory is included in multiple columns. This allows you to use Excel's Sort and Filter functions to quickly find the specific data you need.
Excel → Data → Sort
Once you export the desired data to a csv format, open that file with Excel.
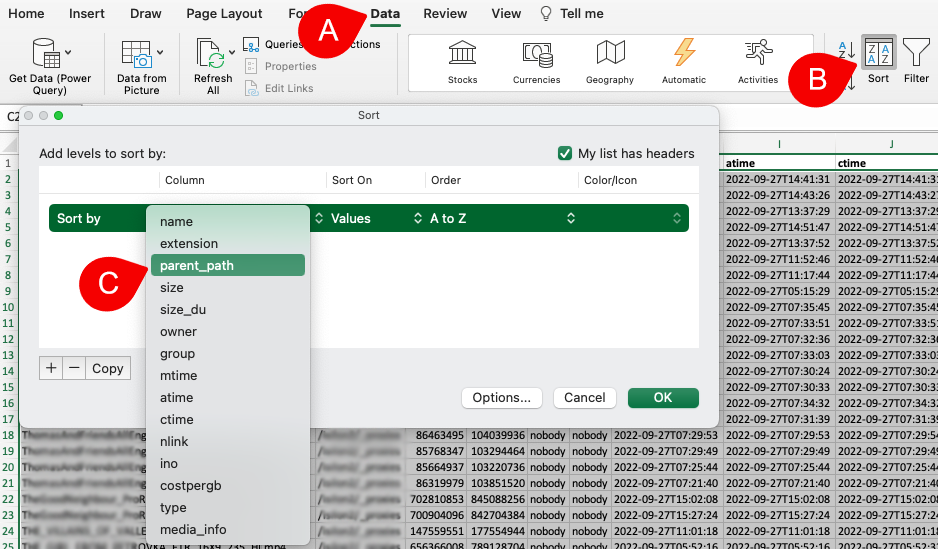
| REFERENCE | DESCRIPTION |
|---|---|
| A | From the Excel application menu, select Data. |
| B | Click the Sort icon. |
| C | Select parent_path to sort by path/directories:
|
Excel → Data → Filter → When Exporting Files from Diskover
After you export files from Diskover in CSV format, open the file in Excel.
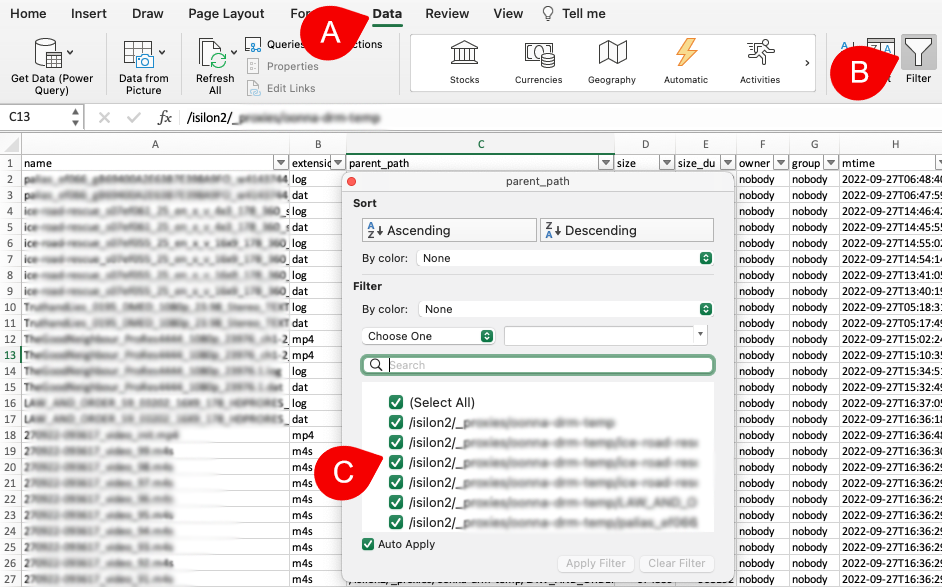
| REFERENCE | DESCRIPTION |
|---|---|
| A | From the Excel application menu, select Data. |
| B | Click on the Filter icon. |
| C | Click on the down-arrow in the parent_path column which will open a window with multiple options:
|
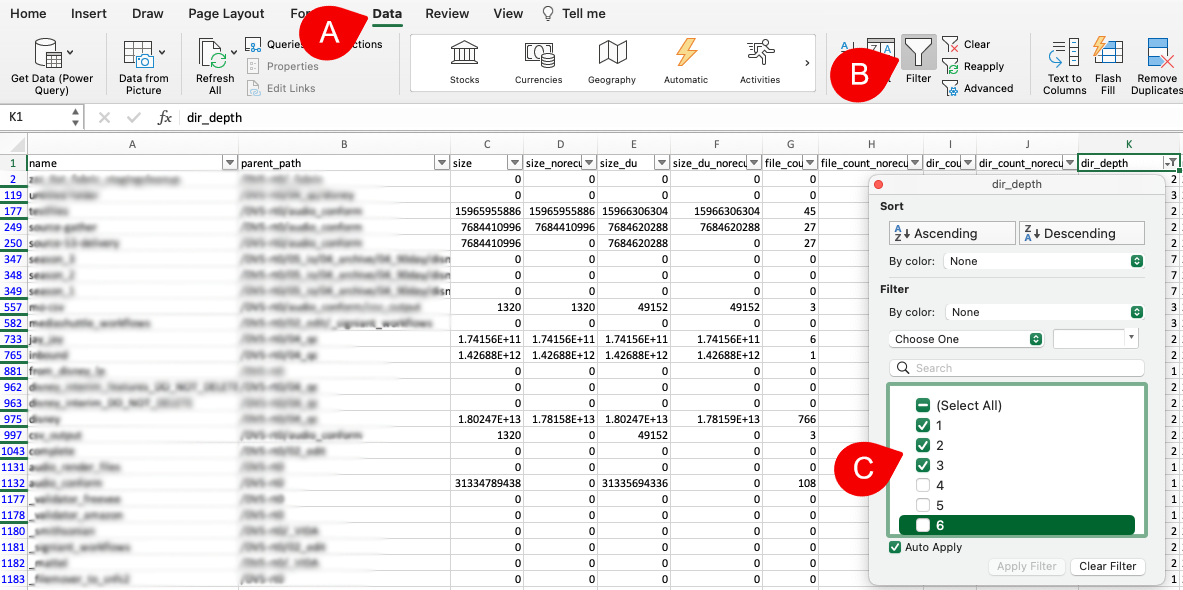
Excel → Data → Filter → When Exporting Directories from Diskover
The same instructions apply when you export directories from Diskover, but the results will include additional columns, providing more filtering options.
| REFERENCE | DESCRIPTION |
|---|---|
| A | From the Excel application menu, select Data. |
| B | Click on the Filter icon. |
| C | Instead of clicking on the down-arrow in the parent_path column, click the down-arrow from the dir_depth column, which will open a window with multiple options:
|
✏️ In Excel, you can use both Sort and Filter simultaneously to refine and display the results you need.
Share
The share options are built for efficiency and can be used in multiple ways.
| REFERENCE | DESCRIPTION |
|---|---|
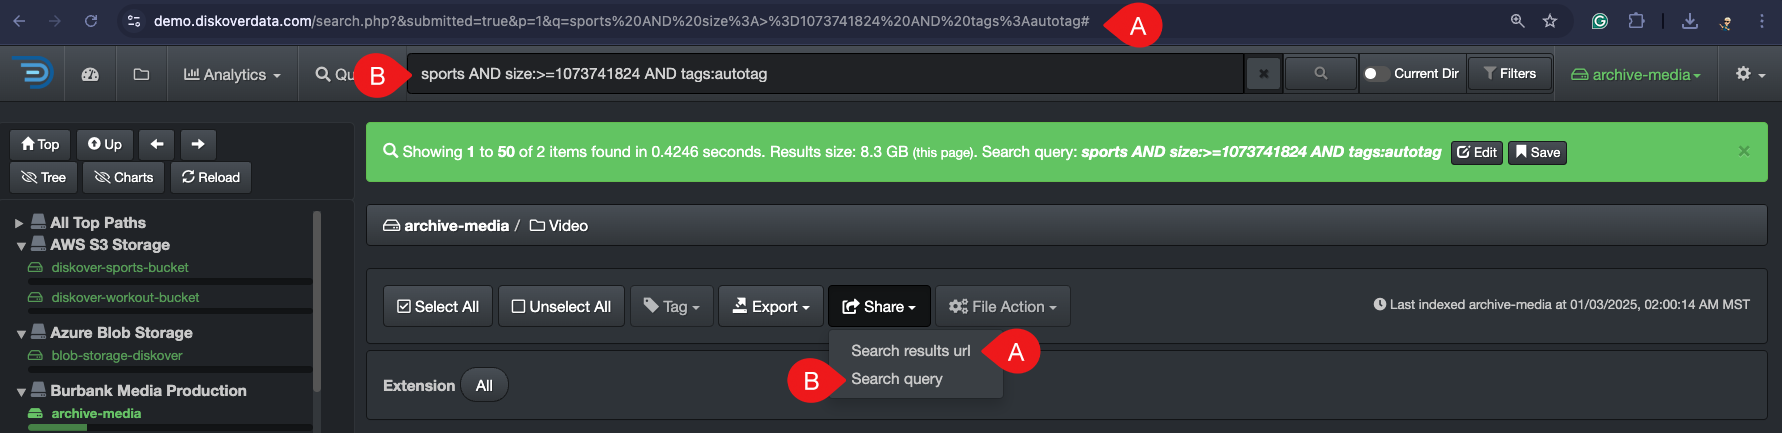
| A | Search results url: to copy your browser’s URL with your current view and results, making it easy to share with a co-worker with access to Diskover - they can simply click the link to see the exact same results. |
| B | Search query: to copy the search query criteria. |
Save Personal Query
You can save personal queries to easily re-run them later. These are stored in your local browser cache and are only visible to you.
How to Save a Query
After running a query you want to save → click the Save button in the green bar.

Where to Find a Saved Query
You can find all your saved queries under Quick → Saved Queries → click on any query to launch it.

How to Edit a Saved Query
Start by launching the query you want to edit as described above → click the Edit button in the green bar → modify the query in the search bar and hit RETURN → this will create a new query with the edited criteria under Quick.

How to Remove Saved Queries
Remove a Single Query
Launch the query you want to remove by selecting Quick → Saved Queries → launch the query you want to remove → click the Remove button in the green bar.

Remove All Saved Queries**
Select Quick → Saved Queries → click Remove all.

Built-In Search Tools
This chapter covers how to use the built-in search tools. Keep in mind that these tools can be combined with manual queries and with each other for maximum efficiency and granular results.
Filters
Using the built-in filters is a great way to get familiar with Diskover while quickly refining your results. Filters add criteria to your search without requiring you to type complex queries in the search bar. You can use filters on their own or combine them with manual searches and other built-in search tools for even more precise results.
✏️ Only adjust the fields you want to filter. Now, let’s explore how Diskover filters work.
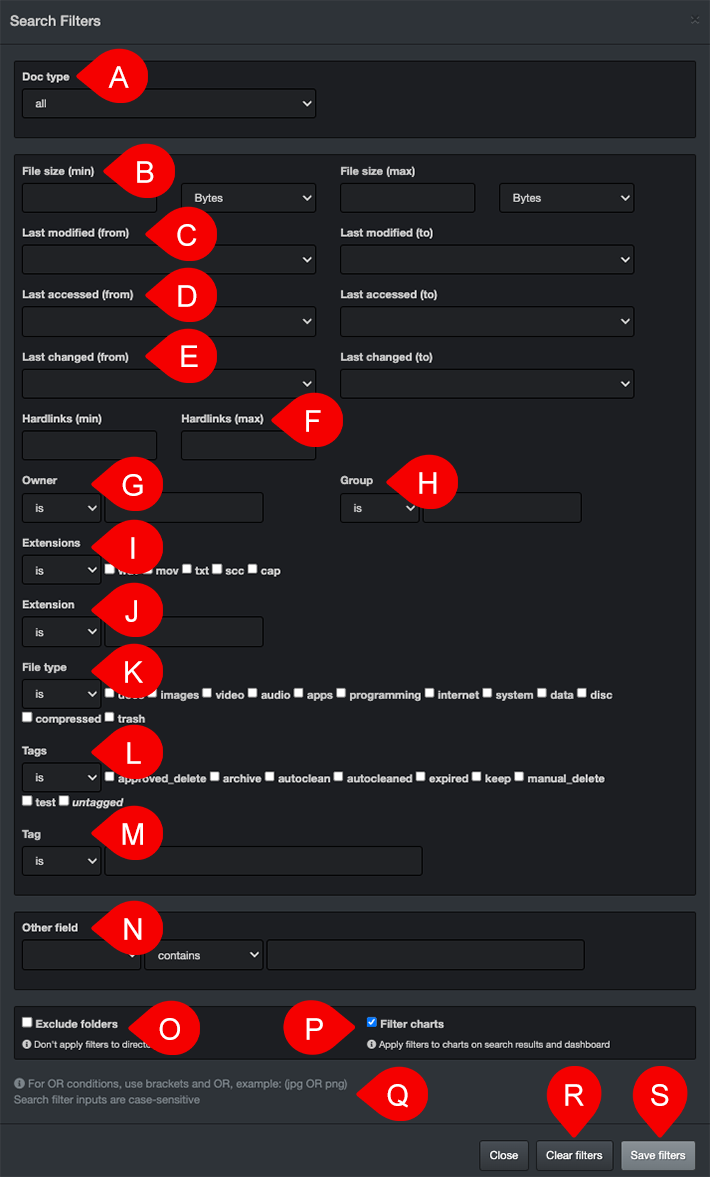
| REFERENCE | DESCRIPTION |
|---|---|
| A | Doc type: options of all, file or directory in your results. |
| B | File size: enter the minimum and/or maximum file size, then choose the desired unit of measurement (e.g., KB, MB, GB) from the drop-down list. ✏️ Type 1 in the File size (min) field to exclude empty directories from your search results. |
| C | Last modified (mtime): enter the time range, starting with the oldest from (default is any time) and ending with the newest to (default is now). |
| D | Last accessed (atime): enter the time range, starting with the oldest from (default is any time) and ending with the newest to (default is now). |
| E | Last changed (ctime): enter the time range, starting with the oldest from (default is any time) and ending with the newest to (default is now). |
| F | Hardlinks: you can select the minimum and/or maximum number of hardlinks when searching for a file with hard links. |
| G | Owner: select is or is not from the drop-down list and type a value in the field to the right. ✏️ Reach out to your System Administrator for details on how users are set up in your instance. |
| H | Group: select is or is not from the drop-down list and type a value in the field to the right. ✏️ Reach out to your System Administrator for details on how groups are set up in your instance. |
| I | Extensions - if listed here: select is or is not from the drop-down list and check the appropriate box(es). |
| J | Extension - if not listed in 🅘: select is or is not from the drop-down list and type a single extension - no dots just the letters. |
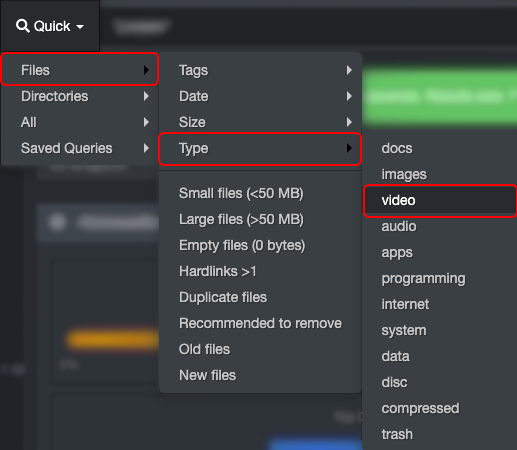
| K | File type: select is or is not from the drop-down list and check the appropriate box(es). ✏️ Diskover allows multiple file extensions to be categorized under a single group, streamlining search and analysis:
|
| L | Tags: select is or is not from the drop-down list and check the appropriate [tag(s)[(#tags)/box(es). |
| M | Tag: select is or is not from the drop-down list and type a known tag name. ✏️ This feature is useful for searching tags that were set outside of Diskover’s user interface but are indexed as attributes. |
| N | Other field: use this to filter metadata that is not listed above:
|
| O | Exclude folders: check this box to prevent filters from limiting the folder view to allow broader search results and the ability to navigate through the folder structure. |
| P | Filter charts: checking this box will temporarily apply the selected filters to the following:
|
| Q | Tips: refer the operators and case sensitivity sections for details. |
| R | Clear filters: to clear all the active filters in this window. |
| S | Save filters: to save all the filters in this window. ⚠️ The filters will remain active and affect all your future searches until you reopen the filters and clear the filters . |
✏️ You can see from the search page if you have active filters and how many.

Quick Search
Quick searches will search all your volumes and their directories. The choices are intuitive and based on pre-established smart groups of criteria. The drop-down list, and its sub-menus, offer several options.
Select any criteria and the results will automatically open in the search page. Here is an example of possibilities:
You can always validate the criteria used for a quick search query in the green bar, this one is based on the example above:

Combine Quick Searches
Quick searches can be used on their own or combined with other searches, here are a few examples:
Combine Quick Search with filters:
- Start by selecting/saving filters.
- Run a quick search.
- Validate the combined criteria in the green bar.
Combine Quick Search with manual queries:
- Start by launching a quick search.
- Click the Edit button in the green bar for the criteria to automatically be pasted in the search bar.
- Add your manual criteria in the search bar using the appropriate operators.
- Hit RETURN to launch the combined query.
Search Within Results
This built-in tool is simple, yet powerful. It's like CTRL or CMD + F on steroids.
| WHAT TO DO | WHAT NOT TO DO | THE RESULTS |
|---|---|---|
|
|
|
Recursive and Non-Recursive Searches
🍿 Watch Quick Tips | Recursive Search, Export, and Excel Manipulation
From the search page, you can list all the directories and files under a specified path, either recursively or non-recursively.
✏️ Learn how to manipulate the search results in Excel for advanced sorting and filtering.
| REFERENCE | DESCRIPTION |
|---|---|
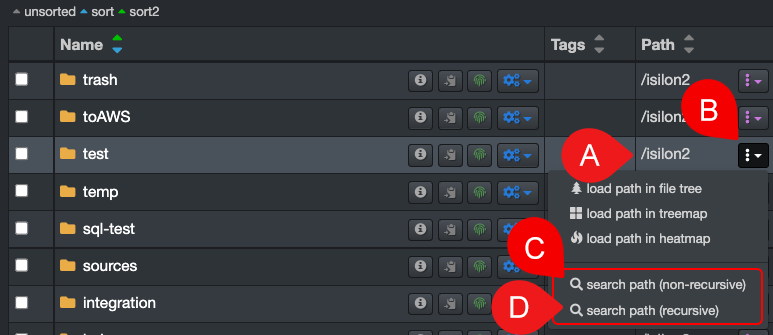
| A | From the results pane, identify the path that you wish to search recursively or non-recursively. |
| B | Click the |
| C | Select search path (non-recursive) to include only the directories and files within the selected path - the results will open in a new browser tab. |
| D | Select search path (recursive) to include ALL the sub-directories and files within the selected path - the results will open in a new browser tab. |
Manual Queries
Overview
The examples in this chapter may not be specific to your industry, but the logic of searching is universal. Understanding these concepts will help you apply them effectively in any context. The list of possible search queries and syntax is extensive; therefore, this chapter will cover only the basics of manual searches.
✏️ Be sure to read the messages in the green and blue information bars in the user interface—they provide helpful guidance!
Many Ways to Search
There are multiple ways to search with Diskover and achieve the same results. You can use the built-in tools, manual queries, or a combination of both, depending on your personal preferences and comfort level.
Golden Rules of Searching
Whether you're building simple or complex queries:
- Expand your results, using wildcards for example, and make sure you are not missing any files or directories in your results—naming convention being one of the biggest problems when it comes to searching.
- Only add one criterion at a time and validate your results between each addition.
- Readjust your query as needed.
Search Rules Based on Elasticsearch
Since Diskover uses Elasticsearch to store the harvested metadata and as its search engine, all search syntax in Diskover follows Elasticsearch's rules and algorithms. This chapter will cover many of these rules, but for more details and examples, please visit the Elasticsearch website.
Naming Conventions
Many organizations struggle with inconsistent naming conventions, including misspellings. Here are a few examples:
| PROJECT NAME | PROJECT NAME | VERSION | EPISODE |
|---|---|---|---|
North Sea Simulation
|
Four Your Eyes Only
|
Version 8
|
Episode 5
|
To ensure comprehensive results, consider using broader or more flexible search terms. Diskover provides tools to refine or expand your search, allowing you to pinpoint the exact data you need or cast a wider net when necessary.
Understanding the Basics and Logic
🍿 Watch Quick Tips | Understanding the Basics of Manual Queries
Case Sensitivity
Search queries are generally case-insensitive, meaning you can use uppercase or lowercase letters in the search bar without affecting the results. However, there are a few exceptions where queries are case-sensitive:
- When searching on time.
- When searching on field names.
Tokenizers | Isolated Characters
When you enter a word, number, or a combination of both in the search bar, Diskover searches for those isolated characters. To identify isolated characters, Diskover uses a tokenizer, which breaks text apart using isolators such as spaces, underscores, hyphens, periods, other punctuation marks, and uppercase letters (also known as 🐫 CamelCase).
Of course, there are ways to find characters that are not tokenized/isolated by using wildcards, which is explained in the next section.
Tokenization | Examples with Letters
🔎 If you launch a query with the word albert:
| FILE NAME | ✅ WHY FILE WOULD BE FOUND | 🚫 WHY FILE WOULD NOT BE FOUND |
|---|---|---|
project_albert_overview.pdf |
albert is isolated by underscores | |
AlbertSimulationTest_log_v001.txt |
albert is isolated by CamelCase | |
albertSIMULATION_test_log_v003.log |
albert is isolated by CamelCase | |
projectalbert.pdf |
albert is only isolated on one side with the . | |
projectalbertoverview.pptx |
projectalbertoverview is read as one word | |
ProjectALBERTOverview.pptx |
reads ALBERTO |
Tokenization | Examples with Numbers
🔎 If you launch a query with the number 2025:
| FILE NAME | ✅ WHY FILE WOULD BE FOUND | 🚫 WHY FILE WOULD NOT BE FOUND |
|---|---|---|
project-albert-2025-draft.pdf |
2025 is isolated by hyphens | |
mapping log 2025 final.log |
2025 is isolated by spaces | |
projectalbert2025.pdf |
2025 is only isolated on one side with the . | |
MappingLog2025Final.log |
CamelCase doesn't work with numbers | |
QA_testing_20250220.pptx |
2025 is only isolated on one side with the _ |
Wildcards Overview
🍿 Watch Quick Tips | Manual Search Tool: Wildcards
This guide covers 3 major wildcards—they are useful to:
- Expand your results and make sure you are not missing files.
- Go around naming convention issues.
- Search on a specific number of variables.
- Find possible misspellings.
* Wildcard
🍿 Watch Quick Tips | Manual Search Tool: Wildcards
The * asterisk wildcard replaces zero or more characters and is the most commonly used wildcard. It’s a powerful tool for overcoming naming convention inconsistencies.
✏️ Using the * wildcard in a search may slow down performance, especially when placed at the beginning of a query, as it requires scanning a much larger dataset.
Search Examples Using the *
| 🔎 SEARCH QUERY | ✅ POSSIBLE RESULTS |
|---|---|
*albert* |
SIMULATIONLOGALBERT.txt projectalbertoverview.pptx albertxb12p.pdf |
R*1005 |
R-1005 R1005 Res_1005 Reservoir1005 |
*2025* |
MappingLog2025Final.log simulation_20250220.txt |
s*1 |
S1 season 1 s01 s_1 ✏️This search query would also find season 11, for example, but it’s often better to start with a broader search and then refine your results once you have a better understanding of the data. |
✏️ If you prefer not typing the * and ALWAYS want to use it by default, you can set Use predictive search in your settings. Throughout this user guide, we assume that predictive search has not been activated.
? Wildcard
🍿 Watch Quick Tips | Manual Search Tool: Wildcards
The ? question mark wildcard replaces a single character and can be used multiple times to match a specific number of characters.
| 🔎 SEARCH QUERY | ✅ POSSIBLE RESULTS |
|---|---|
scene? |
scenes scene1 |
e?2 |
ep2 e02 e22 |
shot??1 |
shot001 shot251 |
project???? |
Project0021__log.txt projectlogs.log projector01.log |
r??05 |
res05 r1005 RS705 |
✏️ Technically, the * wildcard could be used instead of multiple ? characters, but it may return results outside your intended character range since * replaces zero or more characters. In cases where precision is needed, the ? wildcard is often the better choice.
~ Wildcard
🍿 Watch Quick Tips | Manual Search Tool: Wildcards
The ~ tilda, aka fuzziness wildcard, is used to find similar words and catches about 80% of all human misspellings.
By default, when used alone, the ~ wildcard allows up to 2 character changes. However, best practice is to use ~1 to limit changes to 1, which is usually sufficient to catch about 80% of human misspellings.
⚠️ Note that using the ~ wildcard in a query can consume a significant amount of memory and may lead to poor performance, potentially resulting in a "timed out" error.
| 🔎 SEARCH QUERY | ✅ POSSIBLE RESULTS |
|---|---|
life~1 |
live, line, wife, like, rife, lift... |
life~ |
results from life~1 + knife, lived, hide, fire, link, loft, love... |
jungle~1 |
jungle, juggle, jingly, jingle, jingles... |
jungle~ |
results from jungle~1 + june, judge, single, bundle, uncle... |
🔆 The query uses the Damerau-Levenshtein distance to find all terms with a maximum of two changes, where a change is the insertion, deletion or substitution of a single character or transposition of two adjacent characters.
Mixing Wildcards
⚠️ Mixing wildcards can be tricky. Below are a few examples, but remember that additional rules apply when combining wildcards, such as the order in which they are used.
| 🔎 Mixing wildcards in the same QUERY | 🔎 Mixing wildcards in the same CRITERIA |
|---|---|
You can mix any wildcards in the same query, ex:jungle~1 and e*2*albert* not v1? |
You can mix the * and ? but NOT the ~, ex: What you can do: *albert* 2023????What you can't do: *albert~1 |
Operators
Operators are used to join multiple criteria in a query. There are 3 operators: AND, NOT, OR, and they are not case sensitive.
| AND | NOT | OR | MIX'EM |
|---|---|---|---|
🔎 albert AND v*1✅ would find albert isolated anywhere in the path/file name and versions ending with 1. ✏️ Note that AND is assumed if no operators are typed in between two criteria, so the same results would be obtained with albert v*1 |
🔎 albert NOT v*1✅ would find albert isolated anywhere in the path/file name but would exclude versions ending with 1. |
🔎 albert (v*1 OR v*2)✅ would find albert isolated anywhere in the path/file name and versions ending with 1 or 2. ✏️ You need to group the criteria around the OR operator to ensure the query is processed correctly—think of it as building formulas in Excel where it requires you to group conditions to interpret your logic accurately. |
🔎 *test* AND *log* (r*1 OR r*2) NOT 2023✅ would find path/file name with both test and log isolated or not, with releases ending with 1 or 2, but would exclude anything with 2023 isolated. |
Field Names
Searching with field names can be effective when you need precise results, especially if you're searching within a specific or hidden field. You can think of this like searching within a specific column in a massive Excel spreadsheet—rather than scanning the entire dataset, you're narrowing your focus to just the relevant information.
🔎 The query needs to be typed in this exact format fieldname:value
| fieldname: | value |
|---|---|
|
|
Field Names for Base Metadata
This section outlines the fundamental attributes naturally attached to files and directories, harvested by Diskover without the need for special plugins. The fields are listed alphabetically.
| FIELD NAME | SHORT DESCRIPTION | HOW TO USE |
|---|---|---|
| atime | last accessed time |
|
| ctime | last changed time |
|
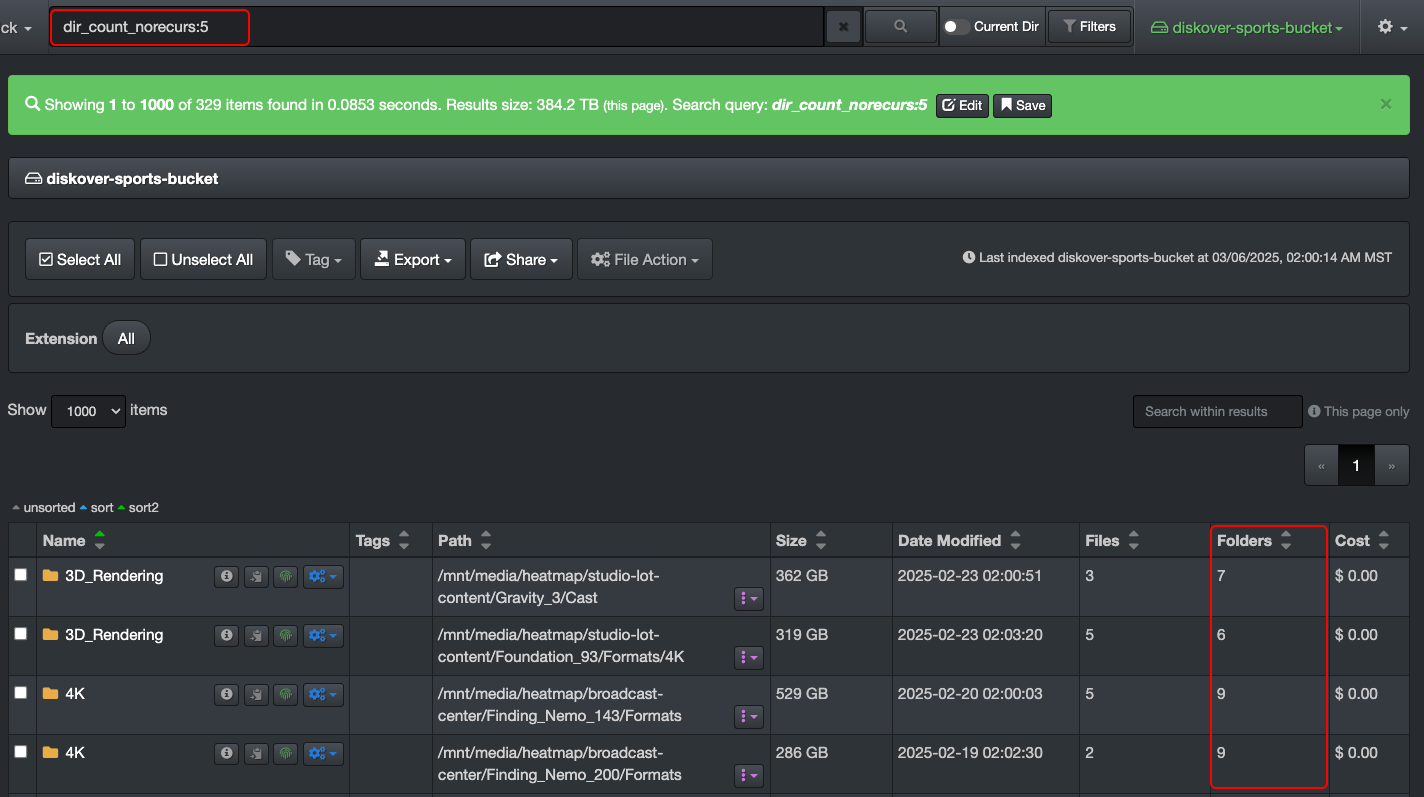
| dir_count | number of recursive sub-directories in a directory |
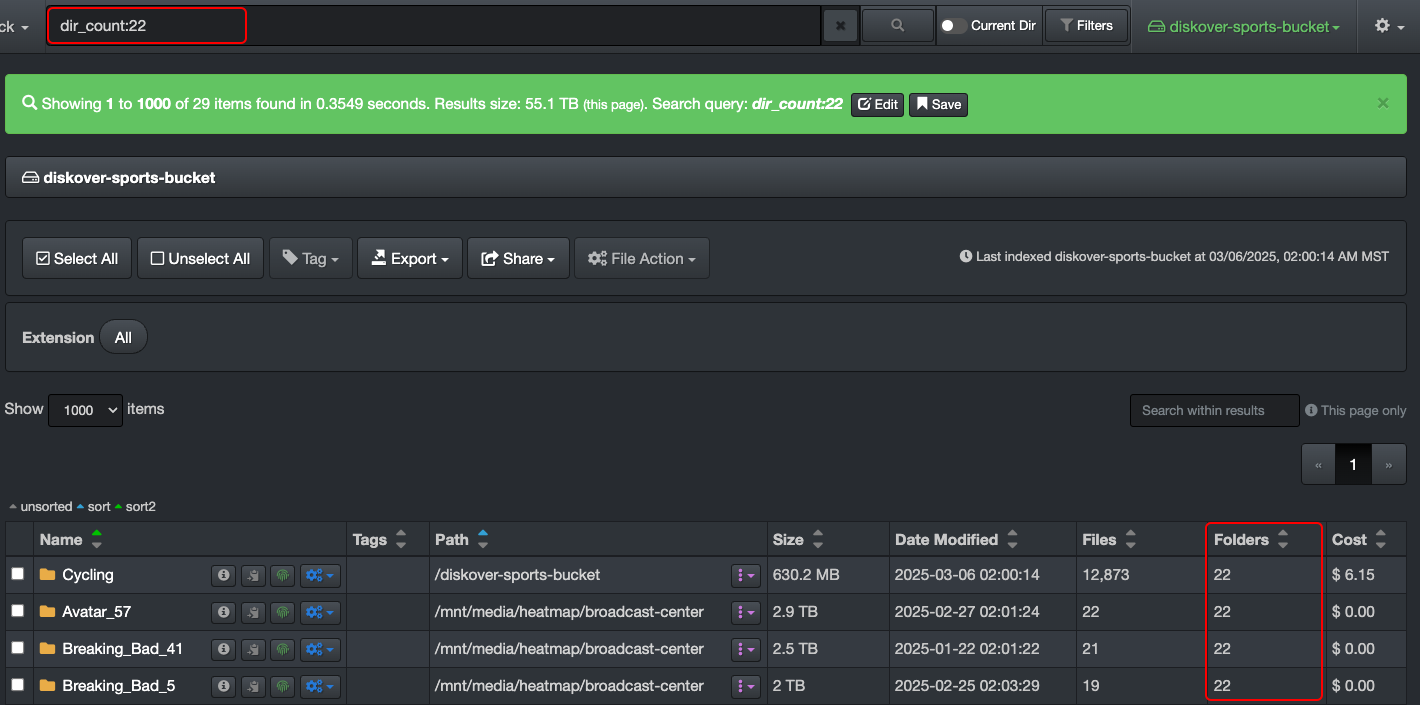 |
| dir_count_norecurs | number of non-recursive sub-directories a directory |
 |
| dir_depth | directory depth in a path |
|
| extension | file extension |
|
| file_count | number of recursive files inside a directory |
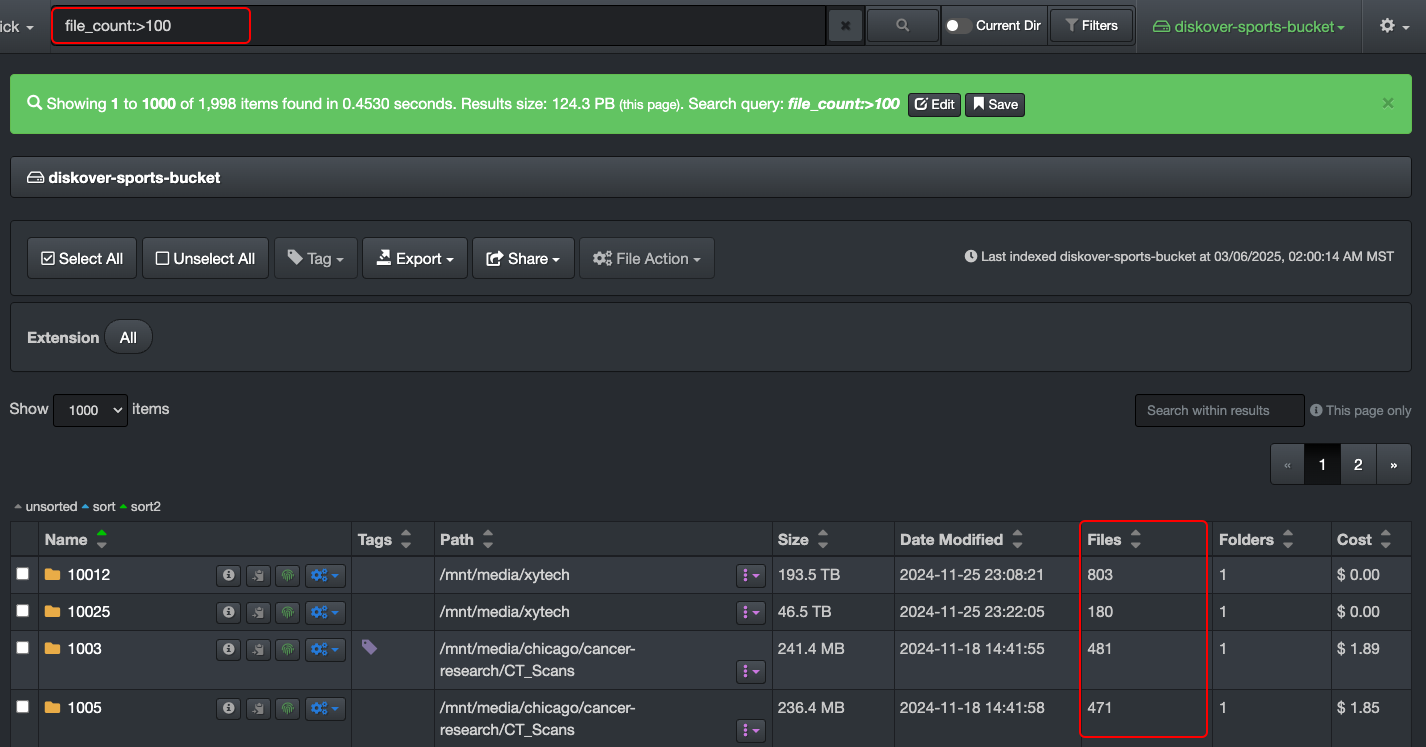 |
| file_count_norecurs | number of non-recursive files within a directory |
|
| file_size | file size |
|
| file_size_du | disk usage size, aka allocated size, for files only |
|
| group | group name associated to a file or directory |
|
| ino | inode number of a file or directory |
|
| mtime | last modified time |
|
| name | file or directory name |
|
| name.text | full-text search analysis, enabling tokenization, stemming, and case-insensitive matching |
|
| nlink | number of hard links pointing to a file or directory |
|
| owner | owner name associated to a file or directory |
|
| parent_path | full directory path where a file or subdirectory is located |
|
| parent_path.text | Full-text search analysis applied to parent directory paths, enabling tokenization, stemming, and case-insensitive matching. |
|
| size | file and/or directory size |
|
| size_norecurs | size of files within a directory, excluding subdirectories non-recursive |
|
| size_du | estimated disk usage of a file or directory, including its contents |
|
| size_du_norecurs | estimated disk usage of files within a directory, excluding subdirectories (non-recursive) |
|
| type | to focus results on files or directories |
|
Stemming
Stemming is primarily applied to .text fields in Diskover searches because these fields use Elasticsearch’s full-text search analysis, which includes stemming, tokenization, and case normalization. However, some other analyzed fields in Diskover may also apply stemming, depending on how they are indexed.
| WHAT | EXAMPLES | WHAT THIS MEANS FOR USERS |
|---|---|---|
| Stemming helps find more results by matching different word variations. Instead of searching for an exact word, Diskover looks for related words with the same root. |
|
|
Inodes vs Hash Values
Inodes and hash values both help identify files, but they serve different purposes in file management, search, and deduplication.
| Feature | Inode | Hash Value |
|---|---|---|
| What It Represents | A file’s unique ID in the filesystem. | A file’s unique fingerprint based on its content. |
| How It Works | Each file (or directory) is assigned an inode number by the filesystem. | A hash function (e.g., MD5, SHA-1) generates a fixed-length value based on the file’s data. |
| Changes When… | File is moved or renamed ➝ Inode stays the same. | File content changes ➝ Hash changes. |
| Used For | Tracking files within the same filesystem (e.g., hard links). | Verifying file integrity and detecting duplicates across different storage locations. |
| Diskover Search Field | ino (inode number) |
hash (file checksum) not explained in this guide, Contact us for the list of extra metadata fields enabled in your instance and how to use them. |
| Key Limitation | Inode numbers are unique only within a single filesystem (same file copied to another storage system gets a new inode). | Two different files with identical content will have the same hash, but different metadata (name, date, etc.). |
Field Names for Extra Metadata
Additional metadata fields can be indexed using Diskover's multiple harvest plugins, extending the depth of searchable information beyond the base metadata. These plugins enable you to extract specialized metadata tailored to your workflows, providing enhanced visibility and search capabilities.
Contact us for a comprehensive list of metadata fields for the plugins in your instance, and how to use them.
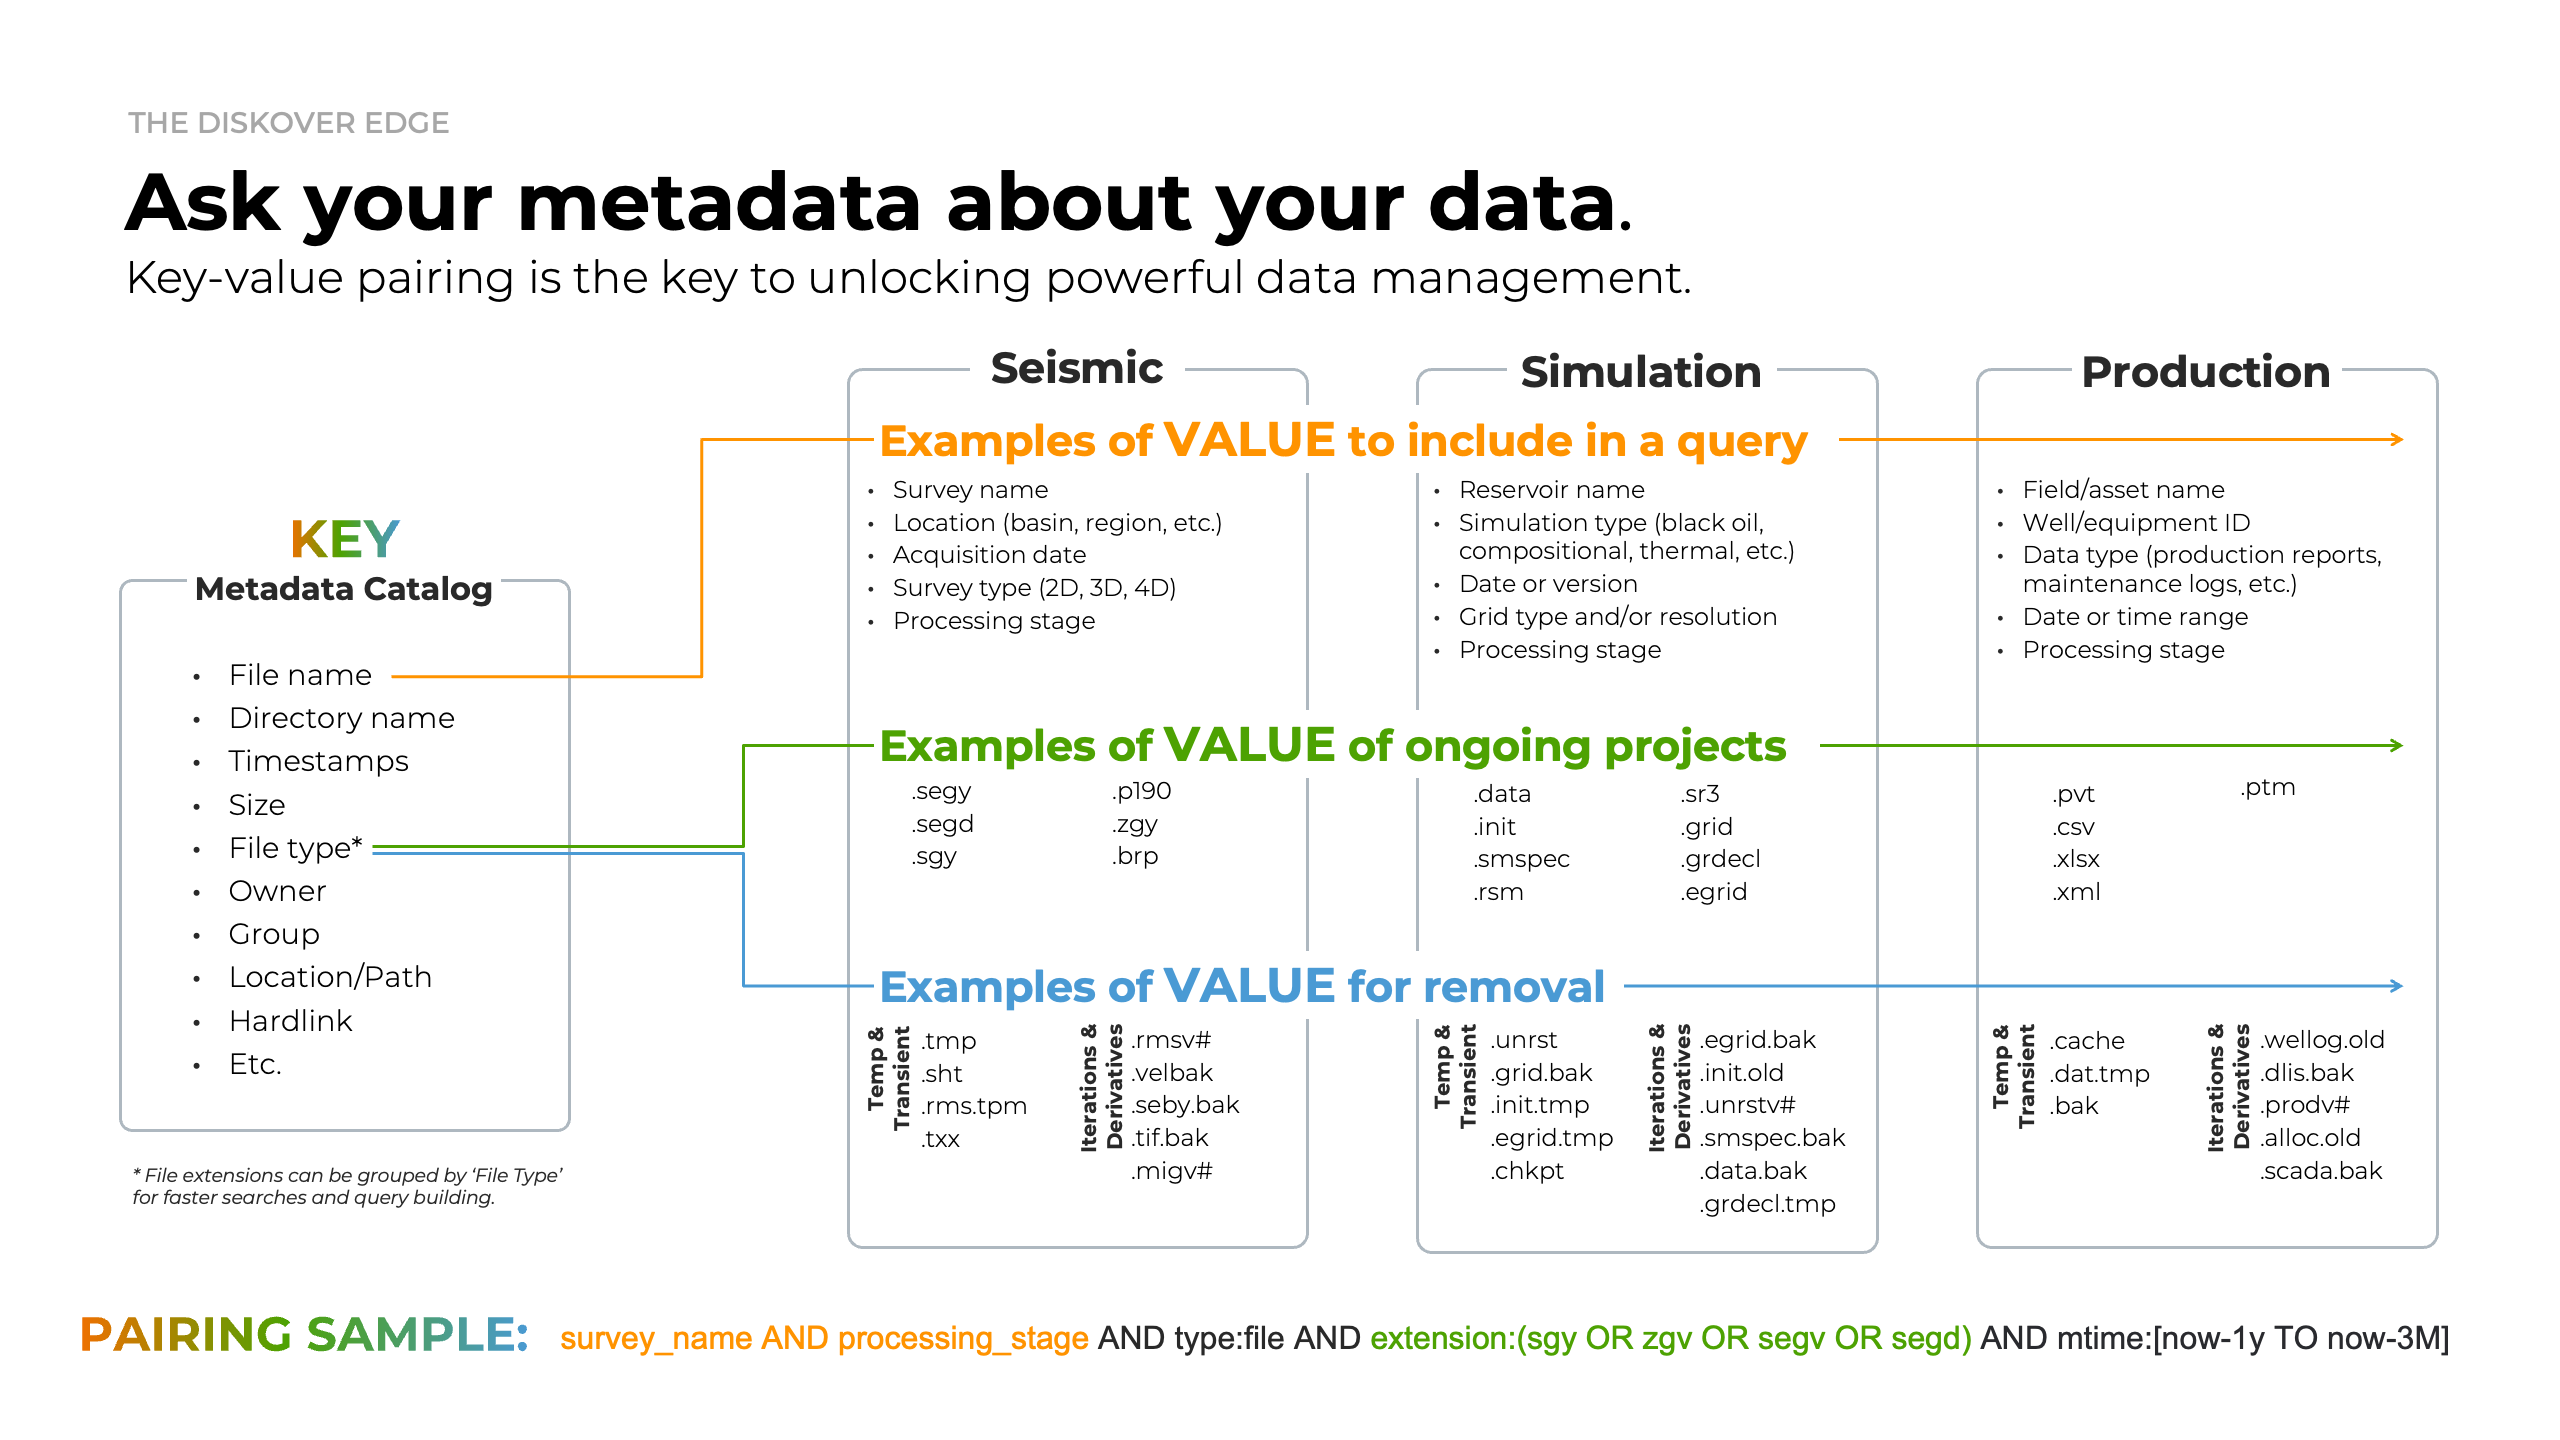
Key-Value Pair
Think of this as a structured way to store and retrieve data, where a key acts as an identifier, and the value holds the associated variable data. In Diskover, key-value pairs are used for various use cases like search queries, custom reporting, and workflows.
The following examples might look complicated, but you can use the built-in search tools to let Diskover create complicated criteria/queries for you.
| 🔎 QUERY | ✅ RESULT |
|---|---|
name.text:*jungle* AND (size:>=5242880 AND size:<=10485760) |
Files and directories with jungle that are between 5MB and 10MB. |
*jungle* AND (ctime:[now-1h TO now] OR mtime:[now-1h TO now]) |
Files or directories with jungle and that have been modified or changed in the last hour. |
*jungle* AND nlink:2 |
Files with jungle that have 2 hard links. |
*albert* AND tags:delete AND extension:mov |
All .mov files tagged delete containing albert in its name. |
tags:(manual_delete AND approve_delete) |
Files and directories with both tags attached to them - please refer to complex queries regarding the use of the parentheses for grouping. |
Queries with Data Size
Diskover shows file size (size) and allocated size (size_du) in bytes. We recommend using the filters, as well as quick search when searching on size, but these fields can also be searched manually. Make sure you are using the proper syntax for mathematical symbols when searching with numbers.
🔆 Use a free byte converter available online when unsure how to translate size from MB, GB, etc. to bytes.
Here are some examples when searching on size:
| 🔎 QUERY | ✅ RESULT |
|---|---|
size:>1048576 |
Files and directories larger than 1 MB |
size:>10485760 AND type:file |
Files larger than 10 MB |
size:>5242880 AND (tags:delete OR tags:approve_delete) |
Files and directories larger than 5 MB tagged delete or approve_delete |
size:>=5242880 AND size:<=10485760 |
Files or directories equal or larger than 5 MB but equal or smaller than 10 MB |
extension:mov AND size:>32212254720 |
.mov files larger than 30 GB |
Queries with Time
Although it is strongly advised to use filters or quick search to query time, below are a few examples on how to do so with a manual query.
Definitions
| FIELD NAME | DEFINITION |
|---|---|
| atime | last accessed → the file may have been opened by you, or may have been accessed by some other program or a remote machine. Anytime a file has been accessed, its access time changes. |
| ctime | last changed → the modification can be in terms of its content or in terms of its attributes—whenever anything about a file changes (except its access time), its ctime changes. |
| mtime | last modified → indicates the time the contents of the file have been changed—mind you, only the contents, not the attributes—for instance:
|
Formatting
Format to use when searching for date and time - ⚠️ searching on time is case-sensitive.
| VARIABLE | FORMAT |
|---|---|
| date |
|
| time |
|
| brackets | These two types of brackets [ ] or { } can be used to contain a range of time, they can even be mixed [ } |
Examples to Find Recent Files
Here are a few examples for finding files with recent activity.
| 🔎 QUERY | ✅ RESULT |
|---|---|
ctime:[now-30m TO now] OR mtime:[now-30m TO now] |
Files that have been modified or changed within the last 30 minutes. |
ctime:[now-1h TO now] OR mtime:[now-1h TO now] |
Files that have been modified or changed in the last hour. |
ctime:[now-1d TO now] OR mtime:[now-1d TO now] |
Files that have been modified or changed in the past day. |
Examples to Find Old Files
Here are a few examples for finding old data.
| 🔎 QUERY | ✅ RESULT |
|---|---|
mtime:[now-5y TO now-3M] |
Files that haven't been modified in over 3 months but less than 5 years. |
mtime:[\* TO now-1y] AND atime:[\* TO now-1y] |
Files that haven't been modified or accessed in over 1 year (* in this case is used to represent "any time in the past"). |
Complex Queries | Syntax and Grouping
Syntax for Mathematical Symbols in Queries
You can only use : with letters, but you can use any other with numbers.
| SYNTAX | EQUATION |
|---|---|
| : | equal to |
| :> | greater than |
| :>= | equal to or greater than |
| :< | lesser than |
| :<= | equal to or lesser than |
| :<> | is not equal to |
When to use Parentheses and Brackets
At times, you will need to group criteria so Diskover can correctly interpret your queries. Think of this like grouping conditions when building formulas in Excel to ensure the logic is applied as intended. This section covers simple to complex groupings using different types of brackets.
| GROUPING TYPE | WHEN TO USE |
|---|---|
| (parentheses) | For grouping conditions in logical queries, ex: (jpg OR png). |
| [square brackets] | Inclusive ranges for time, dates, numeric or string fields, ex: [min TO max] |
| {curly brackets} | Exclusive ranges for time, dates, numeric or string fields, ex: {min TO max} |
| mix [square and curly } | size:[104857600 TO 1073741824} → Finds files between 100MB and 1GB, including 100MB (104,857,600 bytes) but excluding 1GB (1,073,741,824 bytes)mtime:{now-30d TO now] → Finds items with a modified time in the last 30 days, excluding the exact timestamp of 30 days ago but including "now. |
Examples with Single Grouping
Here are a few examples using the file name structure thejunglebook_s01_ep05_en.mov:
| 🔎 QUERY | ✅ RESULT |
|---|---|
*jungle* AND (s*1 OR s*2) |
All files/paths related to season 1 and season 2 for The Jungle Book series. |
*jungle* AND e*5 AND (en OR it) |
All Italian (assuming it was respected in the naming convention) and English (en) translations of episode 5 for The Jungle Book series. |
*jungle* AND s*1 (AND extension:(mov OR mp4)) |
All files of season 1 with .mov and .mp4 extension, a less precise query could be *jungle\* AND s*1 AND (mov OR mp4) |
(new york city) |
Files/paths with those 3 words in them, assuming that all the words are isolated of course—the AND operator is assumed |
Examples with Multiple Groupings
Here are a few examples:
| FILE NAME EXAMPLE | 🔎 QUERY | ✅ RESULT |
|---|---|---|
| thejunglebook_s01_ep05_en.mov | *jungle\* AND (s*1 OR s*2) (NOT (en OR it)) |
All files for season 1 and season 2 of the Jungle Book series, but excluding English and Italian translations. |
Let's say that you have the following files:
|
((quick AND fox) OR (brown AND fox) OR fox) AND NOT news |
The following conditions would be meet:
|
Search with a Path
You can paste a path directly into the search bar to search for files and directories within that path. This is especially useful when a co-worker asks you to investigate a specific location.
⚠️ If you receive a path from a co-worker using a different OS, you may need to adjust the path to match your operating system's directory structure before searching.
Analytics
This chapter covers the various integrated analytics.

⚙️ Customizable analytics.
| ANALYTIC | DESCRIPTION | |
|---|---|---|
| A | Dashboard | Snapshot of a volume with multiple clickable links to see the detailed results. |
| B | Search Page Charts | Snapshot of a path (aging, top files, top directories, etc.) refreshing with every click you make. |
| C | File Tree | Instant profiling of directories by size and aging. |
| C | Treemap | Displays hierarchical data using rectangles to represent the size of the directories. |
| C | Heatmap | Compares 2 indices from 2 points in time, giving an instant visual of data growth or shrinkage. |
| C | Tags | Analyze all your tagged datasets by name, size, and number. |
| C | ⚙️ Smart Searches | Customizable report tailored to what's relevant to your organization. |
| C | User Analysis | Gives insights into data consumption and cost per user and group. |
| C | ⚙️ Cost Analysis | Customizable report helping you put a price tag on the value of your digital assets. |
| C | ⚙️ Reports | Customizable report to help you find your top unknowns. |
| C | Directory Explorer | Provides a visual breakdown of file size, age, and activity across your directory structure. |
Search Page Charts
Instant snapshot of a path—learn all about these nifty charts explained in the Basic Usage | Search Page chapter.
Dashboard
The dashboard view is a great way to get a quick snapshot of an entire volume.
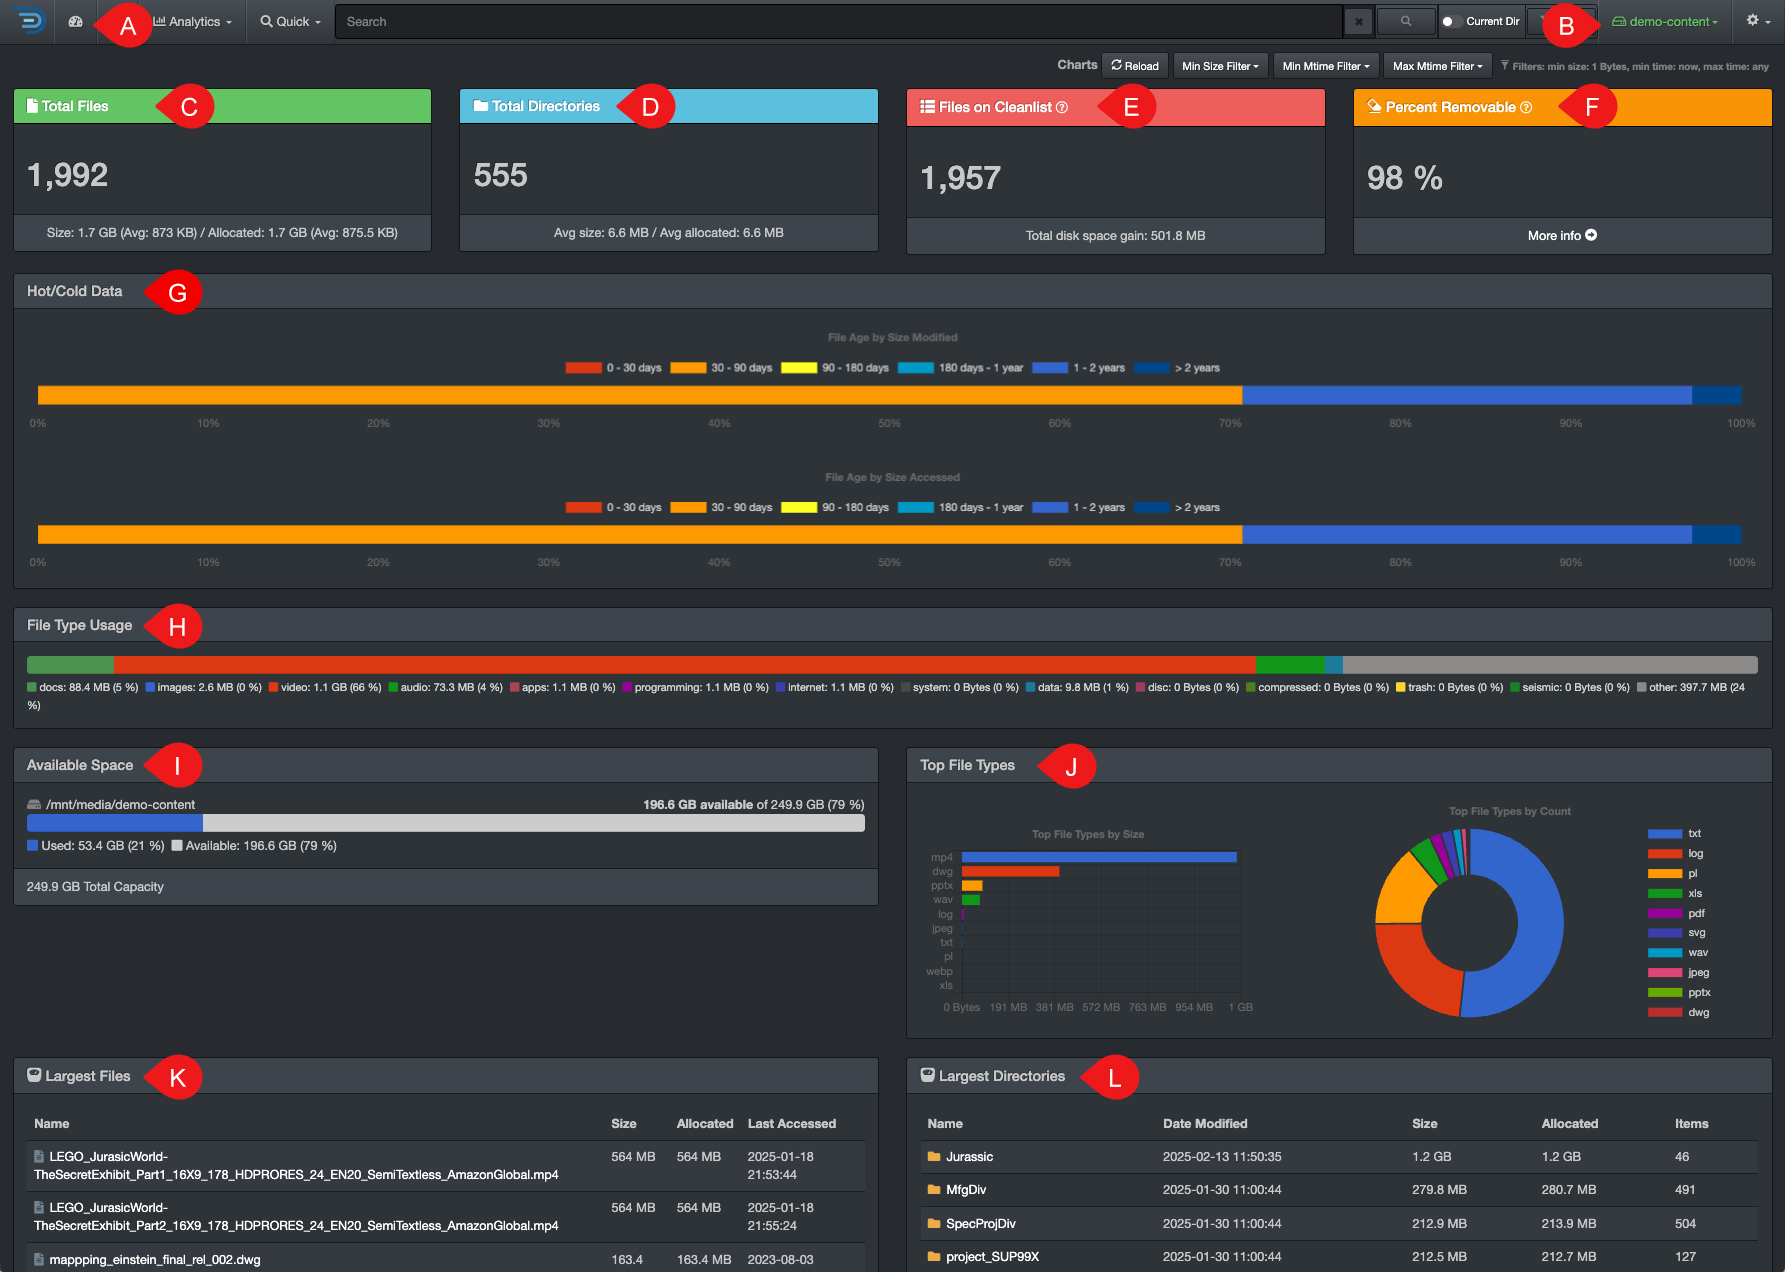
✏️ Hovering several areas will give you more information and many graphics are clickable to open the details in the search page.
| REFERENCE | SECTION | DESCRIPTION |
|---|---|---|
| A | Dashboard button | Click this button to access this dashboard view. |
| B | Drop-down list | Use the drop-down list to select a volume. |
| C | Total Files | Total number of files in the selected volume. Bottom bar: Total space consumed by the files, as well as average size per file. |
| D | Total Directories | Total number of directories in the selected volume. Bottom bar: Average space consumed by directory. |
| E | Files on Cleanlist | Gives an approximation of the files that are candidates for archival or deletion, the criteria to be in that list is modification and access times older than 6 months. Bottom bar: The total disk space gained if these files would be removed from that volume (total files size x percent removable = total disk space gain). |
| F | Percent Removable | Percentage result 🅔 Files on Cleanlist divided by 🅒 Total Files. |
| G | Hot/Cold Data | You can click on the bars to access the detailed results in the search page. |
| H | File Type Usage | Gives a snapshot of the file types (groups of file extensions) in the selected volume, click on the bars to open the detailed results in the search page. |
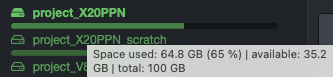
| I | Available Space | Shows the total space of the selected volume, as well as what is used and available. |
| J | Top File Types | Shows the top 10 file types and how much space they are consuming, click on any part of the graphic to access these files in the search page. |
| K | Largest Files | List of the top 10 largest files in the selected volume, you can display more results by clicking Show More at the bottom of that section. |
| L | Largest Directories | List of the top 10 largest directories in the selected volume, you can show more results by clicking Show More at the bottom of that section. |
Smart Searches
Fully customizable reports with what is relevant for your business (by customers, projects, clean up, storage tier, etc). Smart searches were designed for repeatable reports; they are basically saved searches. The goal is to avoid having to recreate complex queries when you know you will need the same report regularly. These reports are global and accessible by everyone in your organization.
Accessing Smart Searches
| From the Analytics drop-down list | From the |
|---|---|
Will aggregate data from all volumes if no filters are activated.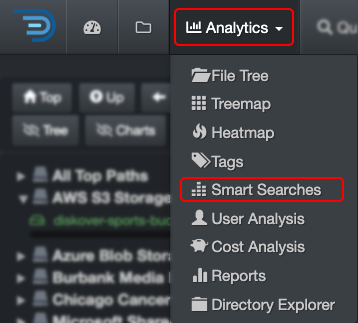 |
Will load the report for that path only.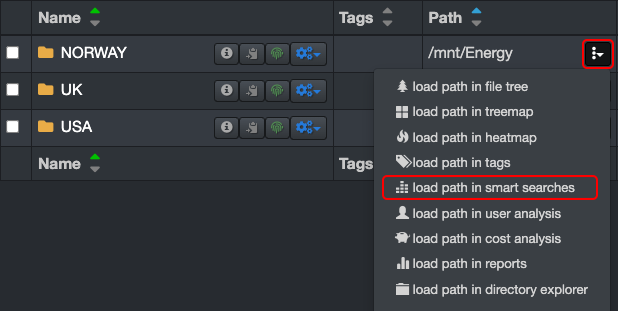 |
Smart Searches Overview
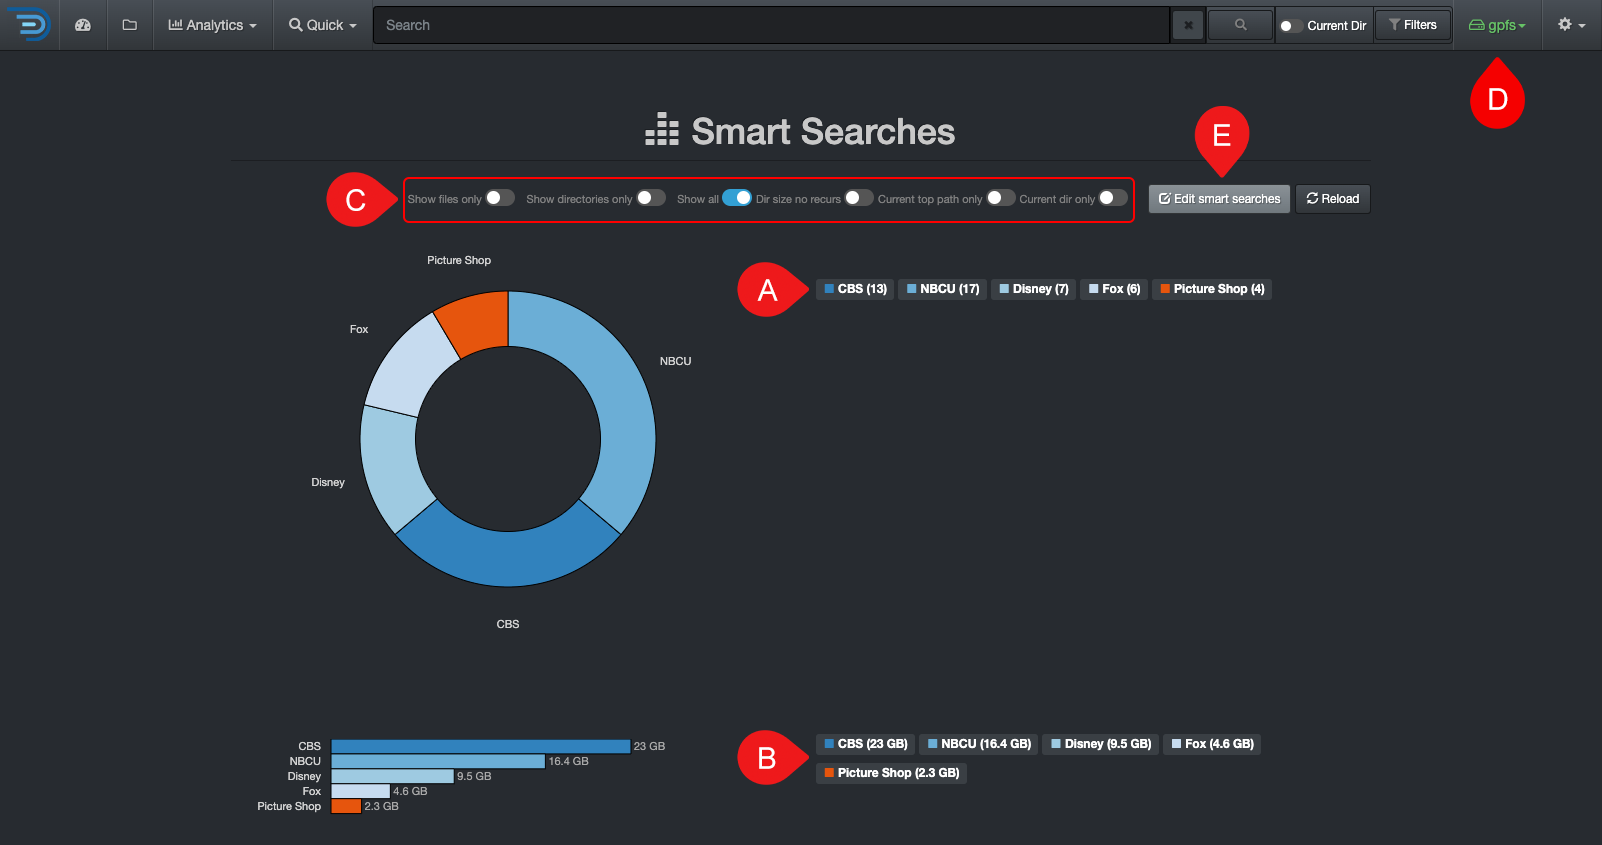
✏️ Hover over the graphics to view more detailed information.
| REFERENCE | DESCRIPTION |
|---|---|
| A | Results by number of items – click on any link to open the results in the search page. |
| B | Results by size – click on any link to open the results in the search page. |
| C | Apply filters to further customize your results:
|
| D | Smart Searches are global, if you want to narrow the results:
|
| E | Edit Smart Searches: You can view the queries used for the report, but editing them requires an admin account. If you need to add or edit a search query and don’t have admin access, contact your System Administrator. |
Launch Smart Searches Results from the Search Bar
You can launch a Smart Search report anytime directly from the search bar by typing !:
- A list of available reports will appear beneath the search bar
- Simply click on the desired report to view its results on the search page.

Customize Smart Searches
Smart Searches analytics includes sample queries out of the virtual box, but these queries can be customized by any user with an admin account.
Reports
Reports are designed to help you easily uncover your top unknowns—like reverse engineering for your data. With fully customizable queries tailored to what matters most to your business, you can quickly pinpoint hard-to-find files and key statistics. These reports are global and accessible to everyone in your organization.
Accessing Reports
| From the Analytics drop-down list | From the |
|---|---|
Will aggregate data from all volumes if no filters are activated.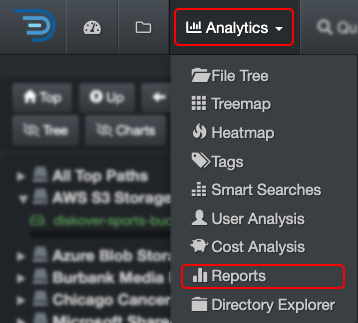 |
Will load the report for that path only.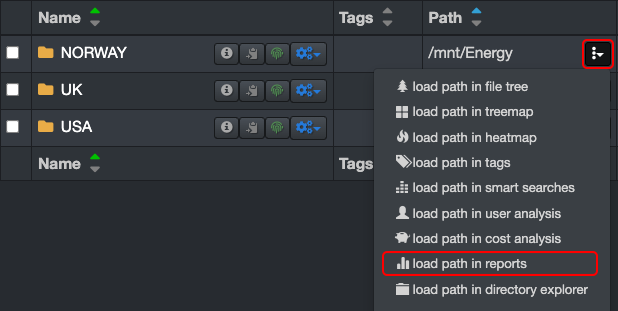 |
Reports Overview
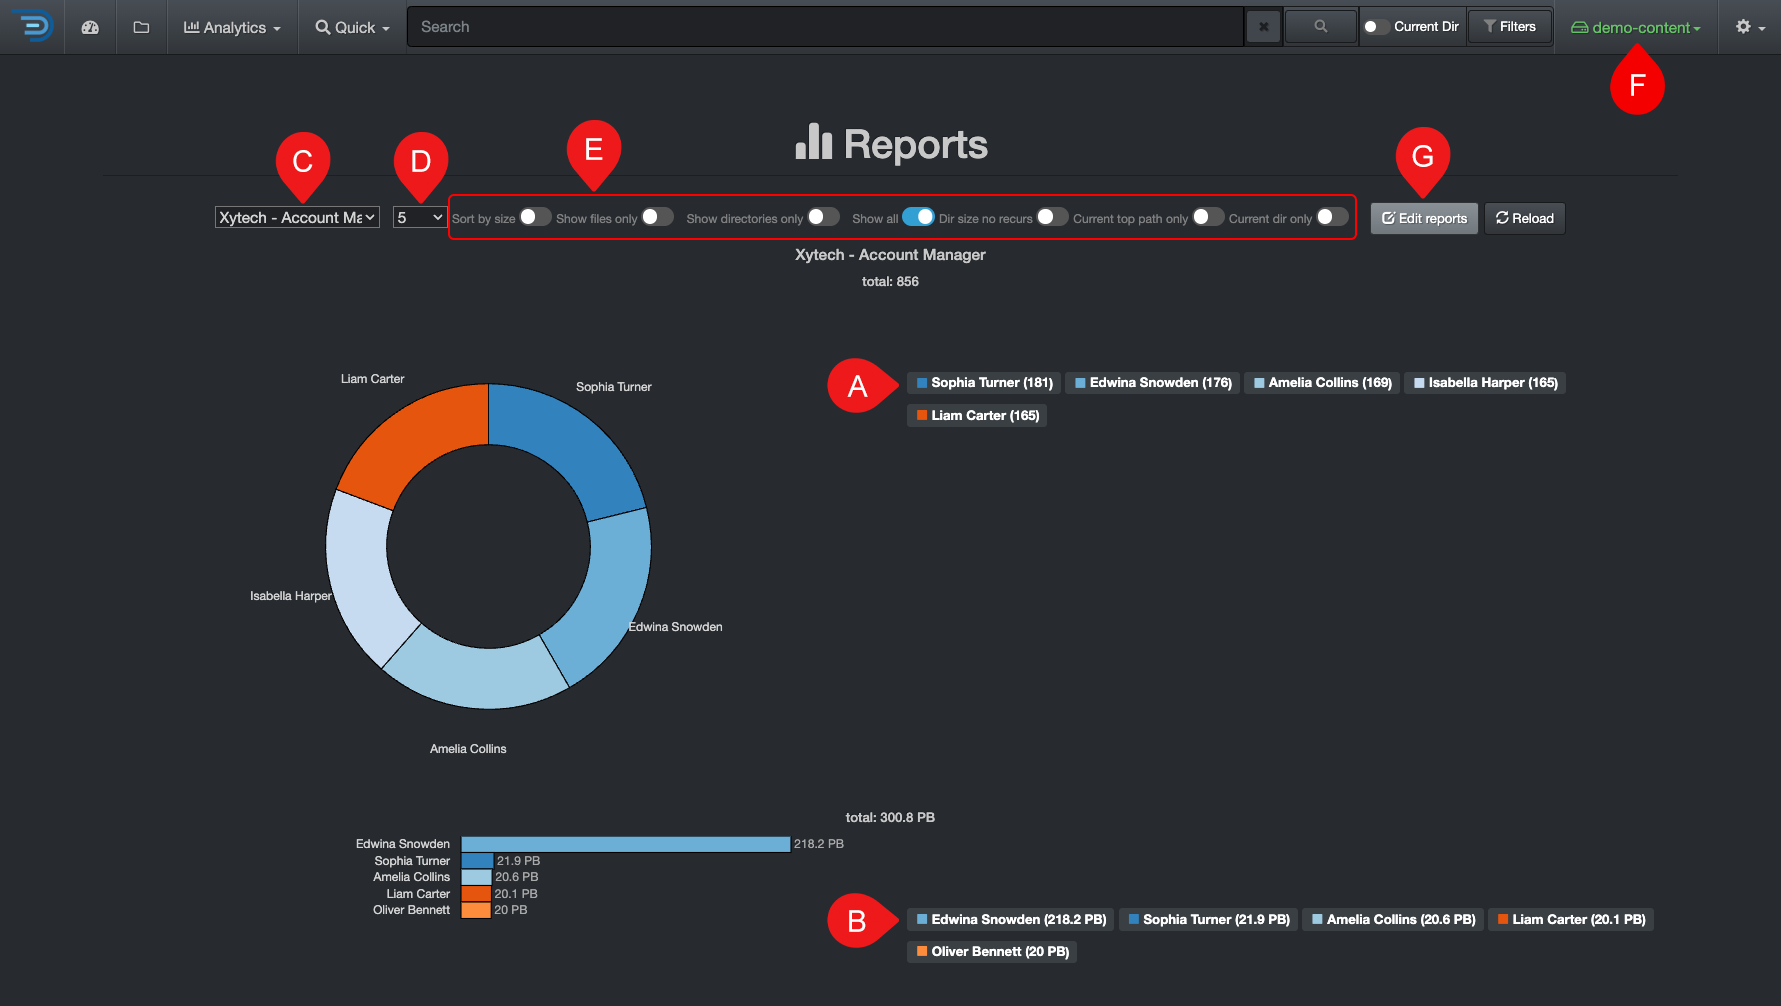
✏️ Hover over the graphics to view more detailed information.
| REFERENCE | DESCRIPTION |
|---|---|
| A | Results by number of items – click on any link to open the results in the search page. |
| B | Results by size – click on any link to open the results in the search page. |
| C | Using the drop-down list, select what you want to investigate. |
| D | Using the drop-down list, select how many top results you want to see. |
| E | Apply filters to further customize your results:
|
| F | Reports are global, if you want to narrow the results:
|
| G | Edit Reports: You can view the queries used for the report, but editing them requires an admin account. If you need to add or edit a search query and don’t have admin access, contact your System Administrator. |
Customize Reports
Reports analytics includes sample queries out of the virtual box, but these queries can be customized by any user with an admin account.
File Tree
The File Tree Report provides insights into the size and aging of data for a selected path. Many users prefer this view for drilling down into data rather than using the [search page](#search_page.
Accessing File Tree
| From the Analytics drop-down list | From the |
|---|---|
Will aggregate data from all volumes if no filters are activated.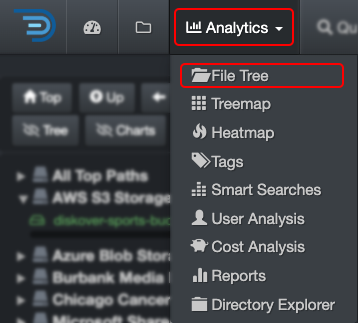 |
Will load the report for that path only.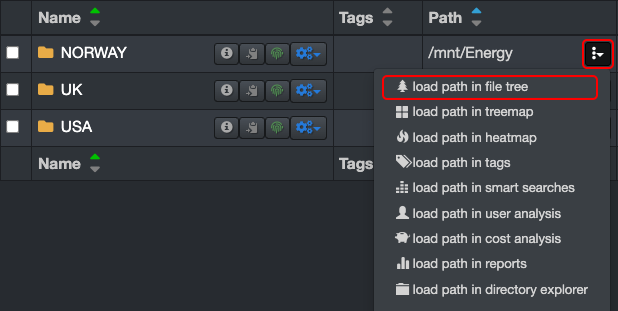 |
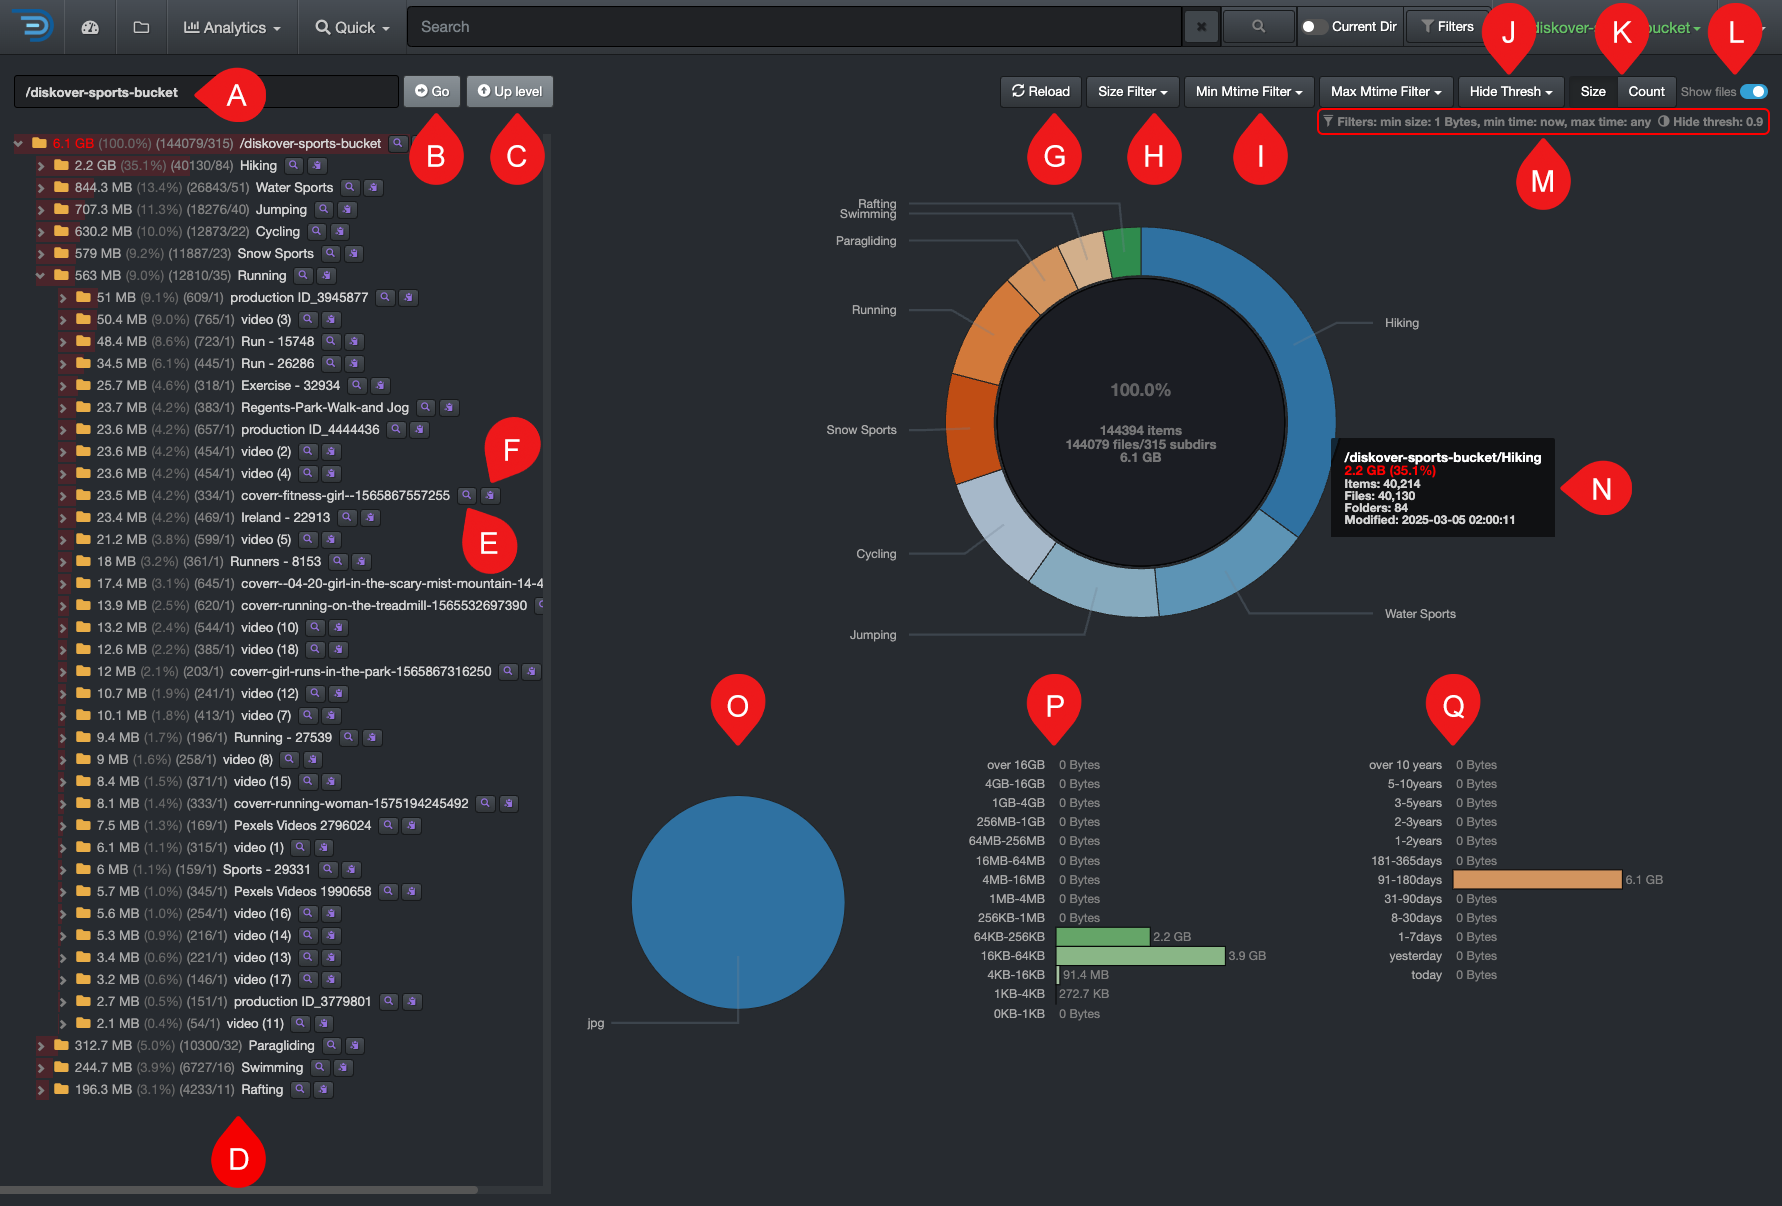
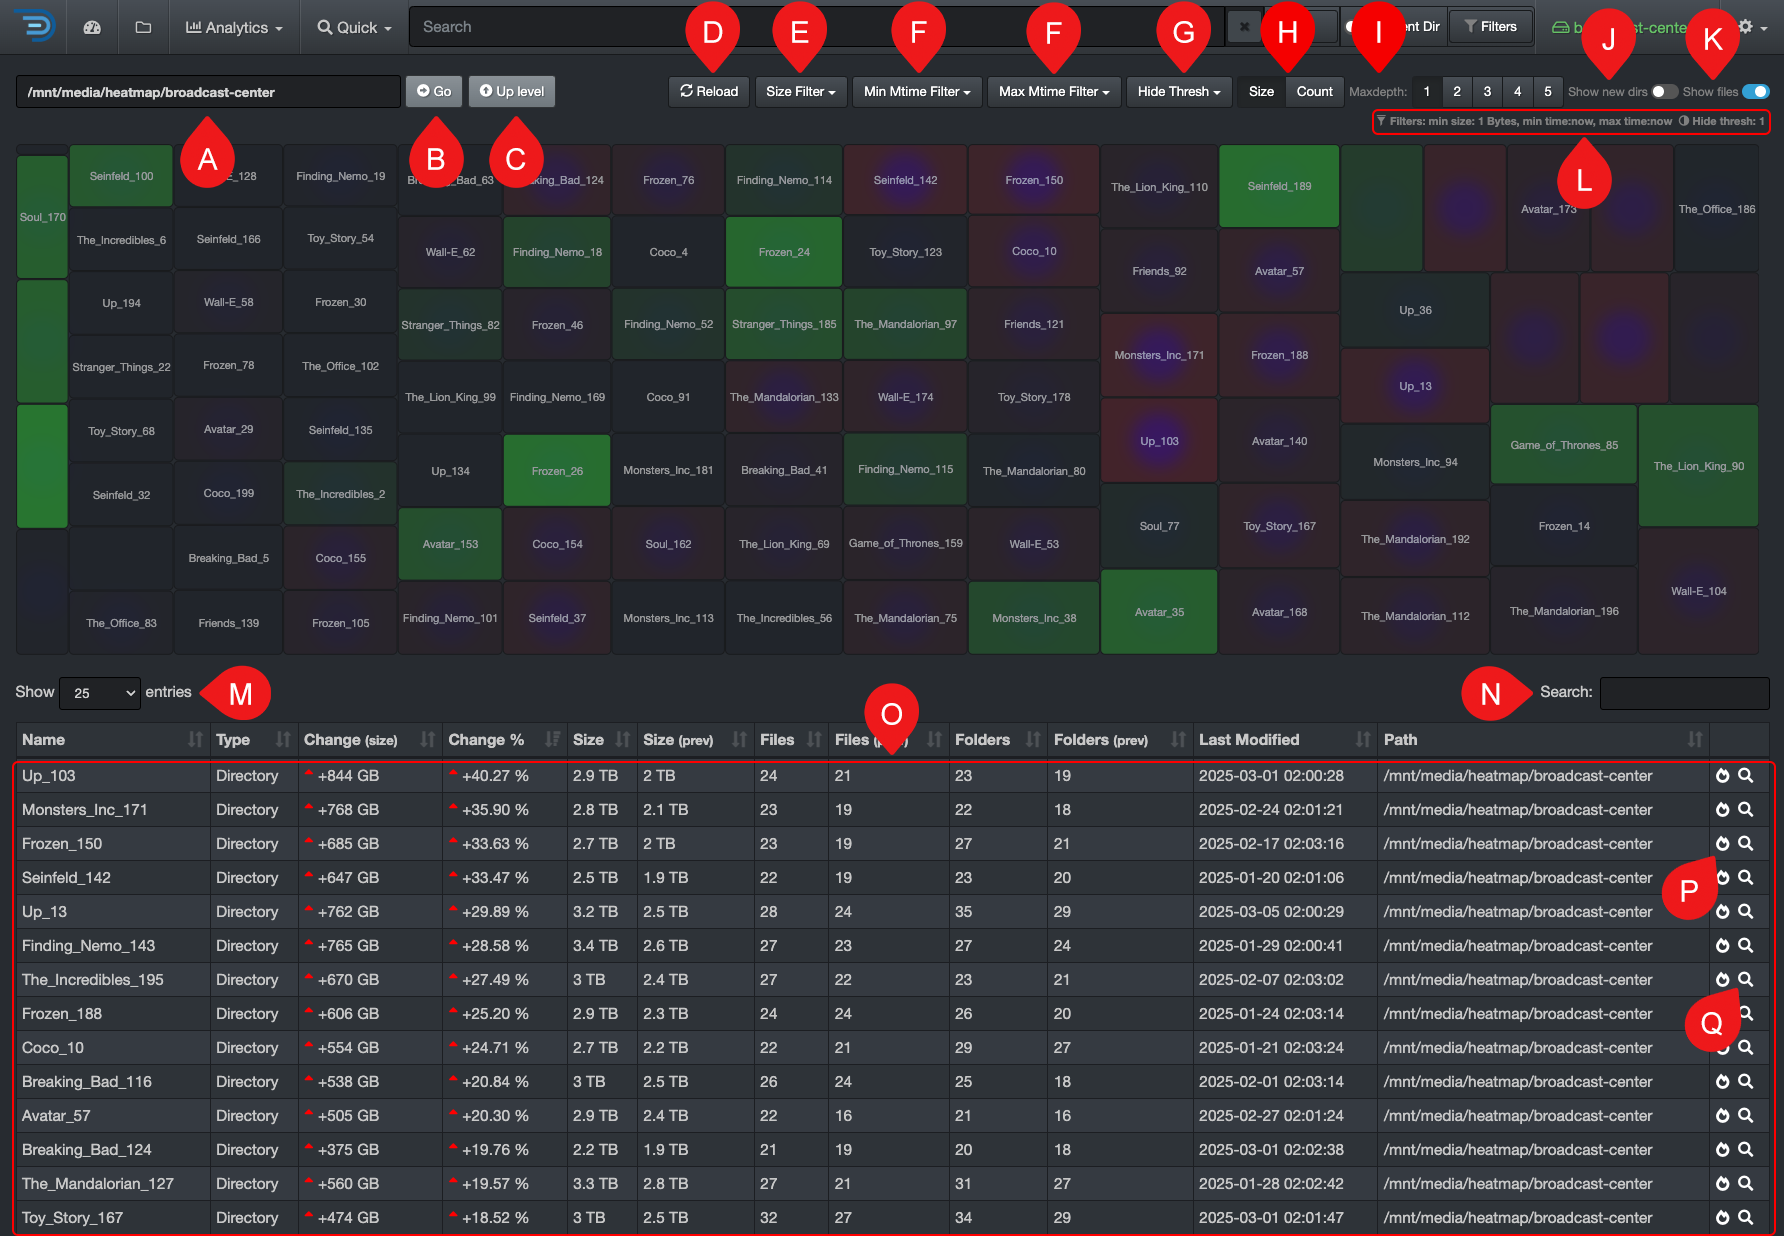
File Tree Overview
✏️ Hover over the graphics to view more detailed information.
| REFERENCE | DESCRIPTION |
|---|---|
| A | Path bar: You can view and paste a path to investigate. |
| B | Go: That button acts as a RETURN key, for example, use if you paste a path in that bar. |
| C | Up Level: To drill up one directory at a time until you reach the top of the volume. |
| D | File Tree: By default, the directories are sorted by size—the sorting will change if you change 🅚 by count. You can drill down using this left pane as well as via 🅝 the pie chart. |
| E | |
| F | |
| G | Reload: To reload the cached data for the chart and file tree. |
| H | Size Filter: To set a minimum data size threshold for filtering results – this will affect results in 🅟. |
| I | Mtime Filter: To focus on a specific data modified time period. |
| J | Hide Thresh: To make the graphics less busy by hiding the results with low percentages. |
| K | Size or Count: Choose whether to view the report by Size (data volume) or Count (number of items)—this will affect the results in 🅟 and 🅠. |
| L | Show Files: By default, the results pane displays only directories—select this option to include files in the results. |
| M | Filters: Summary of the filters you might have selected. ⚠️These filters will stay active, even if you navigate away to other pages AND they will affect other analytics. |
| N | Directories chart: You can drill down by clicking on pie slices—hover over a slice to view more details about a directory. |
| O | File extensions: A summary of the file extensions detected in the current path. You can click on a slice to open the results in the search page |
| P | Size chart: A summary by size detected in the current path. You can click on a bar to open the results in the search page |
| Q | Aging chart: A summary by size detected in the current path. You can click on a bar to open the results in the search page |
Treemap
The treemap report visualizes hierarchical data using nested figures—the larger the rectangle, the more data the directory or file contains. This provides a graphical representation of folder sizes.
Accessing Treemap
| From the Analytics drop-down list | From the |
|---|---|
Will aggregate data from all volumes if no filters are activated. |
Will load the report for that path only. |
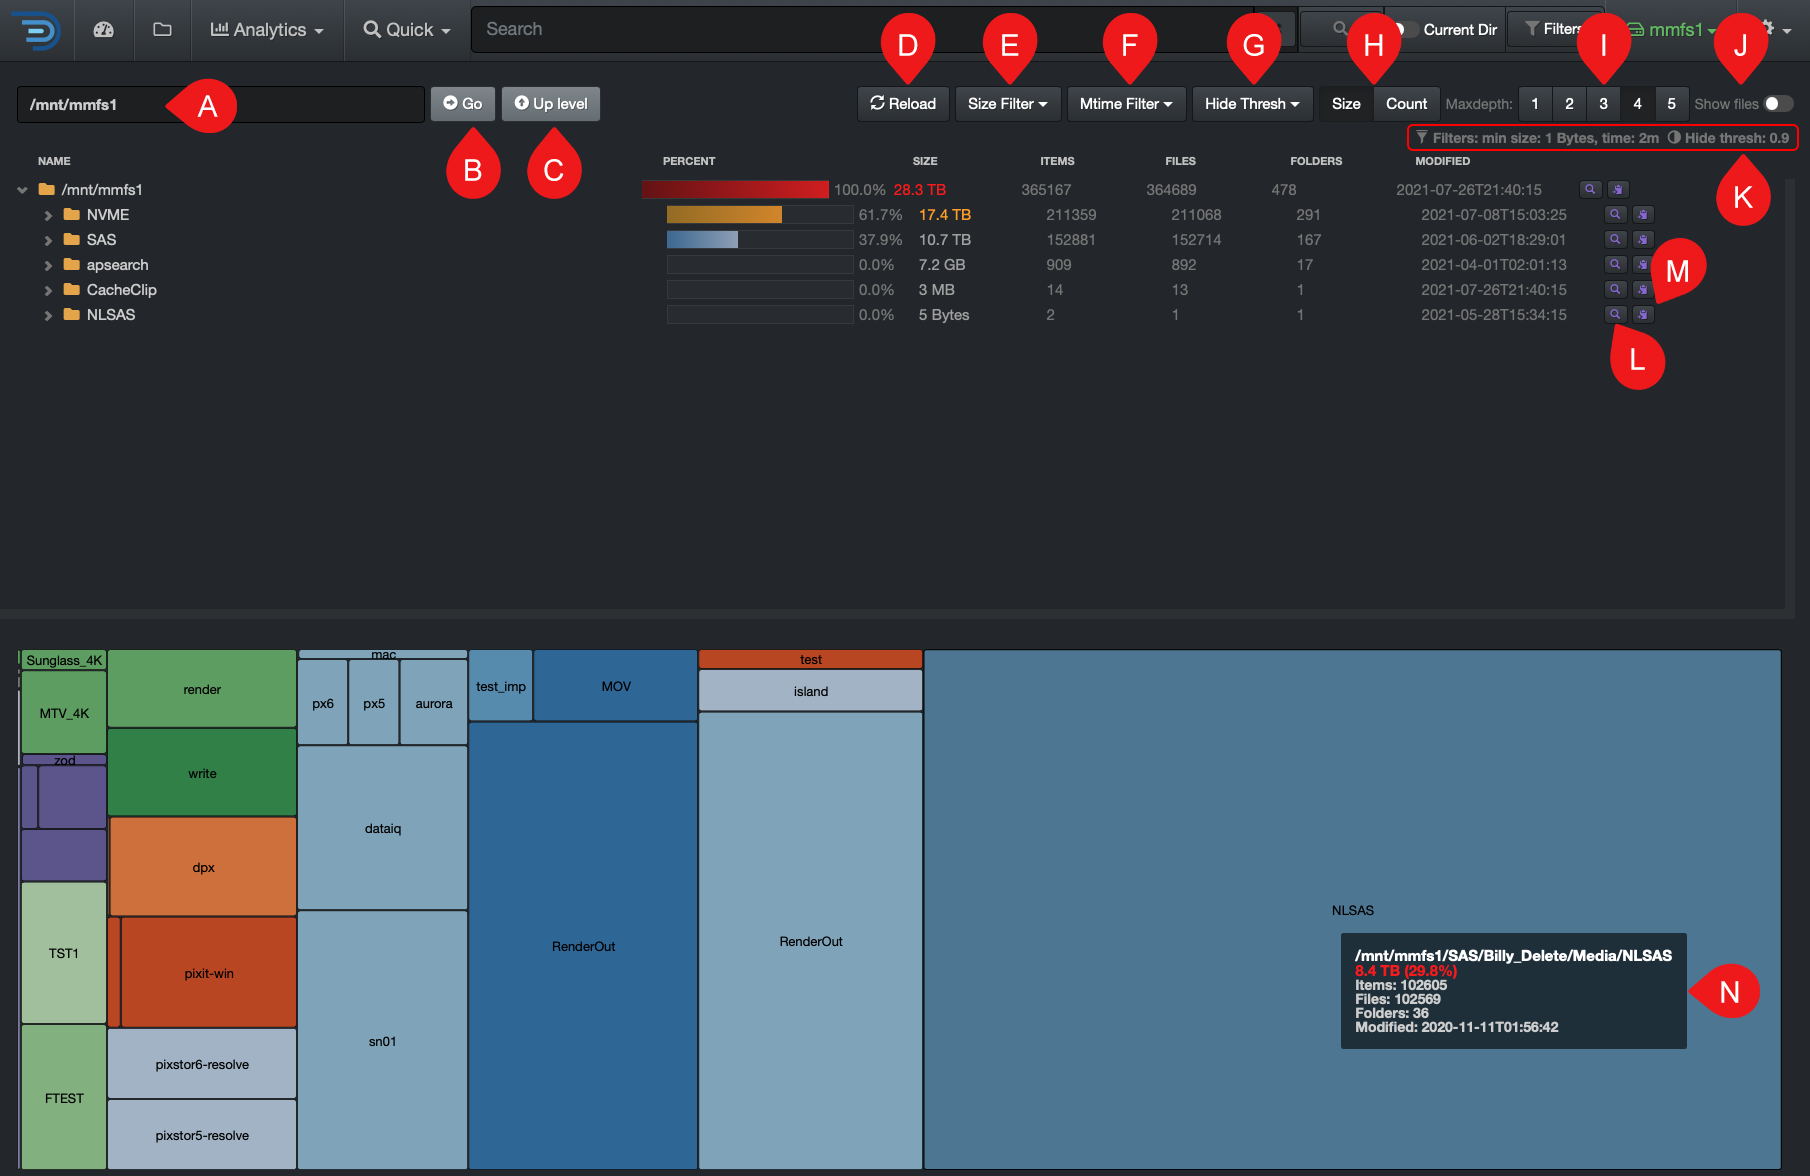
Treemap Overview
✏️ Hover over the graphics to view more detailed information.
| REFERENCE | DESCRIPTION |
|---|---|
| A | Path bar: You can view and paste a path to investigate. |
| B | Go: That button acts as a RETURN key, for example, use if you paste a path in that bar. |
| C | Up Level: To drill up one directory at a time until you reach the top of the volume. |
| D | Reload: To reload the cached data for the chart and file tree. |
| E | Size Filter: To set a minimum data size threshold for filtering results. |
| F | Mtime Filter: To focus on a specific data modified time period. |
| G | Hide Thresh: To make the graphics less busy by hiding the results with low percentages. |
| H | Size or Count: Choose whether to view the report by Size (data volume) or Count (number of items). |
| I | Maxdepth: Select the number of levels/directories to display in the results. |
| J | Show Files: By default, the results pane displays only directories—select this option to include files in the results. |
| K | Filters: Summary of the filters you might have selected. ⚠️These filters will stay active, even if you navigate away to other pages AND they will affect other analytics. |
| L | |
| M | |
| N | Graphics area: You can drill down using the rectangles. ✏️ All rectangles of the same color belong to the same directory. |
Directory Explorer
The Directory Explorer provides a visual breakdown of file size, age, and activity across your directory structure. It helps you quickly identify where storage is being used, spot stale or unused data, and prioritize cleanup or archiving efforts—all in a single, drillable view.
Accessing Directory Explorer
| From the Analytics drop-down list | From the |
|---|---|
Will aggregate data from all volumes if no filters are activated.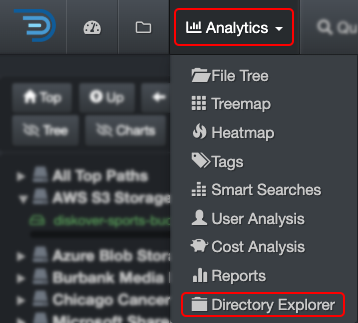 |
Will load the report for that path only.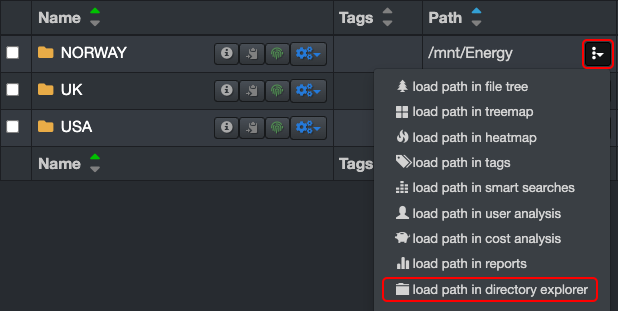 |
Directory Explorer Overview
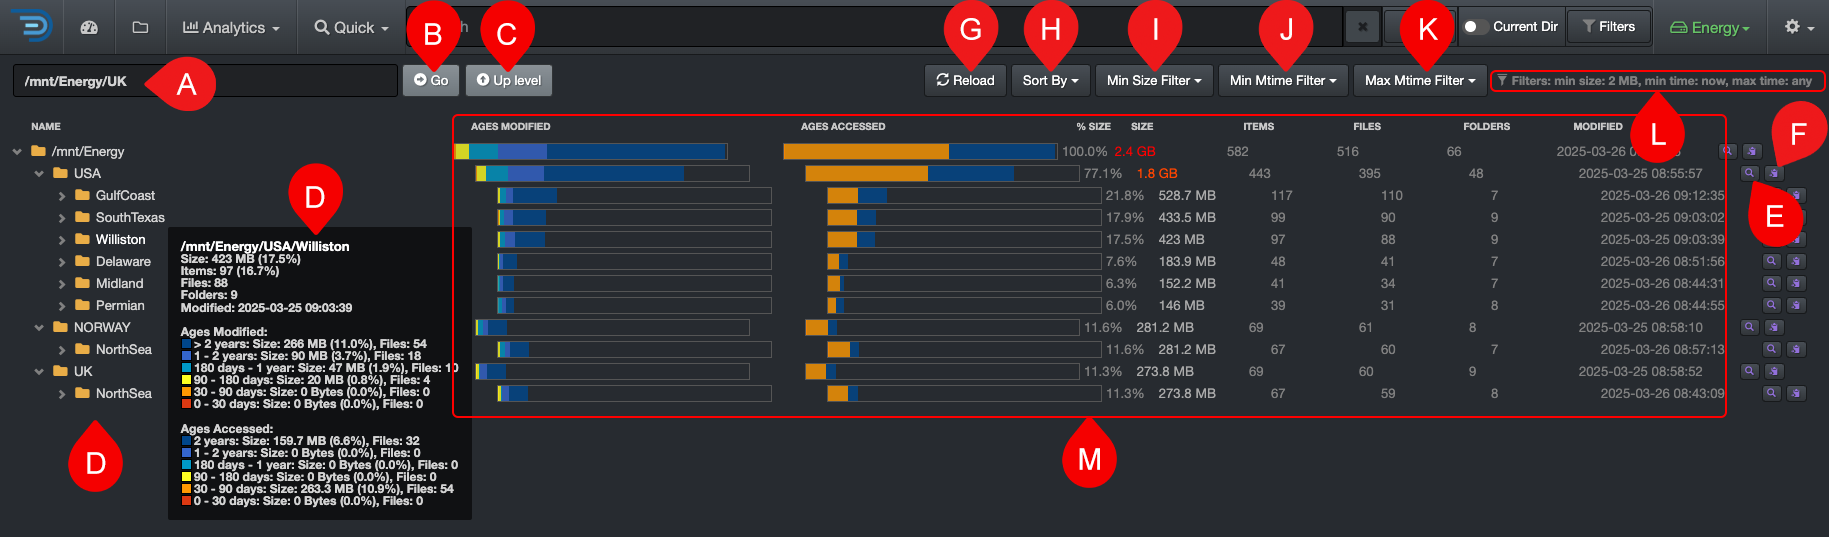
✏️ Hover over the file tree folders to view detailed information.
| REFERENCE | DESCRIPTION |
|---|---|
| A | Path bar: You can view and paste a path to investigate. |
| B | Go: That button acts as a RETURN key, for example, use if you paste a path in that bar. |
| C | Up Level: To drill up one directory at a time until you reach the top of the volume. |
| D | File Tree: To drill down the file tree, note that hovering over any folder will open up a detailed summary. |
| E | |
| F | |
| G | Reload: To reload the cached data for the chart and file tree. |
| H | Sort By: Different options to sort your file tree.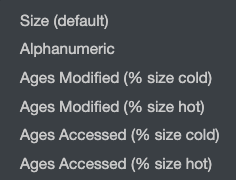 |
| I | Min Size Filter: To set a minimum data size threshold for filtering results. |
| J | Min Mtime Filter: To focus on a specific minimum modified time period. |
| K | Max Mtime Filter: To focus on a specific maximum modified time period. |
| L | Filters: Summary of the filters you might have selected. ⚠️These filters will stay active, even if you navigate away to other pages AND they will affect other analytics. |
| M | Directory Details: Full details of what's included in a path. |
Cost Analysis
The Cost Analysis Report provides a snapshot of how your storage budget is allocated. It offers repeatable, customizable reports that can be configured by project, client, data aging, or other criteria relevant to your organization.
Accessing Cost Analysis
| From the Analytics drop-down list | From the |
|---|---|
Will aggregate data from all volumes if no filters are activated.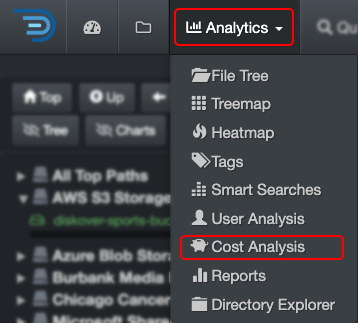 |
Will load the report for that path only.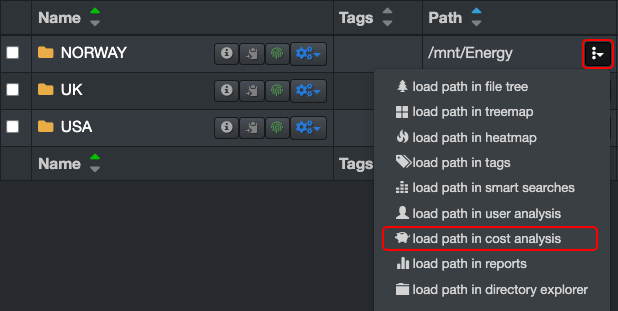 |
Cost Analysis Overview
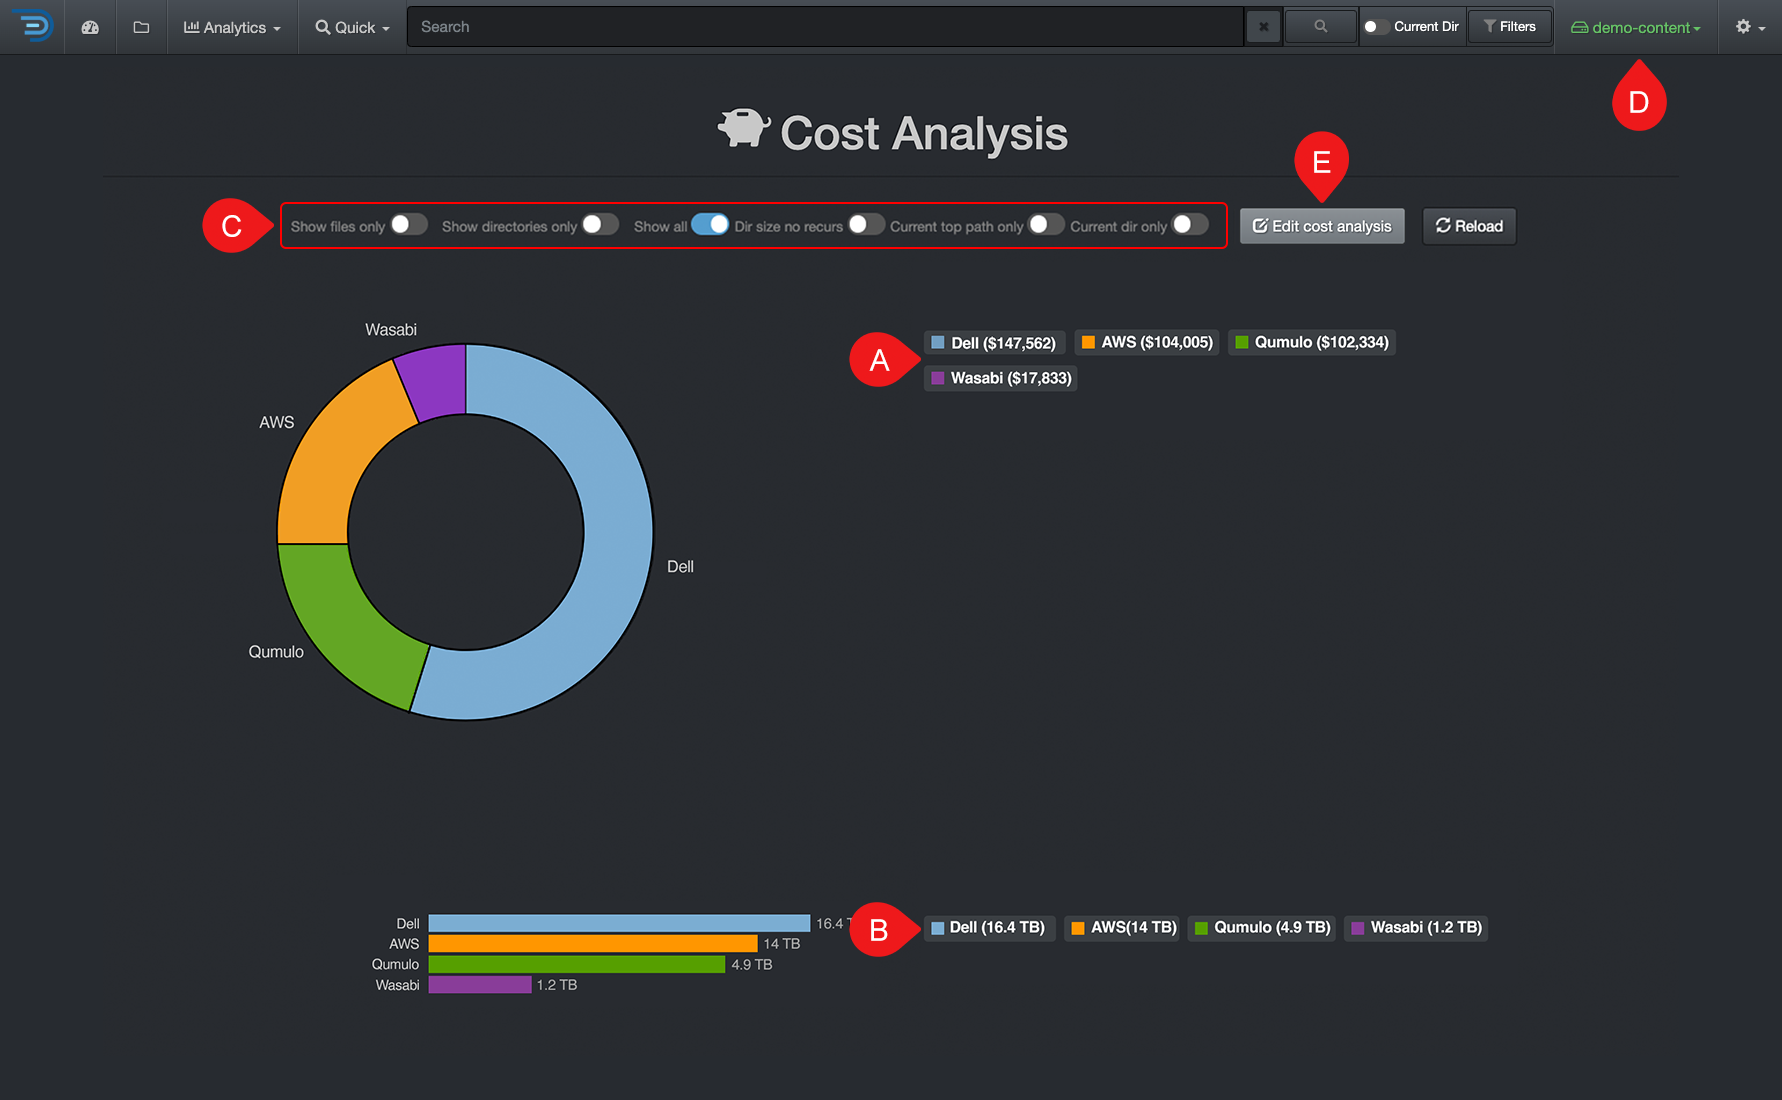
✏️ Hover over the graphics to view more detailed information.
| REFERENCE | DESCRIPTION |
|---|---|
| A | Results by number of items – click on any link to open the results in the search page. |
| B | Results by size – click on any link to open the results in the search page. |
| C | Apply filters to further customize your results:
|
| D | Cost Analysis are global, if you want to narrow the results:
|
| E | Edit Cost Analysis: You can view the queries used for the report, but editing them requires an admin account. If you need to add or edit a search query and don’t have admin access, contact your System Administrator. |
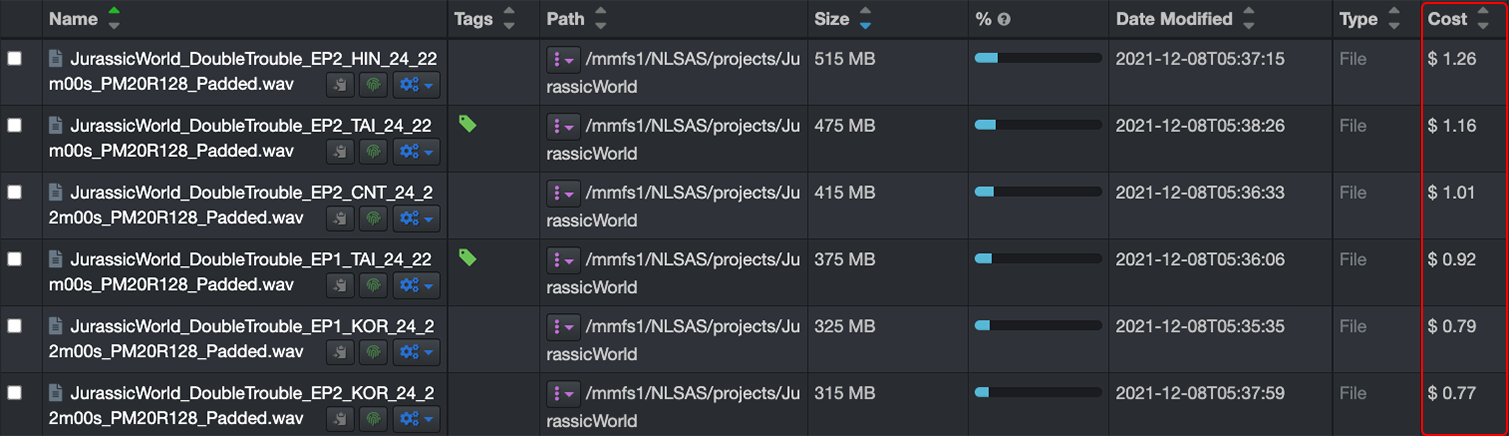
Cost Analysis in the Search Page
Once the cost analysis tool is enabled and configured, the cost associated with a specific directory or a file can be viewed in the file search page.
Storage Cost Calculation and Configuration Overview
Storage cost can be set globally or per storage volume, directory, etc. This tool is designed to control operating costs by 1) charging clients accurately for storage of their projects and 2) clean-up/data incentivizing.
This feature is enabled and configured by your System Administrator. The storage costs can either be estimated globally, by storage volume, or down a directory level. The estimations need to be done outside of Diskover. Besides the cost of the storage itself, other factors can be compounded like electricity, service contract, System Administrator’s salary, subscription fees, etc. The estimations need to be calculated and configured per gigabyte.
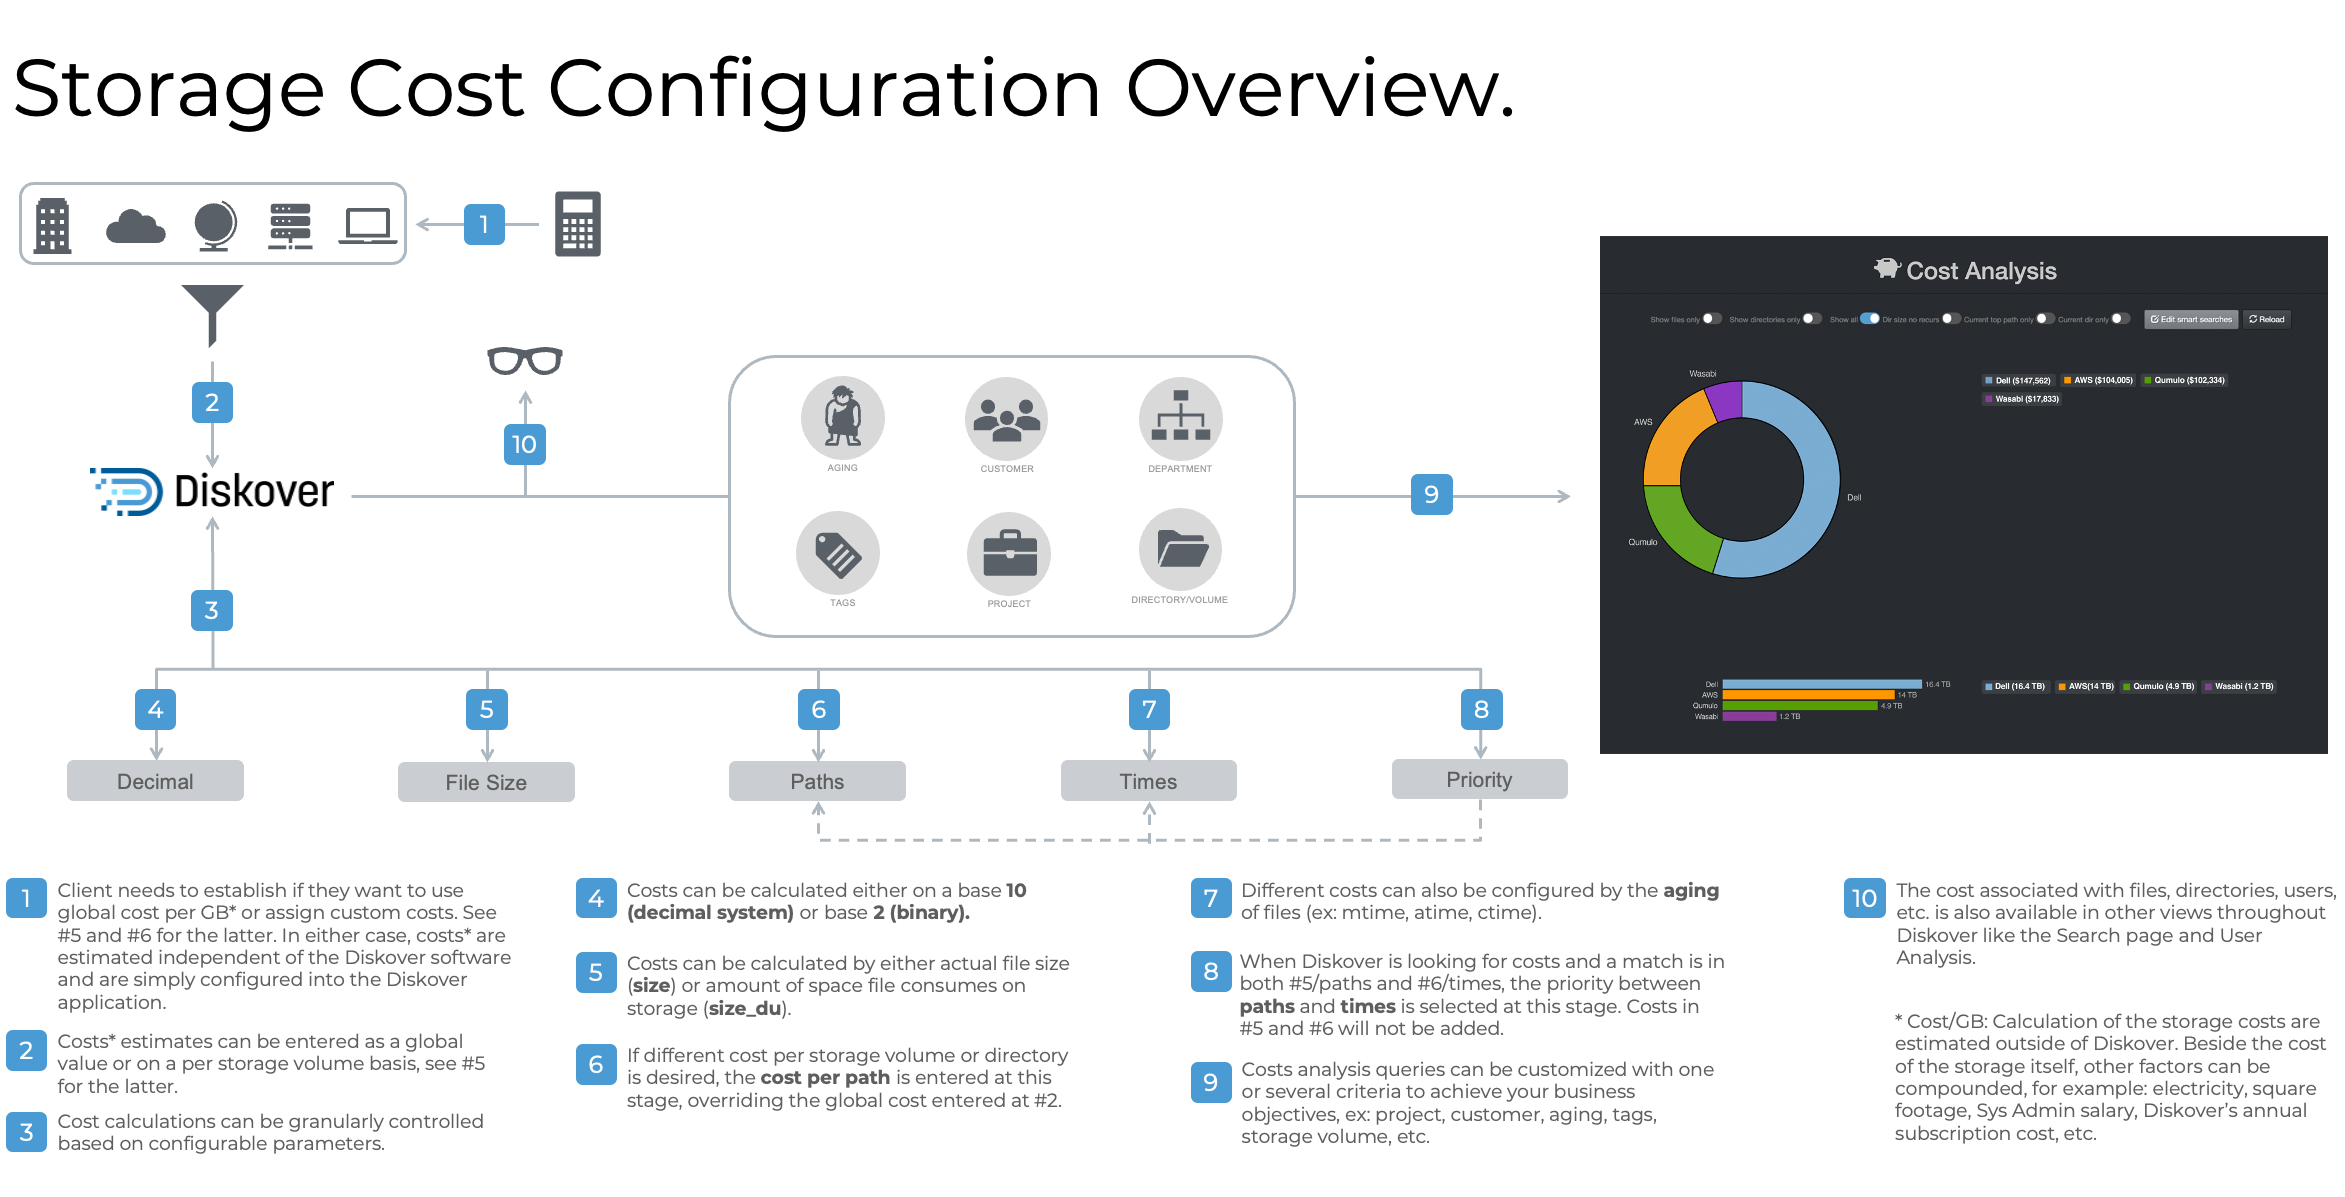
Click here for a full-screen view of the Storage Cost Configuration Overview diagram.
User Analysis
The user analysis report provides a snapshot of data utilization by individual users or groups. It helps manage who's using the storage space, as well as operating costs. This report must be enabled and configured by your System Administrator.
Accessing User Analysis
| From the Analytics drop-down list | From the |
|---|---|
Will aggregate data from all volumes if no filters are activated.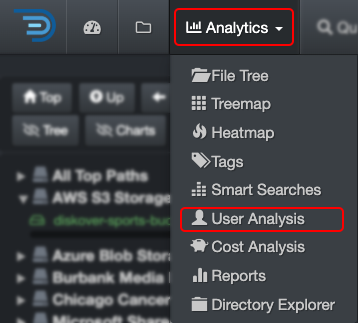 |
Will load the report for that path only.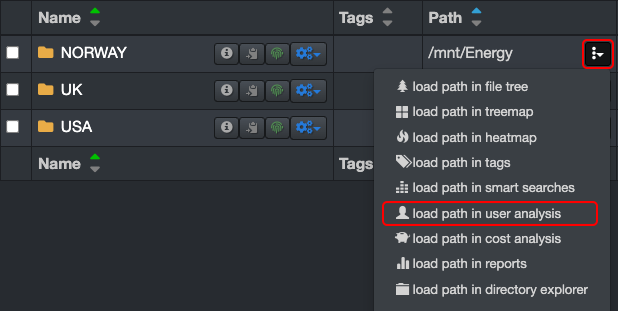 |
Using the User Analysis Report
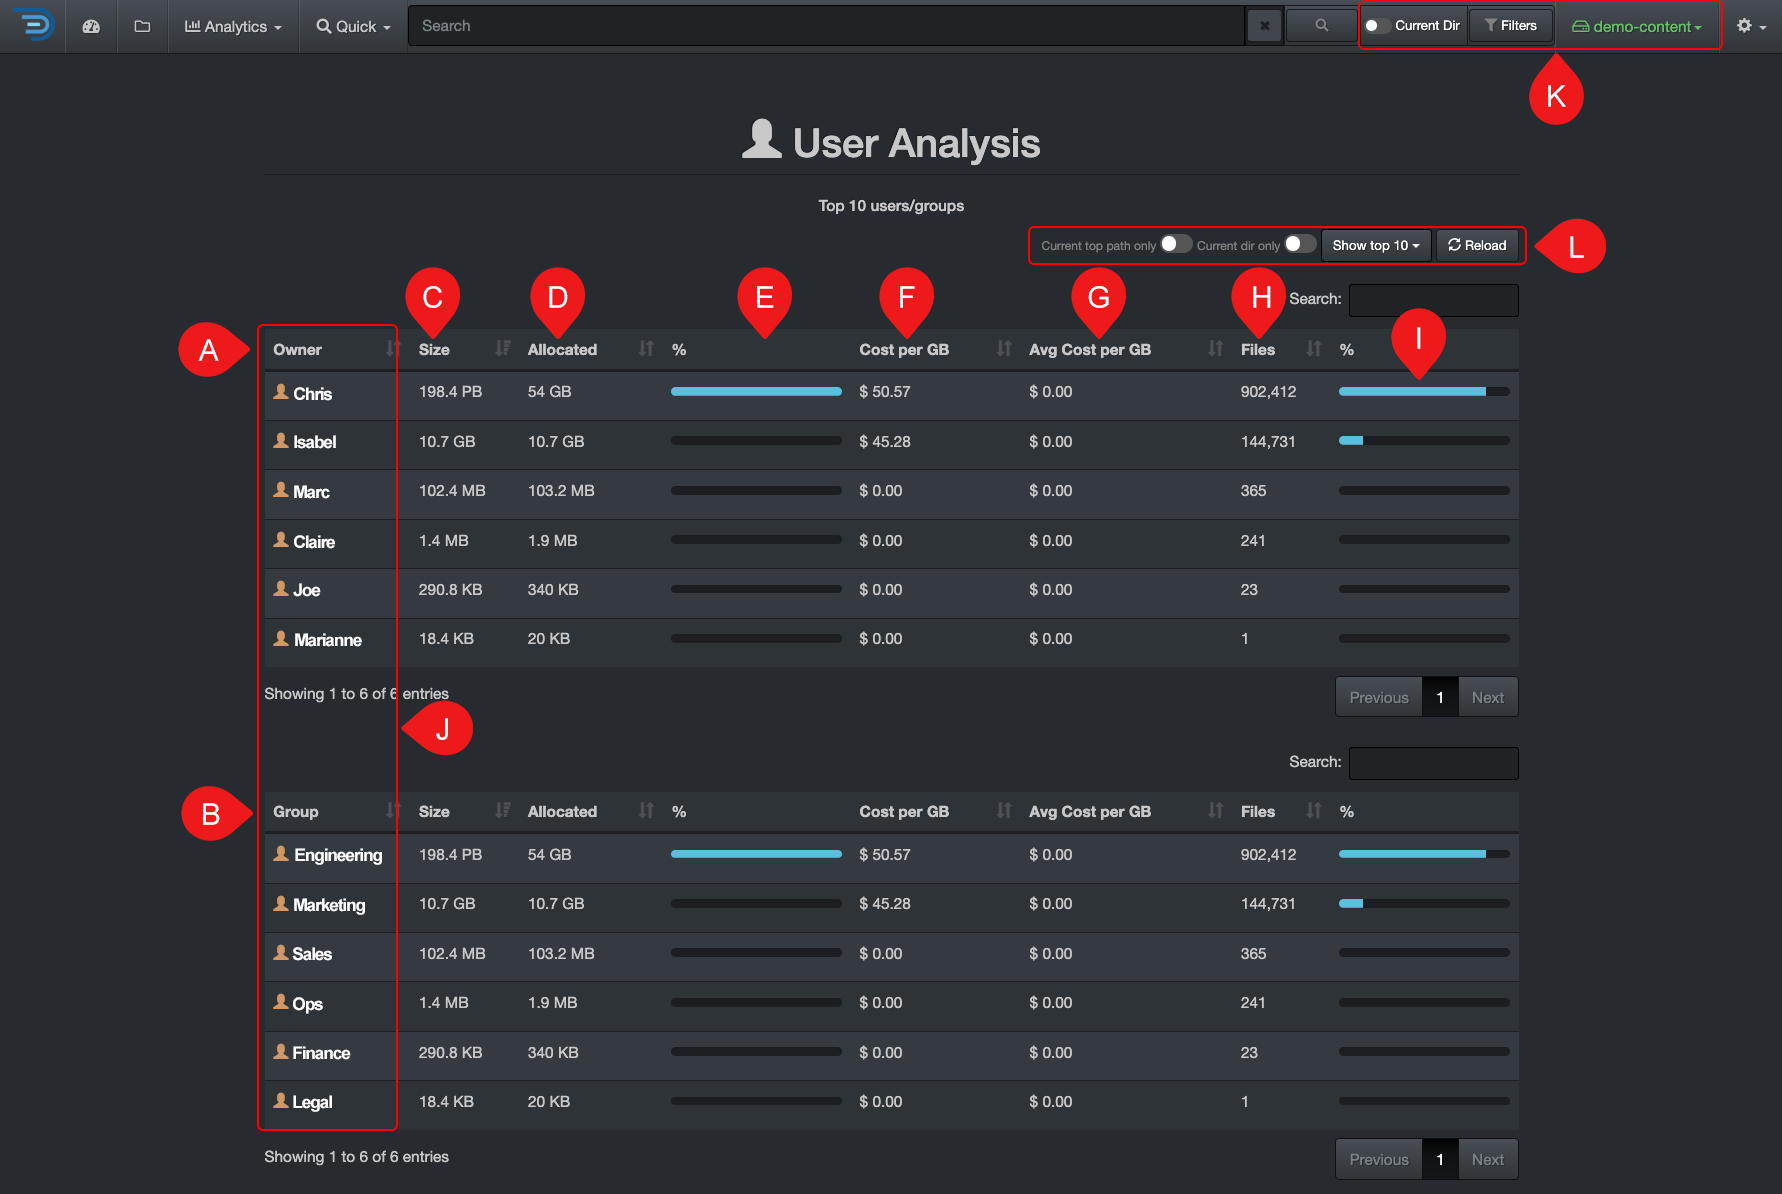
✏️ Hover over the graphics to view more detailed information.
| REFERENCE | DESCRIPTION |
|---|---|
| A | Owner: Aligns with the authentication method in use. It relies on user metadata from the configured authentication system (e.g., LDAP, Active Directory, or other identity providers) to track data utilization by users or groups. However, proper configuration is required to ensure accurate reporting, and access may depend on the permissions set by your System Administrator. |
| B | Group: Aligns with the authentication method in use. It relies on user metadata from the configured authentication system (e.g., LDAP, Active Directory, or other identity providers) to track data utilization by users or groups. However, proper configuration is required to ensure accurate reporting, and access may depend on the permissions set by your System Administrator. |
| C | Size: Total data size under an owner or a group. |
| D | Allocated: The actual size that the files are occupying, can be helpful for charging storage costs accordingly. |
| E | % Allocated: Owner or group storage space usage divided by the total of all owners or groups. |
| F | Cost per GB: Total cost for the space used by an owner or a group, shares the same storage cost configuration as the cost analysis report. |
| G | Avg cost per GB: The average cost by GB for that owner or group. |
| H | ** File**: The number of files linked to an owner or group. |
| I | % File: The number of files assigned to an owner or group, divided by the total number of files across all owners or groups. |
| J | Click on any of the names under Owner or Group to access the results in the search page. |
| K | The user analysis report is global for all volumes, selecting any of these options will not affect the results:
|
| L | Apply filters to further refine your results:
|
Heatmap
The heatmap report is a powerful analytical snapshot offering a differential comparison of two indices across two different points in time:
- An instant visual of the location of data growth and shrinkage:
- Red = data growth
- Green = data shrinkage
- No color = the absence of color is meaningful—it indicates data inertia, which may signal anomalies—also useful for comparisons, such as ensuring a cloud backup matches an on-premise server.
- Insightful for data curation efforts.
- A useful tool to monitor activity, ex: awaiting new project to be onboarded, monitor backups, etc.
How to Select Indices for Heatmap
Before accessing the heatmap report, you need to select 2 indices from 2 different points in time:
- You need to select the same index/volume name to compare the same data.
- For backups though, it makes sense to select different indices or volumes, such as comparing an on-premise index to a cloud index.
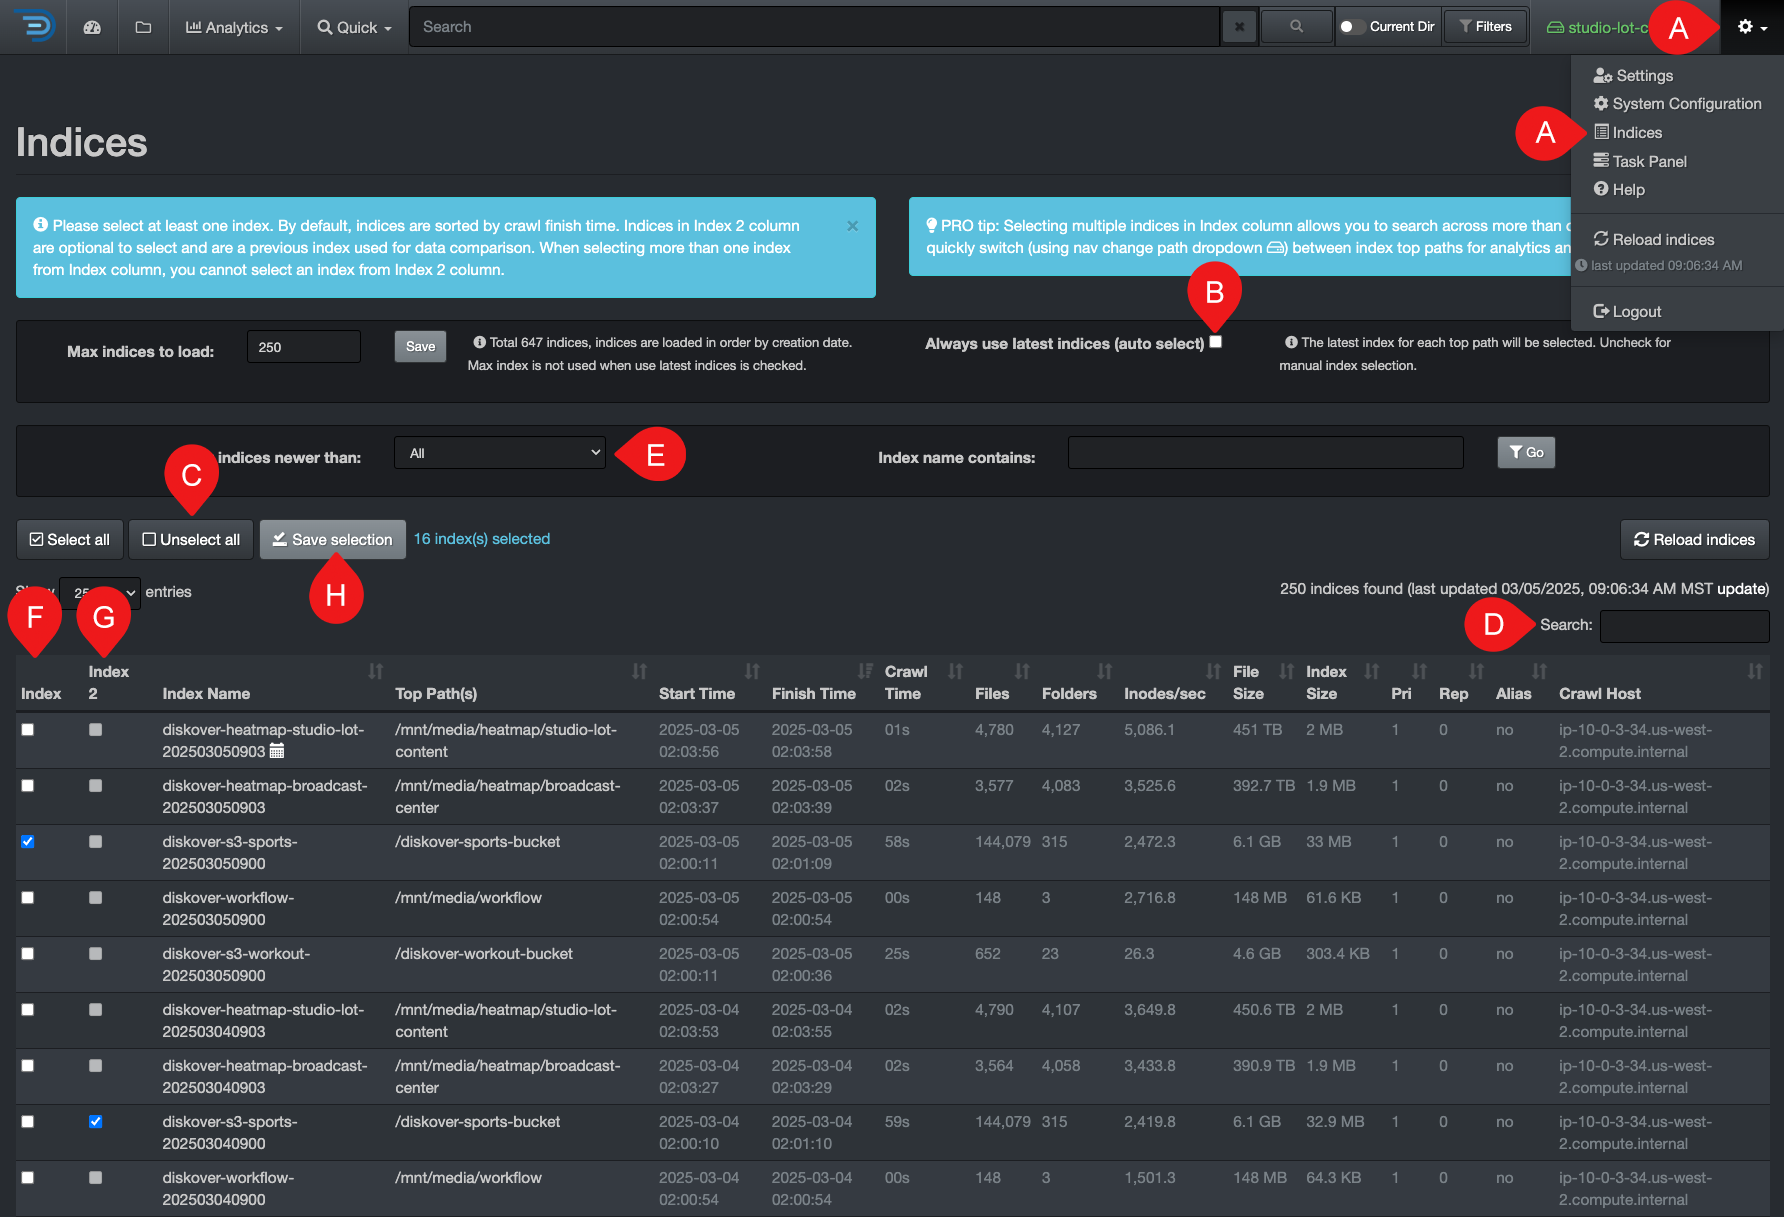
⚠️ These selections will stay active and affect all your future interactions until you return to this page and select 🅑 Always use latest indices.
🔆 The tips in the blue help bars are very helpful!
| STEP | DESCRIPTION |
|---|---|
| A | Click the ⛭ and select Indices |
| B | Deselect Always use latest indices. |
| C | Click Unselect all to ensure all indices are deselected. |
| D | OPTIONAL - You can filter your indices by searching with a keyword, only leaving the desired indices in your results. |
| E | OPTIONAL - You can filter your indices by aging to narrow down the list of indices in your results. |
| F | Select one index from Index column. |
| G | Select one index from Index 2 column, with a different date. |
| H | Click Save selection. |
Accessing Heatmap
⚠️ As explained above, you must select two indices for comparison, otherwise you will get an error message when trying to load the report.
| From the Analytics drop-down list | From the |
|---|---|
 |
 |
Heatmap Overview
✏️ Hover over the graphics to view more detailed information.
| REFERENCE | DESCRIPTION |
|---|---|
| A | Path bar: You can view and paste a path to investigate. |
| B | Go: That button acts as a RETURN key, for example, use if you paste a path in that bar. |
| C | Up Level: To drill up one directory at a time until you reach the top of the volume. |
| D | Reload: To reload the cached data for the chart and file tree. |
| E | Size Filter: To set a minimum data size threshold for filtering results. |
| F | Min and Max Mtime Filters: To focus on specific data modified time periods. |
| G | Hide Thresh: To make the graphics less busy by hiding the results with low percentages. |
| H | Size or Count: Choose whether to view the report by Size (data volume) or Count (number of items). |
| I | Maxdepth: Select the number of levels/directories to display in the results. |
| J | Show new dirs: Leave unselected if you want to hide all the new directories that might have been created, as it can be misleading by adding a lot of red because they are new. ✏️ New directories can distract from the real changes you want to analyze OR it can be exactly what you are looking for! |
| K | Show Files: By default, the results pane displays only directories—select this option to include files in the results. |
| L | Filters: Summary of the filters you might have selected. ⚠️These filters will stay active, even if you navigate away to other pages AND they will affect other analytics. |
| M | Items per page: To modify the number of items per page in the bottom results pane (between 10 to 100). |
| N | Search within page: To refine your search for the current page only, it acts like CTRL or CMD + F, but it will only leave the line items for which it finds a match—the other line items are hidden and will reappear when you clear the search field. |
| O | Results pane: You can sort on a single column at a time by clicking the descending or ascending arrows in the headers. |
| P | |
| Q | Example of the delta you would see in the search page when 2 indices from 2 different points in time are selected: 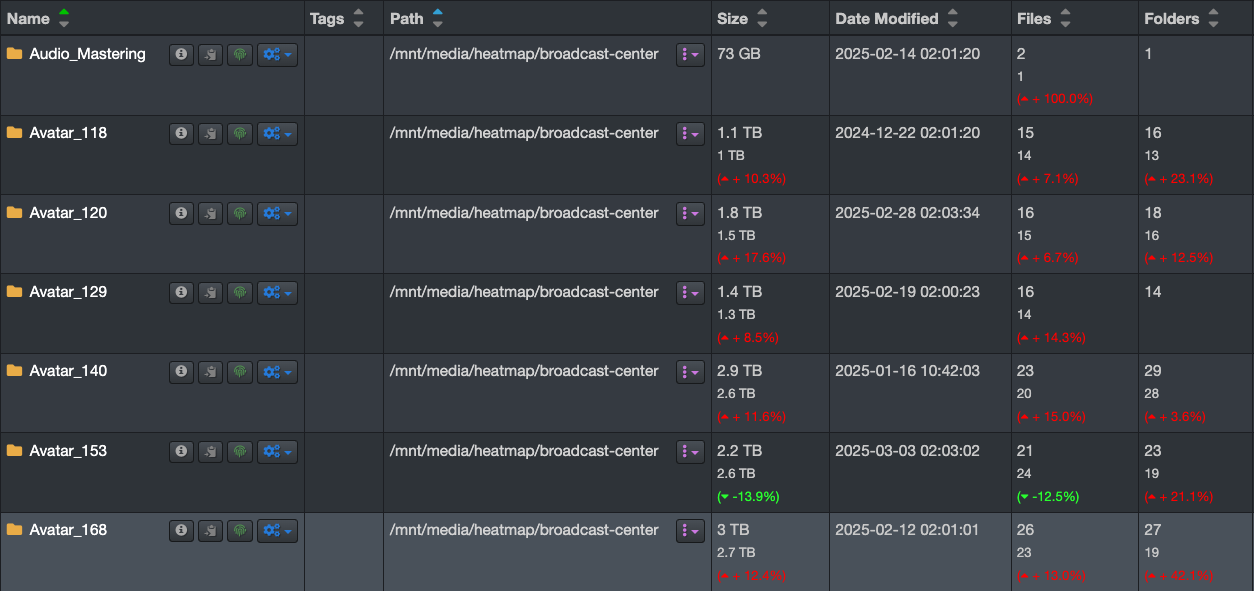 |
Advanced Usage
This chapter covers the advanced features of Diskover.
Tags
Tags are additional metadata attached to files or directories, providing business context and triggering data curation actions like archiving or deletion. Tagging is essential for streamlined workflows and effective data curation.
This section covers manual tagging. Your System Administrator can configure and schedule automated tags, known as AutoTags, and those are usually for data hygiene, lifecycle management, etc., to safely and methodically curate data in the backend.
Tags Overview

| REFERENCE | DESCRIPTION |
|---|---|
| A | Select file(s) and/or directory(ies) to be tagged: You must first select one or more items to add or remove a tag; otherwise, the tag button will remain inaccessible. |
| B | Tag button: Opens a drop-down list with several options—you must first select one or more items for this button to work. |
| C | Tags column: To see tags associated with a file or directory, go to your settings to unhide that column if not visible. |
| D | Tag selection: List of configured tags—you need an admin account to edit that list. |
| E | Remove all tags: You need to select the items you wish to remove the associated tags from first. ⚠️ You can't undo this action. |
| F | Add new tag: To quickly add a single new tag—an admin account is required to add new tags:
|
| G | Apply tags to: Choices of applying tagsChoose to apply tags non-recursively or recursively. This can only be done from a directory that already has an assigned tag(s), allowing you to propagate the same tag(s) recursively or non-recursively.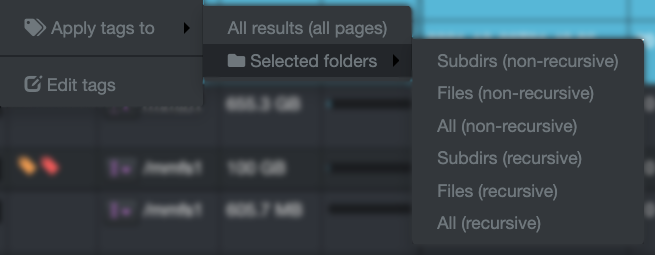
|
| H | Edit Tags: An admin account is required to [add/edit tags]. |
Manual Tagging
Single Tag Application
✏️ A file or directory can have multiple tags.
- Select the item(s) you wish to tag in the results pane.
- Click the Tag drop-down list and select a tag.
Recursive and Non-Recursive Tags Application
✏️ If a directory has multiple tags, this action will propagate all tags to its parent directories and/or files.
- Select the directory(ies) you wish to tag in the results pane.
- Click the Tag drop-down list and select a tag - you need to tag the main directory first in order to tag recursively or non-recursively.
- Reselect that same directory(ies) and click the Tag drop-down list again.
- Select Apply tags to and select an action.
Tags Removal
✏️ Removing a tag is a bit like walking backward!
Single Tag Removal
- Select the item(s) you wish to remove the tag from in the results pane.
- Click the Tag drop-down list.
- Select the same tag that you want to remove OR if the item has a single tag attached to it, you can select Remove all tags.
Multiple Tags Removal
- Select the item(s) you wish to remove the tag from in the results pane.
- Click the Tag drop-down list.
- Select Remove all tags — ⚠️ this action can't be undone!
Recursive and Non-Recursive Tags Removal
- Select the item(s) you wish to remove the tag recursively or non-recursively from in the results pane.
- Remove the tag(s) from this directory first by following the appropriate previous instructions.
- Reselect the directory and click the Tag drop-down list.
- Select Apply tags to and select an action.
Tags Report
The tags built-in report gives a visual snapshot of all tagged items in all your volumes.
Accessing the Tags Report
| From the Analytics drop-down list | From the |
|---|---|
Will aggregate data from all volumes if no filters are activated. |
Will load the report for that path only. |
Tags Report Overview
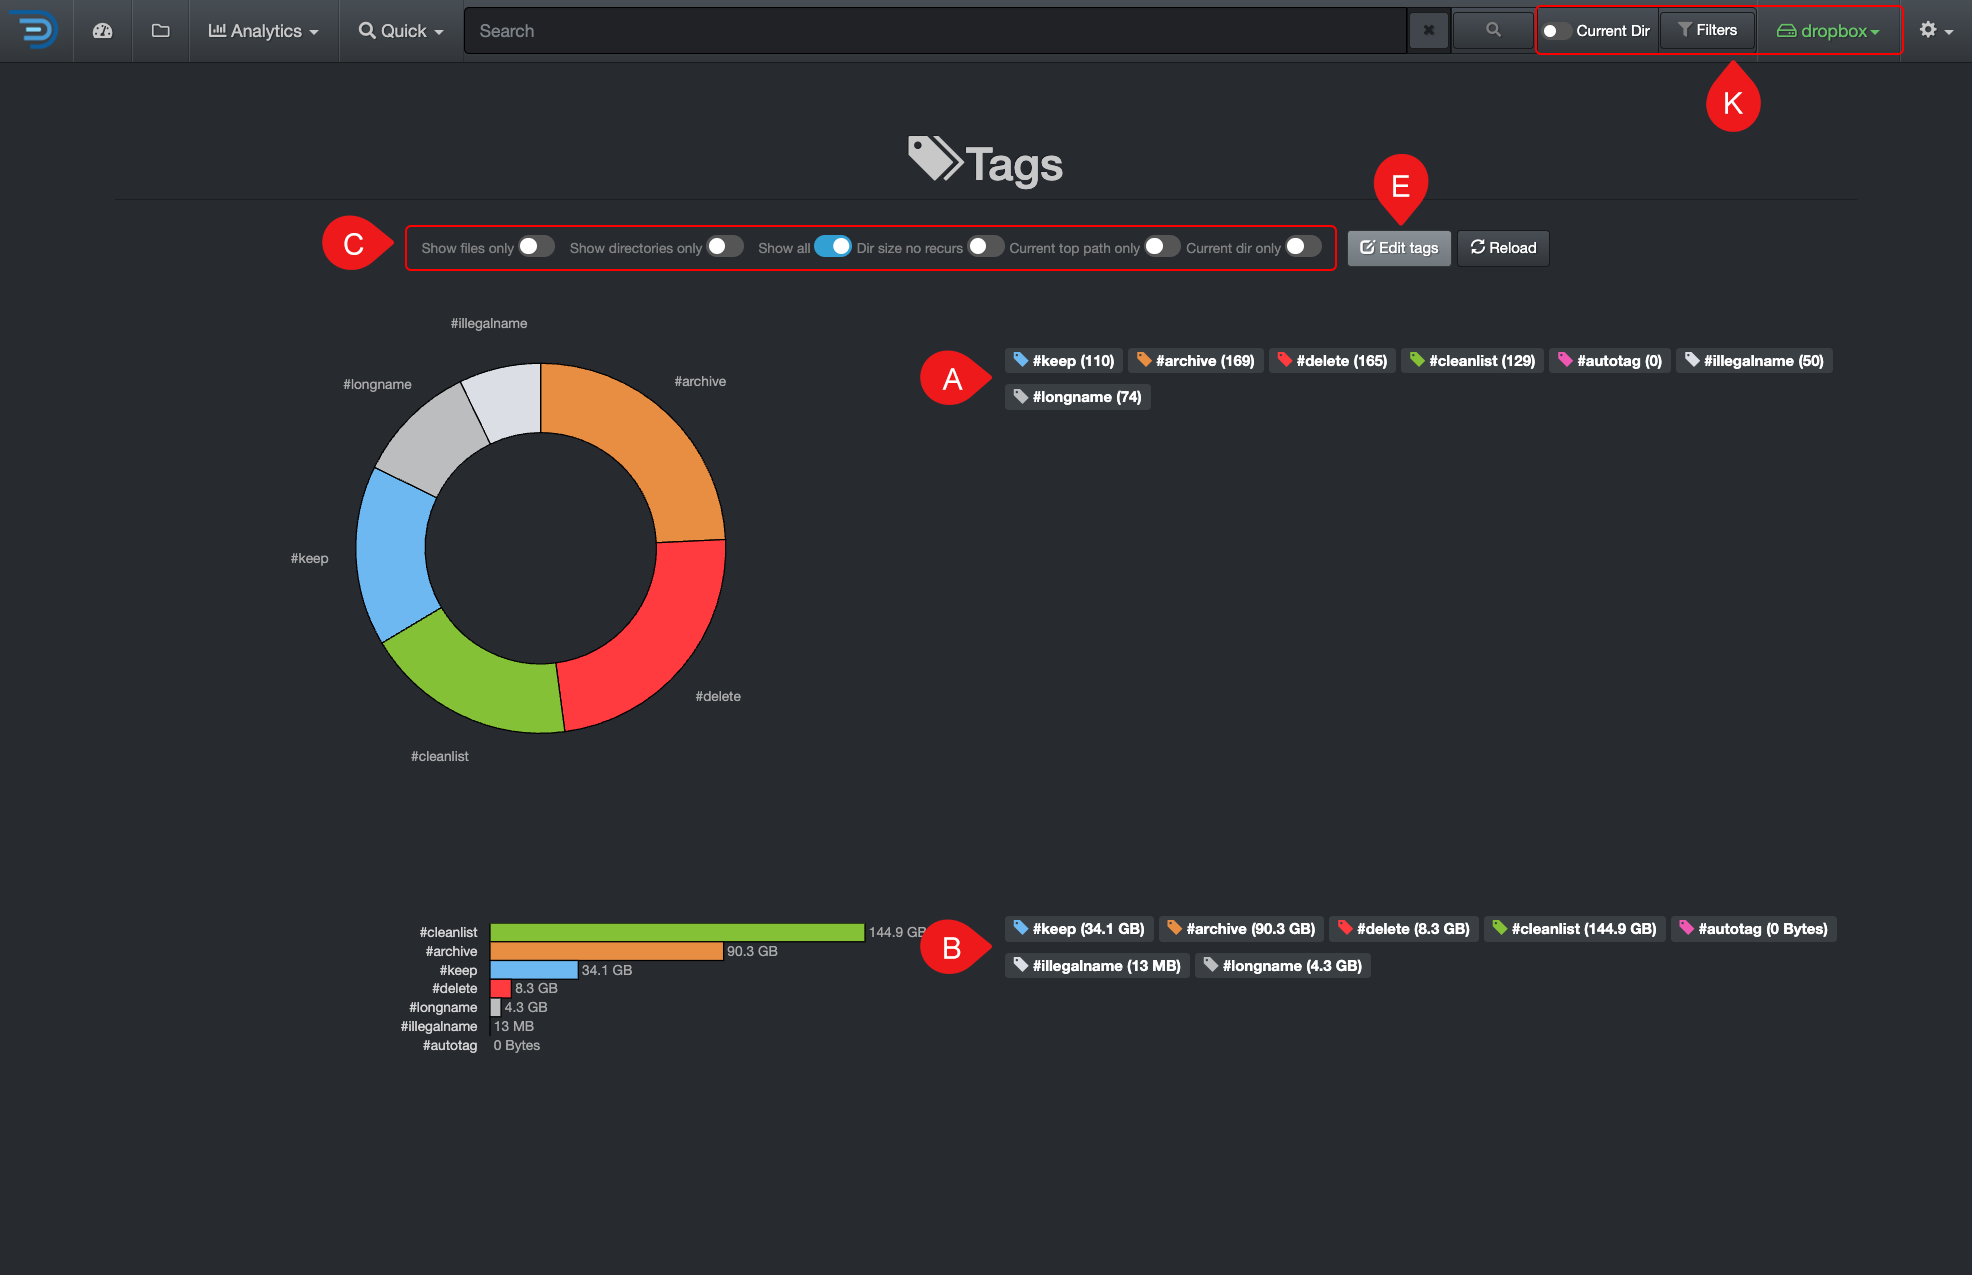
✏️ Hover over the graphics to view more detailed information.
| REFERENCE | DESCRIPTION |
|---|---|
| A | Results by number of items – click on any link to open the results in the search page. |
| B | Results by size – click on any link to open the results in the search page. |
| C | Apply filters to further customize your results:
|
| D | The Tags report is global, if you want to narrow the results:
|
| E | Edit Tags: You can view the queries used for the report, but editing them requires an admin account. If you need to add or edit a search query and don’t have admin access, contact your System Administrator. |
Search on Tags
There are several ways to search on tags, here are a few.
- Search on tags using filters.
- Search on tags using field names, for example, type
tags:deletein your search bar—you can combine that with any other criteria. - You can launch a tag report anytime directly from the search bar by typing #:
- A list of tags will appear beneath the search bar.
- Simply click on the desired report to view its results on the search page.

Indices
🍿 Watch Quick Tips | Indexing and Live View
Diskover continuously scans all your storage volumes and creates indices, which act like snapshots of your files and their attributes at a specific point in time. These indices provide an up-to-date view of your data, allowing you to quickly analyze file sizes, types, ownership, usage patterns, and more. By regularly refreshing indices, Diskover ensures you always have the latest insights into your storage environment, helping with all aspects of sustainable data management.
Accessing the Indices
You can access the indices by selecting ⚙️ → Indices.

Indices Overview
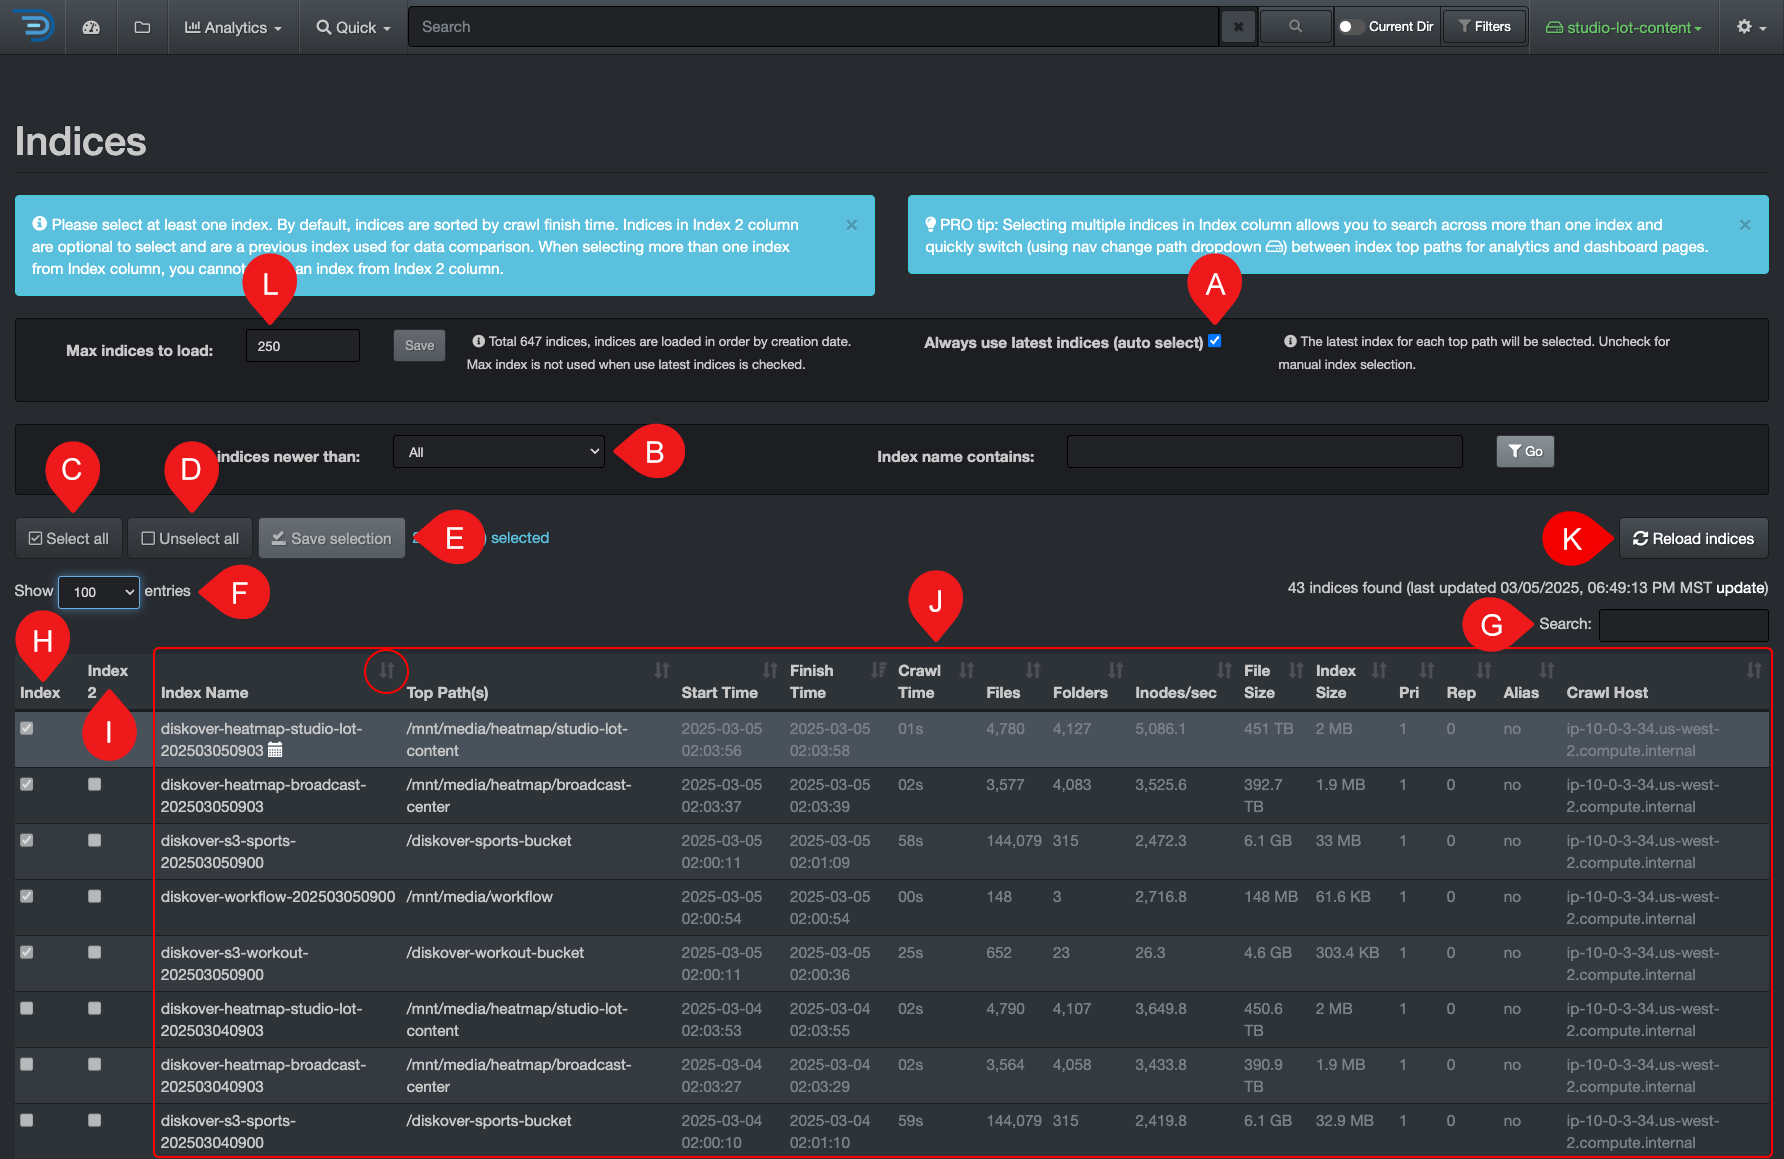
✏️ Take the time to read the tips in the blue message bars, they are very helpful!
| REFERENCE | DESCRIPTION |
|---|---|
| A | Always use latest indices: This box is selected by default so you can search all the latest data at all time—if you must manually select specific indices, make sure to deselect that box first. Some use cases why selecting specific indices may be useful: |
| B | Show Indices newer than: You can filter your indices by aging to narrow down the list of indices in your results. |
| C | Select all: Will select all indices from column 🅗. |
| D | Unselect all: To unselect all indices—you must first deselect Always use latest indices. |
| E | Save Selection: If you manually select indices from either column 🅗 and/or 🅘, you need to click Save selection before leaving the indices page. |
| F | Show # Entries: To change how many rows of indices/results you want to display on a page (between 10 to 100). |
| G | Search: You can filter your indices by searching with a keyword, only leaving the desired indices in your results by hiding the other lines. |
| H | Index: For manual selection of an index when Always use latest indices is deactivated. |
| I | Index 2: For manual selection of an index when Always use latest indices is deactivated and selecting indices for the heatmap report. |
| J | Results pane: The results are sorted by ascending creation date by default - you can sort differently by clicking on the ascending or descending arrows in the headers:
|
| K | Reload indices: To refresh the list of indices. |
| L | Max indices to load: To reduce the number of indices to load at all times. |
Indexing Schedule
Your System Administrator is responsible for setting the index scanning schedule, ensuring it aligns with your organization's workflow and data volume. Scans are scheduled based on workload demands—for example, in high-paced environments like media production, new scans may start immediately after the previous one finishes.
Diskover scans all storage volumes in parallel, not one by one, ensuring faster indexing and up-to-date insights across your entire storage environment.
File Actions
The options within file actions push the boundaries around read-only files while still safeguarding your source assets. Authorized users, following role-based access controls, can initiate File Actions directly from the Diskover interface, supporting a wide range of use cases. Whether it’s taking targeted actions on data or seamlessly integrating with third-party platforms, Diskover’s open-source architecture empowers users to develop custom File Action Plugins, enabling the automation of unique in-house workflows with ease and flexibility.
File Actions Overview
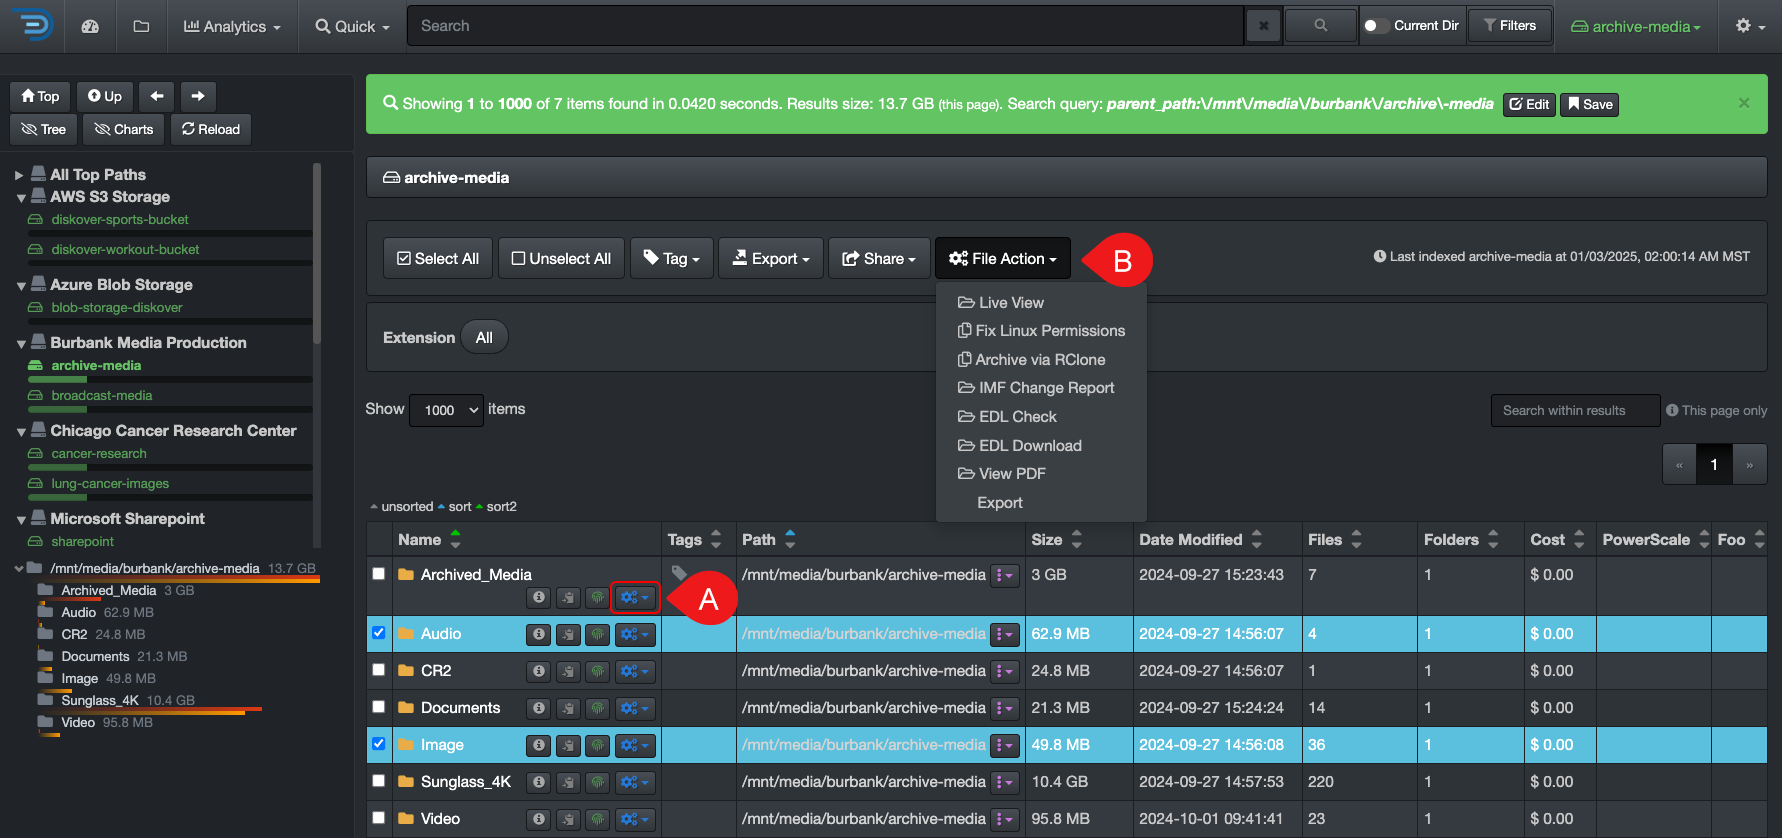
| REFERENCE | DESCRIPTION |
|---|---|
| A | Launch File Action for a single item: You can launch a File Action on a single item by using the button in line with that item. |
| B | Launch File Action for multiple items: Start by selecting the items, then select the File Action. |
Live View
🍿 Watch Quick Tips | Indexing and Live View
This feature gives authorized users a real-time view of a live directory, allowing them to access the latest filesystem content between indexing intervals.
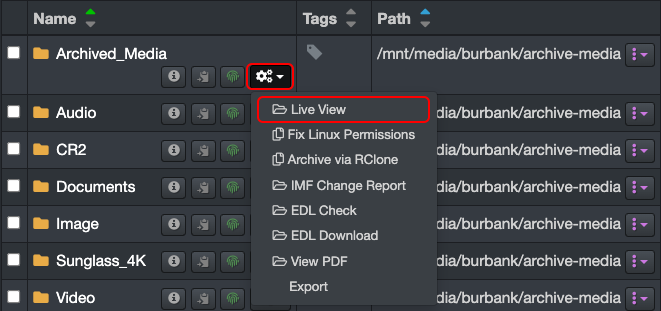
| STEP | DESCRIPTION |
|---|---|
| 1 | Select any directory inside the volume you want to launch Live View as you will be able to navigate up and down once in Live View mode. |
| 2 | Select |
| 3 | Select Live View - the live view directory will open in a new tab. |
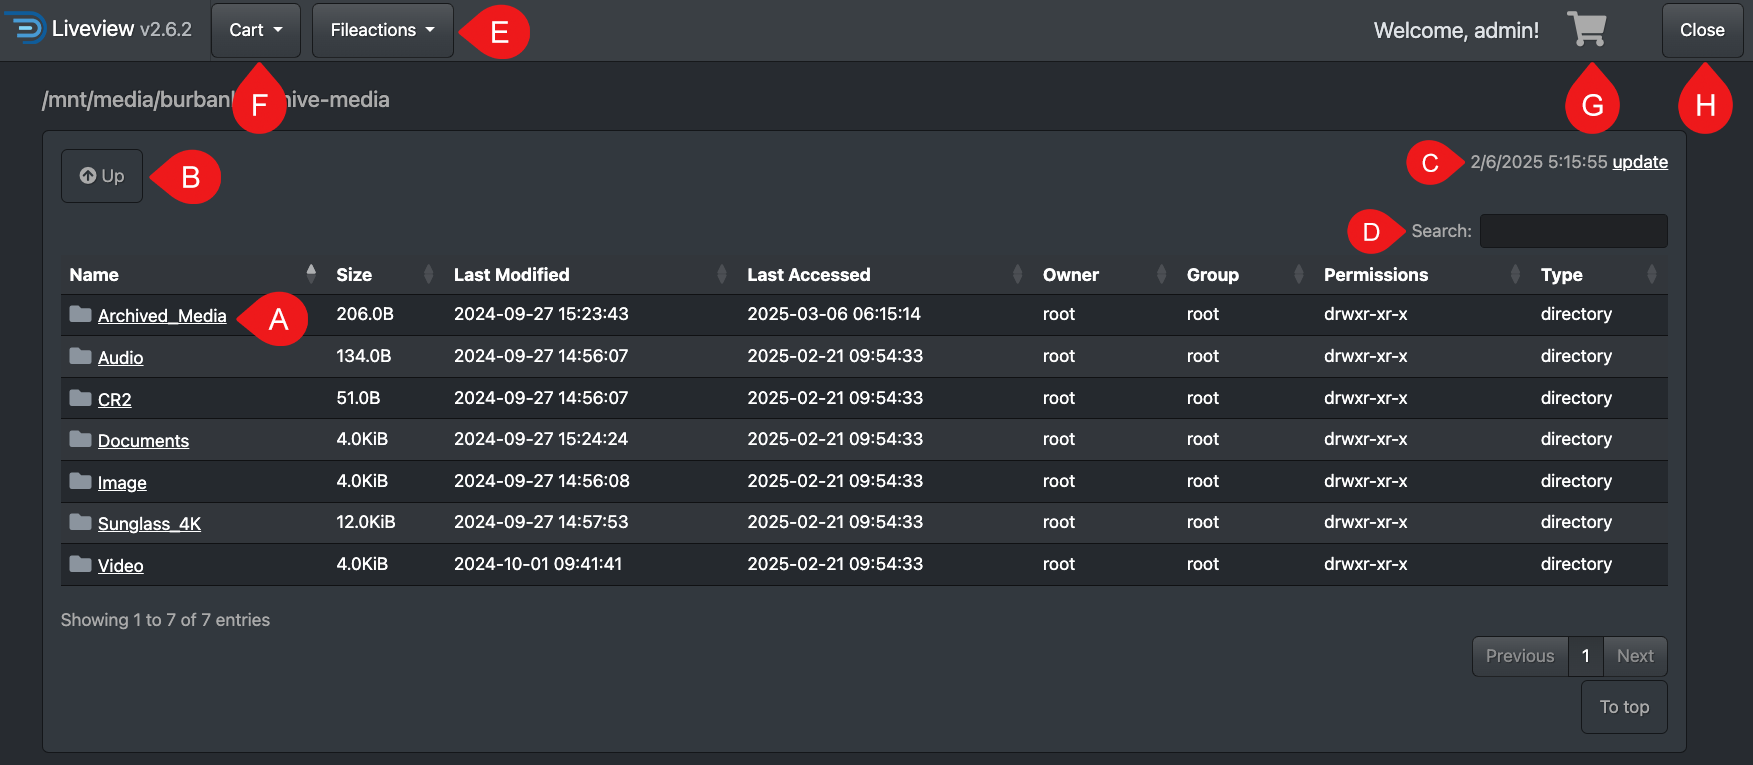
| REFERENCE | DESCRIPTION |
|---|---|
| A | Drill down by clicking on a directory. |
| B | Drill up. |
| C | Timestamp of when you launched Live View in the search page, click update to refresh the information if your tab is idle for a while. If the time doesn't match your local time, make sure your time zone setting is selected. |
| D | Search with keywords - this will only search the current page of results and will hide the other line items, but they will return as soon as you clear the search bar. |
| E | You can launch other File Actions once in Live View, but you must select the items first. |
| F | The use case for the Cart is to copy paths:
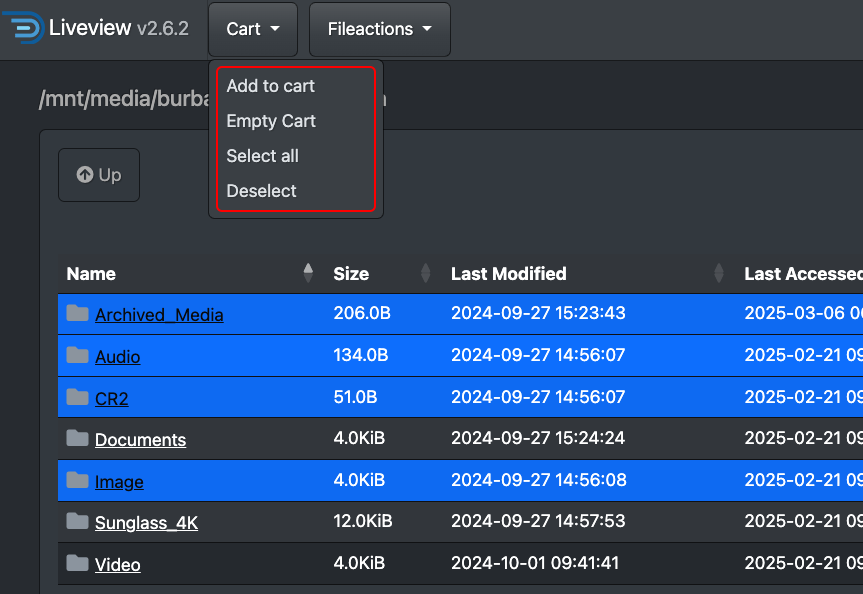 |
| G | Open the Cart and select Copy to clipboard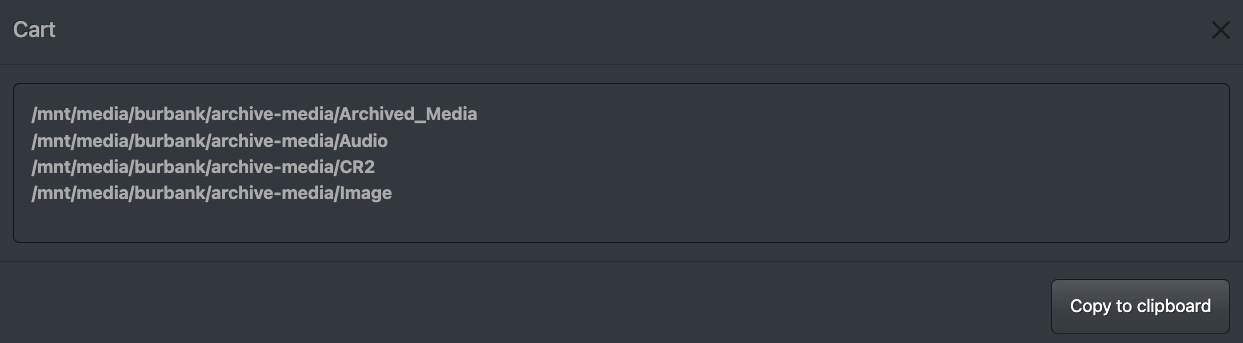 |
| H | You can close Live View with this button or simply close the browser tab. |
File Actions for Media
For details, please refer to the User Guide Companion for the AJA Diskover Media Solutions.
File Actions for Life Science
For details, please refer to the User Guide Companion for Life Science Solutions.
Support
Support Options
| Support & Ressources | Free Community Edition | Annual Subscription* |
|---|---|---|
| Online Documentation | ✅ | ✅ |
| Slack Community Support | ✅ | ✅ |
| Diskover Community Forum | ✅ | ✅ |
| Knowledge Base | ✅ | ✅ |
| Technical Support | ✅ | |
Phone Support
|
✅ | |
| Remote Training | ✅ |
*
Feedback
We'd love to hear from you! Email us at connect@diskoverdata.com
Warranty & Liability Information
Please refer to our Diskover End-User License Agreements for the latest warranty and liability disclosures.
Contact Diskover
| Method | Coordinates |
|---|---|
| Website | https://diskoverdata.com |
| General Inquiries | connect@diskoverdata.com |
| Sales | sales@diskoverdata.com |
| Demo request | demo@diskoverdata.com |
| Licensing | licenses@diskoverdata.com |
| Support | Open a support ticket with Zendesk 800-560-5853 | Mon-Fri 8am-6pm PST |
| Slack | Join the Diskover Slack Workspace |
| GitHub | Visit us on GitHub |
© Diskover Data, Inc. All rights reserved. All information in this manual is subject to change without notice. No part of the document may be reproduced or transmitted in any form, or by any means, electronic or mechanical, including photocopying or recording, without the express written permission of Diskover Data, Inc.